ELECTRIC
WHEELED VACUUM/BLOWER/MULCHER
MODEL EKEWLV1
INSTRUCTION MANUAL
PLEASE READ & SAVE THESE INSTRUCTIONS FOR FUTURE REFERENCE
Any questions or problems? Call the Eckman helpline on : 0844 441 3011 or go to www.eckman.co.uk
Page 1: ...HEELED VACUUM BLOWER MULCHER MODEL EKEWLV1 INSTRUCTION MANUAL PLEASE READ SAVE THESE INSTRUCTIONS FOR FUTURE REFERENCE Any questions or problems Call the Eckman helpline on 0844 441 3011 or go to www eckman co uk ...
Page 2: ...on of the warning symbols 2 3 General Safety Warnings 4 6 Technical Specifications 7 Parts Identification 8 Assembly 8 11 Operating 11 13 Maintenance Storage 14 GUARANTEE 14 EC declaration of conformity 15 Exploded View 16 ...
Page 3: ...ay The appliance should not be used any closer than 15m to other people Never operate while children or pets are nearby Before using check the supply and extension cords for wear or damage Do not use the appliance if the cord is damaged or worn Remove plug from the mains immediately if cable is damaged or cut Wear safety glasses or goggles when operating the appliance Wear hearing protection when ...
Page 4: ...d not be disposed of with household waste Please recycle where facilities exist Check with you local Authority or retailer for recycling advice Guaranteed sound power level according to noise directive 2000 14 EC and 2005 88 EC 110 dB A ...
Page 5: ...lug the tool Keep the cable away from heat lubricants sharp edges or moving parts e Do not carry transport the appliance using the cable f Always direct the cable towards the back away from the operating appliance g Before using check the power cable and extension lead for signs of damage or wear Do not use the appliance if it is damaged h If the cable becomes damaged during use disconnect it imme...
Page 6: ...hout safety devices for example the debris collector must be in place m Always check the appliance before using in order to avoid any risks and do not use the appliance if it is not assembled completely INSTRUCTIONS TO FOLLOW WHEN USING a NEVER operate the appliance when third parties particularly children or animals are in close proximity Switch off the appliance when people approach the work are...
Page 7: ...recommended that you slightly dampen dusty surfaces or that you use a mist blower l It is recommended that you use the intake outlet tube at its maximum length to be able to reach the ground with the air flow m It is recommended that you operate the appliance only at reasonable times not too early in the morning and not too late in the evening which may disturb neighbours Keep to the times set by ...
Page 8: ... 38 52m s Electrical protection class Class II Appliance protection against penetration by solids and liquids IP 20 Collector capacity 45 L Net Gross Weight 9 5 12 00 kg with 10m BS cord SPL Sound Uncertainty Level 2 16 dB A SPL Sound power level 110 dB A Vibration level 2 5 m s2 Mulching Ratio 10 1 The total noise and vibration levels declared were measured in accordance with a test method from d...
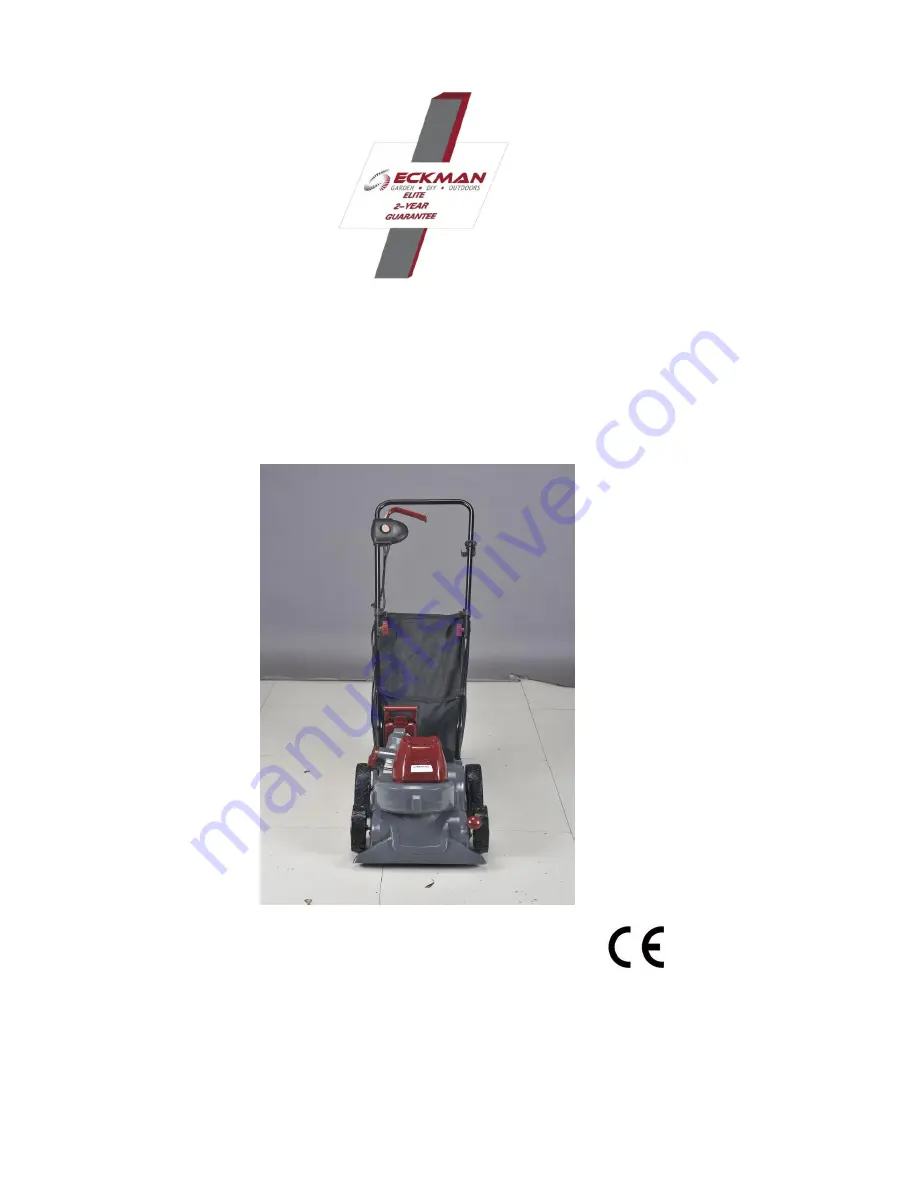
Page 9: ...ge fit the handle and attach the bag your appliance is now ready to go 1 Throttle control trigger lever 2 On off switch lock button 3 Cable hanging hook 4 Collection bag 5 Collection bag collector 6 Motor housing case 7 Blow Vacuum quick change lever 8 Machine height adjustment handle 9 Blowing outlet vacuuming inlet 10 Machine transportation wheels 2 6 3 4 5 1 7 8 9 10 ...
Page 10: ...n on the chassis by using the screwdriver and keep them on the side for next step Fig 1 Fig 1 Insert the two ends of the lower handle into the mounting holes on the chassis as shown Fig 2 Fig 2 Re insert the two locking screws and tightening by using the screwdriver Fig 4 Fig 4 ...
Page 11: ...Fig 5 Attaching the collection bag 1 Hold the bag rear plastic connector handle and place the plastic connector frame onto the supports on the rear part of the discharge chute from the machine Then press the lock button move it forwards and lock it onto the supports on the rear part of the discharge chute from the machine Fig 6 7 Fig 6 Fig 7 2 There are four plastic hooks on each corner of the top...
Page 12: ...lectrical appliances is highly recommended 5 Always direct the cord to the rear and keep well away from the appliance 6 If a cord becomes damaged during use turn off at power point and disconnect the supply cord from the mains immediately Do not touch the cord before disconnecting the power supply 7 Always disconnect the appliance from the mains supply Whenever you leave the machine Before checkin...
Page 13: ...n the lawn and garden bed and other rough surface Fig 11 Fig 11 USING THE BLOW MODE 1 Ensure the appliance is switched off 2 Push the blow vacuum conversion handle forward until it click into position Fig 12 Fig 12 3 Start the machine and blow the leaves forwards in one direction by moving the appliance forwards 4 Never blow any debris in the direction of bystanders USING THE VACUUM MODE 1 Pull th...
Page 14: ...ag double layered for better wear resistance As with all similar bags the material may become clogged with fine particles during use and the operating efficiency of the machine will deteriorate without simple routine maintenance It is good practice to unclog the bag by shaking it after each use to ensure the bag material is able to filter correctly Where a bag is clogged with damp particles it sho...
Page 15: ...lacement parts and accessories Store the appliance only in a dry locked place out reach of children Guarantee This product is guaranteed against faulty workmanship for a period of 24 months from the date of purchase Your guarantee will be invalidated if the machine is modified in any way used for purposes outside the parameters of this instruction manual or willfully damaged or abused Your statuto...
Page 16: ... in accordance with the following standards or standardized documents EN 60335 1 2002 A1 A11 A12 A2 A13 EN 62233 2008 EN 55014 1 2006 EN 55014 2 1997 A1 EN 61000 3 2 2006 EN 61000 3 3 1995 A1 A2 Additionally confirmed by the Directive 2000 14 EC Noise emission Sound power level Guaranteed 110 dB A Measured 108 dB A Applied conformity assessment according to Annex VI 2000 14 EC and 2005 88 EC The t...
Page 17: ...16 ...