16
I
NSTALLATION
C
ONFIGURATION
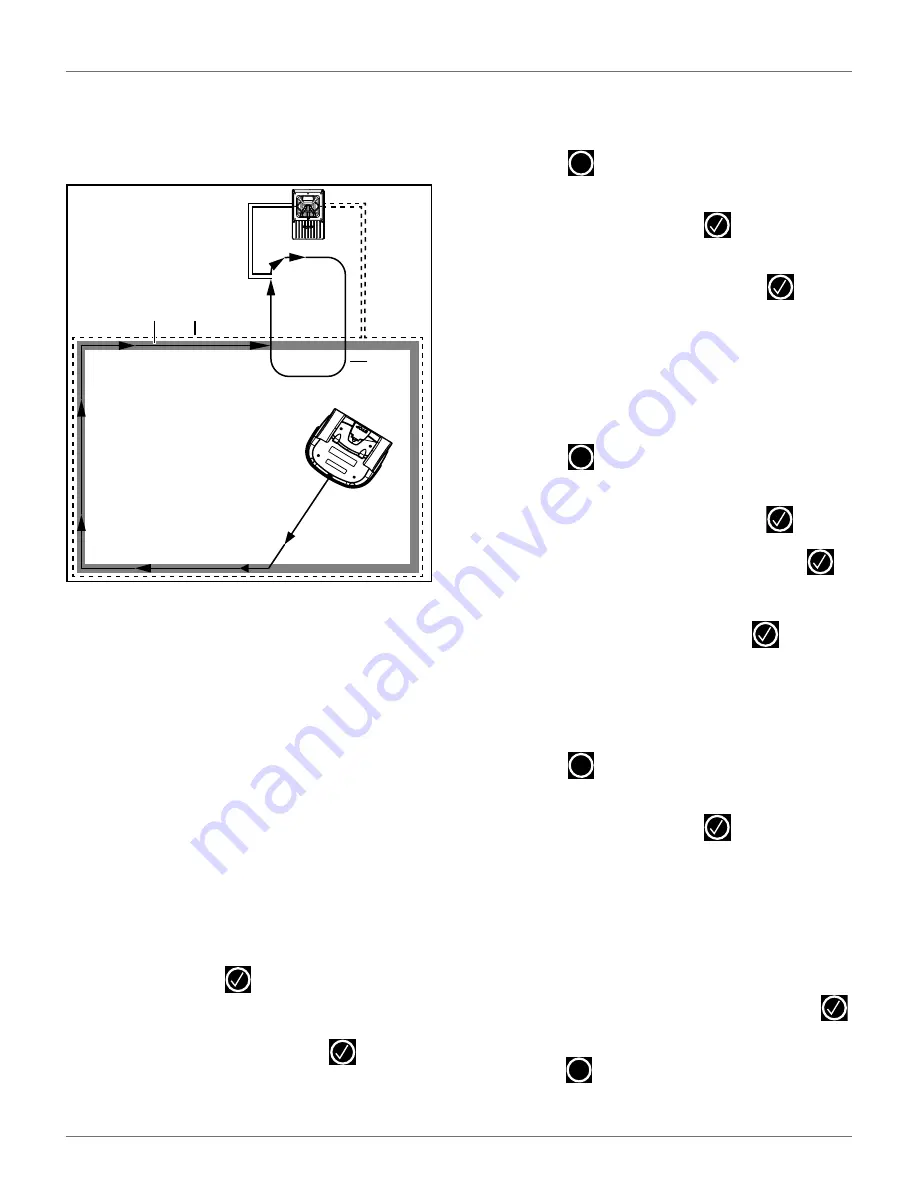
The "Field" wire is configured for the robot to mow
normally. When it returns to the charging station it will
follow the trackborder until it reaches the "Loop" wire.
It will then follow the “Loop” wire until it reaches the
charging station.
When installing the wire for the "lawn" loop all the
conditions described must be respected. This includes
the conditions required for multi-fields.
6.10 Configuration
Configuration of this installation is completed through
the through
below are the minimum set of configuration parame-
ters that must be set for this type of installation.
1)
Press and hold
9
on the user interface screen
until the technician's menu appears.
2)
Select
Infrastructure > Peripheral wires
.
3)
On the "Wire settings" screen, select
Wire
CH{X},
then press
.
4)
Rename this Wire to
LOOP
.
5)
Select
Signal channel
, then press
. Assign the
channel number for the station loop.
6)
Check the value shown at the top of the screen.
This should be
positive
. If it is not, select
Reverse
phase
and check the button ON.
7)
Press
twice to return to the Infrastructure
menu.
8)
Select
Parcels
, then press
. Select the parcel
associated with the LOOP wire.
9)
Select
Return direction
, then press
. Choose
whether you want the robot to return in a clock-
wise or counterclockwise direction.
10)
Disable the use of the trackborder. Select
Use
trackborder
and check the button OFF. This
ensures that when the robot is in this field, it will
just follow the wire to reach the station.
11)
Press
twice to return to the Infrastructure
menu.
12)
Select
Create new wire, then press
.
13)
Select the newly created wire, then press
.
14)
Rename this field to
LAWN
.
15)
Select
Signal channel
, then press
Assign the
channel number for the large field to be mowed.
16)
Check the value shown at the top of the screen.
This should be positive. If it is not, select
Reverse
phase
and check the button ON.
17)
Press
twice to return to the Infrastructure
menu.
18)
Select
Parcels
, then press
. Select the parcel
associated with the LAWN wire.
19)
Set the
Return direction
to the same as above.
20)
Select
Use trackborder
and check the button ON.
This ensures that when the robot is in this field, it
will follow the trackborder until it reaches the
LOOP field.
21)
Select
Neighboring parcels,
then press
.
Check the button next to the LOOP parcel.
22)
Press
to exit this menu.
1 – Station loop wire (“Loop”)
2 – Peripheral wire (“Field”)
3 – Trackborder
2
1
3
X
X
X
X
DRAFT
05-23-2019


