Manual
1. PACKING CONTENT
1)
MAGNIFIQUE Unit
2)
Installation CD Disk
3)
AAA Battery X4
4)
User Manual
5)
Mini-USB Cable
6)
Pouch
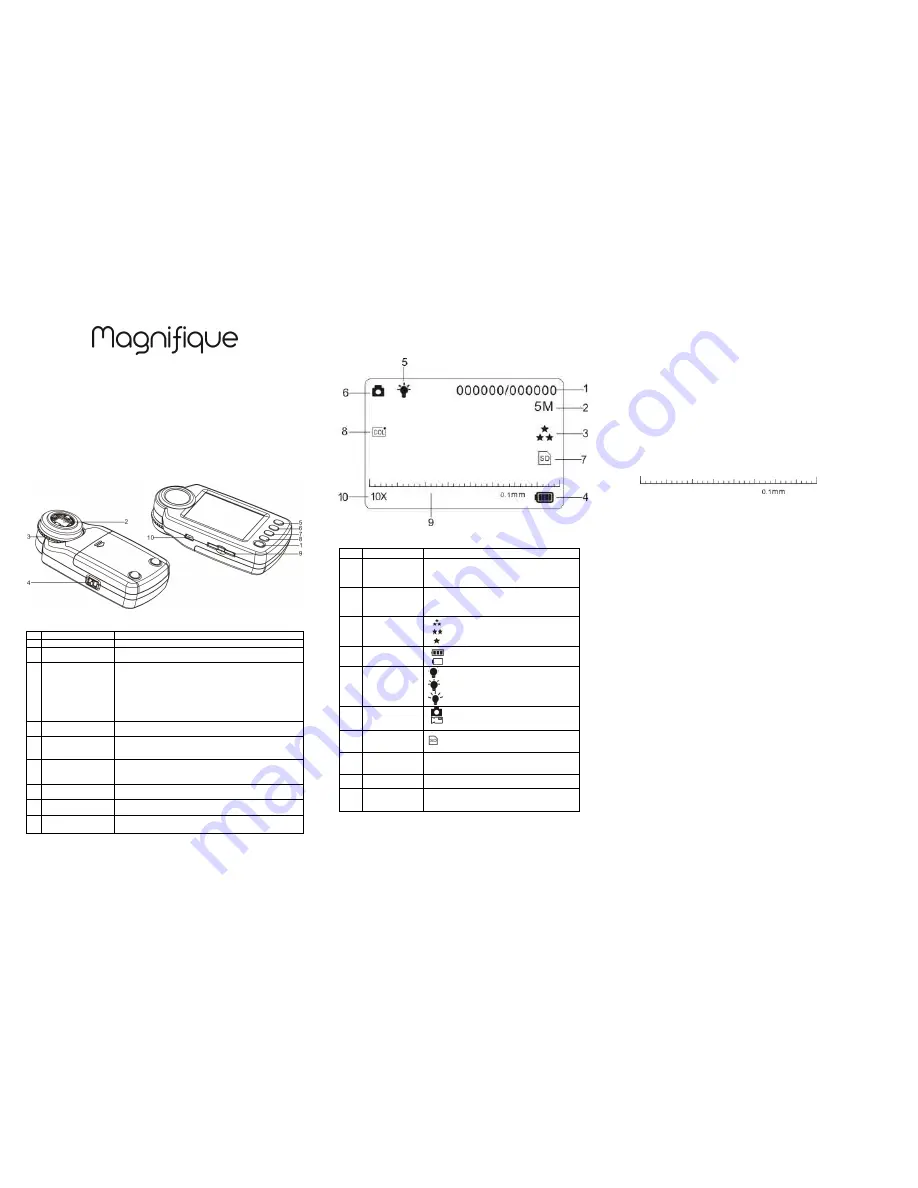
2
.
CONTROLS
1
POWER
Power on/off the unit by hold down POWER button for 2 seconds
2
LENS
It helps to locate len over the observed object.
3
DISTANCE DIAL
Adjust this dial to focus and get a clear image with your observed
object.
4
ZOOM WHEEL(Left 0r
Right key selection)/
CAPTURE(OK)
A 3 way button performs Zoom in and out by turning ZOOM
WHEEL left (zoom out –) or right (zoom in+), Press down the
ZOOM WHEEL onwards to
- capture a image in photo mode, or
- start recording in video mode. Press once again to stop video
recording in video mode.
You may use ZOOM WHEEL to select options (Left or right )and
CAPUTRE(OK) to confirm, if any menu/sub-menu is available.
5
MODE(Up)
Press MODE button to Switch photo/video mode.
In Menu Mode: Up selection Key.
6
LIGHT(Down)
Press this button to switch Light modes .
(Low
Middle
High
Off)
In Menu Mode: Down selection key.
7
MENU/ DELETE
Press MENU/DELETE button for advanced settings. Press
again to exit MENU mode.
Press this button to delete media file in PLAYBACK mode
8
PLAYBACK
Press PLAYBACK button to play your saved photo/video files.
Single
Thumbnail (3x3 pix)
Exit playback mode
9
SD CARD SLOT
Insert a SD Card (support SD/HCSD card, up to 16G) to save
your photo/video files.
10 MINI USB SOCKET
Transfer your photo/video files to computer by using USB cable
connection.
3. EXPLANATION OF THE STATUS ICONS
Item
Function
Description
1
Photo/Video
counter
Photo mode: No. of pictures had been taken.
Video mode: Recording time in second.
Playback mode: No. of pictures or video file.
2
Selected
resolution
5M = 2560x1920; 3M = 2048x1536;
1.3M = 1280x960; VGA = 640x480
3
Picture quality
Super fine.
Fine.
Normal.
4
Battery indicator
The batteries are full.
The batteries are empty.
5
LED Status
indicator
Low
Middle
High
6
Mode selected
Photographs mode.
Videos capture mode.
7
SD Card Status
indicator
SD card inserted
8
Effect Status
indicator
Show effect status: Moving insect/ Sepia/ B&W/
Negative/ Text
9
Ruler
Ruler status indicator
10
Magnification
indicator
Show magnification status
4. BASIC OPERATION
•
Install 4 pieces of AAA batteries in MAGNIFIQUE.
•
Power on your MAGNIFIQUE by pressing and holding the POWER button for 2 seconds.
•
Place your observed object below Digital Magnifier’s Lens.
•
The object will be displayed on the screen. Adjust the DISTANCE DIAL button to get the
best image of the object.
•
Turn the DISTANCE DIAL ,you will find two clear dots, which are in accordance with
the smaller zoom ratio(10X optical magnification) and the larger zoom ratio(17X optical
magnification). Turn the DISTANCE DIAL up/down until the rule is displayed, and then
adjust it properly to get the clear image.
•
This camera provides the Off / Low brightness/Middle brightness/High brightness modes.
You can choose the proper LED brightness when you observe the close-up object.
•
You can use the provided rule to measure the observed object. The length represented by
every bar is displayed on the right of the rule. Take the diagram below as an example,
every bar represents 0.1mm, you can calculate the length of the object according to the
bars it takes up.
Note
:
:
:
:
1.
Make sure the camera lies flatly on the observed object.
2.
The value measured by the rule may have some
deviations because of the difference in focusing positions.
The value is just for reference.
•
The current zoom ratio will appear on the lower left of the rule. Zoom your view by turning
ZOOM WHEEL
left (zoom out) or right (zoom in). When the optical zoom ratio is 10.x, the maximum digital
zoom ratio is up to 320.x; when the optical zoom ratio is 17.x, the maximum digital zoom
ratio is up to 500.x.
Note
:
:
:
:
The bigger the digital zoom ratio, the large the variation the ruller and the real zoom ratio,
and at the same time the worse the image quality. So please select the appropriate
digital zoom ratio according to your need.
•
Switch between photo/video mode by pressing MODE button. Press CAPTURE button
(Zoom wheel) onwards to take a photo/video, it will be saved into SD memory card
which installed in the unit.
•
View your saved photo/video file in PLAYBACK mode.
MAGNIFIQUE will saved your captured image as JEPG format (picture), and AVI
In video
mode, which can be played with your computer.
5. PLAYBACK
Play your saved photo/video files with MAGNIFIQUE in PLAYBACK mode.
•
MAGNIFIQUE provides 2 optionS: a) Single b) Thumbnail
•
Press PLAYBACK button to enter single PLAYBACK mode
•
In single PLAYBACK mode, press up/down key to previous or next media,
press Menu key into delete/ slide show selection menu.
•
When slide show playing, you can stop by press OK Key.
•
In single photo PLAYBACK mode, turn ZOOM WHEEL to Zoom in or Zoom out.
In zoom in mode, press the Ok button to enter Playback Photo mode.
Press the ZOOM WHEEL button to move left/ right and the MODE and LIGHT
buttons to move up/ down to view the photos
•
In thumbnail mode, Turn ZOOM WHEEL left/right and press up/down key to
select media, press CAPTURE/OK to view.
•
You may delete a single photo/video file or all files from your SD card by pressing
MENU/DELETE button in single PLAYBACK mode.
•
Press PLAYBACK button until PLAYBACK mode exit (single→thumbnail→exit)
•
In single PLAYBACK mode, press OK Key exit PLAYBACK Mode.


