

1
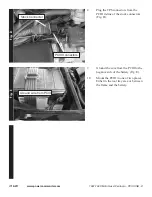
Remove seat assembly.
2
Place the PCIII in the tail section tem-
porarily.
3
Route the wiring harness from the
PCIII towards each cylinder. Route
the harness between the battery and
the frame going under the frame rails.
NOTE:
It does not matter which lead
goes to which injector.
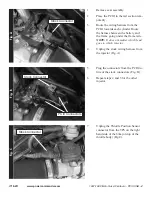
4
Unplug the stock wiring harness from
the injector (Fig. A).
5
Plug the connectors from the PCIII in-
line of the stock connectors (Fig. B).
6
Repeat steps 4 and 5 for the other
injector.
7
Unplug the Throttle Position Sensor
connector from the TPS on the right
hand side of the bike (on top of the
throttle body) (Fig C).
Fig. A
Fig. B
Fig. C
1997-1998 Moto Guzzi Centauro - PCIII USB -
2
i718-411
www.powercommander.com
PCIII Connectors
Stock Connector
Stock Connector
Stock Connector