DynaSample - XO-mini
Quickstart
When you unpack your new XO-mini you should find the following parts:
- XO-mini
- AC adapter
- HDMI-mini to HDMI adapter cable
- USB System Backup Drive
- Please download the operating manual from the DynaSample support website
Placement
- Place the XO-mini on a dry surface and make sure that the air vents are never covered.
- The housing is the cooling device so it gets quite warm. Make sure that it is always vented well.
Power Supply and starting up
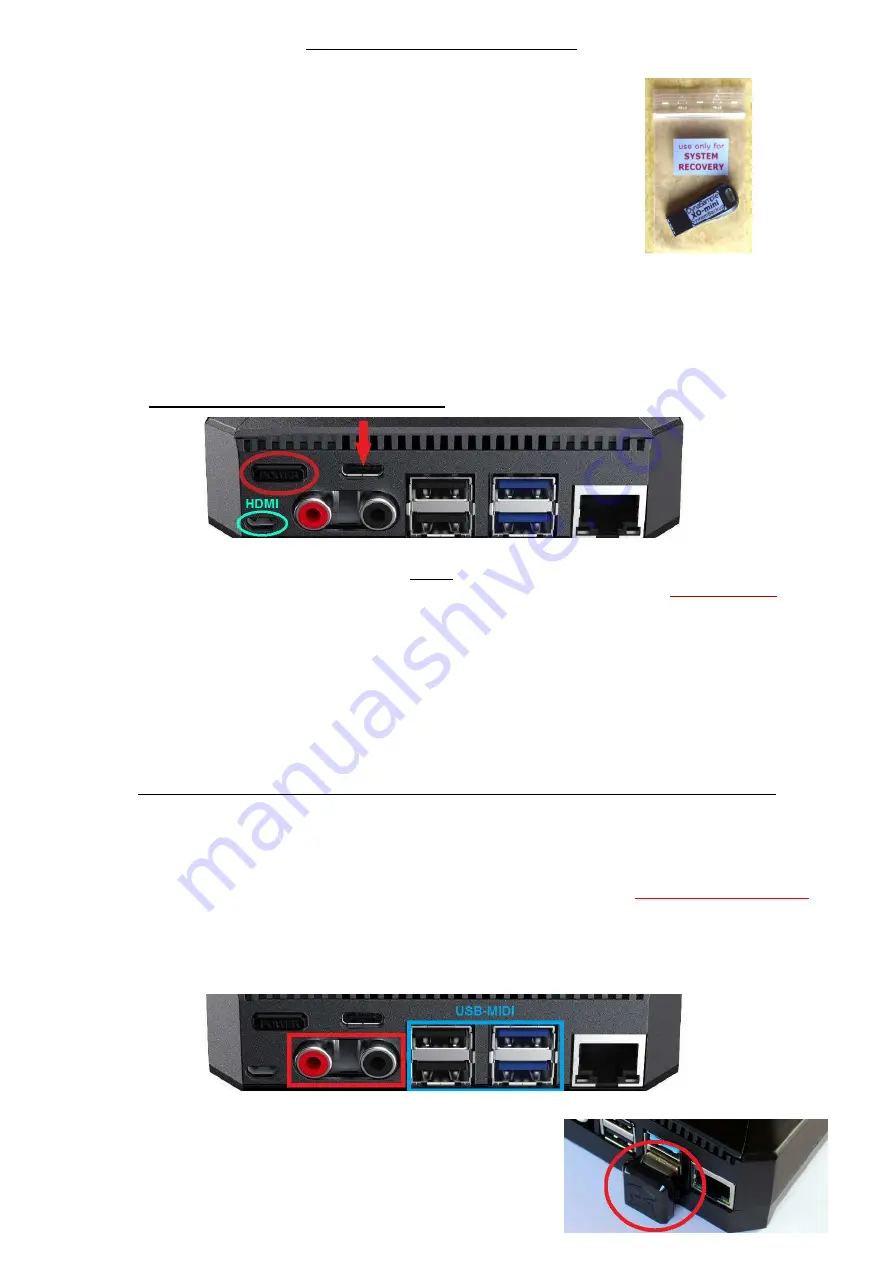
- Connect the included power supply to the USB-C power in jack (DC 5V) on the rear side of the XO-mini.
- Then plug it into the wall outlet. Briefly press the POWER switch next to the power inlet.
(You can turn the unit off later by pressing and holding the power switch for 3 seconds. 6s for full off!
Release after the blue LED in the front extinguishes.
You CANNOT restart until ALL LEDs are off ! ! ! )
If a HDMI monitor or OLED display is connected the display shows a start-up message.
The HDMI monitor needs to be connected before starting up in order to work correctly!
(For connecting a HDMI signal to USB search for a HDMI grabber or capture device - NOT an adapter!
Expect some loss of quality and added video latency with inexpensive units. USB3 is recommended!)
- The XO-mini is now loading the software and the sound library. This will take about 90 seconds in total.
When loading has completed the display will show “READY” and change to the main display page.
LEDs:
-
when starting up the red LED in front turns on after 1 second to show that the unit is powered
(for headless
-
next the blue LED in front turns on during hardware checks (after a bit less that 20 sec)
playing)
-
once the operating system starts loading the blue LED goes off and a red LED on the inside turns on
-
the yellow LED turns on when sample loading starts
-
when the blue LED and all 3 LEDs inside turn on loading samples is done and you are at the READY page
-
once the red and yellow LEDs inside are extinguished and only the green LED is lit you can start playing!
Watch this LED start-up sequence when you play headless to know whether loading is going ok!
A connected HDMI monitor or display is now showing the current patch number and name on the top line.
The next display line will show by default the breath level, pitchbend and number of played notes.
The bottom line shows info about the key-remote status, MIDI program, transposition, octave and the current
edit channel. (This can be customized in the [Global] settings.)
If you are powering a touch screen from USB and have trouble booting use a powered USB-Hub!
Audio Connections
- Connect a stereo RCA cable to the XO-mini RCA audio out jacks and your (stereo) amplifier.
(If you use a single mono cable / amp you should set the stereo out to mono in [Utility] - see manual.
If set to mono both output jacks carry the same mono signal.)
- Turn the volume all the way down before connecting the XO-mini and then turn it back up slowly in order to
avoid damage to both your ears and your amplification system.
Please note that the bottom (where the SSD drive is located)
and the top part (mainboard) always need to be connected with
this double USB plug!
The plug is only removed for system backup operations!
Backup Drive


