background image

A 112A | A 115A | A 118A

3

CONTENTS

I

NTRODUCTION

   . . . . . . . . . . . . . . . . . . . . . . . . . . . . . . . . . . . . . . . . . . . . . . . . . . . . . . . . . . . . . . . . . . . . . . . . . . . . . . .  5

Scope of Delivery, Unpacking and Inspection   . . . . . . . . . . . . . . . . . . . . . . . . . . . . . . . . . . . . . . . . . . . . . . . . . .  5
Warranty  . . . . . . . . . . . . . . . . . . . . . . . . . . . . . . . . . . . . . . . . . . . . . . . . . . . . . . . . . . . . . . . . . . . . . . . . . . . . . . .  5
HF-Interference . . . . . . . . . . . . . . . . . . . . . . . . . . . . . . . . . . . . . . . . . . . . . . . . . . . . . . . . . . . . . . . . . . . . . . . . . .  5

I

NSTALLATION

  . . . . . . . . . . . . . . . . . . . . . . . . . . . . . . . . . . . . . . . . . . . . . . . . . . . . . . . . . . . . . . . . . . . . . . . . . . . . . . . .  6

Controls, Indicators and Connections   . . . . . . . . . . . . . . . . . . . . . . . . . . . . . . . . . . . . . . . . . . . . . . . . . . . . . . . .  6
Power Amplifier and Cooling   . . . . . . . . . . . . . . . . . . . . . . . . . . . . . . . . . . . . . . . . . . . . . . . . . . . . . . . . . . . . . . .  8
Quickstart  . . . . . . . . . . . . . . . . . . . . . . . . . . . . . . . . . . . . . . . . . . . . . . . . . . . . . . . . . . . . . . . . . . . . . . . . . . . . . .  8

A

PPENDIX

 / A

NHANG

  . . . . . . . . . . . . . . . . . . . . . . . . . . . . . . . . . . . . . . . . . . . . . . . . . . . . . . . . . . . . . . . . . . . . . . . . . . .  16

Specifications  . . . . . . . . . . . . . . . . . . . . . . . . . . . . . . . . . . . . . . . . . . . . . . . . . . . . . . . . . . . . . . . . . . . . . . . . . . .  16
Block Diagram . . . . . . . . . . . . . . . . . . . . . . . . . . . . . . . . . . . . . . . . . . . . . . . . . . . . . . . . . . . . . . . . . . . . . . . . . . .  18
Dimensions  . . . . . . . . . . . . . . . . . . . . . . . . . . . . . . . . . . . . . . . . . . . . . . . . . . . . . . . . . . . . . . . . . . . . . . . . . . . . .  20
Setup Examples . . . . . . . . . . . . . . . . . . . . . . . . . . . . . . . . . . . . . . . . . . . . . . . . . . . . . . . . . . . . . . . . . . . . . . . . . .  21

INHALT

E

INFÜHRUNG

  . . . . . . . . . . . . . . . . . . . . . . . . . . . . . . . . . . . . . . . . . . . . . . . . . . . . . . . . . . . . . . . . . . . . . . . . . . . . . . . . .  11

Lieferumfang, Auspacken und Überprüfen  . . . . . . . . . . . . . . . . . . . . . . . . . . . . . . . . . . . . . . . . . . . . . . . . . . . . .  11
Garantie   . . . . . . . . . . . . . . . . . . . . . . . . . . . . . . . . . . . . . . . . . . . . . . . . . . . . . . . . . . . . . . . . . . . . . . . . . . . . . . .  11

I

NSTALLATION

  . . . . . . . . . . . . . . . . . . . . . . . . . . . . . . . . . . . . . . . . . . . . . . . . . . . . . . . . . . . . . . . . . . . . . . . . . . . . . . . .  12

Bedienelemente, Anzeigen und Anschlüsse  . . . . . . . . . . . . . . . . . . . . . . . . . . . . . . . . . . . . . . . . . . . . . . . . . . . .  12
Leistungsverstärker und Kühlung  . . . . . . . . . . . . . . . . . . . . . . . . . . . . . . . . . . . . . . . . . . . . . . . . . . . . . . . . . . . .  14
Quickstart  . . . . . . . . . . . . . . . . . . . . . . . . . . . . . . . . . . . . . . . . . . . . . . . . . . . . . . . . . . . . . . . . . . . . . . . . . . . . . .  15

A

NHANG

  . . . . . . . . . . . . . . . . . . . . . . . . . . . . . . . . . . . . . . . . . . . . . . . . . . . . . . . . . . . . . . . . . . . . . . . . . . . . . . . . . . . .  16

Spezifikationen  . . . . . . . . . . . . . . . . . . . . . . . . . . . . . . . . . . . . . . . . . . . . . . . . . . . . . . . . . . . . . . . . . . . . . . . . . .  16
Blockdiagramm  . . . . . . . . . . . . . . . . . . . . . . . . . . . . . . . . . . . . . . . . . . . . . . . . . . . . . . . . . . . . . . . . . . . . . . . . . .  18
Abmessungen  . . . . . . . . . . . . . . . . . . . . . . . . . . . . . . . . . . . . . . . . . . . . . . . . . . . . . . . . . . . . . . . . . . . . . . . . . . .  20
Systembeispiele  . . . . . . . . . . . . . . . . . . . . . . . . . . . . . . . . . . . . . . . . . . . . . . . . . . . . . . . . . . . . . . . . . . . . . . . . .  21
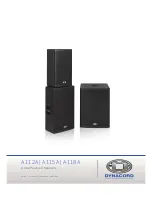
Summary of Contents for A112A

Page 1: ...A 112A A 115A A 118A A Line Powered Speakers Owner s Manual Bedienungsanleitung...

Page 2: ...A 112A A 115A A 118A 2...

Page 3: ...mplifier and Cooling 8 Quickstart 8 APPENDIX ANHANG 16 Specifications 16 Block Diagram 18 Dimensions 20 Setup Examples 21 INHALT EINF HRUNG 11 Lieferumfang Auspacken und berpr fen 11 Garantie 11 INSTA...

Page 4: ...candles should be placed on the apparatus 19 The product should be connected to a mains socket outlet with a protective earthing connection IMPORTANT SERVICE INSTRUCTIONS CAUTION These servicing instr...

Page 5: ...or and a XLR link output socket Setting up a small yet very powerful system turns out to be a piece of cake when combining with DYNACORD CMS mixing consoles e g CMS 600 3 They are the perfect fit and...

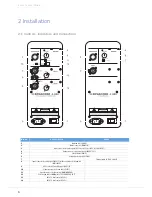
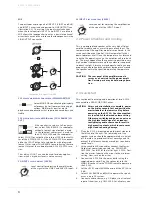
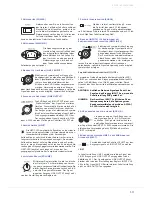
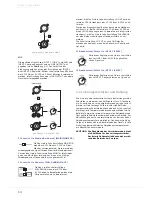
Page 6: ...r forl audio signal LINK OUTPUT 5 Limit indicator LIMIT 6 Volume level control VOLUME 7 Polarity switch 0 180 PHASE 8 Input connector for audio signal INPUT 2 with sensitivity selection switch MIC LIN...

Page 7: ...VOLUME Level control for adjusting the volume of the loudspeaker The level control affects the power amp s overall amplification VOLUME control does not affect the level of the LINK OUTPUT connector...

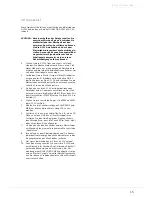
Page 8: ...ce the temperature has returned to within the operating range the amplifier will turn back on This may happen when the speaker is operated in very high ambient temperatures and the enclosure is expose...

Page 9: ...sitions i e volume settings 8 Your system is now ready for operation Individual sound adjustments necessary can be made using the controls of the mixer s corresponding input chan nels 9 Now have fun w...

Page 10: ...oder Trinkgef e auf dem Ger t 16 Um das Ger t komplett spannungsfrei zu schalten muss der Netzstecker gezogen werden 17 Beim Einbau des Ger tes ist zu beachten dass der Netzstecker leicht zug nglich...

Page 11: ...ein XLR Kabel auf weitere Boxen weiterge schleift werden F r das wiedergegebene Signal steht ein Lautst rke Regler ein Schalter f r die Umschaltung auf Monitor Betrieb sowie ein Schalter zur Aktivieru...

Page 12: ...nals mit Line Pegel LINK OUTPUT 5 Anzeige Limiter LIMIT 6 Lautst rke Regler VOLUME 7 Polarit tswahlschalter 0 180 PHASE 8 Eingang XLR Klinke f r Audio Signal mit Line oder Mikrofon Pegel INPUT 2 9 Ste...

Page 13: ...meidung von Verzer rungen in vorgeschalteten Mischpulten sollte dieser Regler normalerweise zwischen 0 dB und 6 dB eingestellt werden Der Signal pegel am Ausgang LINK OUTPUT h ngt nicht von der Einste...

Page 14: ...ten Hochpass w hlen Sie die Schalterstellung FULLRANGE um eine Reihenschaltung von Hochpassfiltern zu ver meiden Die Schalterstellung LO CUT ist auch f r Delay An wendungen geeignet wenn kein hoher Ba...

Page 15: ...nnen nun die A 112A mit dem beiliegenden Netzkabel an das Stromnetz anschliessen Der Stek ker wird hierzu in die Buchse MAINS IN gesteckt Mit dem Netzschalter POWER setzen Sie die A 112A in Betrieb I...

Page 16: ...al 90 x 50 Omnidirectional Audio Input LINE 1 or MIC LINE 2 INPUT 1 XLR and 1 4 TRS combination INPUT 2 XLR and 1 4 TRS combination INPUT XLR and 1 4 TRS combination Audio Input AUX Stereo RCA unbalan...

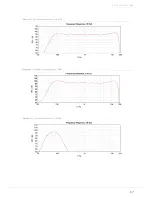
Page 17: ...A 112A A 115A A 118A 17 Illustration 3 1 Frequency response of A 112A Illustration 3 2 Frequency response of A 115A Illustration 3 3 Frequency response of A 118A...

Page 18: ...PROCESSING UNIT VOLUME MONITOR 5x20mm T5A POWER MAINS 1 L MAINS POWER SUPPLY MAIN LO CUT FULLRANGE THERMAL PROTECTION LIMITER HF FIR X OVER EQ HF 220V 240V 50Hz 60Hz LEVEL LINE 1 INPUT 2 AUX L R LIMI...

Page 19: ...agram of A 118A DIGITAL SIGNAL PROCESSING UNIT INPUT LINK OUTPUT VOLUME POLARITY FILTERS THERMAL PROTECTION PHASE 0 180 LIMITER LF LF PROTECTIONS CLASS D AMPLIFIER 5x20mm T5A POWER MAINS 1 L MAINS POW...

Page 20: ...A 112A A 115A A 118A 20 3 3 Dimensions Abmessungen A 112A A 115A A 118...

Page 21: ...A 118A 21 3 4 Setup Examples Systembeispiele FULL RANGE SUBWOOFER CONFIGURATION Illustration 3 6 Stacking full range systems with subwoofers Dual A 112A or A 115A with LO CUT setting selected dual A 1...

Page 22: ...A 112A A 115A A 118A 22 DAISY CHAIN CONFIGURATION Illustration 3 7 Daisy chaining full range systems dual A 112A or A 115A...

Page 23: ...A 112A A 115A A 118A 23 MONITOR CONFIGURATION Illustration 3 8 Using full range systems as Monitors Dual A 112A or A 115A with MONITOR setting selected...

Page 24: ...84 0043 49 9421 706 0 Fax 49 9421 706 265 Asia Pacific only For customer orders contact Customer Service at www dynacord com 65 6571 2534 Fax 65 6571 2699 For technical assistance contact Technical Su...

Reviews: