Machine head
Service Instructions 745-35-10 D - 00.0 - 10/2017
49
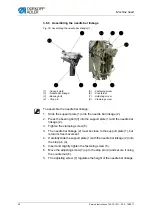
15. Unscrew the screw (6).
16. Turn the needle holder (8) to adjust its height.
A complete 360° rotation is possible.
17. Align the needle holder.
The front faces of the needle holders must face forward and be in the
same plane.
18. Screw in and tighten the screw (6) in the needle holder.
19. Remove locking peg and measuring pin (2).
20. Switch the needle bar back on.
To do so, use the handwheel to turn the needle bar beyond the top
dead center, making sure the switch rod is not pressed.
21. Perform the same setting for the second needle holder.
3.9.5 Setting the distance between hook tips and needles
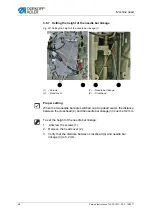
Fig. 40: Setting the distance between hook tips and needles (1)
Proper setting
In the loop stroke position, the distance between the hook tips (2) and the
needles (1) should be = 0.1 mm. The set distance makes it possible to
work with needle sizes Nm 90 to Nm 110.
It is not necessary to correct the distance of the hook tips to the needles
during a change between these needle sizes. The only correction necessary
during a needle change is a readjustment of the needle guard (
The distance between the hook tips and the needles is set using a setting
peg (3) (part number 0244 001014).
(1)
- Needles
(2)
- Hook tips
(3)
- Setting peg
0,1 mm
②
①
②
③
Summary of Contents for 745-35-10 D
Page 1: ...745 35 10 D Service Instructions...
Page 6: ...Table of Contents 4 Service Instructions 745 35 10 D 00 0 10 2017...
Page 10: ...About these instructions 8 Service Instructions 745 35 10 D 00 0 10 2017...
Page 74: ...Machine head 72 Service Instructions 745 35 10 D 00 0 10 2017...
Page 84: ...Transport carriage 82 Service Instructions 745 35 10 D 00 0 10 2017...
Page 116: ...Light barriers 114 Service Instructions 745 35 10 D 00 0 10 2017...
Page 122: ...Aligning the machine head 120 Service Instructions 745 35 10 D 00 0 10 2017...
Page 128: ...Folder 126 Service Instructions 745 35 10 D 00 0 10 2017...
Page 146: ...Throw over stacker 144 Service Instructions 745 35 10 D 00 0 10 2017...
Page 282: ...Programming 280 Service Instructions 745 35 10 D 00 0 10 2017...
Page 292: ...Maintenance 290 Service Instructions 745 35 10 D 00 0 10 2017...
Page 294: ...Decommissioning 292 Service Instructions 745 35 10 D 00 0 10 2017...
Page 296: ...Disposal 294 Service Instructions 745 35 10 D 00 0 10 2017...
Page 308: ...Troubleshooting 306 Service Instructions 745 35 10 D 00 0 10 2017...
Page 337: ......


