Vestizione
Fairing
sezione / section
E 1
6
749R
- M.Y. 2006 - edizione/edition 00
A
B
C
D
E
F
G
H
L
M
N
P
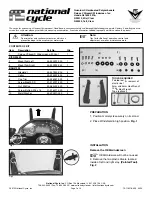
Rimontaggio cupolino
Importante
Per non danneggiare le parti
verniciate e il parabrezza in plexiglas
del cupolino, ad ogni rimontaggio
posizionare sempre le rosette in
nylon (11) e (
15
) in corrispondenza
delle viti di fissaggio.
Nel rimontaggio fare attenzione
al posizionamento degli inserti
filettati (10) sul cupolino (vedi sezione
in figura).
Per evitare che fuoriescano dalla
sede, mentre si montano le viti (12)
con rosetta (11), tenere premuti gli
inserti (10) contro il cupolino (1).
Assicurarsi che il cablaggio (H) degli
indicatori di direzione sia steso nelle
apposite scanalature lungo i supporti
cupolino.
Avvicinare il cupolino al gruppo ottico
e collegare i due faston al
portalampada della luce di posizione.
Posizionare il cruscotto nella sua sede
e inserirlo nei gommini (F).
Spingere il cupolino (1) in sede,
inserendo i perni (G) negli agganci (L)
del supporto fanale.
Inserire le viti (5) di fissaggio con le
rosette di nylon (
15
).
Serrare le viti (5) alla coppia prescritta
(Sez. C 3).
Rimontare gli specchi retrovisori
come descritto precedentemente e
le carenature laterali (Sez. E 2).
Refitting the headlight
shell
Important
On refitting the headlight shell,
always locate the nylon washers (11)
and (
15
) in correspondence with the
retaining screws to avoid damaging
the painted parts and the Plexiglas
windshield.
During reassembly, make sure that
the threaded inserts (10) are correctly
positioned on the headlight shell
(see section view in the illustration).
To prevent them from moving,
while fitting the screws (12) and
washers (11), hold the inserts (10)
pressed against the headlight shell (1).
Make sure the turn indicator wiring (H)
is correctly routed in the grooves
inside the headlight shell supports.
Slide the headlight shell onto the
headlight assembly and connect the
two faston connectors to the sidelight
bulb holder.
Locate the instrument panel and
insert it in the grommets (F).
Push the headlight shell (1) into place,
inserting the pins (G) into the
retainers (L) in the headlight support.
Fit the retaining screws (5) and nylon
washers (
15
).
Tighten the screws (5) to the specified
torque (Sect. C 3).
Refit the rear-view mirrors as
previously described and the side
fairing panels (Sect. E 2).
10
10
1
12
11
13
H
F
L
G
5
1
Summary of Contents for Superbike 749R 2006
Page 12: ......
Page 13: ...A B C D E F G H L M N P Generalità 0 Description 0 ...
Page 26: ......
Page 27: ...A B C D E F G H L M N P Informazioni sul modello 0 Model specific information 0 ...
Page 31: ...A B C D E F G H L M N P Caratteristiche tecniche 0 Specifications 0 ...
Page 75: ...A B C D E F G H L M N P Uso e manutenzione 0 Use and Maintenance operations 0 ...
Page 154: ......
Page 155: ...A B C D E F G H L M N P Vestizione 0 Fairing 0 ...
Page 175: ...A B C D E F G H L M N P Comandi Dispositivi 0 Controls Devices 0 ...
Page 201: ...A B C D E F G H L M N P Ruote Sospensioni Freni0 Wheels Suspensions Brakes 0 ...
Page 248: ......
Page 249: ...A B C D E F G H L M N P Mototelaio 0 Frame 0 ...
Page 274: ......
Page 275: ...A B C D E F G H L M N P Impianto di alimentazione Scarico 0 Fuel system Exhaust system 0 ...
Page 306: ......
Page 307: ...A B C D E F G H L M N P Impianto iniezione accensione 0 Ignition injection system 0 ...
Page 331: ...A B C D E F G H L M N P Motore 0 Engine 0 ...
Page 514: ......
Page 515: ...A B C D E F G H L M N P Impianto elettrico 0 Electric system 0 ...
Page 598: ......
Page 599: ...A B C D E F G H L M N P Indice degli argomenti 0 Subject index 0 ...