INSTALLATION/OWNER'S MANUAL
AM/FM/CD Receiver with Detachable Face
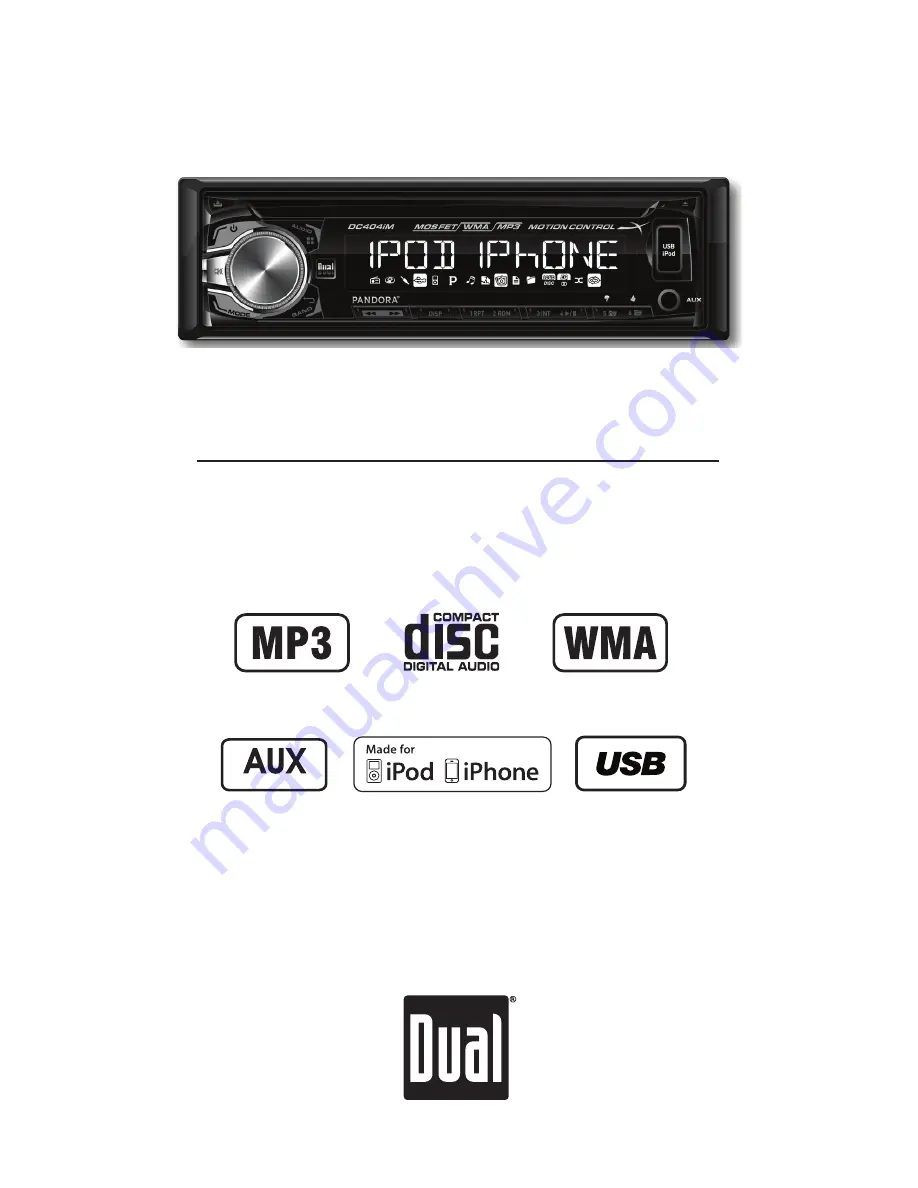
DC404iM
Front and Rear Inputs
Front Input
Page 1: ...INSTALLATION OWNER S MANUAL AM FM CD Receiver with Detachable Face DC404iM Front and Rear Inputs Front Input...
Page 2: ...move 2 transit screws located on top of the unit Insert the supplied keys into the slots as shown and slide the unit out of the mounting sleeve Install mounting sleeve into opening bending tabs to sec...
Page 3: ...m FUSE When replacing the fuse make sure new fuse is the correct type and amperage Using an incorrect fuse could damage the radio The DC404iM uses one 10 amp ATM fuse located beside the wiring connect...
Page 4: ...Menu USB Port Eject Auxiliary Input Preset 6 Folder Up Thumbs Up Preset 5 Folder Down Thumbs Down 1 2 3 4 5 6 7 8 9 Preset 4 Play Pause Preset 3 Intro Preset 2 Random Preset 1 Repeat Display Tune Tra...
Page 5: ...information Press RESET upon initial installation or if abnormal operation occurs Reset button is located behind the front panel With the unit on press and hold DISP until the clock begins to flash t...
Page 6: ...UX FRONT ON Enables the front panel 3 5mm auxiliary input AUX FRONT OFF Disables the front panel 3 5mm auxiliary input Beep Confirmation BEEP OFF Disables the confirmation beep BEEP ON Enables the con...
Page 7: ...USER Any manual adjustment to the Bass or Treble settings are automatically saved as USER Press AUDIO MENU until LOUD appears then rotate volume knob left right to adjust LOUD ON OFF The source volume...
Page 8: ...e step at a time Press and hold to advance quickly Press BAND to select between FM1 FM2 FM3 AM1 and AM2 bands Up to 18 FM stations and 12 AM stations can be stored To store a station select the desire...
Page 9: ...tune to the next strong station Left across the sensor to seek down and tune to the next strong station Put your hand over the sensor to mute the audio Swipe your hand Up across the sensor to increase...
Page 10: ...layback Press INT to enter the Intro menu then turn the volume knob to select one of the following options OFF Cancels the INT function ALL Plays the first 10 seconds of each track Press RPT to enter...
Page 11: ...information ROOT will be displayed if the directory name of a root folder is not labeled This icon will illuminate when the song title is displayed This icon will illuminate when the artist name is d...
Page 12: ...in the root directory will be located in the folder named ROOT Press SELECT to view the files on the root folder Turn the volume knob to cycle through all the folders on the device and press SELECT to...
Page 13: ...lder Press RDM to enter the Random menu then turn the volume knob to select one of the following options OFF Cancels the RDM function ALL Plays all tracks in random order FOLDER Plays all tracks in fo...
Page 14: ...ere recorded in Refer to your recording software s user s manual for more information ISO9660 level 1 ISO9660 level 2 Yellow Book MODE 1 Yellow Book MODE 2 FORM 1 Multi session Maximum files 999 Maxim...
Page 15: ...kHz 48kHz 32kbps 320kbps constant Variable bit rates 32kbps 192kbps constant Variable bit rates Note Some files may not play or be displayed correctly depending on sampling rates and bit rates ID3 tag...
Page 16: ...II again to resume playback Press SELECT to enter the file folder search mode A list of all the folders from the USB device will be displayed Note Any files located in the root directory will be loca...
Page 17: ...h more than one folder Press RPT to enter the Repeat menu then turn the volume knob to select one of the following options ALL Plays all tracks on the device TRACK Continuously repeats selected track...
Page 18: ...B device and begins in the root folder Any empty folders or folders that do not include MP3 WMA files are skipped Depending on your software the playback order may vary Maximum number of files 999 Max...
Page 19: ...48kHz 32kHz 48kHz 32kbps 320kbps constant Variable bit rates 32kbps 192kbps constant Variable bit rates Note Some files may not play or be displayed correctly depending on sampling rates and bit rate...
Page 20: ...l or nn to fast forward or reverse a song Press l II to temporarily stop playback Press l II again to resume playback Press RPT to enter the Repeat menu then turn the volume knob to select one of the...
Page 21: ...gories have subcategories to navigate through See the table below for details Once the search category and subcategories are selected use the volume knob to navigate to the desired song podcast audiob...
Page 22: ...lt song title artist track number clock elapsed time Maximum character display information Song Title 32 character maximum Artist Name 32 character maximum Album Name 32 character maximum Song Title A...
Page 23: ...ration iPod touch 3rd generation iPod nano 3rd generation iPod touch 2nd generation iPod nano 2nd generation iPod classic iPod touch 1st generation iPod nano 1st generation iPod with video iPhone 5S i...
Page 24: ...d station is highlighted and playback will begin Note Stations must be created on your account prior to connecting your iPod iPhone device to the head unit Press SELECT to display the Stations Menu Ch...
Page 25: ...g range 530kHz 1710kHz Usable sensitivity 22uV Frequency response 30Hz 2 2kHz Speaker output impedance 4 8 ohms Line output voltage 2 Volts RMS Dimensions 2 x 7 x 7 51 x 178 x 178 Design and specifica...
Page 26: ...rn shipment of the product Specific license conditions and copyright notices for the software can be found via www dualav com What to do 1 Before you call for service check the troubleshooting guide i...
Page 27: ...Unit is not mounted correctly or backstrap is not secure Check mounting sleeve and backstrap support Physical defect in media CD CD R or CD RW Check media for scratches ERROR 2 appears on display Dis...
Page 28: ...ed operation Warning Changes or modifications to this unit not expressly approved by the party responsible for compliance could void the user s authority to operate the equipment Note This equipment h...