background image


XD10P Cinema Audio Processor, Installation and Operation 

Version 1.0


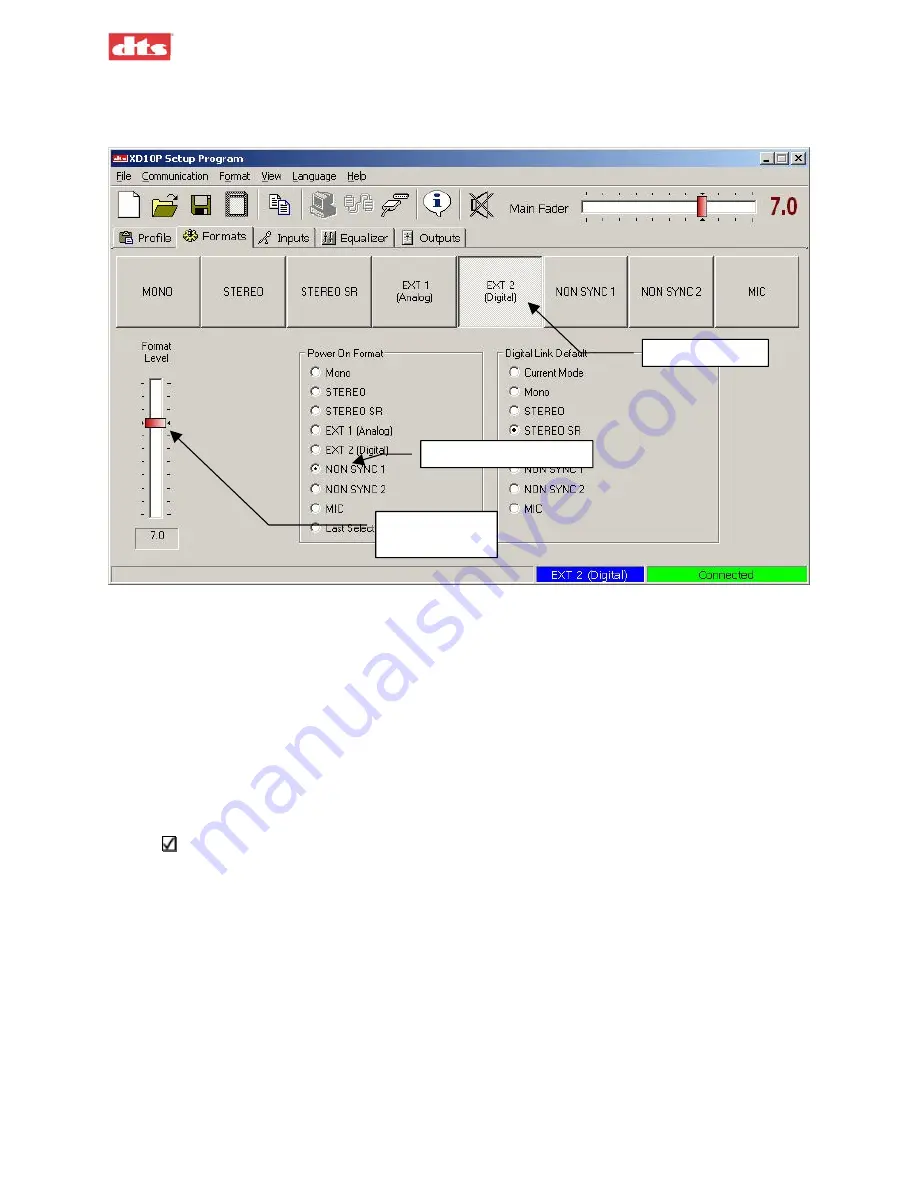
4.6. Formats Tab 

The Formats tab is where you set the processor’s format of operation.   


Select format

Select Power On format

Set level for 

selected mode

Figure 4-24. Formats tab 

Available formats: 

Mono 

Stereo 

Stereo SR   (Spectral Recording, for greater noise reduction) 

EXT 1 analog  

EXT 2 digital (you must configure the Digital Link Default – see next page) 

Non-Sync 1 

Non-Sync 2  

Mic 


Note

: The format can be selected here, as well as from the XD10P front panel, the Inputs tab 

or the Equalizer tab, from the format section of the Menu Bar, by a function key, or by an 
automation unit of your choice. Individual level, however, can only be accessed on this tab. 

Format Level 

–The fader at the left allows you to pre-set the level of a particular format. The master 

level will follow that setting. The system will retain your settings for the different formats until you 
change them. 

The Fader Level is typically set to 7 for all modes.  But you may have an optical trailer or 
something in Stereo mode that is too loud (at 7).  You can adjust the setting here, for Stereo, 
and the system will remember that setting.  

Power On Format

 – Any of the formats may be designated the “Power On” format, which means that 

when the power is turned on, the processor will “wake up” in that mode.  

Last Selected

  (When the unit is powered on, it will resume the mode that was selected 

when the unit was last turned off.) 

4. Software Description


Document #: 9301E855001.0 

4-14

Summary of Contents for XD10P

Page 1: ...designed to facilitate the exchange of information related to cinema projection and film handling with no warranties nor obligations from the authors for qualified field service engineers If you are not a qualified technician please make no adjustments to anything you may read about in these Adobe manual downloads www film tech com ...

Page 2: ...ma Audio Processor Installation and Operation Release Version 1 0 Effective Date December 2004 Document 9301E855001 0 Digital Theater Systems Inc Cinema Products Division 5171 Clareton Drive Agoura Hills CA 91301 USA ...

Page 3: ...therwise without the express prior written permission of Digital Theater Systems Inc The content of this publication is subject to change without notice and does not represent a commitment on the part of Digital Theater Systems Inc Every effort has been made to ensure the accuracy of this publication However due to ongoing improvements and revisions Digital Theater Systems Inc cannot guarantee the...

Page 4: ... 1 8 1 Projector Inputs 1 5 1 8 2 NON SYNC 1 NON SYNC 2 Inputs 1 5 1 8 3 MIC Input 1 5 1 8 4 EXT 1 Analog Input 1 5 1 8 5 EXT 2 Digital Input 1 6 1 9 Audio Signal Output Connections 1 6 1 9 1 ANALOG AUDIO OUT CH 1 8 1 6 1 9 2 MONITOR Output 1 6 1 9 3 HI Hearing Impaired Output 1 6 1 10 Automation Connections 1 7 1 10 1 AUTOMATION INPUTS 1 7 1 10 2 AUTOMATION 1 7 1 10 3 Automation LED Outputs 1 7 1...

Page 5: ...ION 4 1 4 1 The Opening Screen 4 1 4 1 1 Menu Bar 4 1 4 1 2 Toolbar 4 4 4 1 3 Tabs 4 4 4 1 4 Main Fader 4 4 4 2 After Connecting to the XD10P 4 4 4 3 Profile Tab 4 6 4 4 Inputs Tab 4 7 4 4 1 Inputs tab MIC selected 4 9 4 4 2 Inputs tab NON SYNC 1 selected 4 10 4 4 3 Inputs tab NON SYNC 2 selected 4 10 4 4 4 Matrix Controls 4 11 4 5 Equalizer Tab 4 12 4 6 Formats Tab 4 14 4 7 Outputs Tab 4 16 5 SPE...

Page 6: ...Operation Version 1 0 E 1 Alignment of Solar Cell and Preamplifier A Chain E 2 E 1 1 Film Path Alignment Check E 4 E 1 2 Cross talk Alignment E 4 E 1 3 Azimuth Check and Focus Check E 4 WARRANTY DTS MARQUEE SIGN ORDER FORM Document 9301E855001 0 v ...

Page 7: ...électriques pour les appareils numériques telles que perscrites par le règlement sur le brouillage radioélectrique établi par le ministère des Communications du Canada L exploitation faite en milieu résidentiel peut entrainer le brouillage des réceptions radio et télévision ce qui obligerait le propriétaire ou l opérateur à prendre les dispositions nécessaires pour en éliminer les causes CE Warnin...

Page 8: ...r repairs or information should include the unit serial number to ensure rapid service DTS Offices and Technical Support DTS engineers are available to assist you If you have an emergency after business hours please leave a message with the Answering Service and a technician will return your call as soon as possible DTS Headquarters 5171 Clareton Drive Agoura Hills CA 91301 Email cinematech dtsonl...

Page 9: ...Theater Systems Attn Customer Service 5171 Clareton Drive Agoura Hills California 91301 USA Telephone and FAX numbers are listed above under DTS Customer Service Safety Notices Review the following safety precautions to avoid injury and prevent damage to this product To avoid potential risk use this product only as specified and only for the purpose described in this installation and operation man...

Page 10: ...This product is designed and tested to meet the standards of the International Electrotechnical Commission IEC European Norm EN 60950 The Standard for Information Technology Equipment Including Electrical Business Equipment Agency Conformance EC Declaration of Conformity Meets intent of Directive 89 336 EEC for Electromagnetic Compatibility and Low Voltage Directive 73 23 EEC for Product Safety Co...

Page 11: ... reasonable protection against harmful interference within the equipment is operated in a commercial environment This equipment generates uses and can radiate radio frequency energy and if not installed and used in accordance with the instructions manual may cause interference to radio communications Operation of this equipment in a residential area is likely to cause interference in which case th...

Page 12: ... Analog Out toXD10P EXT1 Analog Audio IN and or from XD10 Digital Out to XD10P EXT2 Digital Audio IN See Appendix A Connector Pinouts See Appendix B Drawings Analog Audio Out to amplifiers Phoenix connector supplied See Appendix A Connector Pinouts Connect main power cable and bypass power supply PROGRAMMING STEPS Install XD10P Setup Software See Installing the Software p 3 1 Chapter 4 is a descri...

Page 13: ...XD10P Cinema Audio Processor Installation and Operation Version 1 0 Document 9301E855001 0 xii ...

Page 14: ...l power supply 1 3 System Hardware Mounting and Grounding The XD10P is designed to mount in a standard 19 inch 483 mm rack and is two standard rack spaces high 2U 3 5 inches or 89 mm We recommend blank panels above and below whenever space permits Mounting the unit immediately above a major heat producing component like a power amplifier is not recommended The XD10P includes a three prong groundin...

Page 15: ...el Front panel functions o Manually select formats and adjust the main fader o Numerical readout LED indicates fader level o Status LEDs indicate presence of power supplies o Turn off main power switch to place the unit into the bypass mode Each format has a preset level During system setup these presets can be set using a laptop computer connected to the XD10P See chapter 3 Using XD10P Setup Duri...

Page 16: ... indicate the presence of left center right and surround signals Status LEDs indicate the module is active or in a fault condition 1 2 3 4 5 6 7 11 13 8 9 10 12 INPUT MODULE 1 Projector 1 Bypass Level Adjust 2 Projector 2 Bypass Level Adjust 3 Left Channel Test Point 4 Projector 1 Indicator LED 5 Right Channel Test Point 6 Projector 2 Indicator LED 7 Ground Test Point 8 Bypass Level Test Point 9 L...

Page 17: ...module stores all settings The memory module is a smartcard that resides in a small slot on the Control Module It can be ejected and installed in a different XD10P to move the configuration information from one unit to another But normally the memory module should remain installed in the Control Module Figure 1 3 Removing and inserting memory module from Control Module To remove the memory module ...

Page 18: ...e Appendix A for pinout data 1 8 2 NON SYNC 1 NON SYNC 2 Inputs Two sets of RCA connectors facilitate easy connection to standard CD players A software fade in fade out algorithm only in NON SYNC 1 allows smooth transition between intermission music and the main program See the wiring diagram drawing F207 in Appendix B 1 8 3 MIC Input The public address balanced microphone inputs are available on ...

Page 19: ...nect to the power amplifiers The outputs are balanced and all have a corresponding ground terminal Use two conductor shielded cable for each channel The shield should usually be connected to ground at the power amplifier end only Figure 1 5 Analog Audio Out connector See drawing F208 XD10P Analog Audio Phoenix Connectors in Appendix B 1 9 2 MONITOR Output This is a 25 pin D type connector containi...

Page 20: ...sistor in series with each LED at the LED is recommended in case of wiring faults See the pinout specification for the Automation connector in Appendix A 1 11 Other Connections and Controls 1 11 1 Power Input The XD10P uses an external 16 VAC 500mA power supply to power the bypass circuit 1 11 2 REM FADER Remote Fader The XD10P features a Remote Fader connection on the rear The two button remote f...

Page 21: ... control configure and or automate the XD10P via this interface The cable should be a standard male to female serial to USB adapter to interface with the USB port of a laptop computer The pinout information for the RS 232 serial port is in Appendix A See wiring diagram F205 in Appendix B for identification of the connection 1 XD10P Overview Document 9301E855001 0 1 8 ...

Page 22: ...ppropriate format button on the front panel for two seconds and while continuing to press it rotate the main fader to the desired level Then release the button This will change the preset level for that format No other format levels will change The LED display will indicate the preset level Each format can be set for a different level if necessary 2 4 Operation in Bypass Mode Bypass mode is trigge...

Page 23: ...uccess contact your service technician 2 5 Remote Fader The remote fader function can be accomplished two ways either through RS 232 commands or with a simple pair of push buttons see REM FADER on page 1 7 One button increases levels and the other decreases levels The LED display on the XD10P will indicate the change DTS does not provide a remote fader pushbutton device But an RS 232 interface wit...

Page 24: ...uter must be attached to the XD10P via the RS 232 port in order for the system setup to proceed A serial cable is used to connect the serial port of the computer to the XD10P RS 232 port or a serial to USB adapter connects the USB port of the computer to the XD10P RS 232 port Note When the computer is connected to the XD10P the Setup software takes total control and the buttons and fader knob on t...

Page 25: ...the Connect icon The connection status bar in the lower right hand corner of the main screen will change from Disconnected to Connected Figure 3 3 When you connect to the XD10P the computer will download all the data stored on the XD10P to the computer s memory This data includes Preamp parameters EQ parameters Front Panel parameters and Profile information The Component Information display area o...

Page 26: ...nnected to either Projector 1 and or Projector 2 2 Select the appropriate Projector button for the projector that is the source for the soundtrack input 3 Turn ON the projector with the 50 Modulation Tone film loop loaded 4 Select an optical format Stereo or Stereo SR from the Format buttons Select an optical format Select a Projector Adjust the Gain sliders until all 4 green LEDs are ON Figure 3 ...

Page 27: ...k Noise test film into the projector and start the projector 3 Click the Power On button and a bar graph or line graph will display across the Analyzer screen 4 Select the Bars or Lines option button to select the type of graph to display on the spectrum analyzer SA 5 Select Left and or Right channel In this example both Left Ch and Right Ch are selected 6 The interval for the Y axis defaults to 1...

Page 28: ... the effect on the graph in the Analyzer window Movement of the slider all the way to the right causes the graph to turn downwards on the right end Movement all the way to the left causes the graph to turn upwards on the right end Use the slider for large adjustments use the UP DOWN arrow keys for fine tuning If the bars or lines in the graph are not overlaying each other after fine tuning check y...

Page 29: ... EQ adjustment 3 Using the Mono EQ analyzer adjust the MONO EQ until the following curve is achieved Figure 3 9 SA screen during Mono EQ adjustment The curve shown plus the auditorium roll off approximately equals the standard Academy Curve A Chain Alignment is now complete 3 Using XD10P Setup Document 9301E855001 0 3 6 ...

Page 30: ...ent is to show the XD10P functions that are relevant to B chain alignment Equipment Required Real Time Analyzer RTA with microphone see the topic Built in RTA Function page 3 17 optional multiple microphone system SPL meter Caution Before proceeding with the room equalization it is imperative that the loudspeaker and crossover systems be properly aligned Issues like speaker phasing and horn tilt n...

Page 31: ...ng a multiple microphone system set up the microphones according to the instructions provided with that system 2 In the XD10P Setup software set the Main Fader to 7 0 Verify on the XD10P front panel that the fader setting matches 7 0 3 Select the Equalizer tab and choose a channel The screen channels L LC C RC R are always done before the surround channels In this example Figure 3 11 we begin with...

Page 32: ...ab 10 Repeat the tuning procedure steps 4 through 9 for the left right left center right center and surround channels You may use the Copy feature to simplify this procedure see next topic 3 5 1 Use the Copy Feature The XD10P includes a Copy feature that minimizes the time required for re equalizing similar channels see Figure 3 13 below After equalizing the center channel copy these settings to t...

Page 33: ...oofer selected 3 In Sub Bass Parametric Equalizer section adjust Gain slider to top 0 0 adjust Q to midpoint or 5 25 and adjust Frequency to 120 Hz 4 Power ON the Subwoofer amp Raise gain on amp until sub frequency response is seen on the RTA 5 Note the highest peak on the RTA Move the Frequency slider until center of dip is at the highest peak frequency 6 Adjust Gain slider to flatten the dip 7 A...

Page 34: ...et for 10dB in band gain as compared to the Center channel See Digital Subwoofer Gain Setting below In the Inputs tab Optical analog surround and sub level see Optical Surround Gain and Delay on page 3 12 and Subwoofer Optical Gain on page 3 13 3 7 1 Digital Subwoofer Gain Setting 1 Select Outputs tab 2 Select Pink Noise Center channel adjust to 85 dBC and note average frequency response level 3 S...

Page 35: ...1 13 8 9 10 12 INPUT MODULE Figure 3 16 Input module Bypass Level trim pots 1 and 2 1 Projector 1 Bypass Level Adjust 2 Projector 2 Bypass Level Adjust This completes the calibration of the bypass level Note When in bypass mode the operator can change the bypass level by adjusting the Main Fader However the Main Fader knob must be rotated many more turns compared to non bypass mode to achieve chan...

Page 36: ...fer Optical Gain Equipment Required RTA Pink Noise test film 1 Thread the Pink Noise test film into projector 2 Turn off Subwoofer amplifier 3 Select the Inputs tab and start projector 4 Note average frequency response level on RTA display and the lower frequency roll off 5 Turn off Center channel amplifier and turn on Subwoofer amplifier 6 Adjust Sub Gain under Matrix Controls in the Inputs tab t...

Page 37: ...becomes active Figure 3 18 NON SYNC 1 adjustment Preamp Controls 3 Adjust the Left Gain slide pot The master fader should be set at 7 0 4 In the theatre listen to the non sync 1 audio and then adjust the gain to a comfortable level NON SYNC2 1 Connect the sound source to the NON SYNC 2 L and R RCA jacks 2 Click on the Inputs tab Select the NON SYNC 2 format Use the Left Gain slider to set the NON ...

Page 38: ...cifications 2 Click on the Inputs tab and select the MIC format Use the Left Gain slider to set the MIC level Figure 3 20 MIC adjustment Preamp Controls 3 In the theatre listen to the mic audio and then adjust the gain to a comfortable level 3 7 6 Preset Levels and Startup Mode 1 Select the Formats tab and then choose a format 2 Adjust the format level on this screen to an appropriate setting Note...

Page 39: ...n on the front panel for two seconds and while continuing to press it rotate the main fader to the desired level Then release the button This will change the preset level for that format No other format levels will change The LED display will indicate the preset level Each format can be set for a different level if necessary 3 7 7 Listening Test Equipment Required Buzz and Bill Show test film DTS ...

Page 40: ...To execute tests you must have the XD10P software running and connected 1 Select Outputs tab 2 Press and hold the Ctrl key on your laptop and select the pink noise box of each channel 3 Once all boxes are selected connect your test equipment to the THX pink noise trigger jack on the Input module of the XD10P Your test equipment will now activate all channels with pink noise during the test For fur...

Page 41: ...XD10P Cinema Audio Processor Installation and Operation Version 1 0 3 Using XD10P Setup Document 9301E855001 0 3 18 ...

Page 42: ...etup icon on the desktop The opening screen appears Main Fader Tabs Theater Information area Component Information display Format and connection status indicators Figure 4 1 Initial screen XD10P Software The opening screen has a Menu Bar Toolbar tabs for accessing software functions and on the Profile tab a Theater Information entry area There is also a Main Fader slider control a Component Inform...

Page 43: ...he Copy Feature page 3 9 System Mute Toggle to mute or Unmute all output channels Communication Menu The Comm menu functions are available from the toolbar as well Figure 4 4 Communication menu Communication Settings Make changes to the serial communication parameters When selected a dialog box will display Select from the pull down list of COM ports This will be the communications port of the com...

Page 44: ...system default The software reads your user selected language looks for it and if not found then looks for your system language and if that is also not found it defaults to English Help Menu From the Help menu select About to display version information for the XD10P Setup program The Unlock Diagnostics selection permits privileged access to diagnostic features using a password Figure 4 9 Help men...

Page 45: ...re tabs for accessing various operational modes These tabs will be described in order left to right beginning with the Profile tab on page 4 6 4 1 4 Main Fader See Figure 4 1 page 4 1 The slider at the upper right is the main level control for the XD10P It works in conjunction with the fader knob on the front panel of the unit and will follow it just as the level indicator on the front panel will ...

Page 46: ...eamp parameters EQ parameters Front Panel parameters and Profile information The Component Information display area of the initial screen will no longer be empty it will show serial number and version information Note The serial number and version information are important when contacting DTS Customer Service Figure 4 11 Initial screen Profile tab after connecting to XD10P Connected status indicat...

Page 47: ...nment or in case factory repair is needed You may fill in these fields in Theater Information Digital Player 1 what digital system is connected to the XD10P Examples DTS XD10 SDDS Dolby Digital Digital Player 2 identify a second digital system if any Circuit Name enter the theatre circuit or company name Theater Name enter the name of this theatre Screen Number Projector Model Number Automation Sy...

Page 48: ...ptical format Stereo or Stereo SR The projector must be running and connected to the optical input on the XD10P On the right Matrix Controls is used for setting surround delay and gain subwoofer gain and frequency and non sync gain See Matrix Controls page 4 11 How to adjust levels using sliders To adjust a level place the cursor over the desired slider s button and hold down the left mouse button...

Page 49: ...een the two If Summ Diff is selected with this button the Left Right button will also display Summ Diff Bars or Lines select the type of graph to display on the SA In the example above Bars was selected The two channels are aligned and appear as one set of bars Power On Off Select one or both channels Select Bar or Line graph X axis frequencies Y axis Decibel scale Left Gain slider Y axis interval...

Page 50: ...e Decibel scale Y axis will also move Zoom With the cursor inside the SA double click the left mouse button and the SA will expand to a larger view Built in RTA When a microphone is connected to the XD10P MIC IN connector double click the SA and it will become a built in RTA For details see 3 9 Built in RTA Function page 3 17 Y axis Decibel scale Figure 4 16 Slit Loss Analyzer enlarged view 4 4 1 ...

Page 51: ...4 2 Inputs tab NON SYNC 1 selected Figure 4 18 These Preamp controls will display when NON SYNC 1 is selected 4 4 3 Inputs tab NON SYNC 2 selected Figure 4 19 These Preamp controls will display when NON SYNC 2 is selected 4 Software Description Document 9301E855001 0 4 10 ...

Page 52: ...rix Controls is used for setting optical surround delay and gain and subwoofer gain and frequency See Optical Surround Gain and Delay in chapter 3 page 3 12 for instructions for setting these parameters Figure 4 20 Matrix Controls on Inputs tab 4 Software Description Document 9301E855001 0 4 11 ...

Page 53: ...woofer signals in the XD10P o One subwoofer signal is created by summing the Lt and Rt channels on the two channel input card This signal has its own adjustable low pass filter and 6 dB gain trim o The second subwoofer signal is a discrete input on the analog eight channel connector o The third subwoofer signal is a discrete input on one of the digital AES EBU pairs All the above signals pass thro...

Page 54: ...on 1 0 Figure 4 22 Subwoofer EQ controls Note Muted channels are highlighted in RED in the Equalizer Tab This means the channel has been muted in the Outputs tab Figure 4 23 Muted channels are highlighted in red 4 Software Description Document 9301E855001 0 4 13 ...

Page 55: ... your choice Individual level however can only be accessed on this tab Format Level The fader at the left allows you to pre set the level of a particular format The master level will follow that setting The system will retain your settings for the different formats until you change them The Fader Level is typically set to 7 for all modes But you may have an optical trailer or something in Stereo m...

Page 56: ...e analog input on the XD10P Contact DTS for further information if you wish to upgrade to a digital output card in the XD10 Traditionally with DTS products if timecode is lost the DTS player will pulse the cinema processor to a default sound format This is still true but when using the digital input there is a chance for a digital link failure If the digital link between the DTS player and XD10P i...

Page 57: ...o receive generator output a checkbox is available below the slider These checkboxes may also be utilized to Mute or Invert the channel If a channel is muted in the Outputs tab it will be highlighted in RED in the Equalizer tab A channel can be unmuted only in the Outputs tab Figure 4 28 When channel is muted in Outputs it will be highlighted in red in Equalizer The generator output assignment wil...

Page 58: ...nel such as Left shown in Figure Figure 4 27 above 3 Below the channel selection click the Pink checkbox to assign Pink Noise to that channel 4 Next select the Center channel Pink Noise is automatically enabled for the Center channel and is now unchecked turned off for the Left channel 4 Software Description Document 9301E855001 0 4 17 ...

Page 59: ...XD10P Cinema Audio Processor Installation and Operation Version 1 0 4 Software Description Document 9301E855001 0 4 18 ...

Page 60: ...t 5 3 Signal Inputs o Projector Inputs 2 Voltage Sensitivity 5 mV RMS nominal Impedance 360 ohms Input level adjustment 23 9 to 11 9 dB 35 mV to 20 mV Adjustable High Frequency Slit Loss EQ 10 kHz to 32 kHz Mono EQ 3 kHz to 15 kHz o NON SYNC 1 Input Voltage Sensitivity 300 mV RMS nominal unbalanced Impedance 30k ohms Input level adjustment 23 9 to 11 9 dB in 0 1 dB steps 150 to 750 mV o NON SYNC 2...

Page 61: ...ion o Subwoofer Parametric adjustable from 25 Hz to 100 Hz SW level adjustment 0 to 12 dB o All other 27 1 3 octave bands from 40 Hz to 20 kHz o Level adjustment 6 6 dB o Bass and Treble adjustable 6 6 dB 5 7 Automation I O Automation Inputs DB25 and terminal strip o Active low momentary dry contact closures Automation common is connected to signal ground inside the XD10P through a 15 ohm resistor...

Page 62: ...fused universal power supply o 100 240 VAC 50 60 Hz 360 mA auto switching o Optional back up power supply connection available 5 9 Laptop Computer o RS232 serial port o Windows 98SE Windows 2000 or Windows XP o 800x600 display o 4 MB or more disk space 5 Specifications Document 9301E855001 0 5 3 ...

Page 63: ...XD10P Cinema Audio Processor Installation and Operation Version 1 0 5 Specifications Document 9301E855001 0 5 4 ...

Page 64: ...VED 1 2 3 4 5 6 7 8 9 DB9F Description 1 Reserved 2 Transmit Data TXD 3 Receive Data RXD 4 Reserved 5 Signal Ground 6 Reserved 7 Clear To Send CTS 8 Request To Send RTS 9 Reserved MIC INPUT MIC MIC RESERVED RESERVED CHASSIS GND N C 9V DC ANALOG GND N C 1 2 3 4 5 6 7 8 9 DB9F Description 1 Mic 2 Mic 3 Reserved 4 Reserved 5 Chassis Ground 6 N C 7 9VDC 8 Analog Ground 9 N C Appendix A Connector Pinou...

Page 65: ...s Ls CHASSIS GND N C R RC CHASSIS GND C LC CHASSIS GND L DB25M Description 1 Chassis Ground 2 L 3 Lc 4 Chassis Ground 5 C 6 Rc 7 Chassis Ground 8 R 9 Chassis Ground 10 Ls 11 Rs 12 Sw 13 Chassis Ground 14 L 15 Chassis Ground 16 Lc 17 C 18 Chassis Ground 19 Rc 20 R 21 N C 22 Chassis Ground 23 Ls 24 Rs 25 Sw Note The Monitor Output connector is pin compatible with THX type systems Appendix A Connecto...

Page 66: ...2 Digital LED 20 NON SYNC 1 LED 21 Mic LED 22 Remote Fader LED Reserved 23 Mute LED 24 Reserved 25 Change Over C O 1 2 3 4 5 14 15 16 1 7 6 7 8 9 10 19 20 21 22 11 12 13 24 25 2 3 1 8 MONO PULSE STEREO PULSE S TEREO SR PULSE NONSYN C 2 PULSE EX T 1 A NALOG PULSE E XT 2 DIGITAL PULSE NONSYN C 1 PULSE MIC PULSE REMOTE FADER ON RESERVED MUTE PULSE RESE RVED A UTOMATION RE TURN 5V DC MONO LED STEREO L...

Page 67: ... Analog Ground 12 Analog Ground 13 Analog Ground 14 L 15 Ls 16 Rc 17 R 18 Lc 19 Analog Ground 20 C 21 N C 22 Analog Ground 23 Analog Ground 24 Sw 25 N C 1 2 3 4 5 14 15 16 17 6 7 8 9 10 19 20 21 22 11 12 1 3 24 25 23 18 ANALOG GND Rs ANALOG GND ANALOG GND ANALOG GND ANALOG GND ANALOG GND ANALOG GND ANALOG GND ANALOG GND ANALOG GND ANALOG GND ANALOG GND L Ls Rc R Lc ANALOG GND C N C ANALOG GND ANAL...

Page 68: ... LS RS RETURN LC RC CHASSIS GND N C N C CHASSIS GND N C N C B25F Name Description 1 CH1 2_ret L R Return 2 CH1 2 L R 3 CH3 4 C SW 4 CH3 4_ret C Sw Return 5 CH5 6 LS RS 6 CH7 8 LC RC 7 CH7 8_ret LC RC Return 8 N C 9 Chassis Ground 10 N C 11 N C 12 Chassis Ground 13 N C 14 CH1 2 L R 15 Chassis Ground 16 CH3 4 C SW 17 CH5 6 LS RS 18 CH5 6_ret LS RS Return 19 CH7 8 LC RC 20 Chassis Ground 21 N C 22 N ...

Page 69: ...iption 1 P2 Left 2 P2 Left 3 Chassis Gnd 4 P2 Right 5 P2 Right 6 Analog Ground 7 N C 8 N C 8 Analog Ground OPTICAL IN 1 P1 LEFT P1 LEFT CHASSIS GND P1 RIGHT P1 RIGHT ANALOG GND N C N C ANALOG GND 1 2 3 4 5 6 7 8 9 DB9F Description 1 P1 Left 2 P1 Left 3 Chassis Gnd 4 P1 Right 5 P1 Right 6 Analog Ground 7 N C 8 N C 8 Analog Ground Appendix A Connector Pinouts Document 9301E855001 0 A 6 ...

Page 70: ...D10P Interface Diagram F205 A XD10P Logic Hearing Impaired External Inputs F206 A XD10 Digital Audio OUT to XD10P Digital Audio IN F207 0 XD10P Optical Nonsync Mic Inputs F208 0 XD10P Analog Audio Outputs Phoenix Connector F209 0 XD10P Monitor Output to Monitor Crossover System F210 0 XD10 Analog 6 8 Track OUT to XD10P Analog IN F237 0 DTS 6 to XD10P Interface Diagram E901 0 Cable Assembly XD10 An...

Page 71: ...XD10P Cinema Audio Processor Installation and Operation Version 1 0 Appendix B Diagrams Document 9301E855001 0 B 2 ...

Page 72: ... PROJECTOR 2 DOUSER FORCE A TYPE FORCE SR P LEFT SURROUND RIGHT CENTER SUBW RIGHT LEFT CENTER SUBW CENTER FUTURE S MONO SURROUND FUTURE SUBWOOF INPUT 5V GND LOGIC A TYPE 04 SUBWOOF OUTPUT LOGIC MONO 01 LOGIC DTS 1 1 2 2 3 13 3 4 5 6 7 8 9 10 11 12 13 14 14 15 15 16 16 17 18 17 19 23 25 18 19 20 20 21 21 22 22 23 24 24 25 FUNCTION FUNCTION PIN PIN DTS 6D AUTOMATION CONNECTOR ANALOG OUT 9 10 11 12 1...

Page 73: ...ER ON MUTE PULSE RESERVED AUTOMATION RETURN 5V DC MONO LED STEREO LED STEREO SR LED NONSYNC 2 LED EXT 1 ANALOG LED EXT 2 DIGITAL LED NONSYNC 1 LED MIC LED REMOTE FADER LED RESERVED MUTE LED RESERVED CHANGE OVER C O RESERVED TRANSMIT DATA TXD RECEIVE DATA RXD RESERVED SIGNAL GND RESERVED CLEAR TO SEND CTS REQUEST TO SEND RTS RESERVED 1 2 3 4 5 6 7 8 9 PROJECTOR CHANGEOVER RELAY PROJECTOR CHANGEOVER...

Page 74: ...S COMMON TO PROGRAM THE XD10 AUTOMATION CONNECTOR CHOOSE THE XD10P DIGITAL AUTOMATION PRESET VIA THE FOLLOWING MENU SEQUENCE MAIN MENU SYSTEM SETUP MENU AUTOMATION CONTROL FORMAT AUTOMATION FORMAT PIN DEFS AUTOMATION PRESET SETUP AUTOMATION SETUP FORMAT PIN DEFINITIONS PREDEFINED FORMATS XD10P DIGITAL ENTER ENTER ENTER ENTER ENTER ENTER DTS P N 2503001700 DB25 M M TO TIMECODE READER HEAD DTS P N 2...

Page 75: ... ANALOG GND N C N C ANALOG GND 1 2 3 4 5 6 7 8 9 P2 LEFT P2 LEFT CHASSIS GND P2 RIGHT P2 RIGHT ANALOG GND N C N C ANALOG GND 1 2 3 4 5 6 7 8 9 RIGHT LEFT PROJECTOR 1 PROJECTOR 2 SOLAR CELL IN PROJECTOR 1 SOLAR CELL IN PROJECTOR 2 R R GRN GRN L L BLK BLK RED RED FROM PROJECTOR 1 FROM PROJECTOR 2 RIGHT RIGHT LEFT LEFT 300mV NONSYNC XD10P OPTICAL NONSYNC MIC INPUTS F207 DRAWING NO REV TITLE ...

Page 76: ... DTS is a registered trademark of Digital Theater Systems Inc XD10P ANALOG AUDIO PHOENIX CONNECTORS DRAWING NO REV 7 7 F208 UNBALANCED COM ...

Page 77: ...IS GND LC L CHASSIS GND Sw Rs Ls CHASSIS GND N C R RC CHASSIS GND C LC CHASSIS GND L CINEMA PROCESSOR INPUT NOTE SINGLE SCREEN CHANNEL SHOWN AS EXAMPLE WIRE ALL SCREEN CHANNELS IN ACCORDANCE WITH THE MONITOR CROSSOVER MANUFACTURER S INSTRUCTIONS NOTE SINGLE SURROUND CHANNEL SHOWN AS EXAMPLE WIRE BOTH SURROUND CHANNELS IN ACCORDANCE WITH THE MONITOR CROSSOVER MANUFACTURER S INSTRUCTIONS HF AMP LF A...

Page 78: ...0 12 21 13 23 14 25 24 22 25 FUNCTION FUNCTION PIN PIN PRESET 6D EMULATION MONO A TYPE SR DTS NON SYNC DTS COMMON TO PROGRAM THE XD10 AUTOMATION CONNECTOR CHOOSE THE DTS XD10P ANALOG AUTOMATION PRESET VIA THE FOLLOWING MENU SEQUENCE MAIN MENU SYSTEM SETUP MENU AUTOMATION CONTROL FORMAT AUTOMATION FORMAT PIN DEFS AUTOMATION PRESET SETUP AUTOMATION SETUP FORMAT PIN DEFINITIONS PREDEFINED FORMATS XD1...

Page 79: ...N RETURN 5V DC MONO LED STEREO LED STEREO SR LED NONSYNC 2 LED EXT 1 ANALOG LED EXT 2 DIGITAL LED NONSYNC 1 LED MIC LED MUTE LED RESERVED CHANGE OVER C O 1 2 3 4 5 6 7 8 9 10 11 12 13 14 15 16 17 18 19 20 21 22 23 24 25 FUNCTION PIN XD10P AUTOMATION CONNECTOR CENTER DTS 6 TO XD10P INTERFACE DIAGRAM F237 DRAWING NO REV TITLE BS22 BS 22 JM 21 JM 21 JM 11 W5 MUST BE JUMPERED PASS THROUGH CONNECTOR PL...

Page 80: ......

Page 81: ...udio Processor 9311E92200V1 0 Software Disc XD10P System E922 V1 0 2202160A02 Power supply plug in adapter 230 VAC in 16 VAC out 500mA 50Hz A41160500A0X0G Ault 9003E95000 Hardware kit XD10P Connectors E950 9301E855001 0 Manual XD10P Installation and Operation this manual 5108004500A Input Module PCA 5108004600C Output Module PCA 5108004700A Control Module PCA 9020E93900A Memory Module 2800005004 F...

Page 82: ...XD10P Cinema Audio Processor Installation and Operation Version 1 0 Appendix C System Parts List Document 9301E855001 0 C 2 ...

Page 83: ...d slowly increase o Verify projector exciter lamp is on and that the lamp power supply is operating Solar cell connections may be loose or damaged o Verify settings of Bypass pots one per projector See Section 3 7 2 Bypass Level B Chain Calibration page 3 11 o Verify power amps are on Noise distortion and other sound anomalies Distortion o Verify that the power supply LED indicators on the XD10P f...

Page 84: ...platter reel alignment adjustments including balance of intake versus output Check the projector motor belts Channels are missing or channels do not sound balanced o Are all power amps on Are their volume controls turned up o Switch unit to BYPASS and wait until there is time to troubleshoot o Using the XD10P setup software on a PC use internal pink noise generator to verify output settings for al...

Page 85: ...rd to the new board Remove memory module from old card Insert memory module into new card Figure D 1 Move memory module 4 On the new board set the write protect switch to OFF to the right 5 Load the memory module into the new board by pressing down and holding the RESTORE button while powering on the XD10P Continue to hold down the RESTORE button until the front panel LEDs and level indicator full...

Page 86: ... 1 0 Appendix D Troubleshooting Document 9301E855001 0 D 4 Figure D 2 Control card shown not powered Contact DTS Technical Support See page vii near the front of this manual Write protect switch ON is left LED will light when write protect switch is ON RESET switch ...

Page 87: ... replace them Excessive side to side weave will cause severe problems for the stereo circuitry and must be corrected prior to installation 2 If the exciter lamp is old or blackened inside replace it Make sure the lamp is operating at a voltage greater than 60 of its rating refer to the manufacturer s instructions 3 For stereo installations remove the mono solar cell and place a white card about an...

Page 88: ...st fills the cell width but does NOT spill over Figure E 2 Stereo Solar Cell mounting position 2 Install the audio line from the cell to the XD10P a Use Belden Nº 8404 or equivalent four conductor twin shielded cable or a pair of two conductor shielded cables such as Belden Nº 8451 A single two conductor or three conductor shielded cable is not recommended This cable is not supplied by DTS b Conne...

Page 89: ... such as CE prohibit using the drain conductor for this purpose In that case use two three conductor shielded cables such as Belden Nº 9939 three pair cable such as Belden Nº 8777 or a five or six conductor shielded cable such as Belden Nº 9941 or 9942 4 If there are two projectors the changeover is accomplished by grounding the C O terminal on the rear of the XD10P a Connect a latching relay with...

Page 90: ...and equal signal on left and right Figure E 4 Cell alignment on oscilloscope Correct cell alignment display on oscilloscope E 1 2 Cross talk Alignment Run the 1 kHz Cross Talk Cell Alignment film Observe the scope The objective is to obtain a reading like that shown in Figure E 5 If adjustment is necessary move the lens or move the pickup back and forth to achieve balance Figure E 5 Crosstalk is m...

Page 91: ... E 7 The example shown may not be typical of your results Try to obtain the best response possible Final HF adjustment is done using the XD10P Setup software See chapter 3 page 3 4 Slit EQ Adjustment Figure E 7 Slit EQ analyzer screen typical The pattern will either turn up or down on the right hand side You want to achieve a pattern that is as flat as possible while keeping the good azimuth patte...

Page 92: ...XD10P Cinema Audio Processor Installation and Operation Version 1 0 Appendix E Mechanical Projector Alignment Document 9301E855001 0 E 6 ...

Page 93: ...___________________________________ THEATRE CONTACT Name ________________________________________ Telephone ____________________________________ LOCAL TECH Name ________________________________________ Telephone ____________________________________ DTS XD10P SERIAL ______________________________________________ Date of Purchase _______________________________ PROJECTOR TYPE _______________________...

Page 94: ...____________ Theatre ____________________________ Address ____________________________ Address ___________________________ ___________________________________ ___________________________________ Contact ____________________________ Contact ____________________________ Phone _____________________________ Phone _____________________________ FOR DTS EQUIPPED THEATRES 4 inch mini marquee Qty _________...

Reviews: