


Version 4/5/6/7
DTDAUTO VIETNAM Co., Ltd – EDITED 29/10/2020
www.dtdauto.com
67
3.15.2 Adjust ODOMETER
3.15.2.1 Adjust Odometer
This function used to adjust ODO value on LCD screen when you replace a
new dashboard or odometer is faulty that you need edit new ODO value
equivalent with old ODO value to follow motorcycle using time and
maintenance time.
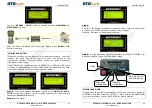
Step 1:
Select “
CONNECT TO VEHICLE
” menu on MOTOSCAN screen and
then press “
Select/ OK
” button, the screen displays list of motorcycle
manufacturers:
Step 2:
Select manufacturer
(Example: HONDA)
then
press “
Select/ OK
”
button. The
screen displays connection guide to motorcycle.
You could ignore this report then press “
Select/ OK
” button to continue
because at ODO adjusting function you need not connect MOTOBOX to
motorbike that connect to EEPROM.
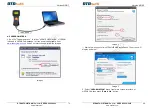
Step 3:
Select market of HONDA manufacturer
(Example: LEAD 125 Viet
Nam, You select
“VIET NAM”
menu)
then press
“Select/ OK
” button.
Step 4:
Screen display list of motorcycle models. Select model to adjust.
Version 4/5/6/7
DTDAUTO VIETNAM Co., Ltd – EDITED 29/10/2020
www.dtdauto.com
68
(Example: LEAD 125)
then press
“Select/ OK”
button
NOTE:
You must choose right motorcycle model. If you select wrong model when
you load data, data inside EEPROM will be wrong and is the cause of failed
software inside odometer.
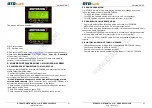
Step 5:
The screen displays function table. Press
“Shift Down”
button to
select “
ODO CORRECTION”
function then press “
Select/ OK
” button.
Step 6:
The screen display as below:
Use
“
ET0006 – LINK
” cable
to connect between
MOTOBOX
and
MOTOSCAN
then press
“Select/ OK”
to continue.