


English
I NS TAL LAT ION M ANUA L
6. Wireless remote control
The appliance is supplied with a wireless remote control.
Controlling the flame height, igniting and switching off take place through a remote control controlling a
receiver.
Chapter 4, Wireless remote control, in the User Manual describes the operation of the appliance and how you
should use the remote control.
!Caution
Do not ignite the appliance before the gas and discharge connections have been fully installed, first observe the
procedure described in chapter 7.3;
Below, we will describe how the receiver is connected.
6.1 Connecting the receiver
Your appliance is equipped with an electronic ignition through the remote control.
The receiver should be connected to the appliance, before the batteries are installed.
Ø
Connect the receiver according to Appendix 3, fig. 12.
Ø
Bend the antenna (N) out of the clips and place it erect (Appendix 3, fig. 13).
!Tip
-
The plugs have different sizes that correspond with the connectors.
-
The size of the eye corresponds with the size of the screw;
-
The colours of eye and screw correspond as well.
-
Place the batteries as described below in section 6.1.1.
!Caution
-
Do not place the ignition cable over and/or along metal, stone or concrete parts: this will weaken the spark.
Make sure the cable is hanging freely.
-
Make sure that the wires of thermocouple 2 cannot come into contact with hot parts.
-
Keep the ignition cable at least 10 cm away from the antenna, in order to avoid damaging the receiver.
-
Avoid formation of dust on or in the receiver: cover it when performing work.
-
Place the receiver in its intended holder under the appliance or in the control hatch according to
Appendix 3, fig. 14.
-
If you want to use an adapter, only an adapter supplied by DRU will guarantee a proper operation of the
receiver.
6.1.1 Placing / replacing the receiver's batteries
Follow the procedure below when placing the batteries:
Ø
Pick up the receiver and slide off the cover.
Ø
Place or remove the 4 penlite (AA type) batteries.
!Caution
-
Observe the "+" and "-" poles of the batteries and the receiver;
-
Use alkaline batteries; rechargable batteries are not allowed.
-
Batteries are regarded as "small chemical waste" and may therefore not be disposed with the household
rubbish.
Ø
Slide back the cover.
Ø
Place back the receiver.
6.2 Setting the communication code
Prior to putting the application into operation, a communication code must be set between the remote control
and the receiver. If the receiver or the remote control are replaced, a new code will have to be set.
Follow the procedure described below:
Ø
If necessary, place the batteries in the receiver's battery holder; see section 6.1.1.
Ø
If necessary, place the 9V block battery in the remote controle; see User Manual, section 1.1.
Ø
Hold down the reset button on the receiver, until you hear two consecutive sound signals
(see Appendix 3, fig. 15).
Ø
After the second, longer signal, let go of the reset button.
Ø
Press the 'small flame' button on the remote control for 20 seconds, until you hear two short sound signals: this
is the confirmation of a good communication.
UK
Summary of Contents for G20
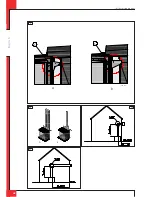
Page 28: ...E n g l i s h INSTALLATION MANUAL UK A C B C 38c 1461 A B 38c 1 462 3a 2 3b 3c ...
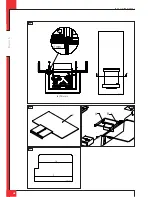
Page 32: ...E n g l i s h INSTALLATION MANUAL UK E 38p 0029 A B C D A 38p 0030 B 38p 0031 10a 10b 10c ...
Page 33: ...E n g l i s h INSTALLATION MANUAL UK C 38p 0032 D 38p 0033 E 38p 0034 10d 10e 10f ...
Page 34: ...E n g l i s h INSTALLATION MANUAL UK 38p 0035 38p 0062 10g 10h ...
Page 37: ...E n g l i s h INSTALLATION MANUAL UK 38p 0181 5mV 38p 0182 20mm 25mm 38c 1471 1 16 17 18 ...
Page 38: ...E n g l i s h INSTALLATION MANUAL UK ...