background image

Drobo5N2 User Guide 

160 

1.8.6


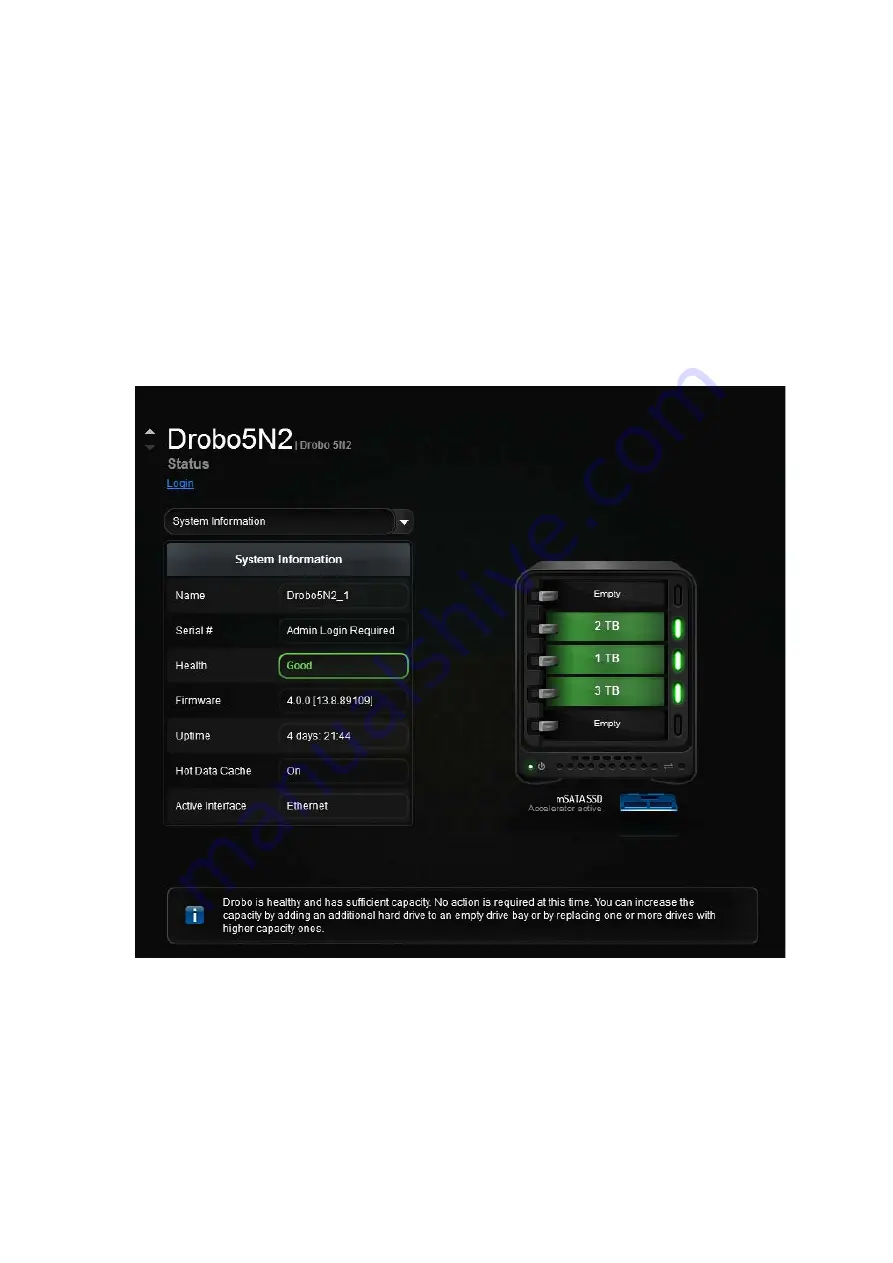
Checking System Information 

The System Information view of the 

Status

 page in Drobo Dashboard provides information such as 

the serial number, firmware version and health of the Drobo 5N2. If you use SSDs, their positions are 
identified in the image of the Drobo 5N2. 

1.


In Drobo Dashboard on the 

All Drobos 

page, select the appropriate Drobo device. 

2.


Click the 

Status

 option on the 

Navigation

 menu, and be sure that 

System Information

 is 

selected from the drop-down list. 
 
The 

Status

 page opens. 


Information you can view on this page includes: 


Name -

 The name of the selected Drobo 5N2. 


Serial -

 The serial number for the selected Drobo 5N2. 


Health - The health of the selected Drobo device. It displays as Good (in green) when healthy or 

Warning (in orange) when you need to add capacity. 

Summary of Contents for 5N2

Page 1: ...Drobo 5N2 User Guide...

Page 2: ...1 2 1 Overview of First Time Setup 22 1 2 2 Downloading and Installing Drobo Dashboard 24 1 2 2 1 Installing Drobo Dashboard on Windows 25 1 2 2 2 Installing Drobo Dashboard on Mac 30 1 2 3 Connectin...

Page 3: ...ty 100 1 4 10 Enabling or Disabling the System Tray 101 1 5 Modifying Device Settings for Your Drobo 5N2 102 1 5 1 Managing Auto Discovery of Drobo 5N2 103 1 5 1 1 Adding a Drobo 5N2 by Its IP Address...

Page 4: ...8 1 1 Viewing the Capacity Chart 149 1 8 1 2 Viewing Storage Usage 151 1 8 2 Checking the Status of Your Drobo 5N2 153 1 8 3 Checking Your Drobo 5N2 s Serial Number 155 1 8 4 Checking Your Drobo 5N2 s...

Page 5: ...2 4 Starting a DroboDR Manually 191 1 9 2 5 Stopping a DroboDR in Progress 193 1 9 2 6 Viewing the Summary Log of Synchronizations 194 1 9 2 7 Saving a Detailed Log of Synchronizations to View 196 1...

Page 6: ...ser Guide Congratulations on your new Drobo This Getting Started section will help you set up your Drobo 5N2 and run it in just a few steps Related topics Before You Begin Setting Up Your Drobo 5N2 in...

Page 7: ...you begin setting up your Drobo 5N2 it s a good idea to check the system and hardware requirements This section covers the following topics Product Features at a Glance Checking Box Contents Checking...

Page 8: ...robo5N2 User Guide 8 1 1 1 Product Features at a Glance For a quick overview of features of the Drobo 5N2 refer to the following images Figure 1 Front of the Drobo 5N2 with the bezel faceplate removed...

Page 9: ...Drobo5N2 User Guide 9 Figure 2 Back of the Drobo 5N2 Related topic Before You Begin...

Page 10: ...Box Contents When you open the product s box you will find the components listed below Drobo 5N2 Two 6ft 1 8m Ethernet cable 6ft 1 8m power cord with power supply Quick Start Card Safety and Warranty...

Page 11: ...hecking System Requirements Check to ensure your operating system and cable interface are supported with the Drobo 5N2 Related topics Operating Systems Supported Connectivity Interfaces Supported for...

Page 12: ...stems Supported For the most current list of supported operating systems check the specifications for your products online at www drobo com products index php Related topics Connectivity Interfaces Su...

Page 13: ...or switch using an Ethernet port Ethernet is the standard local area network LAN access method Gigabit Ethernet Port Drobo 5N2 supports dual gigabit Ethernet connections 1000 Mbit s for optimal perfo...

Page 14: ...wo hard drives If you plan to use Dual Disk Redundancy which protects your data against two hard drive failures you will need at least three hard drives Related topics Selecting Drives Determining Dri...

Page 15: ...capacity and accelerated performance out of your Drobo device Note Make sure that you are not using SandForce SSD s or mSATA Using only SSDs in the main drive bays of your Drobo 5N2 provides the faste...

Page 16: ...con displays in Drobo Dashboard the software companion to your Drobo device The Drobo 5N2 is not compatible with IDE SCSI PATA or SAS drives The Drobo 5N2 supports migrating entire disk packs from a D...

Page 17: ...Drobo5N2 User Guide 17 Related topics Determining Drive Space Requirements Checking the Hardware You Need Before You Begin...

Page 18: ...pacity available for your data is to omit the largest drive and then add the capacity of the remaining drives If you plan to use Dual Disk Redundancy omit the largest two drives For example Single Dis...

Page 19: ...one of your computer s Ethernet ports for the initial setup Tip To check for DHCP support refer to the documentation for your router or switch You may also choose to proceed with installation and chec...

Page 20: ...nd using the following power protection with your Drobo device An uninterruptible power supply UPS which protects against sudden losses in power A power surge protector to protect against power surges...

Page 21: ...g Cables and Powering on Your Drobo 5N2 4 Inserting Drives 5 Setting Administrator Username and Password 6 Understanding the Indicator Lights 7 Migrating a Disk Pack from Another Drobo Device 8 Using...

Page 22: ...of Drobo Dashboard If you are an existing Drobo user and have a Drobo Dashboard version earlier than 2 7 0 installed then you must follow these instructions to uninstall Drobo Dashboard prior to inst...

Page 23: ...on your computer and not via an ethernet switch In this scenario be sure that your computer is set to get its IP address on that Ethernet port via DHCP If Drobo Dashboard will still not detect your D...

Page 24: ...rmware updates for Drobo 5N2 can be downloaded and installed from Start Drobo 5N2 page This section covers the following topics Installing Drobo Dashboard on Windows Installing Drobo Dashboard on Mac...

Page 25: ...5N2 page and download the Drobo Dashboard installation file for Windows 2 After downloading double click the Drobo Dashboard Installer to launch it 3 A pop up will appear asking you to choose the lan...

Page 26: ...ed 6 Follow the instructions of the Installation Wizard by clicking the Next button after each page 7 Once you reach the installation page click the Install button 8 In some Windows operating systems...

Page 27: ...t the Launch Drobo Dashboard checkbox is selected and then click the Finish button 10 The Drobo Dashboard application launches and you will be prompted to register your Drobo 5N2 You can either regist...

Page 28: ...Drobo5N2 User Guide 28 11 Click the Next button to view the All Drobos page After a few seconds Drobo discovers all Drobo devices currently connected and displays them on this page...

Page 29: ...ted to the computer or powered on a No Drobos Detected message displays until you do 13 Your Drobo 5N2 will not work until you update the firmware For information on updating the firmware to the lates...

Page 30: ...download the Drobo Dashboard installation file for Mac 2 After downloading double click the Drobo Dashboard Installer to launch it 3 A pop up will appear asking whether to open the Installer Click Ope...

Page 31: ...uide 31 6 Next the Installation Wizard page appears Click Continue to proceed 7 The Software License Agreement page appears From here you can choose the language in which you want to proceed the insta...

Page 32: ...desired language Click the Continue button 9 A dialog box will appear asking you to Agree or Disagree the terms of the license agreement Click Agree to proceed 10 You will reach the Installation Type...

Page 33: ...will be prompted to enter the administrator password Enter the password and click Install Software 12 Then you will be prompted to restart your computer in order to complete the installation Click Con...

Page 34: ...Guide 34 13 When the installation completes you will see the following screen to restart the computer to finish the installation Click Restart 14 Once the computer restarts launch the Drobo Dashboard...

Page 35: ...ly connected and displays them on this page Note After the Drobo Dashboard launches you may be asked if Drobo can collect anonymous information on your usage Click Yes or No as desired 17 If you have...

Page 36: ...nnected to your network After initial setup you can set a static IP address if desired For more information see Configuring Network Settings for Your Drobo 5N2 After you connect your Drobo device to y...

Page 37: ...you attach one end of the power cord to your Drobo 5N2 and the other end of the cord to a power source turn on the Drobo using the power switch located on the back of the device 2 With Drobo Dashboar...

Page 38: ...Dashboard automatically assigns Drobo as the default name for your Drobo device which you can rename later A drive bay indicator light displays green for each hard drive on your Drobo device For deta...

Page 39: ...t or pack To access the data on them you will need the entire pack The Drobo 5N2 supports migrating entire disk packs from a Drobo5N 16TB volume Drobo5N 64TB volume and DroboFS 16TB volume preserving...

Page 40: ...tible drive options http www drobo com storage products choose drive 6 Insert additional drives in the same manner following steps 2 through 4 7 When finished replace the bezel right side up so that w...

Page 41: ...to password protect this Drobo The Admin Settings page opens 3 In the Username text box enter a username for the administrator Admin is the default 4 In the Password text box enter the appropriate adm...

Page 42: ...Drobo5N2 User Guide 42 Next in the Setup for Your Drobo 5N2 Where to Go Next Return to Setting Up Your Drobo 5N2...

Page 43: ...Blinking Yellow and Green Do not remove these drives or power down Your Drobo device is working to protect your data Solid Red Add a drive or replace the current drive with a larger drive immediately...

Page 44: ...restart Activity Light Blinking Green Data is actively being transferred between your computer and your Drobo device Do not remove or add drives during this process Capacity Gauge Blue Displays the p...

Page 45: ...obo Products Warning Do not migrate drives when either of the Drobo device is powered on This can result in data loss To ensure a safe and successful migration carefully follow the steps shown below 1...

Page 46: ...B volume or DroboFS 16TB volume and insert ALL drives into the Drobo 5N2 3 Turn the Drobo 5N2 back on by pressing its Power Toggle button The Drobo 5N2 may take a few minutes to boot up When finished...

Page 47: ...will appear as a new disk separate from your main Drobo volume Having this dedicated fixed size backup will prevent backup software from filling your main Drobo volume with daily backups Follow the s...

Page 48: ...Drobo5N2 User Guide 48 5 Click on the Share Settings button The Share Settings page will appear as shown in the figure...

Page 49: ...Drobo5N2 User Guide 49 6 Click on the Add button The Add Share dialog box appears Enter the name of your backup in the Share Name text box...

Page 50: ...n length and should not contain reserved characters or spaces 7 Select the Enable Time Machine Support on this share checkbox and enter the backup size GB and click OK 8 The backup you just created ge...

Page 51: ...a user to which you would like to assign or modify access rights to the selected backup For more information see Assigning Users Access Rights to a Share 10 Click OK after assigning the rights The Sh...

Page 52: ...Drobo5N2 User Guide 52 11 To finish the process open the settings of your backup software Time Machine and select the backup that you created as the destination and then click Use Disk...

Page 53: ...Drobo5N2 User Guide 53 Related topics Renaming Backup Deleting Backup...

Page 54: ...data onto it Next steps include the following Click on a topic below to learn more Using Best Practices for Data Protection Keeping Drobo Dashboard and Drobo 5N2 s Firmware Up to Date Using the Onlin...

Page 55: ...and other traumatic events can result in data loss So to know more specific guidelines on how to best protect your data please visit our Best Practices page For additional information for professional...

Page 56: ...ay have already done this during the initial setup This feature keeps both Drobo Dashboard and your product s firmware current You can also install updates from Start Drobo 5N2 page If you would like...

Page 57: ...ion on the Navigation menu to open the Tools page 3 In the Software Updates area of the Tools page click the Check for Updates option Note If needed ensure that you are logged in to this Drobo device...

Page 58: ...r Guide for your product available at the Drobo 5N2 page You can also access the user guide from the Drobo Dashboard by clicking the Help Support option on the Navigation menu This will lead to the He...

Page 59: ...hboard you will find the Help button Click this button to view the context sensitive help The Help window opens in your Internet browser providing information particular to the page from which you cli...

Page 60: ...the Online User Guide To access our knowledge base follow the steps below 1 In the Drobo Dashboard click the Help and Support option on the Navigation menu The Help and Support page opens 2 In the Ch...

Page 61: ...Drobo5N2 User Guide 61 Related topics Using the Online User Guide Using Context Sensitive Help Getting Support...

Page 62: ...e Internet to perform this action To register your Drobo 5N2 1 Open the Drobo Dashboard and from the All Drobos page click the Drobo device you need to register 2 Then click the Help and Support optio...

Page 63: ...step to log into your account If you already have a Drobo account select the Register new Drobo with my Drobo account option and then enter your Drobo username and password You can click the Forgot u...

Page 64: ...n 8 The next page shows with a check mark that your product has been registered Note You can choose to purchase a DroboCare license by clicking on that link 9 Repeat steps 5 and 6 to register addition...

Page 65: ...and Support option on the Navigation menu The Help and Support page opens and allows you to register your Drobo access the online user guide and knowledge base contact the Drobo support team and creat...

Page 66: ...Drobo5N2 User Guide 66 Related topics Using Online User Guide Using Context Sensitive Help Using Knowledge Base...

Page 67: ...the device Using Drobo Dashboard Logging On to a Drobo 5N2 Logging Out of a Drobo 5N2 Modifying the Administrator Username and Password Renaming Your Drobo 5N2 Safely Shutting Down Your 5N2 Restartin...

Page 68: ...robo Dashboard Drobo Dashboard is the software companion to your Drobo 5N2 enabling you to easily set up manage and use your Drobo device Related topics Installing Drobo Dashboard Keeping Your Softwar...

Page 69: ...software and firmware updates for Drobo 5N2 can be downloaded and installed from Start Drobo 5N2 page This section covers the following topics Installing Drobo Dashboard on Windows Installing Drobo Da...

Page 70: ...t 5N2 page and download the Drobo Dashboard installation file for Windows 2 After downloading double click the Drobo Dashboard Installer to launch it 3 A pop up will appear asking you to choose the la...

Page 71: ...ed 6 Follow the instructions of the Installation Wizard by clicking the Next button after each page 7 Once you reach the installation page click the Install button 8 In some Windows operating systems...

Page 72: ...t the Launch Drobo Dashboard checkbox is selected and then click the Finish button 10 The Drobo Dashboard application launches and you will be prompted to register your Drobo 5N2 You can either regist...

Page 73: ...Drobo5N2 User Guide 73 11 Click the Next button to view the All Drobos page After a few seconds Drobo discovers all Drobo devices currently connected and displays them on this page...

Page 74: ...ted to the computer or powered on a No Drobos Detected message displays until you do 13 Your Drobo 5N2 will not work until you update the firmware For information on updating the firmware to the lates...

Page 75: ...download the Drobo Dashboard installation file for Mac 2 After downloading double click the Drobo Dashboard Installer to launch it 3 A pop up will appear asking whether to open the Installer Click Op...

Page 76: ...uide 76 6 Next the Installation Wizard page appears Click Continue to proceed 7 The Software License Agreement page appears From here you can choose the language in which you want to proceed the insta...

Page 77: ...desired language Click the Continue button 9 A dialog box will appear asking you to Agree or Disagree the terms of the license agreement Click Agree to proceed 10 You will reach the Installation Type...

Page 78: ...will be prompted to enter the administrator password Enter the password and click Install Software 12 Then you will be prompted to restart your computer in order to complete the installation Click Con...

Page 79: ...Guide 79 13 When the installation completes you will see the following screen to restart the computer to finish the installation Click Restart 14 Once the computer restarts launch the Drobo Dashboard...

Page 80: ...ly connected and displays them on this page Note After the Drobo Dashboard launches you may be asked if Drobo can collect anonymous information on your usage Click Yes or No as desired 17 If you have...

Page 81: ...may have already done this during the initial setup This feature keeps both Drobo Dashboard and your product s firmware current You can also install updates from Start Drobo 5N2 page If you would like...

Page 82: ...tion on the Navigation menu to open the Tools page 3 In the Software Updates area of the Tools page click the Check for Updates option Note If needed ensure that you are logged in to this Drobo device...

Page 83: ...m the All Drobos page Also if applicable log in to this Drobo device 4 Click the Tools option on the Navigation menu for the selected Drobo device to open the Tools page 5 In the Software Updates area...

Page 84: ...ected to your computer and or network The View buttons in the upper right corner of the page enable you to view your Drobo devices in one of the two following ways View by Icon This button provides a...

Page 85: ...ta is currently busy working to protect your data right now Flashing red indicates that one of the drives needs to be replaced immediately Yellow indicates the Drobo device is more than 85 full but le...

Page 86: ...Drobo applications Tools Opens the Tools page which provides access to special tools such as those to restart your Drobo device or check for software updates Drobo Settings Opens a sub menu with the o...

Page 87: ...on for other connected Drobo devices if applicable by clicking the up or down arrow key that displays to the left of the Drobo device name which is in the upper left corner of the page For example see...

Page 88: ...Login dialog page opens 4 In the Username text box enter the username for this Drobo device 5 In the Password text box enter the password for this Drobo device Note If you are the administrator and h...

Page 89: ...the Drobo device of which you would like to log out The Status page for that Drobo device opens 2 Click the Logout link 3 You are logged out of the Drobo device and the Logout link changes to a Login...

Page 90: ...e steps Note You may need to be logged in to perform this action 1 In Drobo Dashboard on the All Drobos page double click on the appropriate Drobo device The Status page for that Drobo device opens 2...

Page 91: ...essfully 7 Click the Yes button to close the message box and return to the Status page for your Drobo device 8 The new username is displayed in the status page The next time you need to log in to this...

Page 92: ...tings option on the Navigation menu and click Network The Network Settings page opens 3 In the Name text box modify the name for your Drobo device 4 In the Workgroup text box modify the name of your w...

Page 93: ...ata loss It is a good idea to shut down your Drobo device before any of the following situations You are not going to be using your Drobo device for an extended period You are going to disconnect the...

Page 94: ...nsferred the activity light will be blinking green 2 Also check to ensure the drive bay action indicator lights are not blinking alternately between yellow and green This indicates that your Drobo dev...

Page 95: ...opens asking you to confirm the shutdown Click the Yes button 6 It can take up to two minutes for your Drobo device to power down Afterwards the power light turns off indicating your Drobo device has...

Page 96: ...this action 1 In Drobo Dashboard on the All Drobos page select the Drobo device which you would like to restart and then click the Tools option from the Navigation menu The Tools page for that Drobo d...

Page 97: ...Drobo5N2 User Guide 97 4 Your Drobo device powers down and then restarts This may take a few minutes...

Page 98: ...he drives Note You need to be logged in to perform this action To reset your Drobo 5N2 1 In Drobo Dashboard on the All Drobos page select the Drobo device which you would like to reset and then click...

Page 99: ...et to its factory settings which can take a few minutes Once complete this Drobo device no longer displays in Drobo Dashboard 5 If the Drobo device remains powered on and connected to your host comput...

Page 100: ...logged in to perform this action To blink lights to test connectivity 1 In Drobo Dashboard on the All Drobos page select the Drobo device whose lights you would like to blink and then click the Tools...

Page 101: ...shboard Hide or show alerts for your Drobo device You can choose to disable the Drobo shortcut in the system tray and later enable it at any time 1 In Drobo Dashboard click the Dashboard Preferences o...

Page 102: ...topics to learn more Managing Auto Discovery of Drobo 5N2 Enabling or Disabling Dual Disk Redundancy Modifying the Disk Drive Spin Down Time Dimming the Lights on Your Drobo 5N2 Setting Your Drobo 5N2...

Page 103: ...default the auto discovery feature is enabled You can also add network connected Drobo devices to Drobo Dashboard by their IP addresses and manage them Related topics Enabling or Disabling Auto Discov...

Page 104: ...ot in the local subnet 1 In Drobo Dashboard click Dashboard Preferences on the Navigation menu to open the Dashboard Preferences page 2 In the Drobo Discovery area click the Drobo Discovery Settings l...

Page 105: ...Dashboard to see the added Drobo device on the All Drobos page Notes If you add the same IP address twice an error message displays An error message also displays if you add a Drobo device that has a...

Page 106: ...sabling it 1 In Drobo Dashboard click Dashboard Preferences on the Navigation menu to open the Dashboard Preferences page 2 In the Drobo Discovery area click the Drobo Discovery Settings link The Drob...

Page 107: ...the Dashboard Preferences page 2 In the Drobo Discovery area click the Drobo Discovery Settings link The Drobo Discovery page opens 3 In the Network Drobos NAS or SAN area of the Drobo Discovery page...

Page 108: ...Dashboard Preferences page 2 In the Drobo Discovery area click the Drobo Discovery Settings link The Drobo Discovery page opens 3 In the Manual Drobo Discovery area select the Drobo device you would...

Page 109: ...ual Disk Redundancy you need a minimum of three drives The option is not be available to you if you do not have a sufficient number of drives or capacity First you may need to add capacity Enabling du...

Page 110: ...if disabling 5 Click the Yes button in the dialog box to continue 6 In the General Settings page click the OK button 7 If you are enabling Dual Disk Redundancy an In Progress status bar may appear on...

Page 111: ...o be logged in as the administrator to change these settings When drives spin down the lights on the Drobo device dim When the drives spin back up again the lights fully illuminate To modify the disk...

Page 112: ...Drobo5N2 User Guide 112 Related topics Enabling or Disabling Dual Disk Redundancy Dimming the Lights on Your Drobo Device...

Page 113: ...on the All Drobos page select the appropriate Drobo device 2 Click the Drobo Settings option on the Navigation menu and click General The General Settings page opens 3 Click and drag to slide the poi...

Page 114: ...rk segments Network Interface Bonding Port Bonding The two network interfaces Ethernet can be configured as one in a port bonded mode for optimal performance For maximum protection each port can be co...

Page 115: ...s to support jumbo frames Note You need to be logged in as the administrator to change these settings To configure the network settings and IP address for your Drobo 5N2 1 In Drobo Dashboard on the Al...

Page 116: ...xt box Note If you choose to use jumbo frames ensure that the frame size you enter is supported by your computer and router or switch There needs to be end to end matching of MTU settings from the Dro...

Page 117: ...r jumbo frames 1 In Drobo Dashboard on the All Drobos page select the Drobo device for which you would like to modify MTU settings 2 Click the Drobo Settings option on the Navigation menu and click Ne...

Page 118: ...ialog box opens asking you to restart your Drobo to apply the changes 5 Click the Yes button Your Drobo device restarts with your new settings This may take a few minutes Related topic Configuring Net...

Page 119: ...dministrator To create and use shares as the administrator you do the following 1 Create one or more shares on your Drobo 5N2 2 Create the users to which you want to assign access rights to one or mor...

Page 120: ...e user Related topics See the following topics to know more about creating and using shares Creating Shares Creating Users Assigning Users Access Rights to a Share Mounting Shares Accessing Shares as...

Page 121: ...ministrative user per Drobo device To create a share 1 In Drobo Dashboard on the All Drobos page select the Drobo 5N2 on which you would like to create shares 2 Click the Shares option on the Navigati...

Page 122: ...Enable Time Machine support on this share check box and enter a value in gigabytes for the maximum size of the backup To learn more about Time Machine click on the appropriate link Note If you decide...

Page 123: ...that have already been created with access rights to your share s Otherwise if finished click the OK button on the Share Settings page to save your changes 11 Your settings are saved and the new shar...

Page 124: ...have created Users must use their passwords to access shares to which they have been given rights Guests any user who signs in to the Drobo 5N2 over the network as a guest Guests only have access to t...

Page 125: ...ssword for the user Note You need to be logged in as the administrator to create users There is only one administrative user per Drobo device 9 Click the OK button The new user displays in the list un...

Page 126: ...Drobo5N2 User Guide 126 Related topics Assigning Users Access Rights to a Share Deleting Users Creating and Using Shares...

Page 127: ...the Users view of the Share Settings page Notes If you are modifying access rights to a share the new access rights will not affect users currently accessing that share until the next time they connec...

Page 128: ...the selected share Click more than once to toggle through the following options Read Only access to the share Read Write access to the share No access to the share 7 Also note these special users Admi...

Page 129: ...d Everyone includes all users connected to the Drobo 5N2 over the network and can be given access to shares without password protection Guests any user who signs in to the Drobo 5N2 over the network a...

Page 130: ...the All Drobos page 3 Click the Shares option on the Navigation menu The Shares page appears displaying all the shares created on the selected Drobo 5N2 Note Some shares are only visible to the admini...

Page 131: ...p 7 Repeat step 3 for all shares you would like to mount Notes For Windows if you run out of drive letters you cannot mount anymore shares To unmount a share de select the check box in the Mount colum...

Page 132: ...his her computer 2 Have access to the Drobo 5N2 device over the network Note The user has immediate access to shares that have been given access to the Everyone user No password is required 3 For shar...

Page 133: ...or modify a user 1 In Drobo Dashboard on the All Drobos page select the appropriate Drobo 5N2 2 Click the Shares option on the Navigation menu The Share page opens 3 Click the Share Settings bottom T...

Page 134: ...Drobo5N2 User Guide 134 6 In the Username text box modify the user s name as desired...

Page 135: ...this password when logging into the Drobo 5N2 8 In the Confirm Password text box re type the password you modified if needed 9 Click the OK button You are returned to the Share Settings page 10 Click...

Page 136: ...oard on the All Drobos page select the appropriate Drobo 5N2 2 Click the Shares option on the Navigation menu The Share page opens 3 Click the Share Settings button The Share Settings page opens 4 Be...

Page 137: ...the All Drobos page select the appropriate Drobo 5N2 2 Click the Shares option on the Navigation menu The Share page opens 3 Click the Share Settings button The Share Settings page opens 4 Be sure the...

Page 138: ...Drobo5N2 User Guide 138 6 In the Share Name text box edit the text for the share name as desired and click the OK button You are returned to the Share Settings page with the share renamed...

Page 139: ...Drobo5N2 User Guide 139 7 Click the OK button on the Share Settings page to save your changes Your settings are saved and the Shares page opens...

Page 140: ...ption on the Navigation menu The Share page opens 3 Click the Share Settings button The Share Settings page opens 4 Be sure the Shares view displays by clicking the Shares View button in the upper rig...

Page 141: ...unt of space You may need to calculate how much capacity you need for your Drobo device in order to ensure your data is protected You may also be ready to add or remove capacity or install or remove a...

Page 142: ...the remaining drives If you plan to use Dual Disk Redundancy omit the largest two drives For example Single Disk Default Redundancy Dual Disk Redundancy Notes Actual capacity is often less than what i...

Page 143: ...acity you will need to replace two drives one at a time in order to increase the overall amount of protected capacity Replacing one drive will not increase your overall protected capacity in this situ...

Page 144: ...open the drive lock to an empty drive bay 7 Slide the drive into the drive bay release the drive lock and push the drive into place until you feel it connect 8 The drive lock will snap behind the dri...

Page 145: ...our Drobo device first safely shutdown your Drobo device and then unplug the power Data stored on drives removed from your Drobo device cannot be read by other systems 1 Ensure the drive lights on you...

Page 146: ...s from the drive bay Carefully remove it 5 Repeat step 4 to remove additional drives 6 Replace the bezel when finished Related topics Managing Capacity Adding Capacity Safely Shutting Down Your Drobo...

Page 147: ...or lights also provide important key information This section covers the following topics Checking Storage Usage Checking the Status of Your Drobo 5N2 Checking Your Drobo 5N2 s Serial Number Checking...

Page 148: ...h space is allocated for data storage and finally how much free space is available for additional data Viewing Storage Usage This page displays a capacity breakdown bar which provides more detailed in...

Page 149: ...you would like to view and click the Capacity option on the Navigation menu The Capacity page for that Drobo device opens 2 If the capacity chart is not currently displayed click the Capacity button...

Page 150: ...Drobo devices if applicable you can click the up or down arrow key that displays to the left of the Drobo device name which is in the upper left corner of the page See the arrows in the image below Re...

Page 151: ...usage you would like to view and click the Capacity option on the Navigation menu The Capacity page for that Drobo device opens 2 Click the Usage button The Storage Usage view of the Capacity page di...

Page 152: ...Drobo device to manage the hard drives and how your data is stored Tip To view this information for other connected Drobo devices if applicable you can click the up or down arrow key that displays to...

Page 153: ...he Status option on the Navigation menu The Status page opens From this screen you can view the status of different aspects of the Drobo 5N2 such as system information drive information and network in...

Page 154: ...used Note The information box at the bottom of the screen indicates if your Drobo device is healthy if you need to add capacity or if your Drobo device is currently working to protect your data and if...

Page 155: ...ial number on the Status page in Drobo Dashboard 1 In Drobo Dashboard on the All Drobos page select the appropriate Drobo device 2 Click the Status option on the Navigation menu The Status page opens...

Page 156: ...e in Drobo Dashboard 1 In Drobo Dashboard on the All Drobos page select the appropriate Drobo device 2 Click the Status option on the Navigation menu The Status page opens 3 Select System Information...

Page 157: ...Drobo5N2 User Guide 157 1 8 5 Checking Your Current Version of Drobo Dashboard This section covers the following topics Checking Current Version on Windows Checking Current Version on Mac...

Page 158: ...y Note To locate the Drobo icon you may need to enable your system tray 2 Right click on the icon and a shortcut menu will appear 3 Select About Drobo Dashboard from the shortcut menu 4 A message box...

Page 159: ...To locate the Drobo icon you may need to enable your system tray 2 Click on the icon and a shortcut menu will appear 3 Select About Drobo Dashboard from the shortcut menu 4 A message box opens display...

Page 160: ...Drobo Dashboard on the All Drobos page select the appropriate Drobo device 2 Click the Status option on the Navigation menu and be sure that System Information is selected from the drop down list The...

Page 161: ...dicates that you have all HDDs in the standard drive bays with an mSATA SSD present The mSATA SSD is used as a cache for hot data that is frequently read Active Interface The connectivity interface cu...

Page 162: ...tion from the Status Information drop down list 4 Select the disk drive whose information you need by clicking the associated drive bay in the image of the Drobo device You can view the following driv...

Page 163: ...dd capacity soon Critical red Indicates that the drive is full and you need to add capacity now Good green Indicates that the drive is healthy and no action is needed Note In addition if the drive is...

Page 164: ...k Information option from the Status Information drop down list The Network Information page appears You can view the following information on this page IP Address The IP address for your Drobo 5N2 on...

Page 165: ...Drobo5N2 User Guide 165 DNS Server 1 The address for the DNS Server 1 DNS Server 2 The address for the DNS Server 2 Related topic Checking Storage Usage and Device Status Information...

Page 166: ...Support page opens 2 Near the bottom of the screen select the appropriate Drobo device from the drop down list and then click the Get Diags button 3 In the Problem Description box type in a descripti...

Page 167: ...stics file has successfully uploaded to your desktop If you cannot generate a diagnostics file because your Drobo device does not mount see What should I do if my Drobo storage device will not mount R...

Page 168: ...Blinking Yellow and Green Do not remove these drives or power down Your Drobo device is working to protect your data Solid Red Add a drive or replace the current drive with a larger drive immediately...

Page 169: ...n restart Activity Light Blinking Green Data is actively being transferred between your computer and your Drobo device Do not remove or add drives during this process Capacity Gauge Blue Displays the...

Page 170: ...de 170 1 9 Using Additional Software and Functionality Drobo Dashboard provides additional functionality for added value Related topics Using On Screen and Email Alerts Using DroboDR to Replicate Data...

Page 171: ...es or critical situations that could arise with one or more of your Drobo devices such as the need to increase capacity You can also set on screen alerts You can set email or on screen alerts to one o...

Page 172: ...y Custom Email Server To configure the e mail alerts follow the steps given below 1 In Drobo Dashboard click the Dashboard Preferences option on the Navigation menu 2 Click the E mail Settings link in...

Page 173: ...ddress in the space provided at which you wish to receive the notifications and click the Send Verification Email button Note If you already have a key click the Skip button Then enter the code in the...

Page 174: ...erated you can reuse it the next time It is not possible to configure the Drobo Email Relay Server using the same email id if the validation code has already been sent to the email id recently Custom...

Page 175: ...From E mail Address text box enter an e mail address from which the alerts are sent 4 In the Mail Server text box enter the server from which to send the alerts This can be specified as a server name...

Page 176: ...is selected and then select one of the following options On all useful information All alerts related to the condition of your Drobo devices will be e mailed These are Drobo Notifications and can incl...

Page 177: ...to switch between either of the Mail Server configurations but it is not possible to de configure it However you can uncheck the Send email alerts checkbox in the Dashboard Preferences page to stop r...

Page 178: ...and then modify your selection of one of the following options as needed for the level of alerts you want On all useful information All alerts related to the condition of your Drobo devices will be em...

Page 179: ...otential data loss These are Critical Drobo Alerts which can include when your Drobo device cannot currently protect your data against drive failure when your Drobo device doesn t recognize one or mor...

Page 180: ...lert settings To disable email alerts follow these steps 1 From the Drobo Dashboard click the Dashboard Preferences option on the Navigation menu The Dashboard Preferences page opens 2 In the Drobo Da...

Page 181: ...modify your selection of one of the following options as needed for the level of alerts you want On all useful information All alerts related to the condition of your Drobo devices will be displayed o...

Page 182: ...bo devices that could lead to potential data loss These are Critical Drobo Alerts which can include when your Drobo device cannot currently protect your data against drive failure when your Drobo devi...

Page 183: ...To do so follow these steps 1 From the Drobo Dashboard click the Dashboard Preferences option on the Navigation menu The Dashboard Preferences page opens 2 In the Drobo Dashboard Onscreen Alerts area...

Page 184: ...robo 5N2 from the All Drobos page 2 Click the Device Settings option on the Navigation menu and click Alerts The Alert Settings page opens 3 Select the Enable Alerts from this device option button Not...

Page 185: ...a critical situation in the near future will be emailed These are Drobo Warnings which can include when you convert to Dual Disk Redundancy on your Drobo device for example On critical situations only...

Page 186: ...ct your data from disaster by ensuring that you always have an up to date copy of your data in another location Note DroboDR feature is currently available only in Drobo 5N2 and Drobo B810n To take ad...

Page 187: ...nation or target for data replication must have at least as much drive space available as the one to be used as the source The latest Drobo Dashboard application and firmware for the Drobo Device You...

Page 188: ...running VPN software to access each of the Drobo devices By default the external connection from Drobo device must be from Ethernet port 1 on the back of each of the Drobo devices Windows 7 http windo...

Page 189: ...this action 1 In Drobo Dashboard on the All Drobos page select the Drobo device that is designated as the source 2 Click the DroboDR option on the Navigation menu The DroboDR page opens 3 Click the Se...

Page 190: ...Drobo5N2 User Guide 190 Related topics Stopping a DroboDR in Progress Starting a DroboDR Manually Using DroboDR to Replicate Data...

Page 191: ...is disabled then it could be that this is the target system DroboDR is disabled or the disk pack is not viable To enable this Drobo device as the source again see Configuring the Source Drobo device T...

Page 192: ...s interrupted during a manual synchronization data replication will stop and you will need to repeat these steps to synchronize again Related topics Stopping a DroboDR in Progress Setting or Modifying...

Page 193: ...The DroboDR page opens 3 Click the Stop DroboDR Now button The synchronization stops and the button now reads Start DroboDR Now To view what happened during the synchronization see Viewing the Summary...

Page 194: ...Detailed Log for more information The Summary Log builds in a buffer after each synchronization When the buffer gets full old information gets overwritten by new information If you would like to save...

Page 195: ...Drobo5N2 User Guide 195 Related topics Saving a Detailed Log of Synchronizations to View Using DroboDR to Replicate Data...

Page 196: ...ction 1 In Drobo Dashboard on the All Drobos page select the Drobo device that is designated as the source 2 If needed log into this device with your administrator username and password 3 Click the Dr...

Page 197: ...d on the All Drobos page select the Drobo device that is designated as the source 2 Click the DroboDR option on the Navigation menu The DroboDR page opens 3 Click the Setup DroboDR button The Setup Dr...

Page 198: ...Drobo5N2 User Guide 198 Related topics Disabling DroboDR at the Target Using DroboDR to Replicate Data...

Page 199: ...logged in as the administrator on the appropriate Drobo device to perform this action 1 In Drobo Dashboard on the All Drobos page select the Drobo device that is designated as the target 2 Click the D...

Page 200: ...s in the dialog box become disabled grayed out Files on this Drobo device are no longer read only they are accessible after you have logged in using an administrator username and password 6 Click the...

Page 201: ...or details Note You need to be logged in as the administrator on the appropriate Drobo device to perform this action 1 In Drobo Dashboard on the All Drobos page select the Drobo device that you would...

Page 202: ...op of the screen and the Start DroboDR Now button is disabled It is disabled because you can only manage synchronization from the source Drobo device Note When a Drobo device is configured as the dest...

Page 203: ...See Setting Up Your Drobo device to Use DroboDR for details Note You need to be logged in as the administrator on the appropriate Drobo device to perform this action 1 In Drobo Dashboard on the All D...

Page 204: ...ith your administrator username and password for that device and then click the Settings option on the Navigation menu and click Network The IP address appears on this page Warning The source discover...

Page 205: ...o and their partners are supported and those developed by the user community are enabled in Drobo Dashboard but unsupported Drobo Apps are enabled on your Drobo device by default If they have been dis...

Page 206: ...ess to them or re enable them at a later time Note You need to be logged in as the administrator to perform this action 1 In Drobo Dashboard on the All Drobos page select the Drobo device 2 Click the...

Page 207: ...are enabled by default on your Drobo device If they have been disabled you must first enable Drobo Apps before you can have access to them in Drobo Dashboard You must be connected to the Internet to s...

Page 208: ...application that is running click the Start button or the Stop button If an update is available for an application an update warning icon displays To perform an update click the Update button Follow...

Page 209: ...they are available at the time For example if an application has not yet been installed it will not display an Uninstall button Also not all options are available for unsupported Drobo Apps Related to...

Page 210: ...before adding or removing an mSATA SSD It is important to ground yourself before installing the mSATA SSD in order to discharge static electricity To do so touch a grounded metal object just before in...

Page 211: ...Drobo5N2 User Guide 211 4 When finished close the Drobo Accelerator Bay door and return the Drobo 5N2 to its normal position Related topic Setting Up Your Drobo 5N2...

Page 212: ...ch a grounded metal object just before installation Warning Any pre existing data on the mSATA card will be erased If you wish to keep the data copy it to another drive or medium before using with you...

Page 213: ...n on your computer Your computer can be on or off 4 Connect the power supply to the power connection at the back of your Drobo device 5 Connect the other end of the power supply to a power source 6 Pr...

Reviews: