

Installation Instructions
®
24 Channel IR and RF Remote Control by Draper
Copyright ©2008 Draper Inc. Form IntelliFlex_IR_RF_Remote_Inst08 Printed in U.S.A.
®
Each 24 channel IR and RF transmitter works with every channel you can
have within the IntelliFlex family of motor controls. By “Selecting” a layout, you
will be confi guring a transmitter to output a selected range of channels.
To begin the process of “Selecting” which Transmitter layout, you fi rst need
to understand the button numbering system.
This numbering system simply assigns a number to specifi c buttons,
allowing us to press specifi c buttons in the necessary order to “Select” a
layout.
If you encounter any diffi culties programming your IntelliFlex IR or RF control, call
your dealer or Draper, Inc., Spiceland, Ind., (765) 987-7999 or fax (765) 987-7142.
To select a layout for 24-channel transmitter layout, follow these steps:
Button
Press
LED
NOTE
➀
Press and HOLD
ON Solid
both buttons 6 & 7
➁
Continue holding buttons
OFF
LED will not fl ash until BOTH
6 & 7 until LED goes OFF
buttons are released in step 3
➂
Release both
Flashing
You have 4 seconds
buttons 6 & 7
rapidly
to complete step 4
➃
Press and release
Flashes the layout
Complete
the “Layout” button
you have just selected
you wish the Keypad
to become (see charts for
selectable
layouts)
To change the “Radio” address of a 24-channel transmitter, follow these
steps:
Button
Press
LED
NOTE
➀
Press and HOLD both
ON Solid
buttons 6 & 7
➁
Continue holding buttons
OFF
LED will not fl ash until BOTH
6 & 7 until LED goes OFF
buttons are released in step 3
➂
Release both
Flashing
You have 4 seconds
buttons 6 & 7
rapidly
to complete step 4
➃
Press and release
LED does one quick
Complete
button
6
fl ash and goes off
ALL
OPEN CLOSE
OPEN CLOSE
STOP
1
2
3
4
5
6
7
8
9
10
11
12
13
14
15
16
17
18
19
20
21
22
23
24
25
26
27
28
1
2
3
4
5
6
7
1
8
9
10
11
12
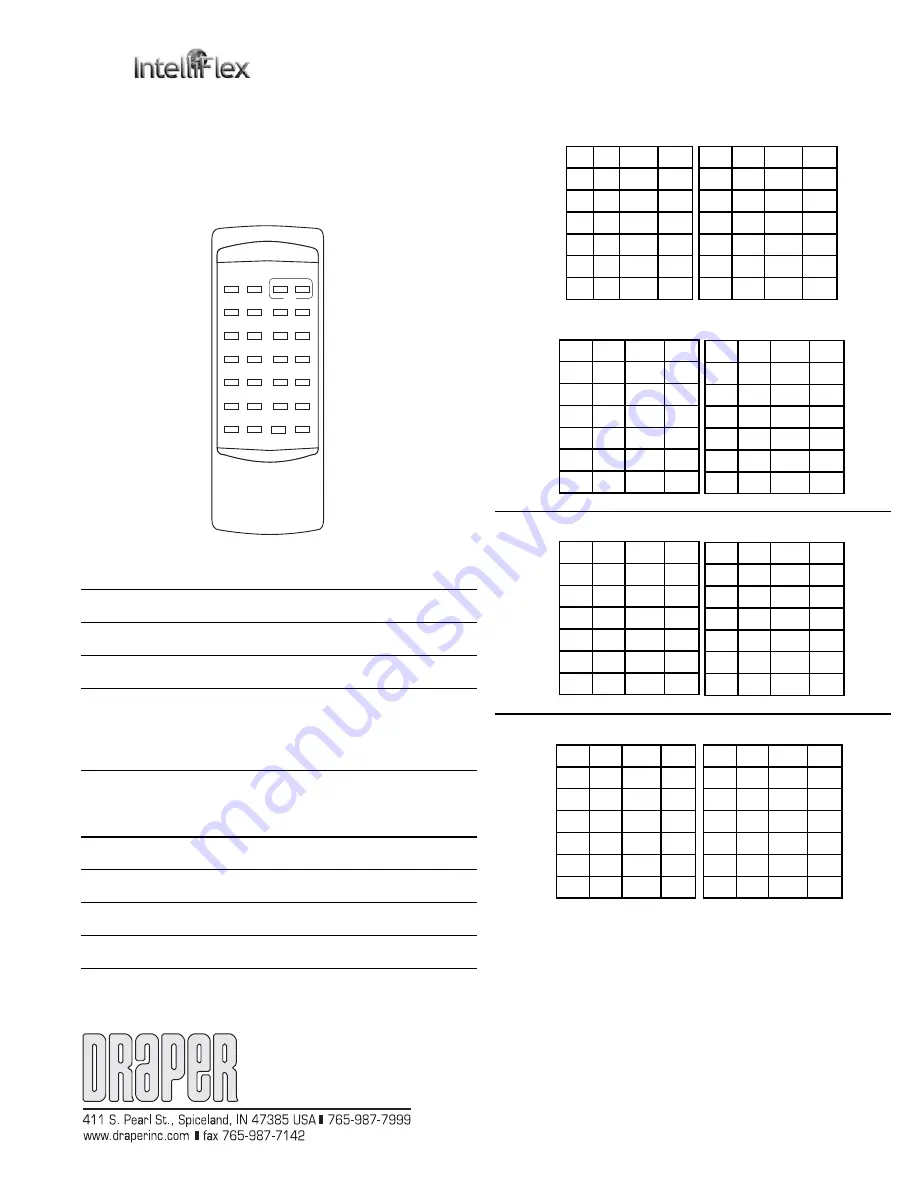
Pre-confi gured layouts (blank cells in the following tables mean button is
not used.
O1
C1
OAll
CAll
O2
C2
O8
C8
O3
C3
O9
C9
O4
C4
O10
C10
O5
C5
O11
C11
O6
C6
O12
C12
O7
C7
Shft>
Stop
Layout 1 (T24 with shift: 1 thru 24)
O13
C13
OAll
CAll
O14
C14
O20
C20
O15
C15
O21
C21
O16
C16
O22
C22
O17
C17
O23
C23
O18
C18
O24
C24
O19
C19
<Shft
Stop
O13
C13
OAll
CAll
O14
C14
O20
C20
O15
C15
O21
C21
O16
C16
O22
C22
O17
C17
O23
C23
O18
C18
O24
C24
O19
C19
Shft>
Stop
O25
C25
OAll
CAll
O26
C26
O32
C32
O27
C27
O33
C33
O28
C28
O34
C34
O29
C29
O35
C35
O30
C30
O36
C36
O31
C31
<Shft
Stop
Layout 2 (T24 with shift: 13 thru 36)
O25
C25
OAll
CAll
O26
C26
O32
C32
O27
C27
O33
C33
O28
C28
O34
C34
O29
C29
O35
C35
O30
C30
O36
C36
O31
C31
Shft>
Stop
O37
C37
OAll
CAll
O38
C38
O44
C44
O39
C39
O45
C45
O40
C40
O46
C46
O41
C41
O47
C47
O42
C42
O48
C48
O43
C43
<Shft
Stop
Layout 3 (T24 with shift: 25 thru 48)
O49
C49
OAll
CAll
O50
C50
O56
C56
O51
C51
O57
C57
O52
C52
O58
C58
O53
C53
O59
C59
O54
C54
O60
C60
O55
C55
<Shft
Stop
Layout 4 (T24 with shift: 37 thru 60)
O37
C37
OAll
CAll
O38
C38
O44
C44
O39
C39
O45
C45
O40
C40
O46
C46
O41
C41
O47
C47
O42
C42
O48
C48
O43
C43
<Shft
Stop


