NMGS
PMC PROCEDURE (continued)
6-31
6.18.9
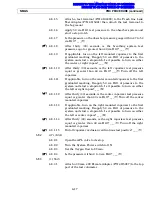
Adjust the Oxygen flow to 10 l/min.
6.18.10
Is the PEEP displayed on the monitor within 0 to 3 cm H
2
O? ___ (Y)
6.18.11
Close the Oxygen flow control valve.
6.18.12
Remove the ventilator hose from the ventilator hose terminal.
6.18.13
Attach a test terminal to the bellows assembly ventilator hose terminal.
6.18.14
Connect a flowmeter test stand (P/N S000081) to the test terminal.
6.18.15
Set the frequency to 1 BPM.
6.18.16
Set the I:E RATIO to 1:1.
6.18.17
Is the flow indicated during the inspiratory phase less than 50 ml? ___ (Y)
6.18.18
Remove the test equipment and reattach the ventilator hose to the
VENTILATOR HOSE terminal.
6.18.19
Return pressure limit control to MAX.
6.18.20
Set AUTO/BAG valve to BAG.
6.18.21
Press the Alarms All Standby key.
6.19 OPEN RESERVOIR SCAVENGER 6-Month Service Interval; Due Date _____, If
applicable
NOTE:
If the ambient air in the local environment contains a significant amount
of dust and lint, the cleaning frequency must be increased to compensate
for these conditions.
6.19.1
OPEN RESERVOIR SCAVENGER CLEANING
6.19.1.1
Remove the scavenger hoses and drain all accumulated
moisture. Inspect all scavenger hoses for deterioration and
replace as needed.
6.19.1.2
Disconnect the hospital vacuum source from the scavenger.
6.19.1.3
Cleaning procedure for assemblies with 2 large relief ports. If
configured with many small vent ports skip to step.
1.
Remove the four screws securing the reservoir tube to
the main block. Examine the two sealing O-rings and
replace as necessary.
2.
Remove the screws securing the access panel at the
bottom of the scavenger canister.
3.
Remove and inspect the silencer; replace if needed.
4.
Clean the reservoir tube with compressed air if
necessary.
5.
Remove the flowmeter from its housing by turning it
counterclockwise.
6.
Inspect the tube and clean with compressed air if
needed.
7.
Apply vacuum to the port at top of the flowmeter
housing.
(
9
)
(
9
)
(
9
)
Summary of Contents for Narkomed GS
Page 2: ...RETURN TO CD ROM TABLE OF CONTENTS RETURN TO THIS MANUAL S TABLE OF CONTENTS ...
Page 10: ...RETURN TO CD ROM TABLE OF CONTENTS RETURN TO THIS MANUAL S TABLE OF CONTENTS ...
Page 40: ...RETURN TO CD ROM TABLE OF CONTENTS RETURN TO THIS MANUAL S TABLE OF CONTENTS ...
Page 46: ...RETURN TO CD ROM TABLE OF CONTENTS RETURN TO THIS MANUAL S TABLE OF CONTENTS ...
Page 50: ...RETURN TO CD ROM TABLE OF CONTENTS RETURN TO THIS MANUAL S TABLE OF CONTENTS ...
Page 52: ...RETURN TO CD ROM TABLE OF CONTENTS RETURN TO THIS MANUAL S TABLE OF CONTENTS ...
Page 90: ...RETURN TO CD ROM TABLE OF CONTENTS RETURN TO THIS MANUAL S TABLE OF CONTENTS ...
Page 91: ...RETURN TO CD ROM TABLE OF CONTENTS RETURN TO THIS MANUAL S TABLE OF CONTENTS ...

