DPS Telecom NetGuardian 16A User Manual Download Page 32

28

9.1.1

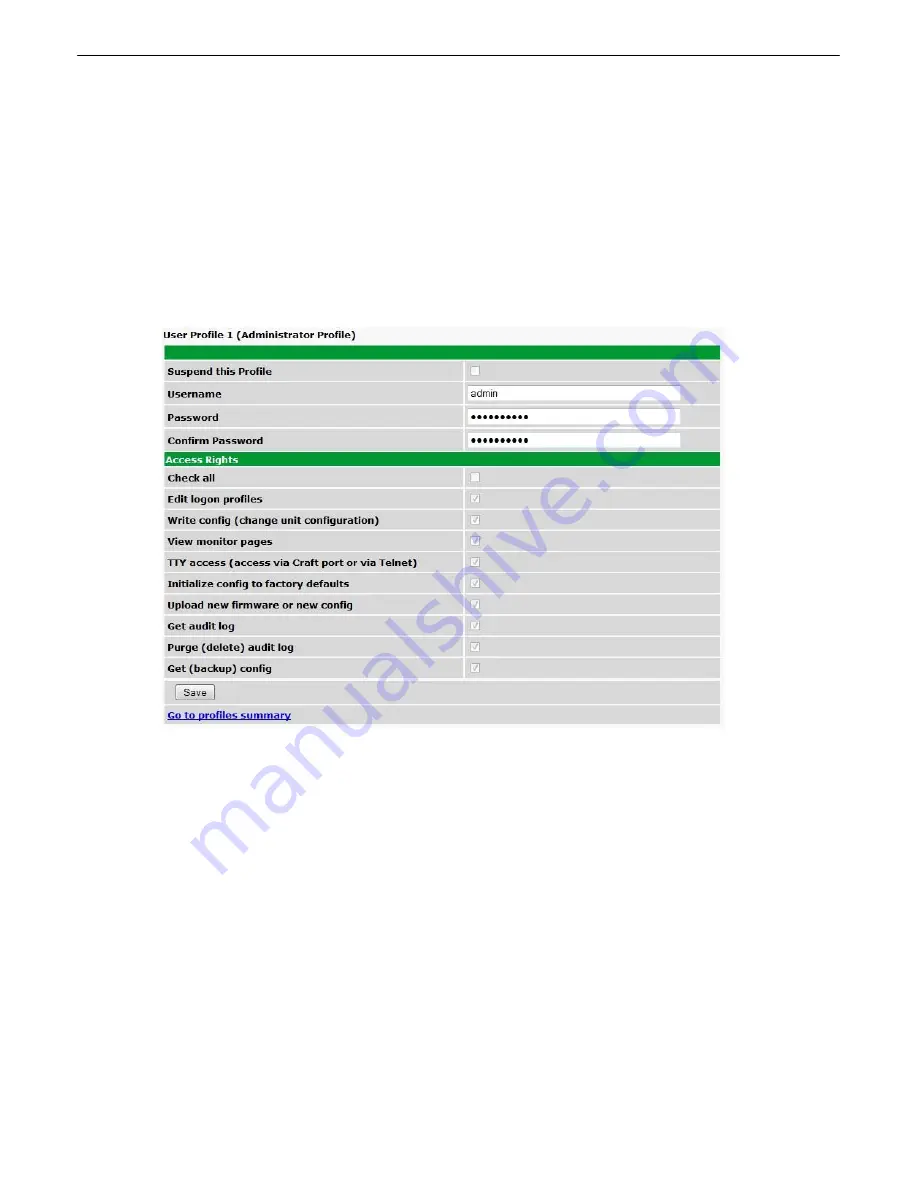
Changing the Default Password

The password can be configured from the 

Provisioning

   > 

User Profiles

 screen. The minimum password length is

four characters; however, DPS recommends setting the minimum password length to at least five characters. 

Use the following steps to change the logon password:

1.  From  the 

Edit

 menu  select 

System

.

2. Enter the new user name in the 

User

 field.

3. Enter the new password in the 

Password

 field.

4.  Click  the 

Save

 button.

Global System Settings section of the Provisioning > System menu

Summary of Contents for NetGuardian 16A

Page 1: ...USER MANUAL NetGuardian 16A October 30 2015 Visit our website at www dpstelecom com for the latest PDFmanual and FAQs D UM NG16A Firmware Version v2 0C...

Page 2: ...ntained herein or consequential damages in connection with the furnishing performance or use of this manual Notice Revision History October 30 2015 May 20 2015 March 9 2015 January 14 2015 September 2...

Page 3: ...5 13 Discrete Alarms 5 6 14 Externally Powered Build Option 5 6 1 14 Optional 66 Block Connector 5 7 15 NetGuardian Front Panel 6 16 USB Craft Port 6 1 16 D Wire Sensor Input 6 2 16 Quick Start How to...

Page 4: ...b Browser 12 55 Alarms 12 1 55 Controls 12 2 55 Analogs 12 3 57 Sensors 12 4 58 DSCP 12 5 59 Ping Targets 12 6 59 System Alarms 12 7 60 BAU Alarms 12 8 60 Graph 12 9 60 Device Access Descriptions 13 6...

Page 5: ...ach through serial port gives LAN access to on site equipment The unit also features a reach through serial port This port provides remote users with LAN based Telnet access to a variety of on site te...

Page 6: ...ude 48VDC 36 to 72 VDC Optional 24 VDC 18 V to 36 VDC Optional 24VDC 18 to 36 VDC Current Draw 250mA for 48VDC GMT Fuse Resettable Fuse Internal if 24V Power Input 48V or 24V Power Input uses 3 4 Amp...

Page 7: ...if you ever need to order new parts please refer to the part numbers listed and call DPS Telecom at 1 800 622 3314 NetGuardian 16A D PK NG16A NetGuardian 16AUser Manual Resource CD D UM NG16A USB Cabl...

Page 8: ...nector Lg Locking Power Connectors 2 821 20835 00 2 820 35102 00 x 4 3 4 Amp GMT Fuses 2 741 00750 00 Optional Shipping Items Available by Request 3 1 x2 Lg Pluggable Power Connectors Replaces Lg Lock...

Page 9: ...1 202 Option only x 1 Sensor Power Only 4 Pin Serial Connector Sensor Power Connector 2 820 00814 02 2 821 10435 00 x 1 Wireless Option Only Wireless Antenna Track Monitor 2 901 00802 00 D PK TRKMN 12...

Page 10: ...6 Installation 4 Tools Needed 4 1 To install the NetGuardian you ll need the following tools Phillips No 2 Screwdriver Small Standard No 2 Screwdriver PC with terminal emulator such as HyperTerminal...

Page 11: ...ian occupies only one standard rack unit The NetGuardian mounts in a 19 or 23 rack and can be mounted on the right or left in the flush mount or rear mount locations as shown in the above diagram The...

Page 12: ...ground into the power connector plug s right terminal and tighten the screw 4 Insert a battery lead to the plug s left terminal and tighten its screw 5 Insert fuse into the fuse distribution panel 6...

Page 13: ...panel of the device 2 Twist the collar of the plug to lock in place 3 Plug in the wall transformer to a power outlet LAN Connection 5 2 To connect the NetGuardian to the LAN insert a standard RJ45 Eth...

Page 14: ...notifications via your cell phone and alphanumeric pager Note If the serial port is configured for alarm reporting to T Mon the port is not available for use as a reach through proxy port Multi Purpo...

Page 15: ...make sure it can only be reinserted with the alarm inputs aligned correctly By default the analog inputs are configured to measure voltage You can switch the analog inputs to measure current by reset...

Page 16: ...vidually configured for current or voltage operation Remember that the default jumper position is OPEN for measuring voltage Note Each jumper inserts a 250 ohm shunt resistor across the input This mus...

Page 17: ...26 ALM 13 13 38 ALM 2 2 27 ALM 14 14 39 ALM 3 3 28 ALM 15 15 40 ALM 4 4 29 ALM 16 16 41 ALM 5 5 30 ALM 17 CT5SW 17 42 ALM 6 6 31 ALM 18 CT6SW 18 43 ALM 7 7 32 ALM 19 CT7SW 19 44 ALM 8 8 33 ALM 20 CT8...

Page 18: ...onnect either as a dry contact or a contact to ground In a dry contact alarm The alarm lead brings a contact to the ground lead activating the alarm In a contact to ground alarm A single wire brings a...

Page 19: ...DPS Telecom s optional 66 block connector For pinout and color code information see the diagrams below Note The 66 Block supports termination of 22 26 AWG 0 81 0 41mm solid insulated cable or 18 19 AW...

Page 20: ...he D Wire sensor port on the NetGuardian to the In jack on a D Wire sensor Chain additional sensors to the NetGuardian using the same straight through cables from the Out jack on the previous sensor t...

Page 21: ...om your PC to the NetGuardian 16A and access its Web Browser See the via LAN section of this chapter via USB Craft Port using TTY Interface 7 1 The simplest way to connect to the NetGuardian is over a...

Page 22: ...ave installed the DPS USB drivers then skip to Step 9 When you first connect the NetGuardian to your PC via USB a Found New Hardware message will appear 1 Click the Found New Hardware message icon to...

Page 23: ...ng message will confirm installation of a new USB Communications Port 8 Click Finish to close the Wizard Now that the driver has been installed a new COM port is being emulated on your PC Before using...

Page 24: ...20 9 Right click the My Computer icon on your desktop then click Manage 10 Click Device Manager in the left pane...

Page 25: ...Communications Port COMx Note the number of the COM port COM3 in the example above Now that you know which COM port to use it s time to launch HyperTerminal or other terminal software 12 Click on the...

Page 26: ...hite HyperTerminal screen Press Enter to activate the configuration menu 16 When prompted enter the default user name admin and password dpstelecom NOTE If you don t receive a prompt for your user nam...

Page 27: ...1 Get a LAN crossover cable and plug it directly into the NetGuardian s LAN port 2 Look up your PC s current IP address and subnet mask and write this information down 3 Reset your PC s IP address to...

Page 28: ...net sessions are established at port 2002 not the standard Telnet port as an added security measure If you re using Windows 7 then you ll need to install telnet before you can use the TTY interface To...

Page 29: ...to toggle through the following options Indicates default settings NOTE Default settings may not reflect the primary interface that shipped in the unit Port Type 232 485 202 Baud 115200 57600 19200 96...

Page 30: ...terface and press C onfig D CP 2 Set the DCP Address Unit ID 3 Set the DCP listening type toggle through the options Choose over serial over LAN or disabled Note If not using DCP to communicate with a...

Page 31: ...setup 1 To connect to the NetGuardian from your Web browser enter its IP address in the address bar of your web browser It may be helpful to bookmark the logon page to avoid entering this each time 2...

Page 32: ...ers however DPS recommends setting the minimum password length to at least five characters Use the following steps to change the logon password 1 From the Edit menu select System 2 Enter the new user...

Page 33: ...You can setup as many as 8 different notifications Begin the setup wizard by clicking Edit for a notification number In this example we ll setup Notification 2 to send emails 2 At the Notification Se...

Page 34: ...test the email notification you ve just setup you will prompted with a pop up Click OK to send a test email alarm notification Confirm all your settings by checking your email to see if you ve receiv...

Page 35: ...n setup as many as 8 different notifications Begin the setup wizard by clicking Edit for a notification number In this example we ll setup Notification 4 to send SNMP traps to your alarm master 3 At t...

Page 36: ...the drop down menus Click Save and Finish To try a test notification click the Test button See next step 6 If you chose to test the email notification you ve just setup you will prompted with a pop u...

Page 37: ...y The web interface will then prompt you to either Write your changes to the unit or Reboot the unit for changes to take effect in the top left corner of your browser The relevant options will be high...

Page 38: ...nit ID Protocol User definable ID number for the target unit DCP Address and desired protocol DCP LAN Enter the DCP port for the target unit UDP TCP port and desired protocol Analogs and Sensors Histo...

Page 39: ...n which an access right is disabled for all users You may still edit the Username Password and Active Days fields for the Administrator Profile The User Profiles screen allows you control user functio...

Page 40: ...y defaults Allows the user to use the Initialize option in the Device Access menu resetting the NetGuardian to factory default settings All user settings will be lost Upload new firmware or config All...

Page 41: ...er The IP you ve already assigned to the unit becomes inactive Using DHCP means the unit will NOT operate in a T Mon environment Unit IP IP address of the NetGuardian Subnet Mask A road sign to the Ne...

Page 42: ...ttempt Time out Enter the number of seconds before a logon request is timed out Servers 1 2 IPA Enter the IP address of the RADIUS server Port Port 1812 is an industry standard port for using RADIUS S...

Page 43: ...lect the appropriate settings from the drop down menu RTS Head Only used if your NetGuardian was built with a 202 modem The most commonly used value is 30 RTS Tail Only used if your NetGuardian was bu...

Page 44: ...engine identification that uniquely identifies the agent in the device SNMPv3 Username Community name for SNMP requests Auth Type Select the authentication type MD5 SHA1 or No Auth Auth Pass Specify t...

Page 45: ...tp gmail com Port number must be set to 465 SMTP authentication radio button must be selected User name and password below under How to Authenticate are the user name and password for the Gmail accoun...

Page 46: ...the number of the relay 1 4 or 1 8 depending on your build option you want to latch upon the alarm triggering 11 7 2 Schedule The notifications scheduling menu is where you will tell the NetGuardian e...

Page 47: ...arm When polarity is reversed a normally closed alarm point is clear when closed Notification Devices Check which notification device s 1 through 8 you want to send alarm notifications for that alarm...

Page 48: ...The Provisioning Controls screen Basic Controls Configuration ID ID number for the control relay Description User definable description for the NetGuardian s control relay Momentary Time Control on t...

Page 49: ...sed if build option was not selected These channels support the entire range of power inputs that the NetGuardian can support Channels 1 4 are user definable Each channel must be individually configur...

Page 50: ...d by the sensor in mA or VDC to a meaningful unit for the user For example for a temperature sensor the lower input collected by the sensor may be 4mA for a 4 20mA sensor which would correspond to a s...

Page 51: ...guration state Also the NetGuardian s first D Wire sensor used to monitor the internal temperature The internal temperature sensor measures a range of 40 F to 180 F 40 C to 82 2 C within an accuracy o...

Page 52: ...m point Advanced Sensor Configuration Details Record Freq The amount of time in minutes min or seconds s between each recorded sensor value Deadband The amount in native units that the channel needs t...

Page 53: ...larm points and analog channels 1 2 come pre configured to the unit however you are able to modify the description for the point The Provisioning DCSP menu Module Configuration Module Address High 4 b...

Page 54: ...n Devices Check which notification device s 1 through 8 you want to send alarm notifications for that alarm point Analog Configuration Details Id ID number for the analog channel Description User defi...

Page 55: ...Ping Targets menu Provisioning Ping Targets ID ID number for the ping target Enab Check this box to enable the ping target Description User definable description for the ping target Server IP or Hostn...

Page 56: ...Mode BAU In this mode of operation access to the site is granted by issuing an OPR command to Display 1 point 54 Extended Propped Door Mode If access to the facility has not been granted using this me...

Page 57: ...Id chosen as the Speaker Sound Control ID set the Provisioning Controls Details Derived Description to _ORD1 1 N where N is the max number of discrete alarms monitored supported Timers 11 16 The Time...

Page 58: ...address or host name then click Sync Example us pool ntp org Note Make sure to configure DNS before using host name instead of IP address Time Zone Select your time zone from the drop down menu Adjus...

Page 59: ...ick on Alarms in the Monitor menu to see if any base alarms have been triggered Basic Alarm Monitoring ID Alarm ID number Description User definable description for the discrete alarm point State The...

Page 60: ...umber for the control relay Description Description for the NetGuardian s control relay defined in the Provisioning Controls menu State Status of the control relay Can either be Released or Latched Co...

Page 61: ...nditions major under minor under major over minor over according to your temperature settings If configured under Provisioning Analogs your analog values will be displayed as a graphical gauge Selecti...

Page 62: ...tion of each analog channel the current reading the units being read and alarm conditions major under minor under major over minor over according to your temperature settings If configured under Provi...

Page 63: ...under major over minor over according to your analog settings Click on DSCP in the Monitor menu to view the current DSCP device statuses Ping Targets 12 6 Ping Targets can be viewed by going to Monit...

Page 64: ...ction for a complete description of system alarms View the status of System Alarms from the Monitor System Alarms menu BAU Alarms 12 8 BAU alarms are not editable and are only used when BAU Mode is en...

Page 65: ...61 Provision the Channels Group Interval Group Function and more all from the Graph Parameters section of the web browser interface...

Page 66: ...e over the lines to quickly view measurements date time and value within their context of the overall graphing trend Below the graph is a full textual list of all indexed points with their dates and v...

Page 67: ...cated in the bottom left of the web interface Device Access Option Description Backup Config Backs up the units configuration settings Read Reads a configuration file from the unit Write Commits all c...

Page 68: ...reen click the Restore Configuration link located in the System Controls section To upload firmware click on Upload on the top right corner of the web interface At the Firmware Load screen simply brow...

Page 69: ...power thresholds Relays Solid Green 1 or more control relays latched Craft Flashing Green NG 16A data transmit over craft port Flashing Red NG 16A data recieve over craft port Front Panel LED Descrip...

Page 70: ...r Over 99 1 3 4 Analog 3 Range 99 1 9 11 Analog 3 Polarity 99 1 13 Analog 3 Value 99 1 17 32 Analog 4 Minor Under Minor Over 99 1 33 34 Analog 4 Major Under Major Over 99 1 35 36 Analog 4 Range 99 1 4...

Page 71: ...Under Minor Over 99 1 33 34 Analog 10 Major Under Major Over 99 1 35 36 Analog 10 Range 99 1 41 43 Analog 10 Polarity 99 1 45 Analog 10 Value 99 1 49 64 Note Analog Value must be multiplied by the ap...

Page 72: ...Under Major Over 99 1 35 36 Analog 16 Range 99 1 41 43 Analog 16 Polarity 99 1 45 Analog 16 Value 99 1 49 64 Display 11 Pow er A Minor Under Minor Over 99 1 1 2 Pow er A Major Under Major Over 99 1 3...

Page 73: ...arity 99 1 45 Digital Temp Sensor 6 Value 99 1 49 64 Display 15 Digital Temp Sensor 7 Minor Under Minor Over 99 1 1 2 Digital Temp Sensor 7 Major Under Major Over 99 1 3 4 Digital Temp Sensor 7 Sensor...

Page 74: ...Polarity 99 1 45 Digital Temp Sensor 14 Value 99 1 49 64 Display 19 Digital Temp Sensor 15 Minor Under Minor Over 99 1 1 2 Digital Temp Sensor 15 Major Under Major Over 99 1 3 4 Digital Temp Sensor 15...

Page 75: ...Polarity 99 1 45 Digital Temp Sensor 22 Value 99 1 49 64 Display 23 Digital Temp Sensor 23 Minor Under Minor Over 99 1 1 2 Digital Temp Sensor 23 Major Under Major Over 99 1 3 4 Digital Temp Sensor 23...

Page 76: ...der Minor Over 99 1 33 34 Digital Temp Sensor 30 Major Under Major Over 99 1 35 36 Digital Temp Sensor 30 Sensor not Detected 99 1 37 Digital Temp Sensor 30 Range 99 1 41 43 Digital Temp Sensor 30 Pol...

Page 77: ...elp diagnose notification problems 43 Notification 6 failed A notification 6 event such as a page or email w as unsuccessful Use RPT filter debug to help diagnose notification problems 44 Notification...

Page 78: ...O _OV_Traps points _OV_vTraps 1 3 6 1 4 1 2682 1 4 0 PointSet 20 PointClr 21 SumPSet 101 SumPClr 102 ComFailed 103 ComRestored 014 P0001Set 10001 through P0064Set 10064 P0001Clr 20001 through P0064Clr...

Page 79: ...iption 0 Version Public Request Trap Request 1 3 6 1 4 1 2682 1 4 Enterprise 126 10 230 181 Agent address Enterprise Specific Generic Trap 8001 Specific Trap 617077 Time stamp 1 3 7 1 2 1 1 1 0 Object...

Page 80: ...ht or it doesn t work at all What s going on A Make sure your using the right COM port settings Your COM port settings should read Bits per second 9600 9600 baud Data bits 8 Parity None Stop bits 1 Fl...

Page 81: ...both NetGuardian 16Aand T MonXM variables A The NetGuardian 16A SNMP agent manages an embedded MIB that supports only the NetGuardian 16A s RTU variables The T MonXM variables are included in the dist...

Page 82: ...78 2 Make sure all alarm points are configured to send SNMP traps 3 Make sure the NetGuardian 16A and the SNMP manager are both on the network Use the unit s ping command to ping the SNMP manager...

Page 83: ...rmation when you call our Technical Support representatives can assist you in gathering it Please write the information down for easy access Please have your user manual and hardware serial number rea...

Page 84: ...old it harmless for and against any and all claims damages losses costs expenses obligations liabilities fees and costs and all amounts paid in settlement of any claim action or suit which may be asse...

Page 85: ...81...

Page 86: ...82...

Page 87: ...83...

Page 88: ......

Page 89: ...r lightning unless and to the extent that the product specification provides for resistance to a defined disaster e damage caused by unauthorized attachments or modifications f damage during shipment...

Page 90: ...Product manuals Product datasheets Exclusive user forms Expert tips on using your alarm monitoring equipment advanced techniques that will save you hours of work Educational White Papers deliver fast...

Reviews: