background image

Color:

White

Espresso

Blue

Black

Gray

Date of Purchase: _____  / _____  / _____

Lot Number:

(taken from carton)

TWIN LOFT BED

DA8377-BL

UPC Code:

Model Number:

0-65857-19907-9

0-65857-19287-2

0-65857-19262-9

DA8377

DA8377-E

DA8377-BK

0-65857-19908-6

Our agents are available Monday to Friday 8am to 5pm (EST) to take your call and 

answer any questions. For faster service, always have the model number ready when contacting us. 

Toll free #: 1-800-295-1980

You can also reach us by email or by visiting our website and clicking on the Support tab:

[email protected]

www.dorelliving.com

NOTE: THIS INSTRUCTION BOOKLET CONTAINS 

IMPORTANT

 SAFETY 

INFORMATION. PLEASE READ AND KEEP FOR FUTURE REFERENCE. 

Congratulations on your latest furniture purchase! 

Dorel Living

 furniture has been developed with quality, 

convenience and style in mind. We trust it will provide you with 
many years of exceptional comfort and service. 

Before beginning assembly, we encourage you to familiarize yourself with your new furniture piece by taking a 
few minutes to go through this booklet. It contains important information on our warranty and care tips to keep 
your furniture looking as good as new.

For more great furniture ideas, check out our website at 

www.dorelliving.com

You can also keep up to date on all the latest trends by liking our 

Facebook page 

and

 Instagram page

.

Questions, concerns, missing parts? Customer satisfaction is important to us at Dorel 

Asia.

 CONTACT OUR CUSTOMER SERVICE DEPARTMENT BEFORE RETURNING  

PRODUCT TO THE RETAILER. 

DA8377-GR

0-65857-19909-3

Summary of Contents for 0-65857-19262-9

Page 1: ...E REFERENCE Congratulations on your latest furniture purchase Dorel Living furniture has been developed with quality convenience and style in mind We trust it will provide you with many years of excep...

Page 2: ...USE GUARDRAILS ON BOTH LONG SIDES OF THE UPPER BUNK IF THE BUNK BED WILL BE PLACED NEXT TO THE WALL THE GUARDRAIL THAT RUNS THE FULL LENGTH OF THE BED SHOULD BE PLACED AGAINST THE WALL TO PREVENT ENTR...

Page 3: ...labor is included This warranty does not apply to any product which has been improperly assembled subjected to misuse or abuse or which has been altered or repaired in any way The warranty does not co...

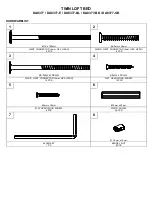
Page 4: ...EW 6 PCS TWIN LOFT BED DA8377 DA8377 E DA8377 BL DA8377 BK DA8377 GR HARDWARELIST WOOD JOINT CONNECTOR 4mm HEX HEAD 16 PCS FLAT HEAD WOOD SCREW 12 PCS 6 5mm x 100mm 4mm x 35mm 4mm x 30mm 10mm x 50mm 1...

Page 5: ...A B C D E F HEADBOARD TOP CROSS 2 PCS HEADBOARD CENTER CROSS 2 PCS HEADBOARD BOTTOM CROSS 2 PCS POST 2 PCS POST 1 PC POST 1 PC TWIN LOFT BED DA8377 DA8377 E DA8377 BL DA8377 BK DA8377 GR PARTS LIST...

Page 6: ...DA8377 DA8377 E DA8377 BL DA8377 BK DA8377 GR PARTS LIST SIDE RAIL WITH 3 HOLE 1 PC SIDE RAIL WITH 1 HOLE 1 PC LONG GUARDRAIL 2 PCS SLAT 6 PCS LADDER END 1 PC LADDER STEP 2 PCS SHORT GUARDRAIL 2 PCS...

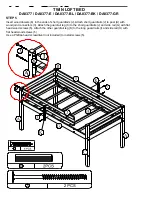
Page 7: ...headboard top crosses D has a label on it use it in this step Insert wood dowels 6 into the ends of headboard top cross D headboard bottom cross F and headboard center cross E Attach hardboard crosse...

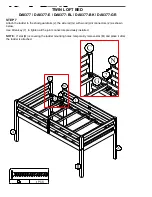
Page 8: ...each end of the long guardrails I Attach long guardrails I and side rails G and H to posts A B and A C as shown below Fasten the side rails G and H with joint connectors 1 and barrel nuts 8 Fasten lo...

Page 9: ...DA8377 DA8377 E DA8377 BL DA8377 BK DA8377 GR Insert two slats L into the center slots of the side rails G and H as shown below NOTE Once the two L slats are inserted there should be three empty spac...

Page 10: ...BK DA8377 GR Insert slats M into remaining holes on the side rails G and H Secure slats M to the side rails G and H with flat head wood screws 4 using a Phillips head screwdriver not included NOTE Sl...

Page 11: ...h short guardrails J to post A with wood joint connectors 3 Attach the guardrail leg K to the short guardrails J and side rail G with flat head wood screws 5 Attach the other guardrail leg K to the lo...

Page 12: ...eps O to ladder end N with wood joint connectors 2 and to post C with wood joint connectors 3 TWIN LOFT BED DA8377 DA8377 E DA8377 BL DA8377 BK DA8377 GR NOTE Do not fully tighten the joint connectors...

Page 13: ...er to the short guardrails J the side rail G with wood joint connectors 2 as shown below Use Allen key 7 to tighten all the joint connectors previously installed NOTE If slat M is covering the ladder...

Page 14: ...ALLOW CHILDREN UNDER 6 YEARS OF AGE TO USE THE UPPER BUNK BED IS DESIGNED FOR CHILDREN RANGING FROM 6 YEARS OF AGE TO YOUNG TEENAGERS USE ONLY COIL SPRING MATTRESSES ON THE UPPER BUNK FAILURE TO DO SO...

Page 15: ...nuestra garant a y consejos de cuidados para que su mueble siempre conserve su apariencia de nuevo Para obtener m s ideas de muebles inspirantes visite nuestro sitio web en www dorelliving com Tambi...

Page 16: ...LA SUPERFICIE DEL COLCH N DEBE QUEDAR POR LO MENOS 5 127MM POR DEBAJO DEL BORDE SUPERIOR DEL MARCO DE LAS CUCHETAS NO PERMITA QUE NI OS MENORES DE 6 A OS DUERMAN EN LA CUCHETA SUPERIOR SIEMPRE UTILIC...

Page 17: ...eparado de cualquier manera Cualquier uso rotura o p rdida de color de la tela no est n incluidos en esta garant a donde corresponda Esta garant a le da derechos legales espec ficas y usted puede tamb...

Page 18: ...6 PZAS CLAVIJA DE MADERA 34 PZAS CONECTOR 4mm CABEZA HEX 8 PZAS CONECTOR PARA MADERA 4mm CABEZA HEX 6 PZAS 6 5mm x 100mm 4mm x 35mm CONECTOR PARA MADERA 4mm CABEZA HEX 16 PZAS TORNILLO PARA MADERA 12...

Page 19: ...VESA O SUPERIOR CABECERA 2 PZAS TRAVESA O CENTRAL CABECERA 2 PZAS TRAVESA O INFERIOR CABECERA 2 PZAS CAMA LITERA DOBLE DA8377 DA8377 E DA8377 BL DA8377 BK DA8377 GR LISTA DE PIEZAS PATA 2 PZAS PATA 1...

Page 20: ...A 2 PZAS LIST N 2 PZAS LIST N 6 PZAS EXTREMO DE LA ESCALERA 1 PZA ESCAL N 2 PZAS CAMA LITERA DOBLE DA8377 DA8377 E DA8377 BL DA8377 BK DA8377 GR LISTA DE PIEZAS SOPORTE LATERAL con 3 agujero 1 PZA SOP...

Page 21: ...en este paso Inserte clavijas de madera 6 en los travesa os superiores de la cabecera D los travesa os inferiores de la cabecera F y los travesa os central de la cabecera E Conecte los cruces de mader...

Page 22: ...barandillas largas I Una las barandas largas I y las barandas laterales G y H a los postes A B y A C como se muestra a continuaci n Sujete los rieles laterales G y H con los conectores 1 y las tuercas...

Page 23: ...7 E DA8377 BL DA8377 BK DA8377 GR Inserte dos listones L en las ranuras centrales de los soportes laterales G y H como se muestra a continuaci n NOTA una vez que se insertan los dos listones L deben q...

Page 24: ...los listones M en los agujeros restantes de los soportes laterales G y H Asegure los listones M a los soportes laterales G y H con los tornillos de madera 4 con la ayuda de un destornillador Phillips...

Page 25: ...andas cortas J al poste A con los conectores de madera 3 Coloque el soporte de baranda K en las barandas cortas J y en la baranda lateral G con los tornillos para madera 5 Conecte el otro suporte de b...

Page 26: ...los extremos de los esaclones de la escalera O Fije los escalones de la escalera O al extremo de la escalera N con los conectores de madera 2 y al poste C con los conectores de madera 3 NOTA No aprie...

Page 27: ...J la baranda lateral G con los conectores de madera 2 como se muestra a continuaci n Use la llave Allen 7 para apretar todos los conectores instalados previamente NOTA Si el liston M est cubriendo los...

Page 28: ...A OS DUERMAN EN LA CUCHETA SUPERIOR LA CAMA EST DISE ADA PARA NI OS DESDE 6 A OS HASTA LA ADOLESCENCIA TEMPRANA UTILICE SOLAMENTE COLCHONES CON RESORTES EN ESPIRAL EN LA CAMA LITERA EL NO RESPETAR EST...

Page 29: ...our lire ce manuel Il contient de l information importante concernant notre garantie et des conseils d entretien pour vous assurer de garder votre meuble aussi beau qu aux premiers jours Pour trouver...

Page 30: ...95 98 CM 37 1 2 38 1 2 DE LARGE ASSUREZ VOUS QUE L PAISSEUR DU MATELAS N EXC DE PAS 6 15 CM LA SURFACE DU MATELAS DOIT TRE ENVIRON 5 12 7CM EN DESSUS DU BORD SUP RIEUR DES BARRI RES DE LIT NE PAS PERM...

Page 31: ...est valable uniquement sur pr sentation d une preuve d achat Cette garantie se limite exclusivement la r paration ou au remplacement de pi ces d fectueuses du mobilier et aucun travail d assemblage n...

Page 32: ...IS BOIS 6 PCES GOUJON DE BOIS 34 PCES RACCORDEMENT 4mm TETE HEX 8 PCES RACCORDEMENT 4mm TETE HEX 6 PCES 6 5mm x 100mm 4mm x 35mm RACCORDEMENT 4mm TETE HEX 16 PCES VIS BOIS 12 PCES GRAND LIT SUPERPOS D...

Page 33: ...RIEURE T TE DE LIT 2 PCES TRAVERSE CENTRALE T TE DE LIT 2 PCES TRAVERSE INF RIEURE T TE DE LIT 2 PCES GRAND LIT SUPERPOS DA8377 DA8377 E DA8377 BL DA8377 BK DA8377 GR LISTE DE PI CES POTEAU 2 PCES PO...

Page 34: ...RRI RE 2 PCES LATTE 2 PCES LATTE 6 PCES EXTR MIT DE L CHELLE 1 PCE MARCHE 2 PCES GRAND LIT SUPERPOS DA8377 DA8377 E DA8377 BL DA8377 BK DA8377 GR LISTE DE PI CES BARRE LAT RALE avec 3 trous 1 PCE BARR...

Page 35: ...ez la dans cette tape Ins rez les goujons en bois 6 aux extr mit s de la traverse sup rieure de t te de lit D des traverses inf rieures de t te de lit F et de la traverse centrale de t te de lit E Fix...

Page 36: ...es I Attachez les barri res longues I et les rails lat raux G et H aux poteaux A et B et A C comme indiqu ci dessous Fixez les barres lat rales G et H avec les raccordements 1 et les crous transversal...

Page 37: ...8377 E DA8377 BL DA8377 BK DA8377 GR Ins rez deux lattes L dans les fentes centrales des barres lat rales G et H comme indiqu ci dessous NOTE Une fois que les deux lattes L sont ins r es il doit reste...

Page 38: ...DA8377 GR Ins rez les lattes M dans les trous restants des barres lat rales G et H Fixez les lattes M sur les barres lat rales G et H avec des vis bois 4 l aide d un tournevis cruciforme non fourni NO...

Page 39: ...z de barri res courtes J au poteau A avec les raccordements pour bois 3 Fixez le support de barri re K aux barri res courtes J et aux barres lat rales G l aide de vis bois 5 Fixez le support de barri...

Page 40: ...x extr mit s des marches d chelle O Fixez les chelons O l extr mit de l chelle N l aide des raccordements pour bois 2 et au poteau C avec les raccordements pour bois 3 NOTE Ne serrez pas compl tement...

Page 41: ...s des barri res courtes J et a la barre lat rale G avec les raccordements 2 comme indiqu ci dessous Utilisez la cl Allen 7 pour serrer tous les raccordements d j install s NOTE Si la latte M recouvre...

Page 42: ...NS D UTILISER LE LIT SUP RIEUR LE LIT EST CON U POUR DES ENFANTS DONT L GE SE SITUE PARTIR DE 6 ANS JUSQU JEUNES ADOS UTILISEZ SEULEMENT DES MATELAS RESSORTS SUR LES LITS SUP RIEUR D FAUT DE QUOI DES...

Reviews: