11
! WARNING
When all the frost has melted, dry the interior of the re-
frigerator with a clean cloth. Replace all food and set the
thermostat to the COLDEST temperature setting for a
few hours. Then reset the thermostat to the desired set-
ting, usually at mid setting.
CLEANING
Cleaning the refrigerator is usually done after it is defrosted
or put into storage. To clean the interior liner of the re-
frigerator, use lukewarm weak soda solution. Use only
warm water to clean the finned evaporator, gasket, ice
tray and shelves.
NEVER use strong chemicals or abrasives to clean these
parts, as the protective surfaces will be damaged. It is
important to always keep the refrigerator clean.
SHUT OFF- (STORAGE PROCEDURE)
Shut off the refrigerator by pressing the main power ON/
OFF button to the UP (OFF) position.
If the refrigerator will not be in operation for a period of
weeks, it should be emptied, defrosted, cleaned and the
doors left ajar. The ice trays should also be dried and
kept outside the cabinet.
HOW TO USE THE REFRIGERATOR
FOOD STORAGE COMPARTMENT
The food storage compartment is completely closed and
unventilated, which is necessary to maintain the required
low temperature for food storage. Consequently, foods
having a strong odor or those that absorb odors easily
should be covered. Vegetables, salads etc. should be
covered to retain their crispness. The coldest positions
in the refrigerator are under the cooling fins and at the
bottom of the refrigerator. The warmer areas are on the
upper door shelves. This should be considered when
placing different types of food in the refrigerator.
FROZEN FOOD STORAGE
COMPARTMENT
Quick frozen soft fruits and ice cream should be placed
in the coldest part of the compartment, which is at the
bottom of the aluminum liner. Frozen vegetables, may
be stored in any part of the compartment.
This compartment is not designed for deep or quick freez-
ing of food. Meat or fish, whether raw or prepared, can
be stored in the frozen food storage compartment pro-
vided they are precooled first in the refrigerator. They
can be stored about three times longer in the frozen food
compartment as compared to the fresh food compart-
ment. To prevent food from drying out, keep it in covered
dishes, containers, plastic bags or wrapped in aluminum
foil.
Ice cubes can be made in the freezer compartment.
For faster ice making, the trays should be placed in direct
contact with the bottom of the freezer compartment.
Ice will be made more rapidly if the thermostat is set at
its highest position.
It is a good idea to do this a few hours before the antici-
pated need for ice, but be sure to move back to normal
setting, usually about mid setting when the ice is formed.
Food in the lower compartment may be frozen if the set-
ting is left on “COLDEST” position.
Refrigerator volume.
Total refrigerated volume is 8 cu.ft. for the model RM 3862.
DEFROSTING
Shut off the refrigerator by pressing the main power
ON/OFF button to the UP (OFF) position.
Empty the refrigerator, leaving the drip tray under the
finned evaporator, and the cabinet and freezer doors
open.
Defrosting time can be reduced by filling the ice trays
with hot water and placing them in the freezer compart-
ment.
DO NOT use a hot air blower. Permanent damage
could result from warping the metal or plastic parts.
DO NOT use a knife or an ice pick, or other sharp
tools to remove frost from the freezer compartment.
They can create a leak in the ammonia system.
! CAUTION
DO NOT store explosive substances in the refrig-
erator, such as cigarette lighter gas, gasoline, ether
or the like.
NOTE: Sodium chromate is used for corrosion protec-
tion (less than 2 weight % of the coolant).
CLIMATE CONTROL
During the summer months of high temperatures and
humidity, the metal frame between the freezer and fresh
food compartments may have water droplets forming.
The number of water droplets will increase if the vehicle
isn’t air conditioned during these months.
This refrigerator comes standard with a 12 volt (DC)
climate control that will evaporate the water droplets
when they form.
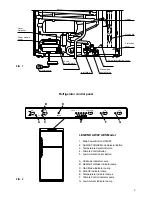
To turn on the climate control, press the CLC-button (4)
on the display panel, the indicator lamp (F) will illumi-
nate. (See FIG. 2 or display panel, section OPERATING
INSTRUCTIONS).
The climate control can be left on continuously or only
used when temperatures require it.
NOTE: The climate control will draw 12 volt DC power
continuously when in the ON position. It should be turned
OFF when a charging source is not available.
LOW AMBIENT CONTROL
All RV absorption refrigerators, while similar, operate a
little differently than your home refrigerator. Dometic
designers and engineers have equipped your refrigera-
tor with an exclusive feature that allows for trouble-free
operation in low ambient temperature (like below 50°F)
for extended periods of time. Simply press the LAC-but-
ton (5) on the display panel, the indicator lamp (G) will
illuminate (see FIG. 2 or display panel, section OPER-
ATING INSTRUCTIONS). Once the outdoor tempera-
ture is above 50°F, the low ambient switch should be
turned off.
Summary of Contents for RM3862
Page 2: ......
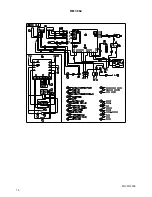
Page 16: ...16 RM 3862 MO FO 0309...

