10
THERMOSTAT
The thermostat on the refrigerator, controls both the gas
and electric operation, thereby eliminating the neces-
sity of resetting each time a different energy source is
employed.
After the initial start-up, the thermostat should be moved
from COLDEST to the desired temperature setting,
usually about mid setting.
DESCRIPTION OF OPERATING
MODES
AUTO MODE
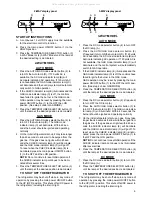
When operating in the AUTO mode, the AUTO mode
indicator lamp (D) will illuminate.
The control system will automatically select between AC
and GAS operation with AC having priority over GAS.
Either the AC indicator lamp (B) or the GAS indicator
lamp (C) will illuminate depending on the energy source
selected by the control system. If the control system is
operating with AC energy and it then becomes unavailable,
the system will automatically switch to GAS. As soon as
AC becomes available again the control will switch back
to AC regardless of the status of GAS operation.
GAS MODE
When operating in the GAS mode the AUTO mode in-
dicator lamp (D) will be off and the GAS mode indicator
lamp (C) will be illuminated. This mode provides LP gas
operation only. The control system will activate the igni-
tion system and will attempt to light the burner for a pe-
riod of approximately 45 seconds. If unsuccessful, the
CHECK indicator lamp (E) will illuminate and the GAS
mode indicator lamp (C) will turn off.
To restart GAS operation, press the main power ON/OFF
button (1) to the OFF and then ON position. The control
system will attempt a new 45 second ignition sequence.
If the refrigerator has not been used for a long time or
the LP tanks have just been refilled, air may be trapped
in the supply lines. To purge the air from the lines may
require resetting the main power ON/OFF button (1) three
or four times. If repeated attempts fail to start the LP gas
operation, check to make sure that the LP gas supply
tanks are not empty and all manual shutoff valves in the
lines are open. If the problem is still not corrected, con-
tact a service center for assistance.
If the control is switched to AC or DC (3-way models
only) operation while the CHECK indicator lamp is on, it
will function properly, but the CHECK indicator lamp will
not go off until the main power ON/OFF button is pressed
to the OFF then ON position.
DC MODE (3-way models only)
When operating in the DC mode the DC mode indicator
lamp (A) will be illuminated. All other mode lamps will
be off. The DC mode overrides all other operating modes.
If one of the other operating modes is desired, the DC
selector button (2) must be pressed to turn OFF the DC
lamp (A).
IMPORTANT:
To prevent the refrigerator from being left on and
draining the battery when the vehicles engine is not
running and charging the battery.
It is recommended that an automatic cutout relay be
installed between the battery and the refrigerator
toggle switch so that the refrigerator will not draw
current when the ignition of the vehicle is switched
off.
Alternatively, a suitable plug and receptacle should
be installed in the 12 Volt supply line, so that the
refrigerator can be disconnected from the supply,
as necessary.
LIMP MODE OF OPERATION
This control system contains a feature where it will con-
tinue to operate the cooling system in the event of a
failure of a major operating component. Two different
modes of operation can occur in this category.
If for some reason the display module becomes non func-
tional, the control system will revert to full automatic
operation selecting the best energy source available with
AC, DC (3-way only) and GAS priority. The temperature
of the refrigerator will be maintained at the MID position
within normal temperature tolerances. The power mod-
ule will continually attempt to reestablish operation of
the display module.
The second limp mode of operation will execute when a
failure of the temperature sensing device or associated
electronic circuitry occurs.
If this should occur, the control system will operate on
the energy source selected via the control panel. The
cooling unit will run continuously on the selected energy
source.
The refrigerator will continue to operate in this mode in-
definitely or until a new sensor is installed and the sys-
tem is reset.
2-WAY display panel
3-WAY display panel
ON
OFF
AC
DC
GAS
AUTO
CHECK
COLD
1
2
3
4
5
COLDEST
ON
OFF
AC
GAS
AUTO
CHECK
COLD
1
2
3
4
5
COLDEST
D
B
C
E
F
A
B
C
D
E
F
1
2
3
1
2
3
4
All manuals and user guides at all-guides.com
Summary of Contents for RM3662
Page 2: ...All manuals and user guides at all guides com...
Page 17: ...17 RM 3662 RM 3862 RM 3663 RM 3863 All manuals and user guides at all guides com...
Page 18: ...18 All manuals and user guides at all guides com...
Page 19: ...19 All manuals and user guides at all guides com...
Page 20: ...20 MO FO 0233 All manuals and user guides at all guides com...

