background image

7

EN

CCF-T Refrigerator 

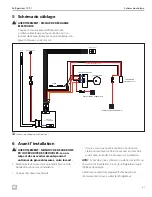
Wiring Diagram

5  Wiring Diagram


WARNING: ELECTRIC SHOCK HAZARD .

Turn the power off before performing any electrical 
installation or maintenance activities. Failure to 
obey this warning could result in death or serious 
injury. 

4364 0

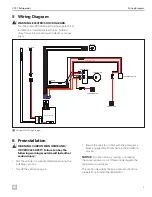
NTC

RED

BLK

1

2

5

6

4(NA)

3(NA)

molex

1

Inner LED

Control board

GROUND

-

+

F+
F-

LIN

CONTROL UNIT

SWITCH 

POWER INPUT DC12V

CONDENSER FAN

AIR DUCT FAN

COMPRESSOR

43

64

0

Auto-Fuse 10A

Refrigerator Wiring Diagram

6  Preinstallation


WARNING: CARBON MONOXIDE AND/
OR VEHICLE SAFETY . Failure to obey the 
following warnings could result in death or 
serious injury:

•  Park the vehicle in a well-ventilated area during the 

installation process.

•  Turn off the vehicle’s engine.

•  Ensure the vehicle is in Park with the emergency 

brake engaged at all times during the installation 
process.

NOTICE: 

Avoid pinching, crushing, or breaking 

the wires or power cord. Otherwise damage to the 
refrigerator could occur. 

This section describes the assessment and location 
preparations to install the refrigerator.

Summary of Contents for GM CCF-T

Page 1: ...arnings ca gov Revision A Form No 3318069 000 04 22 2022 Dometic Corporation GM CCF T EN CCF T Refrigerator Installation and Operation Manual 2 FR R frig rateur CCF T Manuel d installation et de fonct...

Page 2: ...nter Dealer Locations Visit www dometic com Please read these instructions carefully and follow all instructions guidelines and warnings included in this product manual in order to ensure that you ins...

Page 3: ...improper installation adjustment alterations service or maintenance of the appliance Service and maintenance must be done by a qualified service person only Do not modify this product in any way Modi...

Page 4: ...or use of spare parts other than the original spare parts provided by the manufacturer Alterations to the product without express permission from the manufacturer Use for purposes other than those des...

Page 5: ...Max Pressure Input Voltage Rated Current ND 11 bar HD 25 bar DC 13 5 V 5 6 A GWP 1430 tCO2 eq 0 037 R 134a 0 026kg C5 H10 Model SKU CCF T GM_T1XX 9600049539 PNC Serial XXXXXXXXX XXXXXXX Contains fluo...

Page 6: ...nergy Consumption at Startup 5 6 A Energy Consumption during Operation at 90 F Ambient 4 2 A Internal Volume 7 L Beverage Storage Capacity Six 16 9 oz 500 mL Bottles Nine 12 oz 355 mL Cans Refrigerant...

Page 7: ...0 Auto Fuse 10A 4 Refrigerator Wiring Diagram 6 Preinstallation WARNING CARBON MONOXIDE AND OR VEHICLE SAFETY Failure to obey the following warnings could result in death or serious injury Park the v...

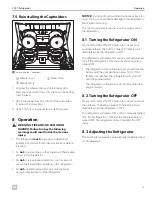
Page 8: ...Cupholders q w 5 Removing the Cupholders qCupholders wScrew 1 Lift up the rubber trim at the front of the cupholders to access the screw 2 Use a T15 Torx screwdriver to loosen and remove the screw 3...

Page 9: ...cle s 12 V rear power connector into the refrigerator unit s 12 VDC power cord plug 3 Start the vehicle engine 4 Confirm the blue LED is illuminated on the refrigerator unit s ON OFF button If not pre...

Page 10: ...4 Use the 3 5 in 89 mm hole saw drill bit to drill an opening for the front fan 5 Vacuum any debris from the console and console bin area 6 7 Preparing the Rear Power Connector Location w e r q q 11 D...

Page 11: ...ilt in structure clear of obstruction NOTICE Do not leave the refrigerator unit in an inverted position or run the compressor soon after having the refrigerator in an inverted position Otherwise damag...

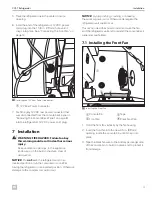
Page 12: ...wScrews 1 Lower the refrigerator into the console 2 Open the refrigerator lid 3 Using a 2 Phillips screwdriver hand tighten the provided screws to secure the refrigerator to the mounting brackets 7 4...

Page 13: ...s fan vents Doing so could cause damage to the refrigerator s fan or electrical wiring This section provides instructions on the proper use of the refrigerator 8 1 Turning the Refrigerator ON Press an...

Page 14: ...lways turn the refrigerator OFF before cleaning or servicing Maintenance and repair must be done by a qualified service person only Do not use mechanical devices to defrost the refrigerator Do not pun...

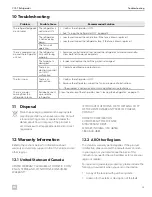
Page 15: ...ior Residue has built up inside the refrigerator Clean the interior of the refrigerator See Cleaning the Refrigerator on page 14 11 Disposal M Place the packaging material in the appropriate recycling...

Page 16: ...r frig rateur lorsqu il n est pas utilis 28 10 D pannage 29 11 limination 29 12 Renseignements concernant la garantie 29 12 1 tats Unis et Canada 29 12 2 Toutes les autres r gions 30 Liste des centre...

Page 17: ...respecter les directives suivantes avant de continuer installer ou utiliser cet appareil Lisez et suivez tous les renseignements et toutes les consignes de s curit Lisez et comprenez les pr sentes di...

Page 18: ...nement de refroidissement automatiquement contr l pour des articles emball s Ce r frig rateur est uniquement adapt l usage et l application pr vus conform ment aux pr sentes directives Ce manuel fourn...

Page 19: ...Volume Climatic class Refrigerant Insulation Blowing Gas CoolFreeze 7L N or T Max Pressure Input Voltage Rated Current ND 11 bar HD 25 bar DC 13 5 V 5 6 A GWP 1430 tCO2 eq 0 037 R 134a 0 026kg C5 H10...

Page 20: ...onsommation d nergie durant le fonctionnement une temp rature ambiante de 90 F 32 C 4 2 A Volume int rieur 7 l Capacit de rangement de boissons Six bouteilles de 16 9 oz 500 ml Neuf canettes de 12 oz...

Page 21: ...ED2 INT LED1 INT MARCHE ARR T TERRE BATT MODBUS 4 Sch ma de c blage du r frig rateur 6 Avant l installation AVERTISSEMENT MONOXYDE DE CARBONE ET OU S CURIT DES V HICULES Le non respect de ces avertiss...

Page 22: ...enseignements 6 2 Retrait des porte gobelet q w 5 Retrait des porte gobelet qPorte gobelet wVis 1 Soulevez la garniture en caoutchouc situ e l avant des porte gobelet pour acc der la vis 2 Utilisez un...

Page 23: ...connecteur d alimentation arri re de 12 V dans la prise du cordon d alimentation de 12 V c c du r frig rateur 3 D marrez le v hicule 4 Confirmez que la DEL bleue est allum e sur le bouton marche arr...

Page 24: ...ur avant 4 Utilisez la m che de 3 5 po 89 mm pour percer une ouverture pour le ventilateur avant 5 Utilisez un aspirateur pour liminer les d bris de la console et de la zone du bac de la console 6 7 P...

Page 25: ...ventilation dans le bo tier de l appareil ou dans la structure int gr e libres de toute obstruction AVIS Ne laissez pas le r frig rateur en position invers e et ne faites pas fonctionner le compresseu...

Page 26: ...tilateur avant au connecteur auxiliaire provenant de la prise d alimentation du r frig rateur 7 3 Fixation du r frig rateur w e q 15 Fixation du r frig rateur qCouvercle du r frig rateur eR frig rateu...

Page 27: ...is Ne rangez pas de l essence ou d autres liquides avec des vapeurs inflammables dans ce r frig rateur Ne rangez pas des substances explosives comme des bombes a rosols contenant un propulseur inflamm...

Page 28: ...laquelle le couvercle reste ouvert 9 Entretien AVERTISSEMENT RISQUE DE D CHARGE LECTRIQUE D INCENDIE OU D EXPLOSION Le non respect de ces avertissements pourrait entra ner de graves blessures voire l...

Page 29: ...yant Il y a une obstruction 1 V rifiez que le r frig rateur est teint 2 Retirez le r frig rateur inspectez le ventilateur et liminez toutes les obstructions 3 Sileprobl men estpasr solu communiquezave...

Page 30: ...icant dans votre r gion ou votre concessionnaire reportez vous aux adresses Web au dos de ce manuel d utilisation pour les localiser Pour le traitement des r parations ou d une r clamation en vertu de...

Page 31: ...uando no est en uso 44 10 Resoluci n de problemas 44 11 Eliminaci n 45 12 Informaci n de la garant a 45 12 1 Estados Unidos y Canad 45 12 2 Otras regiones 45 Centros de servicio y ubicaci n de los dis...

Page 32: ...icables 1 4 Mensajes generales de seguridad ADVERTENCIA PELIGRO DE DESCARGA EL CTRICA INCENDIO Y O EXPLOSI N Hacer caso omiso a las advertencias puede ocasionar lesiones graves o la muerte Utilice nic...

Page 33: ...un rendimiento insatisfactorio y posibles fallos El fabricante no acepta ninguna responsabilidad por lesiones o da os al producto que resulten de Montaje o conexi n incorrectos incluido el exceso de v...

Page 34: ...HD 25 bar DC 13 5 V 5 6 A GWP 1430 tCO2 eq 0 037 R 134a 0 026kg C5 H10 Model SKU CCF T GM_T1XX 9600049539 PNC Serial XXXXXXXXX XXXXXXX Contains fluorinated greenhouse gases covered by the Kyoto Proto...

Page 35: ...g a en el arranque 5 6 A Consumo de energ a durante el funcionamiento a una temperatura ambiente de 90 F 4 2 A Volumen Interno 7 litros Capacidad de almacenamiento de bebidas Seis botellas de 16 9 oz...

Page 36: ...64 0 Fusible de 10 A del veh culo SW LED2 SW LED1 INT SW ON OFF Tierra BATER A MODBUS 4 Diagrama de cableado del refrigerador 6 Preinstalaci n ADVERTENCIA MON XIDO DE CARBONO Y O SEGURIDAD VEHICULAR...

Page 37: ...vasos q w 5 Extracci n de los portavasos qPortavasos wTornillo 1 Levante la moldura de goma en la parte delantera de los portavasos para acceder al tornillo 2 Utilice un destornillador Torx T15 para a...

Page 38: ...de la parte trasera de la consola rea de la segunda fila 2 Inserte el conector trasero de alimentaci n de 12 V del veh culo en el enchufe del cable de alimentaci n de 12 V CC de la unidad del refriger...

Page 39: ...Pared frontal del compartimiento de la consola wPlantilla de ventilador frontal 1 Pegue con cinta adhesiva la plantilla del ventilador frontal en el interior de la pared frontal del compartimiento de...

Page 40: ...frigerador cerca de la abertura de la consola central 6 Inserte el extremo del enchufe del cable de alimentaci n de 12 VCC del refrigerador en el agujero de 1 1 8 pulgadas 29 mm hasta que encaje en su...

Page 41: ...ventilador frontal en la nueva abertura de 3 5 pulgadas 89 mm dentro del compartimiento de la consola hasta que encaje en su lugar 3 Pegue con cinta adhesiva el cable negro del ventilador en la parte...

Page 42: ...a conectar todas las conexiones el ctricas al panel posterior de la consola 2 Alineando las presillas de retenci n con las ranuras de retenci n empuje el panel posterior de la consola dentro de la con...

Page 43: ...n estado ENCENDIDO cuando se reinicie el motor 8 2 APAGAR el refrigerador Mantenga presionado el bot n de ENCENDIDO APAGADO durante un segundo y luego su ltelo El indicador LED azul del bot n no estar...

Page 44: ...microfibra 9 2 Mantenimiento del refrigerador cuando no est en uso Para un cuidado ptimo del refrigerador cuando no est en uso observe las siguientes instrucciones Limpie y seque el interior del refr...

Page 45: ...reglamentaciones nacionales y locales aplicables 12 Informaci n de la garant a Consulte las secciones a continuaci n para obtener informaci n sobre la garant a y soporte de garant a en EE UU Canad y...

Page 46: ...46 EN CCF T Refrigerator...

Page 47: ...47 EN CCF T Refrigerator...

Page 48: ...ich comprise the Dometic Group can be found in the public filings of DOMETIC GROUP AB Hemv rnsgatan 15 SE 17154 Solna Sweden YOUR LOCAL DEALER dometic com dealer YOUR LOCAL SUPPORT dometic com contact...

Reviews: