23
UH 5947 / 25.03.19 en / 091A
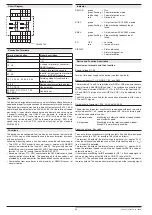
of E1 with a ratio 1:2 if sensor selection is E1+E2. If E1+E2 is not chosen
in sensor selection, the semiconductor outputs have no function.
Variant /200: the transistor outputs are not connected to the relay status.
They are continuously on when the unit is on operation and are switched
off as soon as a failure is detected.
Test signals T1, T2, T3, T4
To detect errors in the input circuitry or while the safety-related inputs ST,
RF1, RF2, EA1, EA2, P1, P2, and MAG are processed, a dynamic output
signal is routed via the switching elements and via the start and feedback
circuits. To this end, the output signals on the individual outputs T1, T2, T3
and T4 are different allowing to detect cross faults between the output sig-
nals.
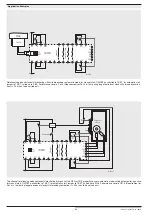
Signal input ST (start circuit)
The start signal is applied to this input. ST is supplied from the test signal T4.
To start the movement connected to 23/24 and the monitoring the ON/OFF
pushbutton has to be pressed for manual starting. This pushbutton is mon-
itored for cross fault and short circuit by requiring a falling edge for starting.
Therefore, it may not be pressed for more than 3 sec. When a cross fault or
short circuit is detected the device changes to the safe condition and a diag-
nostic alarm is displayed. Once the fault is eliminated, a reset (see fault han-
dling) or a restart by switching off and back on the supply voltage is required.
For automatic starting, the test signal T4 must be present on ST via a jumper
to start the device.
Signal input MAG (interlocking of the safety gate)
MAG is supplied from the test signal T4. To start the dangerous movement
(output 43/44, 53/54) the safety gate must be locked. The locking magnet
has a contact that is read from the device via the MAG terminal. When this
contact is not closed the device cannot be started or immediately chang-
es to a safe condition (output contact 43/44, 53/54 drops out). However,
when the contact is closed again the device can be started again. It is not
needed to acknowledge the alarm.
At automatic mode the contact is permanently monitored. When it is not
used the terminals T4 and MAG must be bridged.
In setup mode the signal input MAG is not monitored.
Signal input RF1 (feedback circuit for setup or automatic mode)
RF1 is supplied from the test signal T3. The terminal RF1 is used to read
the NC contacts of the external contactors that are connected to the ter-
minal 44, 54. Switching through of the output contact 43/44, 53/54 is only
possible when the feedback contacts are closed. When the output con-
tacts 43/44, 53/54 are switched off, the feedback contacts must be closed
within the monitoring time tf. If not a failure message is displayed (see
section time functions).
If no contact extension or reinforcement is used, the terminals T3 and RF1
must be bridged.
Signal input RF2 (feedback circuit for standstill)
RF2 is supplied from the test signal T3. The terminal RF2 is used to read
the NC contacts of the external contactors that are connected to the ter-
minal 14, 24. Switching through of the output contact 13/14, 23/24 is only
possible when the feedback contacts are closed. When the output contact
13/14, 23/24 is opened the feedback contacts need to be closed again
after 1 second, otherwise a diagnostic alarm appears. Once the fault is
eliminated, a reset (see fault handling) or a restart by switching off and
back on the supply voltage is required.
If no contact extension or reinforcement is used, the terminals T3 and RF2
must be bridged.
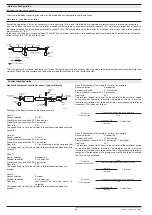
Signal inputs P1 and P2 (position switches for safety gate)
P1 is supplied from the test signal T1 and P2 from the test signal T2.
These terminals are used to connect the position switches for the safety
gate with tumbler mechanism. To achieve the highest possible catego-
ries (Performance Level e as per DIN EN ISO 13849-1 and SIL3 as per
IEC EN 61508) the position switches are connected via two channels.
The position switches are monitored for silmultaneity. When the position
switches are opened the contacts P1 and P2 must be opened within t <
1.0 sec. A diagnostic alarm appears on the display when the simultaneity
is not met. Once the fault is eliminated, a reset (see fault handling) or a
restart by switching off and back on the supply voltage is required. To start
the output contact 43/44, 53/54 both position switches must be closed at
automatic mode.
Device and Function Description
When the connection is only single-channel or two separate single-chan-
nel position switches are connected for a lower category the detection of
simultaneity has to be disabled in the menu. When using a single-channel
position switch the terminals T2 and P2 have to be bridged.
If none of the position switches are used, the terminals T1 and P1 and the
terminals T2 and P2 have to be bridged.
In setup mode the signal inputs P1 and P2 are not monitored.
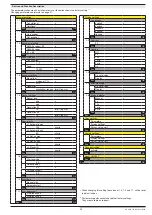
Signal inputs EA1 and EA2 (operating mode selection)
This speed monitor is suited for monitoring 2 different operating modes
(setup and automatic mode). The speed limits for each operating mode
are set in the menu using the keys. A safety-related two-channel antiva-
lent switch connected to the terminals EA1 and EA2 is used to select the
operating mode and thus the speed to be monitored.
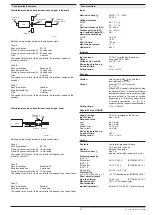
Monitoring of the setup speed is selected when EA1 is connected to T1
via the antivalent selector switch and EA2 is disconnected from T2 by the
antivalent switch. To monitor the automatic speed EA1 must be discon-
nected from T1 by the antivalent switch and EA2 must be connected to T2
via the antivalent selector switch. Both channels of the switch are moni-
tored for simultaneity (t
diff
< 1.0 s). When the simultaneity is not fulfilled or a
cross fault between EA1 and EA2 is present the device changes to a safe
failure condition. Once the fault is eliminated, a reset (see fault handling)
or a restart by switching off and back on the supply voltage is required. If
no selection switch is connected to EA1 and EA2, wire links have have to
be installed according to the required function. (set up mode bridge EA1
to T1; automatic mode bridge EA2 to T2).
Times
Start-up delay time t
a
The start-up delay time is used to override the monitoring during the motor’s
start-up time until it has reached a certain rotational speed, for example.
When the parameterized min. setup or automatic speed is not reached with-
in the parameterized start-up delay time t
a
the device immediately switches
to a safe condition. The contacts 43/44, 53/54 are opened and the signalling
output 68 is de-energized.
The start-up delay time is counted down whenever the device is restarted,
a change from setup to automatic mode occurs in automatic start mode,
or the ON/OFF pushbutton is pressed in manual start mode. However, the
precondition before starting the start-up delay time is always that all safety
requirements (position switch, magnet switch, feedback circuit) except of the
speed are fulfilled. During this start-up delay time, the output contact 43/44,
53/54 is permanently switched through provided the safety requirements
such as position and magnet switches remain fulfilled.
Release delay time t
v
The release delay time is the time that is counted down until the output
contacts 13/14, 23/24 and the signalling contact 15 are switched through
after a detected standstill.
Release monitoring time t
f
The release monitoring time is used to check the contactors connected to
the output contacts 43/44, 53/54. When the feedback to RF1 is not present
within the parameterized release monitoring time t
f
after release of the
output 43/44, 53/54 a 50/50 flashing code is immediately issued from the
signalling output 68. Additionally, an alarm is displayed.
Once the fault is eliminated, a reset (see fault handling) or a restart by switching
off and back on the supply voltage is required.
Device and Function Description
Summary of Contents for SAFEMASTER S UH 5947
Page 4: ...4 UH 5947 25 03 19 de 091A ...
Page 20: ...20 UH 5947 25 03 19 en 091A ...
Page 36: ...36 UH 5947 25 03 19 fr 091A ...


