background image

DNP Imagingcomm America Corporation

39

Configuring the IDW500 Console

IDW500 User Guide

Configuring the IDW500 Console

Your IDW500 console arrives pre-configured to the settings you will need for daily operation. However, if you need to 

change any of the configuration settings, use this section to do so. 

Attention

DNP Imagingcomm America Corporation recommends not changing the system from the default settings unless 

you have spoken with technical support. Doing so can cause inconsistencies and vary the output from the 

recommended tolerance thresholds.

1.

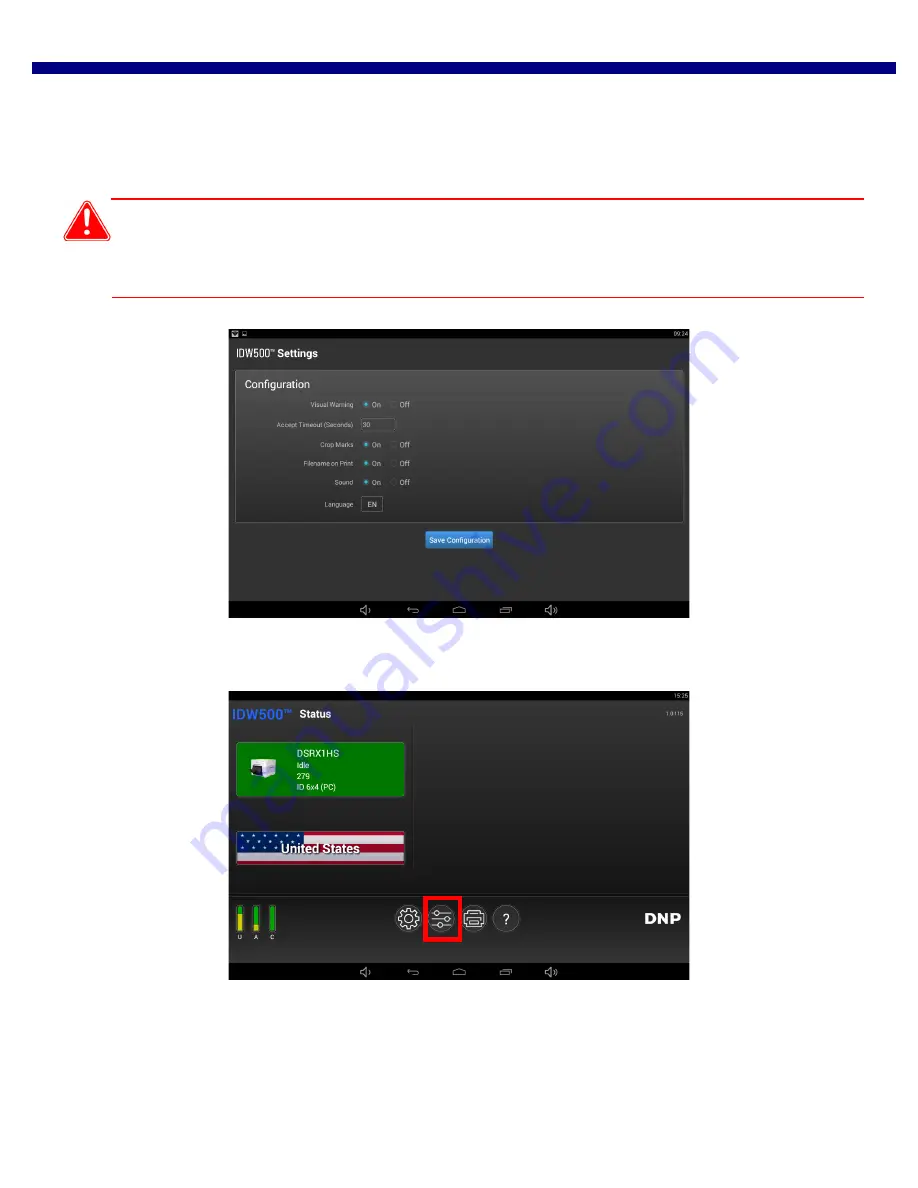
To access the 

IDW500 Configuration

 screen, press the 

Configuration

 button on the bottom of your IDW500 

console.

Summary of Contents for IDW500

Page 1: ...Wireless Passport System IDW500 2017 DNP Imagingcomm America Corporation PN DOC U WPS PRO ID R01 All rights reserved REV 03 2017 User Guide...

Page 2: ...onent parts At the Licensor s sole discretion the Licensor may from time to time provide You with updates to the Software Any such updates shall become part of the Software licensed to You hereunder a...

Page 3: ...anical photocopying recording or otherwise or for any purpose without the express written permission of DNP Imagingcomm America Corporation DNP Imagingcomm America Corporation may have patents patent...

Page 4: ...act with the body of the user under normal operating conditions This transmitter must not be co located or operating in conjunction with any other antenna or transmitter Under Industry Canada regulati...

Page 5: ...nte PIPO Technology Co Ltd declara que el Wireless Print Server cumple con los requisitos esenciales y cualesquiera otras disposiciones aplicables o exigibles de la Directiva 1999 5 CE Para mayor info...

Page 6: ...6 DNP Imagingcomm America Corporation IDW500 User Guide...

Page 7: ...stallation Preparing the Camera 13 Setting up the Printer 13 Setting Up IDW500 Unit 17 Setting Up the Camera 19 4 Using the IDW500 Console Your Camera Icons 21 Turning ON the System 22 About the ID Ph...

Page 8: ...er Media 41 Maintaining the Printer 44 Cleaning the Platen Roller 44 Cleaning the Thermal Print Head 45 Repacking the Printer 46 Troubleshooting Printer Issues 47 Clearing Paper Jams 47 Clearing Ribbo...

Page 9: ...nient or useful instructions Used to denote a procedure that requires two people to lift a heavy item Warns of a time sensitive step Be sure to read the surrounding instructions completely before perf...

Page 10: ...can get caught in the equipment or may conduct electricity and cause injury Never insert any foreign object into the system unit without powering the system OFF first Never block ventilation ports all...

Page 11: ...necessary Using the IDW500 console monitor your printer for media usage and possible error conditions IDW500 System Components The following components make up the IDW500 system Sony DSC H300 digital...

Page 12: ...n view and reprint up to the last six 6 printed images view information about your printer and keep your system running smoothly Attention While the following applications are running on your system i...

Page 13: ...that fits best to the camera Working from the center of the sticker slowly press outwards to remove any wrinkles or bubbles Go slowly to minimize air bubbles Figure 1 Applying the photo template stick...

Page 14: ...omm America Corporation Setting up the Printer IDW500 User Guide 4 Plug the USB cable into the back of the printer 5 Press the release lever on the top front of the printer to open the printer media c...

Page 15: ...safe place 8 Plug the printer power cord into the wall outlet Power the printer ON The printer lights will flash and the printer will beep as it initializes 9 Locate your box of printer media paper a...

Page 16: ...wo white ends in the lower or front brackets Set the take up side one white and one yellow end in the upper or back brackets Insert the left side of the ribbon spool into place first then snap the rig...

Page 17: ...box on the front of the printer 17 Place the print catch tray on the front of the printer Setting Up IDW500 Unit 1 Unpack the IDW500 console from the shipping box 2 Remove any protective plastic or f...

Page 18: ...comm America Corporation Setting Up IDW500 Unit IDW500 User Guide 4 Plug the power cord into the IDW500 unit and into a wall outlet 5 Press the power button on the right side of the console to power O...

Page 19: ...the camera 2 Locate the Toshiba FlashAir card that came with the kit Install the card in the camera 3 Power the camera ON 4 Once the setup menu appears follow the prompts on the camera to enter the ti...

Page 20: ...20 DNP Imagingcomm America Corporation Setting Up the Camera IDW500 User Guide...

Page 21: ...iew your passport photos prior to sending the image to the IDW500 console for printing The template overlay sticker allows you to take perfectly aligned ID photos every time Control Wheel The control...

Page 22: ...camera has been recognized as connected to the network Note If you hear a beep after starting the system check the console for an error message Typical error messages are PRINTER NOT FOUND verify the...

Page 23: ...nal information Name The name of the printer attached to your IDW500 console Status Shows whether your system is idle printing an image etc Media Left Displays the remaining media amount for the print...

Page 24: ...tom of the main ID Photo screen look for the CAMERA FOUND message when you re ready to take a passport photo When you re transferring images for printing this same area is used to show progress messag...

Page 25: ...n 1 Gear icon 2 Configuration icon 3 Printer icon 4 Help icon Use the Gear icon to access the Maintenance and Shutdown buttons Use the Configuration icon to access the Configuration screen Use the Pri...

Page 26: ...he subject would wear on a daily basis Uniforms clothing that looks like a uniform and camouflage attire should not be worn in photos except in the case of religious attire that is worn daily The subj...

Page 27: ...The head covering does not need to be removed If the subject does not want to remove their glasses check the image for glare before printing Sometimes tilting the head slightly up or down will remove...

Page 28: ...the subject and further reduce shadows If necessary use the camera flash to reduce shadows 4 Stand 6 feet away from the subject Hold the camera so that the camera lens is eye level with the subject 5...

Page 29: ...you look at the Photo ID application you will see a CAMERA FOUND message at the bottom of the screen 4 Press the PLAYBACK on the back of the camera 5 Once the camera is in playback mode press the MEN...

Page 30: ...CAMERA FOUND message Next a Electronic sound occurs as the image is transferred TRANSFERRING IMAGES is displayed on the screen A Pump sound is heard as the console prepares the image for printing PROC...

Page 31: ...photo you have taken has met all of the Biometrics requirements for passport photos the background of the acceptance screen is displayed as green image above If the Biometric requirements have not be...

Page 32: ...image to a USB drive If the image was successfully sent to the printer you will hear a brief Gong sound from your console Note For more information about saving your image to a USB drive see Saving I...

Page 33: ...ate option 3 When you have finished editing the image press ACCEPT to print your image Press CANCEL to return to the main screen Note Whenever you make edits to an image they are saved as the default...

Page 34: ...an image to the IDW500 console you have the option of saving the image to a USB drive 1 Insert a USB drive into the console s USB port It is recommended to plus the USB drive into the USB 3 port see...

Page 35: ...erted a USB device already your console gives you a Long Beep noise as well as an Insert USB Media message 5 When the image begins to transfer your console gives you a Pump noise to let you know the i...

Page 36: ...mages you have sent to your printer via the IDW500 console this screen logs whether a sent image Failed did not print Pending waiting to be printed Completed printed 1 From your console s main screen...

Page 37: ...press SELECT 5 Scroll DOWN to OK press SELECT 6 Press MENU EXIT or the POWER button to return to shooting mode Enabling the Flash Use the camera flash if needed to increase the quality of your photos...

Page 38: ...Down the IDW500 System Note It is recommended that you shut down your IDW500 System daily at the end of business 1 To shut down the IDW500 console press the GEAR icon on the main ID Photo screen 2 Pre...

Page 39: ...to change any of the configuration settings use this section to do so Attention DNP Imagingcomm America Corporation recommends not changing the system from the default settings unless you have spoken...

Page 40: ...es Visual Warning Accept Timeout Seconds Crop Marks Enables disables crop marks on the final print Crop marks are helpful when cutting out the images Default is ON Filename on Print Enables disables d...

Page 41: ...some troubleshooting and maintenance steps Attention Be sure to save your shipping box If you need to transport your printer or send your printer in for repairs the original shipping box is the safest...

Page 42: ...Remove the paper spool Take the spool ends off of the spent paper roll and throw away the roll Do not throw away the spool ends 5 Load your new paper roll onto the spool ends Make sure that there are...

Page 43: ...correct position 9 Set the ribbon supply side two white ends in the lower or front brackets Set the take up side one white and one yellow end in the upper or back brackets Insert the left side of the...

Page 44: ...en roller if you experience soft blurry lines on your prints that run in the same direction of the print feed 2 Release the open lever and open the front cover 3 Remove the ribbon tray and set it asid...

Page 45: ...lean the platen roller first 1 Release the open lever and open the front cover 2 Remove the ribbon tray and set it aside 3 Remove the paper spools and set them aside 4 Locate the thermal head in the p...

Page 46: ...transport the printer Remove all accessories media and attachments from the printer this includes all the ribbon paper roll and paper spools as well as the USB and power cables Place the accessories i...

Page 47: ...Guide Troubleshooting Printer Issues Clearing Paper Jams 1 Open the printer media compartment using the release lever on the front of the printer 2 Remove the ribbon 3 Carefully pull any remaining pap...

Page 48: ...e roll Printing over bent paper can damage the printer and cause more paper jams 6 If the paper is not cut evenly it may cause abnormal printing and or the paper to jam Re feed the paper as you would...

Page 49: ...aring Ribbon Jams IDW500 User Guide 3 Use clear tape to reattach the two ribbon spools 4 Replace the ribbon in the printer and wind the ribbon a few times to remove any slack and until the tape is no...

Page 50: ...50 DNP Imagingcomm America Corporation Clearing Ribbon Jams IDW500 User Guide...

Page 51: ...ower available If the camera has less than half of the battery power remaining change or recharge the camera batteries 5 Make sure you are standing within 15 feet of the IDW500 console If you are in a...

Page 52: ......

Reviews: