background image


19 


Ordercode: 101281 

D1 Videomixer 

6. Transition 
In this menu you can set the desired transition effect. 
 

01)


While in main menu, select 

 and open the menu.  

02)


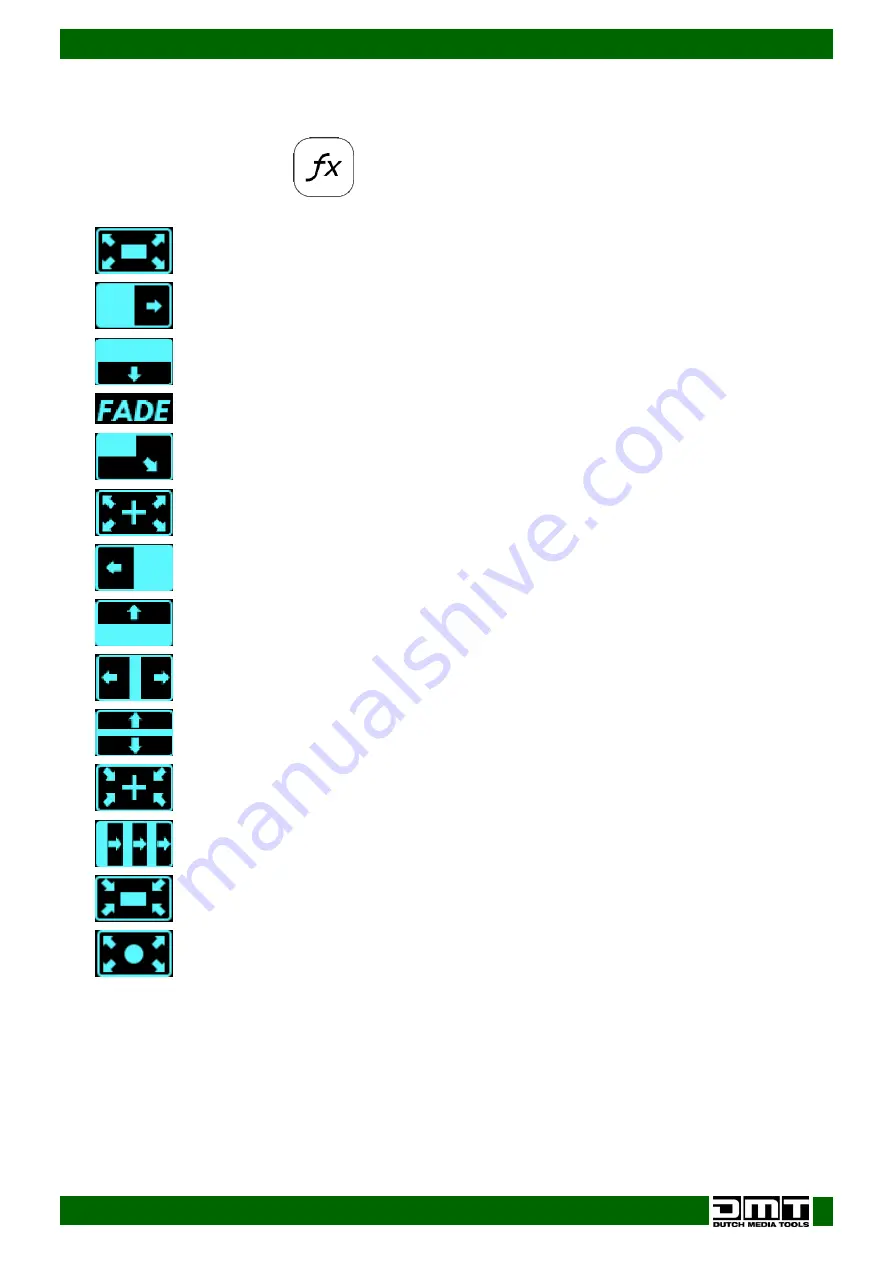
Select one of the following transition effects:  


Iris box 


Wipe to right 


Wipe to bottom 


Fade in/fade out 


Wipe to bottom right 


Iris cross 


Wipe to left 


Wipe to top 


Center split horizontal 


Center split vertical 


Cross inwards 


Blinds vertical 


Box inwards 


Iris round 

 
03)


Press the TAKE button (09) or move the T-bar (07) to apply the selected transition effect. 


Summary of Contents for D1 Videomixer

Page 1: ...D1 Videomixer with scaler V1 Highlite International B V Vestastraat 2 6468 EX Kerkrade the Netherlands Ordercode 101281 MANUAL ENGLISH ...

Page 2: ...t 16 2 3 External Sync 16 2 4 Test Pattern 16 3 Freeze 17 4 Black 18 5 Scale 18 6 Transition 19 7 DSK 20 8 Blend 20 9 Logo 21 10 Mask 21 11 Audio Input 22 12 Audio Output 22 13 Front Panel Lock 23 14 Settings 23 14 1 Transition 23 14 2 Version 23 14 3 Ethernet 24 14 3 1 IP 24 14 3 2 Subnet Mask 24 14 3 3 Gateway 25 14 3 4 State 25 14 4 T Bar Correction 25 14 5 Fader Correction 25 14 6 Key Board 26...

Page 3: ...ST PGM Logo 31 Maintenance 31 Troubleshooting 31 No Output 31 Screen Only Displays a Part of the Image 31 Output Does Not Fill the Entire Screen 32 Black Spots Appear on the Sides of the Screen 32 Product Specifications 32 Dimensions 33 ...

Page 4: ...eomixer 2 x HDMI HDMI cable 1 3 m 1 x USB cable 1 3 m 1 x CAT5 cable 1 3 m Schuko to IEC power cable 1 3 m User manual Safety Instructions Every person involved with the installation operation and maintenance of this system has to be qualified follow the instructions of this manual Before the initial start up please make sure that there is no damage caused by transportation Should there be any con...

Page 5: ... struck disconnect mains power supply immediately Have a qualified engineer inspect for safety before operating If the device has been exposed to drastic temperature fluctuation e g after transportation do not switch it on immediately The arising condensation water might damage your device Leave the device switched off until it has reached room temperature If your DMT device fails to work properly...

Page 6: ...ays a safe method to use Note If you are given an RMA number please include the following information on a piece of paper inside the box 01 Your name 02 Your address 03 Your phone number 04 A brief description of the symptoms Claims The client has the obligation to check the delivered goods immediately upon delivery for any short comings and or visible defects or perform this check after our annou...

Page 7: ...voltage 100 240 V AC 50 60 Hz Power consumption 65 W Inputs 4 x HDMI Output program PGM 1 x HDMI Output preview PVW 1 x HDMI Input resolutions HDMI SMPTE 625 25 50 PAL 525 29 97 59 94 NTSC 1080p 50 59 94 60 1080i 50 59 94 60 720p 50 59 94 60 VESA 800x600 60 1024x768 60 1280x768 60 1280x1024 60 1600x1200 60 1920x1080 60 Output resolutions SMPTE 480i 576i 625 25 50 PAL 525 29 97 59 94 NTSC 1080p 50 ...

Page 8: ... to select set and confirm settings 06 MENU button Press the button to open main menu or to return to the previous screen s 07 T Bar Move the bar to transition between the buses 08 Function buttons MASK button Press the button to key the video into special shapes SCALE button Press the button to set PIP in the PST window Press the layer buttons 11 to disable PIP 09 TAKE button Press the button to ...

Page 9: ...ss the button to mute the audio output The function is active when the button lights red 15 CUE button Press the button to select the audio monitor PST or PGM When the button is lit it is possible to adjust the audio volume with the SOURCE 01 and MASTER 02 faders Back Fig 02 16 Power switch ON OFF 17 RCA audio IN 18 RCA audio OUT 19 3 5 mm jack headphones connector OUT 20 PVW HDMI OUT Preview outp...

Page 10: ...t subject to warranty Do not HOT plug HDMI Turn OFF your device before connecting any cables Otherwise your device can become damaged and your warranty will become void Setup and Operation Follow the directions below as they pertain to your preferred operation mode Before plugging the unit in always make sure that the power supply matches the product specification voltage Do not attempt to operate...

Page 11: ...10 Ordercode 101281 D1 Videomixer Menu Overview ...

Page 12: ...11 Ordercode 101281 D1 Videomixer ...

Page 13: ...12 Ordercode 101281 D1 Videomixer ...

Page 14: ...ect adjust open and confirm Please note that some options can be accessed ONLY by turning pressing the control and the touch screen will not work 01 At start up the display will show 2 screens 02 Press the MENU button 06 or turn the menu control 05 to enter the main menu The display will show 03 Turn the menu control 05 to toggle through the submenus or touch the white arrows located on the opposi...

Page 15: ...14 Ordercode 101281 D1 Videomixer 1 Input 2 Output 3 Freeze 4 Black 5 Scale 6 Transition 7 DSK 8 Blend 9 Logo 10 Mask 11 Audio Input 12 Audio Output 13 Front Panel Lock 14 Settings 15 Factory Reset ...

Page 16: ...NO in order to reset EDID Confirm your choice BRIGHTNESS Set the brightness 0 100 CONTRAST Set the contrast 0 100 SATURATION Set the saturation 0 100 SHARPNESS Set the sharpness 0 100 RESET CONFIG Confirm and select YES or NO in order to reset the configuration Confirm your choice TEST PATTERN Select OFF or COLOR BAR and confirm your choice 2 Output In this menu you can set the output settings 01 ...

Page 17: ...t DVI or HDMI BIT DEPTH Select 8 bits or 10 bits only if HDMI is selected COLOR SPACE Select IMAGE or VIDEO DE ADJUST When black spots appear on the sides of the screen use this function to shift the black out of the screen Select adjust the following settings ON OFF Enable disable DE H POS Set the horizontal position V POS Set the vertical position H SIZE Set the width V SIZE Set the height H POL...

Page 18: ...lect and open the menu The display will show 02 Select one of the 4 options LIVE Select this option to reactivate the currently frozen layers FREEZE B Select to freeze layer B FREEZE A Select to freeze layer A FREEZE ALL Select to freeze layers A and B 03 Touch PGM FREEZE on the screen to switch PGM freeze ON OFF ...

Page 19: ... select and open the menu 02 Select adjust the following settings FULL SCREEN Select ON OFF to enable disable full screen H POS Set the horizontal position V POS Set the vertical position H SIZE Set the width V SIZE Set the height H V SIZE Set the size keeping the aspect ratio RESET The display will read Do you want to reset scale parameter Select YES NO and confirm CROP H POS Crop the horizontal ...

Page 20: ... 02 Select one of the following transition effects Iris box Wipe to right Wipe to bottom Fade in fade out Wipe to bottom right Iris cross Wipe to left Wipe to top Center split horizontal Center split vertical Cross inwards Blinds vertical Box inwards Iris round 03 Press the TAKE button 09 or move the T bar 07 to apply the selected transition effect ...

Page 21: ...ESET will remain unchanged The other colors will cut out ALPHA Set the alpha parameter 0 128 RED MIN Set the minimum value of the red color 0 255 RED MAX Set the maximum value of the red color 0 255 GREEN MIN Set the minimum value of the green color 0 255 GREEN MAX Set the maximum value of the green color 0 255 BLUE MIN Set the minimum value of the blue color 0 255 BLUE MAX Set the maximum value o...

Page 22: ...of the still DELETE STILL Delete the previously selected still 10 Mask In this menu you can set the mask 01 While in main menu select and open the menu 02 Select adjust the following settings MASK Select the desired mask DIAMOND ROUND HEART STAR TRI ANGLE OVAL HEXAGONS PENTAGON 4 POINT STAR 6 POINT STAR LIGHTNING CRESCENT LEFT CRESCENT RIGHT See the pictures below MASK SIZE Set the mask size 1 6 O...

Page 23: ...ts and enter its settings menu 03 In the settings menu select adjust the following setting AUDIO SOURCE SEL Set the audio source EMBEDDED or EXTERNAL 12 Audio Output In this menu you can set audio output settings 01 While in main menu select and open the menu 02 Select adjust the following settings AUDIO SOURCE SEL Set the audio source LAYER A or LAYER B AUDIO MONITOR Set the audio monitor PST or ...

Page 24: ... In this menu you can set the device s general settings 01 While in main menu select and open the menu The display will show 02 Select one of the 7 submenus TRANSITION VERSION ETHERNET T BAR CORRECTION FADER CORRECTION KEY BOARD ADVANCE 14 1 Transition In this menu you can set the transition time between sources 01 Select adjust the following setting TRANS TIME Transition time 0 0 9 9 seconds 14 2...

Page 25: ...u control 05 to edit the currently selected section of the IP address the currently selected section will be underlined 05 Press the menu control 05 to save changes 06 Repeat steps 4 5 to edit the remaining sections of the IP address 14 3 2 Subnet Mask In this menu you can set the subnet mask 01 The display will show 02 Turn the menu control 05 until the current subnet mask lights up 03 Press the ...

Page 26: ...atus It is not possible to adjust settings in this menu 01 The display will show 14 4 T Bar Correction In this menu you can calibrate the T bar 01 Move the T bar to the top 02 Select STEP2 CHOOSE ON and set it to ON 03 Move the T bar to the bottom 04 Select STEP4 CHOOSE ON and set it to ON 05 The display will read Calibration successed which means that the calibration is complete 14 5 Fader Correc...

Page 27: ...tton in the PST section 12 to set the PST logo properties PST FREEZE Press the LOGO button in the PST section 12 to set freeze the PST output 14 6 2 Key Board Test In this menu you can test the keyboard 01 Select adjust one of the 2 settings LED LIGHT TEST Select ON OFF If you have chosen ON all the buttons on the device will light up in order to test if the LEDs function properly KEY VALUE Select...

Page 28: ...9 buttons 12 to see the selected source on the preview HDMI output 06 Press the TAKE 09 or CUT 10 button or move the T bar 07 in order to send the selected video source from the PST to the PGM output Layering PIP MASK SCALE These functions work only in PVW preview mode 01 Press the A button 11 to select the source for PIP layer 1 Press one of the 6 9 buttons 12 to select the input source 02 Press ...

Page 29: ...te an existing preset If a button is continuously on This bank has not been used yet and it is possible to save a preset without overwriting any data 04 Press one of the 1 5 buttons in the Preset Bank section 03 to save a preset Loading Presets 01 Press the LOAD button located in the Preset Bank section 03 The display will show 02 Select one of the 4 pages 03 The buttons 1 5 in the Preset Bank sec...

Page 30: ... Turn the D1 Videomixer off 02 Loosen the mounting screws and remove pull out the indicated module 03 Remove the microSD card from the housing and connect it to your PC The card should be FAT32 formatted 04 Install XTOOL software on your PC 05 Double click the XTOOL shortcut on the desktop to start the software The display will show ...

Page 31: ...kground color 11 Click on Create a Logo The display will show 12 Choose the correct file number File No The adjustment range is 1 50 When saving multiple logos save them in the ascending order It is not allowed to skip numbers 13 Type in the name of your logo File Name 14 Click on Select and choose the LOGO folder on the microSD card Create such folder if it does not exist Note stands for the card...

Page 32: ...d for installing the device or parts of the device have to be tightly connected and must not be corroded 02 There may not be any deformations on housings fixations and installation spots 03 Mechanically moving parts like axles eyes and others may not show any traces of wearing 04 The electric power supply cables must not show any damages or material fatigue Troubleshooting This troubleshooting gui...

Page 33: ...0 60 1024x768 60 1280x768 60 1280x1024 60 1600x1200 60 1920x1080 60 Output resolutions SMPTE 480i 576i 625 25 50 PAL 525 29 97 59 94 NTSC 1080p 50 59 94 60 1080i 50 59 94 60 720p 50 59 94 60 VESA 800x600 60 1024x768 60 1280x768 60 1280x1024 60 1600x1200 60 1920x1080 60 Genlock Y In Black Burst 480i 576i 720p 50 59 94 1080i 50 59 94 1080p 50 59 94 60 1080psf 23 98 24 Grayscale processing 12 bit Pro...

Page 34: ...33 Ordercode 101281 D1 Videomixer Dimensions ...

Page 35: ...34 Ordercode 101281 D1 Videomixer ...

Page 36: ... 2020 DMT ...

Reviews: