

6b. If your kit includes a single foot,
attach it to bottom of frame.
Secure foot with locking pin.
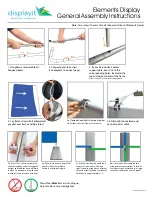
2. Connect poles to corners.
(See diagram to on next page)
1. Straighten and assemble all
bungeed poles.
4. Lay frames down. Pull pillowcased
graphic over frame and zip closed.
5b. Slide light onto clamp and
connect power cable.
5a. Clamp optional lights clamp on top bar.
Tip: Put lights on before standing the display up.
Elements Display
General Assembly Instructions
Updated 9/25/2017
Note: Assembly is the same for all shapes and sizes of Elements Frames
6c. If your kit includes a double foot,
connect as seen above. Frame on
right (shown in green above) attaches
to the front foot nub and overlaps the
back frame by approximately 1.5”.
6d. Nubs can be disassembled and
arranged in many variations. A total of
four frames can be attached to a single
foot. Experimentation is encouraged!
6a. If your foot is not preassembled,
slide the included screw through the
bottom and twist the nub until firmly
in place. Or, optionally screw the nub
in with a screw driver (not included).
Mount feet
after
frame is standing up.
Failure to do so may damage feet.
3. If your kit includes a center
support pole, insert it into the
corresponding holes, located in the
top and bottom poles of the frame.
Frames over 100” wide recquire support poles


