background image

MP3/WMA Digital Music Player

User’s Guide

Reproductor Digital de Música MP3/WMA

Manual del Usuario

Lecteur numérique MP3/WMA

Guide d'utilisation

For additional set-up or operating assistance, 

please visit our website at www.disneyelectronics.com 

or contact customer service at (954) 660-7026. 
Please keep all packaging material for at least 90 days in case you  

need to return this product to your place of purchase or Memcorp. 
For parts and accessories, contact Fox International at 1-800-321-6993. 
Distributed by Memcorp Inc., Weston, FL, Disney Elements © Disney 2005. 

Para informacion adicional sobre la configuracion o si necesita asistencia  

con la operacion del equipo, por favor visitenos en nuestra pagina web 

www.disneyelectronics.com o si requiere asistencia directa, comuniquese  

con nuestro departamento de servicio al cliente al numero (954) 660-7026.  
Por favor mantenga todo el material de empaque por lo menos por  

90 dias, en caso que usted necesite devolver el producto donde lo  

compro a directamente a Memcorp Inc. 
Para Accesorios o Partes en general, por favor comuniquese con  

Fox International al numero 1-800-321-6993. 
Distribuido por Memcorp Inc. Weston, FL, Disney Elements ©Disney 2005. 

Pour obtenir des informations supplémentaires sur l’installation ou une  

assistance concernant l’emploi de votre produit, veuillez visiter notre site  

Web sur www.disneyelectronics.com ou contacter notre service clientèle  

au (954) 660-7026. 
Veuillez conserver tout matériel d’emballage pendant au moins 90 jours  

au cas où vous devriez renvoyer votre produit à votre revendeur ou  

directement à Memorex. 
Pour les pieces et les accessoires, contactez Fox International at au  

1-800-321-6993. 
Éléments Disney ©Disney 2005.  Distribué par Memcorp Inc. Weston, Floride 

DDA8040-CAR

FO  LD 

FO  LD 

4.72”wide 

4.72”

 high 

Job # DDA8040-CAR

Colors: 1-color print

Pantone 1807c

Summary of Contents for DDA8040-CAR Mix Stick

Page 1: ...MP3 WMA Digital Music Player User s Guide Reproductor Digital de M sica MP3 WMA Manual del Usuario Lecteur num rique MP3 WMA Guide d utilisation DDA8040 CAR LD LD 4 72 wide...

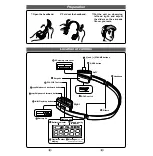
Page 2: ...vel Connect USB jack to computer Press to skip search backwards Press to power on play or pause Press and hold for 2 seconds to stop play Attach Neck strap to Strap holder Press to skip search forward...

Page 3: ...stop HIGH SPEED MUSIC SEARCH During playback press and hold the Skip Search n o buttons to move the player forward or backward within a file to locate a specific musical passage The player will move f...

Page 4: ...h the windows closed during periods of excessive heat ROAD SAFETY Do not use headphones while driving cycling or operating any motorized vehicle It may create a traffic hazard and it is illegal in som...

Page 5: ...nstallation This equipment generates uses and can radiate radio frequency energy and if not installed and used in accordance with the instructions may cause harmful interference to radio communication...

Page 6: ...your hearing Guard against this by setting your equipment at a safe level BEFORE your hearing adapts To establish a safe level Start your volume control at a low setting Slowly increase the sound unti...

Page 7: ...garbage disposals alarm clock at two feet THE FOLLOWING NOISES CAN BE DANGEROUS UNDER CONSTANT EXPOSURE 90 Subway motorcycle truck traffic lawn mower 100 Garbage truck chain saw pneumatic drill 120 Ro...

Page 8: ...p Button 3 Skip Search o Button 4 Play Pause Stop Power On Button 5 Volume Down Button 6 Flash Plug Inside Flash Plug Cover 7 Flash Plug Cover 8 Headphone Jack 9 Strap Holder 10 SD MMC Memory Card Slo...

Page 9: ...e battery as follows 1 Remove the Flash Plug cover and connect your player to the USB port on your computer using the Flash Plug as shown The Function indicator will blink red and green when charging...

Page 10: ...until snug 3 Connect the Neck strap back to the Strap connector 4 Press the Tabs to release the Strap connector from the Neck strap IMPORTANT SAFETY FEATURE The Neck strap contains a safety strap tha...

Page 11: ...not be activated without driver installation To activate the USB mass storage function please use the installation CD Rom to install the driver For Windows 98SE if you are connecting your player to y...

Page 12: ...At the Welcome screen click NEXT 3 Read the License Agreement then click YES 4 At the Setup screen click NEXT It is recommended to leave the destination folder as it is WINDOWS 98 DRIVER INSTALLATION...

Page 13: ...finished the InstallShield Wizard Complete screen will appear Click FINISH to exit the Install program 7 When the installation has completed the new folder Disney Mix Stick will be added to the PROGR...

Page 14: ...ouble click on the CD drive then the installation screen will appear Click on the Windows Media Player 10 Setup icon NOTE The Windows Media Player 10 is for Windows XP only For Windows 98SE Windows ME...

Page 15: ...4 Installation will continue 5 At the Welcome screen click NEXT 6 Select the desired privacy options WINDOWS MEDIA PLAYER 10 INSTALLATION CONT 14...

Page 16: ...en finished click Next 8 Read the instructions and tick the check boxes as desired Then click on More Options and tick the check boxes as desired 9 Click Finish to finish the installation of the Windo...

Page 17: ...u are finished see the Remove Hardware procedure on page 19 before disconnecting the player IMPORTANT A WMA file with DRM will not play back if you directly drag and drop it into the Removable Disk wi...

Page 18: ...K to confirm the settings 3 Click on the Rip Music icon to start ripping the music to your computer 4 When the music tracks are ripped connect the player to your computer Open the Removable Disk windo...

Page 19: ...c List pull down menu to locate the music files you wish to download Then make sure to tick the box next to the files 3 Select the Portable Device that you want to copy to from the right side drop dow...

Page 20: ...USB Mass Storage Device and click the Stop button The Stop a Hardware Device window will pop up as shown Click OK When the Safe to Remove Hardware window is displayed you may remove the player from th...

Page 21: ...AGE make sure the unit is OFF before inserting or removing the card Insert a SD MMC memory card not included up to 512MB with the front of the card facing up as shown To remove the SD MMC memory card...

Page 22: ...power was turned off NOTE There will be no resume function if the SD MMC memory card is inserted removed or the music files is added or deleted from the player There will be no resume function if the...

Page 23: ...P3 and WMA files to this unit 3 To turn the unit on slide the POWER switch 1 to the ON Down position then press the Play Pause Stop Power On button 2 the indicator will light orange and then will ligh...

Page 24: ...e the button normal playback will resume 1 2 1 HIGH SPEED MUSIC SEARCH During playback press the Skip Search n button to advance the player to the beginning of the next file Press the Skip Search n bu...

Page 25: ...cancel Random playback press the Random OFF button 2 RANDOMLY PLAYING THE TRACKS NOTES If a SD MMC memory card is inserted the player will randomly playback the music files in the SD MMC memory card a...

Page 26: ...Volume is set too Raise the volume using the low VOLUME Up button The MP3 or WMA files Download uncorrupted are corrupted files No files are in the Upload files to the unit as player described on page...

Page 27: ...sk and left click on Format 3 At the Format window select FAT32 from the file system pull down menu then click start to format the unit see figure to the right NOTE Make sure you have selected FAT32 a...

Page 28: ...try resetting it by sliding the POWER switch to the OFF position and then back to the ON position FOR FIRMWARE UPGRADE Please visit out website at www disneyelectronics com to check if there is new f...

Page 29: ...3 WMA Windows Media Audio WMA file with DRM Bit Rate 8kbps 320kbps General Dimension 107 x 39 x 18 mm Weight 40g USB USB 2 0 Built in Memory 128MB Max Playtime Approx 8 hours Supported OS Win ME 2000...

Page 30: ...a para brincar buscar hacia atr s Oprima para encender la unidad empezar a reproducir o poner en pausa Oprima y mantenga oprimido por 2 segundos para detener la reproducci n Enganche la cinta para cue...

Page 31: ...DAD Durante la reproducci n oprima y sostenga los botones de Brincar Buscar n o para moverse hacia adelante o atr s dentro de un archivo para ubicar un pasaje espec fico en la canci n Mientras manteng...

Page 32: ...mpoco en un auto con las ventanas cerradas durante per odos de calor excesivo SEGURIDAD EN EL CAMINO No utilice aud fonos mientras conduce anda en bicicleta o mientras opera un veh culo motorizado Est...

Page 33: ...nable contra la interferencia da ina en una instalaci n residencial Este equipo genera usa y puede irradiar energ a de radiofrecuencia y si no se instala y usa conforme a las instrucciones puede gener...

Page 34: ...este da o innecesario ajustando el volumen de su equipo a un nivel bajo antes de acostumbrarse a escuchar siempre la m sica a un volumen alto Para establecer un nivel auditivo seguro Ponga el control...

Page 35: ...IENTES RUIDOS PUEDEN SER PELIGROSOS SI SE SOMETE A ELLOS EN FORMA CONSTANTE 90 Subterr neo motocicletas tr fico de camiones podadora de pasto 100 Cami n de basura sierra el ctrica perforadora neum tic...

Page 36: ...Encendido 5 Bot n de Bajar Volumen 6 Conexi n de Flash adentro de la cubierta de la conexi n de Flash 7 Cubierta de la conexi n de Flash 8 Enchufe para aud fonos 9 Sujetador de banda 10 Ranura para t...

Page 37: ...ierta de la Conexi n de Flash y conecte el reproductor al puerto USB en su computadora usando la Conexi n de Flash como se muestra El indicador de Funci n parpadear de color rojo y verde mientras se e...

Page 38: ...zo del cordel hasta que quede fijo 3 Conecte la cinta para cuello al conector 4 Oprima las Leng etas para desenganchar el conector de la cinta FUNCIONES IMPORTANTES DE SEGURIDAD La cinta para cuello c...

Page 39: ...rolador Para activar la funci n de almacenamiento masivo del USB s rvase utilizar el disco de instalaci n para instalar el controlador Para Windows 98SE si usted est conectando su reproductor por prim...

Page 40: ...haga clic en SIGUIENTE 3 Lea el Contrato de licencia luego haga clic en S 4 En la pantalla de Configuraci n haga clic en SIGUIENTE Recomendamos que deje la carpeta de destino como est INSTALACI N DEL...

Page 41: ...termine aparecer la pantalla del Asistente de instalaci n Haga clic en FINALIZAR para salir del programa de instalaci n 7 Cuando termine la instalaci n se agregar la nueva carpeta Disney Mix Stick al...

Page 42: ...disco y entonces aparecer la pantalla de instalaci n Haga clic en el icono de Configuraci n del Reproductor de Windows Media 10 NOTA El Reproductor de Windows Media 10 nicamente es para Windows XP Pa...

Page 43: ...4 La instalaci n continuar 5 En la pantalla de bienvenida haga clic en SIGUIENTE 6 Seleccione las opciones de privacidad deseadas INSTALACI N DE REPRODUCTOR DE WINDOWS MEDIA 10 CONT 14...

Page 44: ...iente 8 Lea las instrucciones y active las casillas de verificaci n deseadas Luego haga clic en M s opciones y active las casillas de verificaci n deseadas 9 Haga clic en Finalizar para finalizar la i...

Page 45: ...Quitar hardware con seguridad en la p gina 19 para desconectar el reproductor IMPORTANTE Un archivo WMA con DRM no se reproducir si lo arrastra y coloca directamente en la ventana del disco extra ble...

Page 46: ...las configuraciones 3 Haga clic en el icono de Copiar desde CD para empezar a copiar la m sica a su computadora 4 Cuando copie las pistas de m sica conecte el reproductor a su computadora Abra la ven...

Page 47: ...sincronizaci n para encontrar los archivos de m sica que desea descargar Luego aseg rese de seleccionar la casilla junto a los archivos 3 Seleccione el Dispositivo port til al que desea copiar desde e...

Page 48: ...vo USB y haga clic en bot n de Detener Se abrir la ventana Detener un dispositivo de hardware como se muestra Haga clic en Aceptar Cuando vea la ventana Es seguro quitar el hardware puede quitar el re...

Page 49: ...d est apagada antes introducir o sacar la tarjeta Introduzca una tarjeta de memoria SD MMC no incluida con m ximo de 512MB con el frente hacia arriba como se muestra Para quitar la tarjeta de memoria...

Page 50: ...apagarla NOTAS La funci n de reanudar no opera si introduce o retira la tarjeta de memoria SD MMC o si agrega o borra archivos de m sica del reproductor La funci n de reanudar no opera si la tarjeta d...

Page 51: ...c mo cargar los archivos MP3 y WMA a esta unidad 3 Para encender la unidad deslice el interruptor de ENCENDIDO 1 a la posici n ON abajo luego oprima el bot n Tocar Pausa Paro Encendido 2 el indicador...

Page 52: ...normal 1 2 1 B SQUEDA DE M SICA A ALTA VELOCIDAD Durante la reproducci n oprima el bot n de Brincar Buscar n para avanzar el reproductor al inicio del pr ximo archivo Oprima repetidamente el bot n de...

Page 53: ...ar la Reproducci n aleatoria oprima el bot n de Desactivar aleatorio 2 REPRODUCIR LAS PISTAS EN ORDEN ALEATORIO NOTAS Si introduce una tarjeta de memoria SD MMC el reproductor reproducir aleatoriament...

Page 54: ...usando el bajo bot n indicado Los archivos MP3 o Descargue archivos no WMA est n corruptos corruptos No hay archivos en el Cargue archivos a la unidad reproductor como se describe en las p ginas 16 a...

Page 55: ...ear 3 En la ventana de Formatear seleccione FAT32 del men desplegable del sistema de archivos luego haga clic en iniciar para formatear la unidad vea la figura a la derecha NOTA Aseg rese de seleccion...

Page 56: ...lizando el interruptor de ENCENDIDO a la posici n de OFF y luego de regreso a la posici n de ON ACTUALIZAR EL SOFTWARE DEL FABRICANTE Visite nuestro sitio web en www disneyelectronics com para revisar...

Page 57: ...Windows Media archivo WMA con DRM Velocidad en bits De 8kbps a 320kbps General Dimensi n 107 x 39 x 18 mm Peso 40 g USB USB 2 0 Memoria integrada 128 MB Tiempo m x de reproducci nAprox 8 horas Sistem...

Page 58: ...er rechercher vers l arri re Appuyez pour mettre en marche d marrer la lecture ou faire une pause Appuyez et maintenez enfonc 2 secondes pour arr ter la lecture Attachez la courroie de cou au support...

Page 59: ...E 1 Pendant la lecture appuyez et maintenez enfonc les boutons Skip Search n o pour faire avancer le lecteur vers l avant ou vers l arri re dans un fichier afin de localiser un passage musical sp cifi...

Page 60: ...excessive S CURIT SUR LA ROUTE N utilisez pas les couteurs lorsque vous conduisez que vous faites du v lo ou que vous utilisez un v hicule motoris Cela pourrait cr er un risque et c est ill gal dans...

Page 61: ...lation r sidentielle Cet quipement g n re utilise et peut irradier l nergie des fr quences radio et s il n est pas install et utilis conform ment aux instructions peut causer des interf rences nuisibl...

Page 62: ...ion Prot gez vous contre cela en r glant votre quipement un niveau s curitaire AVANT que votre ou e ne s adapte Pour tablir un niveau s r Commencez par un contr le du volume bas Augmentez lentement ju...

Page 63: ...ne d potoir r veille matin deux pieds LES BRUITS SUIVANTS PEUVENT TRE DANGEREUX LORS D UNE EXPOSITION CONSTANTE 90 m tro moto circulation de camions tondeuse gazon 100 camion ordures scie cha ne perce...

Page 64: ...ause Stop Power On 5 Bouton VOLUME vers le bas 6 Prise Flash dans le couvercle de la prise Flash 7 Couvercle de la prise Flash 8 Prise des couteurs 9 Support de la courroie 10 Fente de la carte m moir...

Page 65: ...la prise Flash et connectez votre lecteur au port USB de votre ordinateur l aide de la prise Flash tel qu illustr L indicateur de fonction clignotera en rouge et vert lors du chargement et s allumera...

Page 66: ...justement parfait 3 Reliez la dragonne au connecteur de la dragonne 4 Appuyez sur les languettes pour lib rer le connecteur de la dragonne IMPORTANTE OPTION DE S CURIT La dragonne contient une bande d...

Page 67: ...ne sera pas activ e sans l installation du pilote Pour activer cette fonction utilisez le CD Rom pour installer le pilote Pour Windows 98 SE si vous connectez votre lecteur votre ordinateur pour la pr...

Page 68: ...sur NEXT 3 Lisez la convention de droits d utilisation puis cliquez sur YES 4 l cran de configuration cliquez sur NEXT Nous vous recommandons de laisser le r pertoire de destination tel quel INSTALLA...

Page 69: ...an InstallShield Wizard Complete fin de l installation appara tra Cliquez sur FINISH pour terminer le programme d installation 7 Lorsque l installation est termin e le nouveau r pertoire Disney Mix St...

Page 70: ...s sur lecteur CD et l cran d installation appara tra Cliquez sur l ic ne d installation Windows Media Player 10 REMARQUE le Windows Media Player 10 est pour Windows XP uniquement Pour Windows 98SE Win...

Page 71: ...4 L installation se poursuit 5 l cran de bienvenue cliquez sur NEXT 6 S lectionnez les options de confidentialit d sir es INSTALLATION DE WINDOWS MEDIA PLAYER 10 suite 14...

Page 72: ...avez termin cliquez sur Suivant 8 Lisez les instructions et cochez les cases selon vos besoin Puis cliquez sur Plus d options et cochez les cases selon vos besoins 9 Cliquez sur Terminer pour compl te...

Page 73: ...ur la fen tre disque amovible Lorsque vous avez termin consultez la proc dure Retrait du mat riel la page 19 avant de d connecter le lecteur IMPORTANT un fichier WMA avec DRM ne pourra pas tre lu si v...

Page 74: ...es param tres 3 Cliquez sur l ic ne Musique Rip pour commencer acheminer la musique votre ordinateur 4 Lorsque les plages musicales sont achemin es branchez le lecteur votre ordinateur Ouvrez la fen t...

Page 75: ...List pour localiser les fichiers musicaux que vous d sirez t l charger Assurez vous de cocher la case correspondant aux fichiers 3 S lectionnez le dispositif portable partir duquel vous d sirez copier...

Page 76: ...t cliquez sur le bouton Arr t La fen tre Arr ter un dispositif mat riel s affichera tel qu illustr Cliquez sur OK Lorsque la fen tre Vous pouvez retirer votre mat riel en toute s curit s affichera vou...

Page 77: ...assurez vous que l appareil est teint OFF avant d ins rer ou de retirer la carte Ins rez une carte m moire SD MMC non comprise avec l avant de la carte face au haut tel qu illustr Pour retirer la cart...

Page 78: ...de fonction de red marrage si la carte m moire SD MMC est ins r e retir e ou que des fichiers de musique sont ajout s ou supprim s du lecteur La fonction de reprise n est pas disponible lorsque la car...

Page 79: ...sur le t l chargement des fichiers MP3 et WMA dans cet appareil 3 Pour allumer l appareil glissez l interrupteur POWER 1 en position ON bas puis appuyez sur le bouton Play Pause Stop Power On 2 l indi...

Page 80: ...enfonc Lorsque vous rel cherez le bouton la lecture normale reprendra 1 2 1 HIGH SPEED MUSIC SEARCH Pendant la lecture appuyez sur le bouton Skip Search n pour avancer le DVD jusqu au d but du fichier...

Page 81: ...atoire 1 Pour annuler le mode al atoire appuyez sur le bouton Random OFF 2 LECTURE AL ATOIRE DES PLAGES REMARQUES Si une carte m moire SD MMC est ins r e le lecteur lira de fa on al atoire les fichier...

Page 82: ...vers le haut Les fichiers MP3 ou WMA sont corrompus T l chargez des fichiers non corrompus Il n y a aucun fichier dans le lecteur T l transmettez des fichiers dans l appareil tel que d crit aux pages...

Page 83: ...uton de gauche sur Format 3 Dans la fen tre Format s lectionnez FAT32 partir du menu d roulant syst me puis cliquez pour d marrer le formatage de l appareil voir figure droite REMARQUE assurez vous de...

Page 84: ...tialiser en glissant l interrrupteur POWER en position OFF puis en le ramenant en position ON POUR UNE MISE JOUR DU MICROPROGRAMME Visitez notre site Web www disneyelectronics com pour v rifier si un...

Page 85: ...er 3 WMA Windows Media Audio fichier WMA avec DRM D bit binaire 8kbps 320kbps G n ral Dimensions 107 x 39 x 18 mm Poids 40g USB USB 2 0 M moire int gr e 128MB Dur e de lecture maximale 8 heures enviro...

Page 86: ...4 660 7026 Por favor mantenga todo el material de empaque por lo menos por 90 dias en caso que usted necesite devolver el producto donde lo compro a directamente a Memcorp Inc Para Accesorios o Partes...

Reviews: