background image

Manual no.: 658  Ver. 2 EN  200819     

Service manual - English

Visual 

inspection 


Check the condition and function of the product regularly. Check to ensure that material is free from damage. If there are 
signs of wear, the product must be inspected and serviced.

Always read the manuals for all assistive devices used during a transfer.
Keep the manual where it is accessible to users of the product.
Do not leave the patient unattended during a transfer situation.
The product should be inspected yearly, and otherwise as required, by a qualified technician. Service must be performed 
by a qualified technician.

Functional inspection

Always read the manual

RoWalker400

System

RoMedic

TM

SWL: 180 kg / 400 lbs

20101010

REF

Summary of Contents for 20101010

Page 1: ... Always read the manuals for all assistive devices used during a transfer Keep the manual where it is accessible to users of the product Do not leave the patient unattended during a transfer situation The product should be inspected yearly and otherwise as required by a qualified technician Service must be performed by a qualified technician Functional inspection Always read the manual RoWalker400...

Page 2: ...omponent list 4 Spare part list 5 6 Detail descriptions for Periodic inspection 7 Periodic inspection instruction 8 10 Change of spareparts 11 13 Care of the product 13 General 13 Dimensions 14 Technical information 15 2 SystemRoMedic TM ...

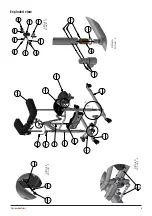
Page 3: ...CALE 1 3 1 21 19 1 13 4 11 2 SCALE 1 3 12 2 DETAIL F 13 4 BRAKO Q A MFG APPV D CHK D D E F C 1 2 3 4 B A 3 2 1 5 C D 4 ANGULAR 6 8 7 B A RoWo 0 000 B N Jovanovski WEIGHT A3 SHEET 1 OF 2 SCALE 1 20 DWG NO TITLE REVISION DO NOT SCALE DRAWING EDGES DEBUR AND DATE BREAK SHARP MATERIAL NAME SIGNATURE UNLESS OTHERWISE SPECIFIED DIMENSIONS ARE IN MILLIMETERS SURFACE FINISH TOLERANCES LINEAR DRAWN ...

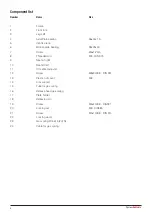
Page 4: ... kit right 10 Seat kit left 11 Off center adjuster 12 Screw M8x30 8 8 DIN 931 13 Plastic nut cover M8 14 Arm support 15 Tube for gas spring 16 Release head gas spring 17 Plate holder 18 Releasing pin 19 Screw M8x40 8 8 DIN931 20 Locking nut M8 DIN985 21 Screw M5x10 8 8 DIN 914 22 Locking clamp 23 Gas spring 205 615 207N 24 Cable for gas spring Component list 4 SystemRoMedic TM ...

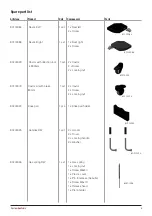
Page 5: ...0100073 Castor kit with brake 1 set 2 x Castor 80mm 2 x Screw 2 x Locking nut 80200024 Knee pad 1 pce 1 x Knee pad holder 80200025 Handles RW 1 set 2 x Handle 2 x Cover 2 x Locking handle 2 x Washer 80200026 Gas spring RW 1 set 1 x Gas spring 1 x Locking nut 1 x Screw M8x40 1 x Plastic cover 1 x Pin to release the buffer 1 x Screw M5x10 1 x Release head 1 x Plate holder 5 SystemRoMedic TM 80200024...

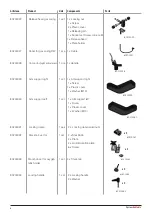
Page 6: ...x Armsupport right 1 x Screw 1 x Plastic cover 1 x Washer M10 80200030 Arm support Left 1 set 1 x Armsupport left 1 x Screw 1 x Plastic cover 1 x Washer M10 80200031 Locking clamp 1 pair 2 x Locking clamp aluminum 80200032 Star knob set for 1 set 2 x Star Knob 2 x Plate 2 x Holder rotation plate 6 x Screw 80200033 Star knob set for oxygen 1 set 4 x Star knob tank holder 80200034 Locking handle 1 s...

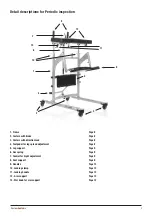
Page 7: ... 4 Footpedal for leg spread adjustment Page 8 5 Leg support Page 9 6 Gas spring Page 9 7 Control for hight adjustment Page 9 8 Seat support Page 9 9 Handles Page 10 10 Locking clamp Page 10 11 Locking handle Page 10 12 Arm support Page 10 13 Star knob for arm support Page 10 7 SystemRoMedic TM 1 2 3 8 4 5 6 7 9 10 11 12 13 ...

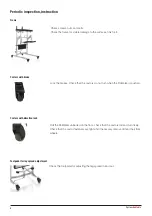
Page 8: ...at the castors do not turn when the RoWalker is pushed Castors with direction lock Roll the RoWalker unloaded on the floor check that the castors roll and turn freely Check that the castor fasteners are tight and if necessary remove dirt and hair from wheels Footpedal for leg spread adjustment Check the footpedal for adjusting the leg spread in and out 8 SystemRoMedic TM ...

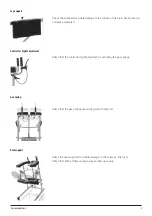
Page 9: ... and flip ups easily Leg support Check the kneepad for visible damage to the surfaces finish etc Make sure it is correctly assembled Check that the control for hight adjustment is activating the gas springs Control for hight adjustment Check that the gas springs are moving smooth and soft Gas spring 9 SystemRoMedic TM ...

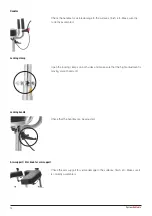
Page 10: ...s correctly assembled Handles Check the handles for visible damage to the surfaces finish etc Make sure it is correctly assembled Check that the handles can be adjusted Locking handle Open the locking clamps on both sides and make sure that the hight adjustment is moving smooth and soft Locking clamp 10 SystemRoMedic TM ...

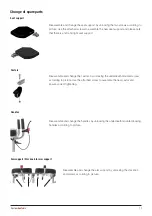
Page 11: ...Disassemble and change the castors by unlocking the underneath mounted screw according to picture Use the attached screw to assemble the new castor and ensure correct tightening Disassemble and change the handles by unlocking the underneath mounted locking handles according to picture Handles Arm support Star knob for arm support Disassemble and change the arm support by unlocking the star knob an...

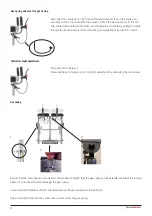
Page 12: ...nd adjustment by function control Disconnect the cable set Disassemble and change control for hight adjustment by unlocking the two screws Control for hight adjustment Gas spring Ensure that the arm supports are raised to the maximum height that the gas spring is fully extended and that the locking clamps 1 are locked before removing the gas spring Lower mount 2 Release the pin and then remove the...

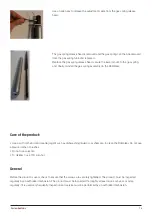
Page 13: ...ized technician The product must be inspected thoroughly at least once each year or more regularly if it is used very frequently Inspection and service must be performed by an authorized technician The gas spring release head is removed and the gas spring can then be removed from the gas spring tube and replaced Replace the gas spring release head secure the lower mount to the gas spring and final...

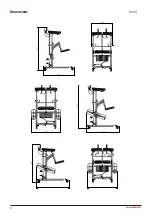
Page 14: ... DWG NO TITLE REVISION DO NOT SCALE DRAWING EDGES DEBUR AND DATE BREAK SHARP MATERIAL NAME SIGNATURE UNLESS OTHERWISE SPECIFIED DIMENSIONS ARE IN MILLIMETERS SURFACE FINISH TOLERANCES LINEAR DRAWN 906 987 1379 694 N Jovanovski MFG APPV D CHK D D E F C 1 2 3 4 B A 3 2 1 5 C D 4 6 Q A BRAKO 7 B 8 RoWo 0 000 without holders A Maximum height WEIGHT 42 01 A3 SHEET 1 OF 1 SCALE 1 20 DWG NO TITLE REVISIO...

Page 15: ...Technical information Seat width 480 mm 18 8 Seat depth 265 mm 10 4 Castor Ø Ø80 mm Ø3 Weight 37 5 kg 82 67 lbs Weight incl OxygenTankHolder 43 5 kg 95 9 lbs SWL 180 kg 400 lbs 15 SystemRoMedic TM ...

Page 16: ... of care and cost savings The philosophy behind SystemRoMedic is focused on the prevention and reduction of occupational injuries while allowing users to experience a greater sense of independence and dignity Through a unique combination of training and a complete range of efficient transfer aids SystemRoMedic offers improvement of both work environment and quality of care and at the same time ach...

Reviews: