


Introduction
Thank you for chosing this Dimplex Opti-V
fi
re. Please read
information guide carefully to be able to safely install, use
and maintain your product. The appliance is designed to be
installed into a cabinet or wall opening.
Important Safety Advice
When using electrical appliances, basic precautions should be
followed to reduce the risk of
fi
re, electric shock, and injury to
persons, including the following:
If the appliance is damaged, check immediately with the supplier
before installation and operation.
Do not use this appliance in the immediate surroundings of a
bath, shower or swimming pool.
Means for disconnection must be incorporated in the
fi
xed wiring
in accordance with the wiring regulations.
Do not use outdoors.
In the event of a fault switch off the appliance.
Switch off the appliance when not required for long periods.
If the supply cord is damaged, it must be replaced by a special
cord or assembly available from the manufacturer or its service
agent.
Warning - No naked
fl
ame sources, such as candles, should be
placed on this apparatus.
Warning - The appliance shall not be exposed to dripping or
splashing and that no objects
fi
lled with liquid, such as vases,
shall be placed on the apparatus.
Warning - this appliance is of Class I construction and must be
connected to a mains outlet with protective earthing connection.
Electrical
WARNING – THIS APPLIANCE MUST BE EARTHED
Do not switch the appliance on until properly installed. Please
read all the safety warnings and operating instructions.
General
Unpack the appliance carefully and retain the packaging for
possible further use, in the event of moving or returning the
appliance to the supplier.
Contents of Carton
•
Opti-V Fire Model PGF10
•
Remote control and batteries (AAA type)
Product Features
Volume Control
Remote or Manual operation
Red light indication of standby mode
Installation
Warning.
Do not connect the appliance until properly
fi
xed to a secure
base and the instruction lea
fl
et is read fully.
At installation of the appliance, care must be taken not to
damage any cables that may be concealed in the wall.
Positioning the Fire
The Opti-V uses an illusory re
fl
ection technique and is designed
to work best when ambient light levels are low. If the Opti-V is
installed in brightly lit areas, the strong re
fl
ections may diminish
the
fl
ame picture.
Opti-V Fire : PGF 10
IMPORTANT: THESE INSTRUCTIONS SHOULD BE READ CAREFULLY AND RETAINED FOR FUTURE REFERENCE
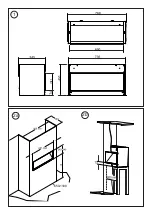
Fixing dimensions
The Opti-V is supplied in an assembled state.
This model is designed to be permanently fixed.
Please see
Fig.2a and 2b
for recommended
fi
xing dimensions.
Height of Fire
There is a choice of height when
fi
tting the
fi
re.
Recommended heights (from
fl
oor to bottom opening of
fi
re - *
Fig 2a) :
- Minimum 65cm when the
fi
re is viewed while sitting
(e.g. lounge).
- Maximum 110cm when the
fi
re is viewed while standing
(e.g. reception area).
Electrical connection
The outline of the chassis and the position of the electrical socket
are shown as dotted outlines in
Fig.4.
Please consult with a
quali
fi
ed electrician for appropriate wiring requirements.
Operation: -
The power ‘ON’ switch (
‘O/I’
see
Fig.3
) must
fi
rst be switched
‘I’
to operate the appliance.
An ‘Opti-V’ screen will appear for about 3 seconds before the
fl
ame picture starts .
Note: The user may notice a blank screen for approximately 5
seconds, every 30 minutes. This is normal and should not be a
cause for concern.
Manual Control Operation: -
The manual controls for the screen are located at the inner top
left hand side of the appliance above the glass.(see
Fig.3
).
The appliance Power switch (
‘O/I’
see
Fig.3
) may be used to
switch the appliance off (
‘O’
) when it is not required, for example,
overnight or for long periods, to avoid energy wastage.
The standby button ( ) is located just below the mains switch.
Screen Brightness:-
The screen brightness can be adjusted using the
and
buttons. These are located at the inner top, just above the glass
(see
Fig.3
). The
button darkens the screen and the
button
brightens the screen.
Remote Control Operation: -
The remote control may be operated once the appliance is
switched
‘I’
(‘I’ see
Fig.3
).
Aim the remote control at the
fi
re (the sensor is indicated in
Fig.
4
). The volume may be adjusted up or down by pressing the
volume control buttons ( + and -).
The button funtions are identi
fi
ed as described below;
Standby
-
Volume down
+
Volume up
A red light will indicate when the appliance is in standby mode.
(see
Fig 4
)
1