Dimplex DFG3033 Owner'S Manual Download Page 16

16  www.dimplex.com


Maintenance

 WARNING: 

Disconnect power 

before attempting any main-

tenance or cleaning to reduce 

the risk of fire, electric shock 

or damage to persons.

!

NOTE: 

The fireplace should 

not be operated with an accumu-

lation of dust or dirt on or in the 

unit, as this can cause a build up 

of heat and eventual damage. For 

this reason the heater must be 

inspected regularly, depending 

upon conditions and at least at 

yearly intervals.

Light Bulb Replacement

Light bulbs need to be replaced 

when you notice a dark section of 

the flame.  There are three bulbs 

under the ember bed, which gen-

erate the flames and embers, and 

two bulbs above that illuminate 

the firebox interior.

Lower Light Bulb Requirements

Quantity of three clear chande-

lier or candelabra bulbs with an 

E-12 (small) socket base, 60 Watt 

rating.  Example: GE 60BC or 

Philips 60 CTC.  

Do not exceed 

60 Watts per bulb.
Helpful Hints:  

It is a good idea 

to replace all light bulbs at one 

time if they are close to the end 

of their rated life.  Group replace-

ment will reduce the number of 

times you need to open the unit to 

replace light bulbs.  

 CAUTION: 

Allow at least five 

minutes for light bulbs to cool 

before touching bulbs to avoid ac-

cidental burning of skin.
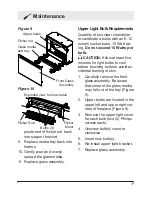
1.  Carefully remove the front 

glass assembly. Be aware 

that some of the glass media 

may fall out of the tray (Figure 

9).

2.  Empty the tray of glass me-

dia.

 CAUTION:  

Handle glass me-

dia with care as some pieces may 

have sharp edges.
3.  Lift the tray up and remove 

from firebox.

4.  Pull flicker rod towards the 

motor and bend gently to 

remove the opposite end from 

the support bracket (Figure 

10).

5.  Remove flicker rod from mo-

tor (see Figure 10).

6.  Unscrew bulb(s) counter 

clockwise.

7.  Insert new bulb(s).
8.  Push flicker rod back onto 

motor shaft and replace op-

Summary of Contents for DFG3033

Page 1: ...www dimplex com 7210600100R04 IMPORTANT SAFETY INFORMATION Always read this manual first before attempting to install or use this fireplace For your safety always comply with all warnings and safety...

Page 2: ...phasize CAUTION Procedures and techniques which if not carefully followed will result in damage to the equipment WARNING Procedures and techniques which if not carefully followed will expose the user...

Page 3: ...l void the warranty Please record your model and serial numbers below for future reference model and serial numbers can be found on the Model and Serial Number Label of your fireplace NO NEED TO RETUR...

Page 4: ...h a damaged cord or plug or if the heater has malfunctioned or if the electric fireplace has been dropped or damaged in any man IMPORTANT INSTRUCTIONS ner contact Dimplex Technical Service at 1 888 34...

Page 5: ...outlet power strip Do not burn wood or other materials in the electric fireplace Do not strike the fireplace glass Always use a certified electrician should new circuits or outlets be required Always...

Page 6: ...evice may not cause harmful interference and 2 this device must accept any interference received including interference that may cause undesired operation FCC CAUTION Any changes or modifications not...

Page 7: ...r liquids in the vicinity of the heater CAUTION Clearance for air circulation beneath the fire place insert is provided by two 2 rubber feet Do not install the fireplace insert directly on carpet or s...

Page 8: ...p 120 Volt circuit is required A dedicated circuit is preferred but not es sential in all cases A dedicated circuit will be required if after in stallation the circuit breaker trips or fuse blows on a...

Page 9: ...black wire line from the unit to the line wire from power supply Figure 3 Wiring GROUND LINE 120 V Power Supply Breaker Panel NEUTRAL LOGSET LED LIGHTS 7 Connect the white wire neutral from the unit...

Page 10: ...anual Control Switch Figure 5 A B C B 3 Position Manual Control Switch Remote left position The unit is operated with the re mote control Flame center position The flame effect is turned on Flame Heat...

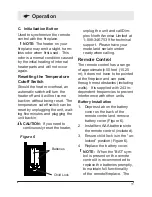
Page 11: ...th America Limited at 1 888 346 7539 for technical support Please have your model and serial number ready when calling Remote Control The remote control has a range of approximately 50 feet 15 25 m it...

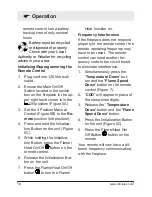
Page 12: ...e Flame Heat On Off button on the remote control 6 Release the Initialization But ton on the unit 7 Press the Flame Heat On Off button to turn the Flame Heat function on Frequency Interference If the...

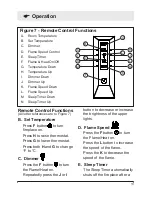
Page 13: ...Temperature C Dimmer D Flame Speed Control E Sleep Timer F Flame Heat On Off G Temperature Down H Temperature Up I Dimmer Down J Dimmer Up K Flame Speed Down L Flame Speed Up M Sleep Timer Down N Sle...

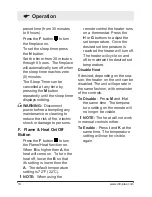
Page 14: ...higher then A the heat will come on To turn the heat off lower the B so that it s setting is lower then the A The default temperature setting is 72 F 22 C NOTE When using the remote control the heater...

Page 15: ...re 6 2 Move Child Lock tab to the right to lock the remote control 3 Move Child Lock tab back to the left to unlock the remote control 4 Replace the battery cover NOTE To temporarily unlock the remote...

Page 16: ...ll socket base 60 Watt rating Example GE 60BC or Philips 60 CTC Do not exceed 60 Watts per bulb Helpful Hints It is a good idea to replace all light bulbs at one time if they are close to the end of t...

Page 17: ...glass assembly Be aware that some of the glass media may fall out of the tray Figure 9 2 Upper bulbs are located in the upper left and upper right cor ners of fireplace Figure 9 3 Remove the upper lig...

Page 18: ...les these can be removed by dusting lightly with a clean dry cloth To remove fingerprints or other marks the glass can be cleaned with a damp cloth To prevent scratching do not use abrasive cleaners o...

Page 19: ...material and workmanship for a period of 5 years from the date of the first purchase of such products as follows a a repair or replacement warranty on defec tive products or parts including in home s...

Page 20: ...or in home warranty services Accord ingly Dimplex will be responsible for all labour and transportation costs associ ated with the repair or replacement of the product or part except as follows i cha...

Page 21: ...AGENTS BE LIABLE TO THE PURCHASER OR ANY THIRD PARTY WHETHER IN CON TRACT IN TORT OR ON ANY OTHER BASIS FOR ANY INDIRECT SPECIAL PUNITIVE EXEMPLARY CONSEQUEN TIAL OR INCIDENTAL LOSS COST OR DAMAGE ARI...

Page 22: ...2000330200RP On Off Switch 2800070200RP Power Cord 4100040300RP Upper Light Harness 2500400200RP Lower Light Harness outer pair 2500400100RP Lower Light Socket center 2500150200RP Partially Reflective...

Reviews: