Wireless
Collaboration System
Manual
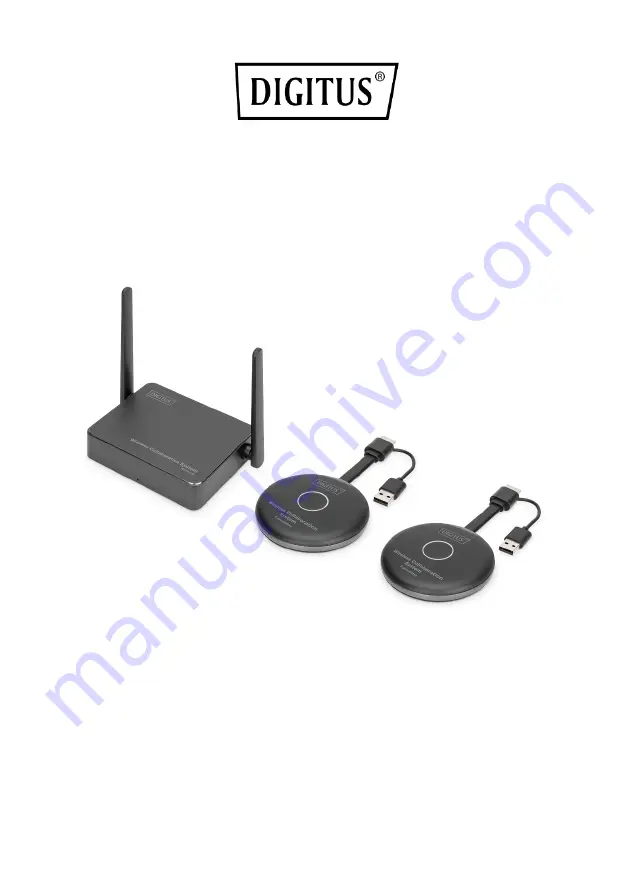
DS-55317 – Set: 2x Transmitter (TX), 1x Receiver (RX)
DS-55322 – Additional Transmitter (TX)
Page 1: ...Wireless Collaboration System Manual DS 55317 Set 2x Transmitter TX 1x Receiver RX DS 55322 Additional Transmitter TX ...
Page 2: ...f the system has been optimally simplified here no additional software apps are required Increase the efficiency of your meetings save time and achieve optimal results Share Present Collaborate 2 Features Share present and collaborate from your notebook tablet or smartphone Transmission distance of up to 50 m Easy installation No software or app required Present simultaneously from up to 4 partici...
Page 3: ... DS 55317 supports devices with an HDMI port It supports Windows and macOS PC systems In case your PC doesn t have an HDMI port i e just equipped with USB C ports you can use an video adapter or docking station with HDMI interface Smartphone Tablet Requirements To share from smartphone tablet video to DS 55317 please ensure the devices meet the following requirements iOS 9 0 or above Android 5 0 o...
Page 4: ... HDCP2 1 Authentication Protocol WPA2 WPAS PSK WPA2 Enterprise Security AES 128 bit Platform supported Windows macOS iOS Android Distance Up to 50 meters in the clear line of sight Transmitter Cable USB cable HDMI cable Status LED 1x Switch button 1x Power supply DC 5V 0 5A Power Consumption About 2 5W Dimension 80 x 80 x 14 mm Weight 80 g Receiver Interfaces 2x USB A in 1x Micro USB 1x RJ45 1x HD...
Page 5: ...ter 1 HDMI Type A Connect computer or other devices with HDMI 2 USB 2 0 Type A Connect to computer or other devices for power 3 Connection button Share button with LED indicator Press to start sharing 4 Status indicator Indicate different statue Static and flashing red TX is booting on Flashing blue Waiting for connection Static blue Connected and start to presenting Flashing purple No video input...
Page 6: ... A Connect with touch panel or mouse keyboard for KVM function 3 HDMI A Connect to TV projector and monitor by using the HDMI cable 4 RJ45 Fast Ethernet Connect to router network for internet access 5 Status indicator Flashing blue Waiting for connection Static blue Connected with TX ...
Page 7: ...6 6 Connection Diagram Transmitter Receiver 1 Smartphone Tablet 5 Connection Cable 2 Laptop 6 Mouse 3 70 m max Distance 7 Keyboard 4 Power supply 8 TV Beamer ...
Page 8: ...he USB cable to the display by USB cable for touch panel control only 3 Connect RJ45 cable to your RX to access the internet Remark Please ignore step 2 if the display doesn t have a touch panel Please ignore step 3 if no need to access the internet 7 1 Receiver Settings In the bottom right of receiver main page it s Setting function ...
Page 9: ...age 1 General Setup user can select the language and check product version 2 Group Setup user can adjust information shown while Multi User Mode 3 Advanced Setup Wi Fi Password set the SSID password HDMI Zoom adjust the HDMI output size ...
Page 10: ...s and number of participants which are connected to the RX will be shown on the upper right corner of the main page of RX start screen Click logo the TX participants list will be show on the display The TX list will be hided when click again It s easy for the meeting moderator to control each TX on the big screen ...
Page 11: ...10 ...
Page 12: ...play please make sure to use USB Power Adapter for the RX 2 Connect the USB cable USB A plug of the Transmitter TX to the USB A port of the Receiver 3 Wait around 15 seconds the button light of TX will turn to constant blue from red light and pairing successful message will be displayed on the RX screen Remark Repeat the process if needed 9 TX and RX Software Upgrade Guide The TX and RX already co...
Page 13: ...32 3 Connect the Udisk Memory stick with RX USB port and then power on the RX 4 After RX enter the main page power on TX no need to connect the HDMI cable then the TX will link with RX automatically 5 Then RX will send the upgrade file to TX for upgrade wirelessly upgrade message will show on the RX screen During the upgrade process the TX Red and blue lights will flash alternately ...
Page 14: ...13 6 After upgrade down the TX light will become flash blue and TX updated OK message will display on the RX screen 7 After the upgrade please pair TX and RX again Please refer to TX and RX pair guide ...
Page 15: ...no need to unzip the file and copy to the root of USB disk 2 Connect the U disk with RX USB port and then power on the RX 3 The RX will recognize the firmware and update message will be displayed on the screen please click install for upgrade 4 Then the RX will restart for upgrade ...
Page 16: ...15 5 After RX update successfully message will be displayed on the screen you can chose to save or delete the file ...
Page 17: ...nd USB plug to the notebook s inputs 2 The LED indicator of the TX will turn red when it s booting up 3 The LED indicator will become blue and flashing when the TX is ready to stream 4 The LED indicator will become constant blue when click the button to start presenting ...
Page 18: ...e is SSID shown on the left upper corner of the RX start screen Use the screen mirroring function of the smartphone Choose RX Receiver DIGITUS to start sharing Remark if the RX already connect with your office network and the iOS devices are in the same network in this case it s no need for the iOS devices to connect with the RX SSID first ...
Page 19: ...er DIGITUS to start sharing Remark there are different names on different brands of phones or tablets WIFI Display WLAN Display Wireless Display Allshare Display Allshare Cast Wireless Display MirriorShare etc 12 Multi User Application Multi Split Screen Mode 1 Single Screen Mode If there is one Transmitter TX press the button on TX shortly the screen ...
Page 20: ...content from a Smartphone or Tablet please follow the streaming process described before on 11 Streaming from Smartphone Tablet Remark If a HDMI Transmitter TX is connected with the HDMI Receiver RX please unpair the TX and the RX by press the button on TX first start screen will be shown Then you can connect a mobile device Priority is HDMI Transmitter TX before mobile device smartphone tablet 2 ...
Page 21: ...irroring function of the mobile device you will see the content of the device on the big screen 2 To add now the Wireless HDMI Transmitter notebook to the Receiver screen please press the button on the TX and hold it for 3 5 seconds the Receiver screen will split to Multi Screen Split Screen Mode you will see content of Mobile Device TX on the big screen Example 2 2x Wireless HDMI Transmitter TX 1...
Page 22: ...cted to the RX first Please follow the streaming process described before on 11 Streaming from Smartphone Tablet iOS Devices 3 How to quit multiple screens split mode Click any Wireless HDMI TX button shortly to switch to one single screen mode 13 Multicast or Display Group Setup In the group mode where video transmission from one transmitter is addressed to a group of receivers simultaneously Ste...
Page 23: ... on Display Group function all the receivers which are in the same subnet will be listed on the Device List please select the receivers which you want to join the display group and confirm then the screen will stream to other receivers ...
Page 24: ...ch the display to control the PC Remark macOS devices don t support touch back control function 15 White Board Function DS 55317 supports instantly edit draw and write on the big screen with touch panel Step 1 Click the White Board icon from the start screen of the RX on the to enter the white board function Step 2 You will find white board function at the left side of the main menu click the pen ...
Page 25: ...24 ...
Page 26: ...not attempt to repair the unit yourself or open the cabinet Risk of electric shock 5 Ensure adequate ventilation to prevent damage due to overheating 6 Turn off the power supply and make sure the environment is safe before installation 7 In the event of thunderstorms there is a risk of lightning strike and damage to connected electrical equipment due to overvoltage 8 Do not install this device dur...
Page 27: ...erms HDMI and HDMI High Definition Multimedia interface and the HDMI Logo are trademarks or registered trademarks of HDMI Licensing LLC in the United States and other countries Hereby Assmann Electronic GmbH declares that the Declaration of Conformity is part of the shipping content If the Declaration of Conformity is missing you can request it by post under the below mentioned manufacturer addres...