background image

12

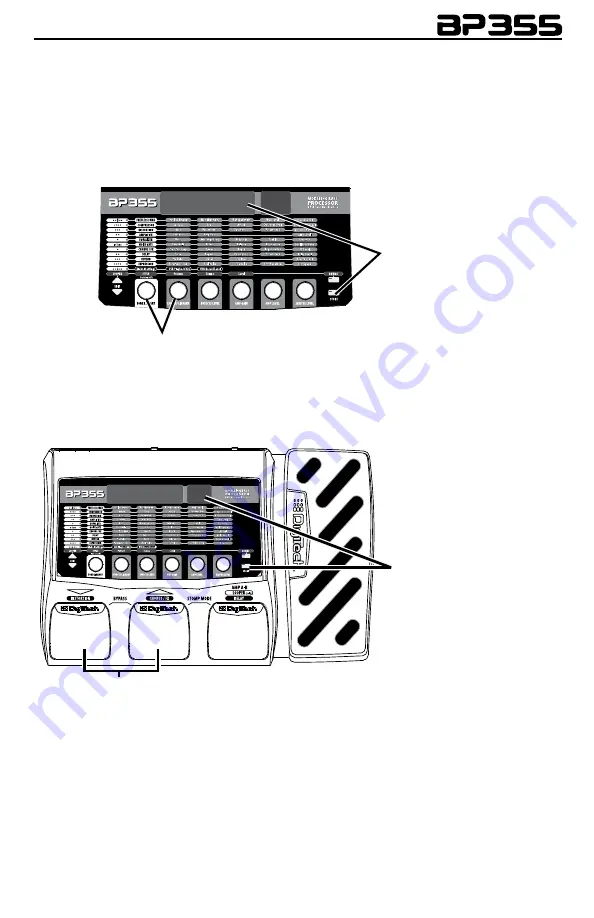
Storing/Copying/Naming a Preset

Once the preset has been modified to your liking, you may store your settings to any of the 

70 User preset locations (presets 1-70).  The following steps outline the procedure for storing 

changes to a preset or copying a preset to a different location:

1.   Press the Store button once.  The Store button LED blinks and the first character in the 

Display flashes, indicating that you can now name your custom creation. 

2.  Use Knob 1 to select the alpha-numeric character and Knob 2 to select the next character 

location. 

1. Press Store;
    characters in Display
    flash individually

2. Use Knobs to
    name Preset

3.   Once the desired name is shown in the display, press the Store button again to enter the 

second stage of the storing process.  The red Display begins to flash.

4.   Select the User preset location where your new sound will reside using the Up and Down 

Footswitches.  The displays show the preset name and User preset number about to be 

overwritten.

4. Select destination
    with Footswitches

3. Press Store again;
    Preset number flashes

5. Press the Store button again to save the changes. 

The procedure for copying one preset to another preset location is the same.  Use the Foot-

switches to select the preset that you want to copy, then follow steps 1-4 for storing a preset 

as described above.  Press either Edit button at any time to abort the Store procedure.

Summary of Contents for BP335

Page 1: ...1 Bass Multi Effects Processor Owner s Manual Professional audio equipment...

Page 2: ...UCE HEAT ONLY USE ATTACHMENTS ACCESSORIES SPECIFIED BY THE MANUFACTURER UNPLUG THIS APPARATUS DURING LIGHTNING STORMS OR WHEN UNUSED FOR LONG PERIODS OF TIME Do not defeat the safety purpose of the po...

Page 3: ...er 8 Stereo Operation 8 Stereo Amp Setup 8 Stereo Mixer Setup 9 Computer Recording Setup 9 Amp Mixer Setup 9 Applying Power 10 Section Three Editing Functions 11 Editing Creating Presets 11 Storing Co...

Page 4: ...be liable for special or consequential damages or from any delay in the performance of this warranty due to causes beyond their control NOTE The information contained in this manual is subject to cha...

Page 5: ...with your BP355 About the BP355 Performance Mode When you first apply power to the BP355 it powers up in Performance mode Performance mode provides access to all of the presets within the BP355 via t...

Page 6: ...427 A 453 The display window briefly flashes the current tuning reference Tone Library Knob 1 In Performance mode this knob selects a variety of genre based amp tone defaults ranging from Blues to Met...

Page 7: ...allow you to store any changes to them From the factory the 70 User presets are exact duplicates of the 70 Factory presets This allows you to create your own presets without losing the sounds that ca...

Page 8: ...a library of preset amp tones See page 33 for a list of preset amp tones 2 When editing a preset this knob changes theAmp or Effect model for the selected row 3 When editing an Effect row press this k...

Page 9: ...Effect row 3 When the Expression row is selected this knob selects the LFO waveform LFO 1 or LFO 2 must first be selected with Knob 1 for this parameter to be available MasterVolume Knob 6 1 In Perfo...

Page 10: ...ilable for Expression Pedal control The Expression Pedal is equipped with a V switch that turns the Wah feature on or off when you apply extra pressure to the toe See page 13 for more information abou...

Page 11: ...XLR outputs for use when plugged into a power amp speaker system or a mixer recording device When set to Mixer In position display reads xlrMIX speaker compensation is turned on and the outputs are op...

Page 12: ...to Amp Bass Amp Input Effect Return Amp Mixer switch set to Amp Left Mono Output Input Stereo Operation For stereo operation connect the bass to the Input of the BP355 Connect one cable to the BP355 s...

Page 13: ...USB Ports Input XLR Amp Mixer switch set to Mixer XLR Left Out XLR Right Out USB Studio Reference Monitors Amp Mixer Setup Stereo Power Amp 2 Speaker Cabs Input PA Speaker Left XLR Left and Right Out...

Page 14: ...panel of the BP355 3 Connect the other end of the PS0913B power supply to an AC outlet Turn the BP355 s Master Level knob Knob 6 down to 0 4 Turn the power of your amplifier s to the on position and...

Page 15: ...e Effects Library knob 3 Adjust the effects level with the Effects Level knob To edit and create a preset 1 Use the Up and Down Footswitches to select the preset you wish to edit 2 If you find a prese...

Page 16: ...individually 2 Use Knobs to name Preset 3 Once the desired name is shown in the display press the Store button again to enter the second stage of the storing process The red Display begins to flash 4...

Page 17: ...when using a fretted bass Wah is an effect controlled by an Expression Pedal making the bass sound as if it s saying Wah Fretless Wah Model Knob 1 selects the Fretless Simulator or Wah model FRET 1 3...

Page 18: ...off scream Based on an Ibanez TS 9 808 Based on an Ibanez TS 808 Tube Screamer Spark Based on aVoodoo Lab Sparkle Drive oddriv Based on a Guyatone Overdrive OD 2 dod250 Based on a DOD 250 Overdrive Pr...

Page 19: ...Level SPARK Gain Tone Clean Volume oddriv Drive Level DOD250 Gain Level redlne Gain Low High Level rodent Distortion Filter Level mxdist Distortion Output dsdist Gain Tone Level Grunge Grunge Butt Fac...

Page 20: ...ifierTM digslo DigiTech Solo DIGCLN DigiTech Clean Tube diggan DigiTech High Gain DIRECT Direct Cabinet When the Amp Cabinet row is selected Knob 2 selects the speaker Cabinet model AC1X18 Based on an...

Page 21: ...mount of high end level Treble Ranges from 12dB to 12dB Presence Knob 6 boosts or cuts the Presence level for the selected channel Ranges from 12dB to 12dB Treble Frequency X EditTM only This paramete...

Page 22: ...ctronic Chorus CHORUS DigiTech s Dual Chorus and MCHORS Digi Tech s famous Multi Chorus Knobs 2 6 have the following functions for the various Chorus models Chorus Model Knob 2 Pre Post Amp Knob 3 Spe...

Page 23: ...ter clockwise for Pre appears before the Distortion effect or clockwise for Post appears after the Noise Gate effect Speed Knob 3 adjusts the rate Speed at which the pitch modulates Ranges from 0 to 9...

Page 24: ...d vibrato As the parameter is turned up the phase difference of the vibrato signal sent to the two channels is changed until a full stereo image is obtained at 99 Waveform Knob 6 selects a waveform tr...

Page 25: ...The DigiTech Envelope Filter is a dynamic Wah effect that alters your sound based upon how hard you play Pre Post Amp Knob 2 determines where the effect appears in the effects chain Turn counter cloc...

Page 26: ...e effects chain Turn counter clockwise for Pre appears before the Distortion effect or clockwise for Post appears after the Noise Gate effect Pedal Knob 3 adjusts the Ya pedal position Ranges from 0 t...

Page 27: ...ollows WhammyTM no Dry Signal oct up 1 octave above 2octup 2 octaves above 2nd dn a second below rv2ndn a second below reversed pedal action 4th dn a fourth below oct dn an octave below 2octdn 2 octav...

Page 28: ...interval within the selected key and scale creating a true harmony Pre Post Amp Knob 2 determines where the effect appears in the effects chain Turn counter clockwise for Pre appears before the Distor...

Page 29: ...ecording can repeat just once or several times Delay Model Knob 1 selects one of the 7 different Delay models Values include algdly DigiTech Analog Delay dm dly Based on the Boss DM 2 Analog Delay dig...

Page 30: ...he Reverb model or acoustic space Press this knob to turn the Reverb models on and off The following models are available lexamb Lexicon Ambience lexstd Lexicon Studio lexrom Lexicon Room lexhal Lexic...

Page 31: ...phrase added 6 To stop the Phrase Looper press and release the Amp A B Footswitch quickly You can resume playback by pressing this footswitch again 7 To clear a recorded loop stop the loop playback fi...

Page 32: ...and the Wah The procedure for linking a parameter to the Expression Pedal is as follows 1 Press either Edit button until the Expression row has been selected indicated by the LED lighting on the Expre...

Page 33: ...ng Store button for 3 seconds until RSTORD appears in the display and release The Restore procedure takes several seconds to complete during the proce dure the display will count up After the Restore...

Page 34: ...ld until it only engages when you want it to too sensitive a setting will lead to theV Switch falsely triggering on or off when using the Expression Pedal 6 When theV Switch sensitivity is set to your...

Page 35: ...ctions Universal Serial Bus USB Type B supports USB1 1 Full Speed 12 Mbps Bandwidth USB 2 0 compatible BP355 USB Recording Specifications Sample Rate 44 1 kHz Bit depth supports 16 bit or 24 bit depen...

Page 36: ...Classic Fuzz clasfz Fuzz Tone Volume Arbiter Fuzz FaceTM fuzzY Fuzz Volume Electro Harmonix Big Muff Pi big MP Sustain Tone Volume Amp Amp Model Cabinet Model Amp Gain Amp Level X Edit All amp models...

Page 37: ...vel DigiTech Harmony HARMNY Pre Post Amp Shift Amount Key Scale Level Boss OC 2 Octaver OCTAVR Pre Post Amp Octave 1 Octave 2 Dry Level Delay Effects based on Delay Model Time Repeats Parameter 1 Para...

Page 38: ...cts Library 1 Chorus CHORUS 16 Chorus Digital Delay CHRDLY 2 Phaser PHASER 17 Chorus Delay Reverb CHDLRV 3 Flanger FLANGR 18 Flanger Analog Delay FLGDLY 4 Pitch PITCH 19 Phaser Tape Delay PHSDLY 5 Tre...

Page 39: ...35...

Page 40: ...reserved DigiTech and the BP355 are trademarks of the Harman Music Group Other product names modeled in this product are trademarks of their respective companies that do not endorse and are not assoc...

Reviews: