background image

83

Remote Setup

Quick Setup

Use the Quick Setup menu to quickly apply 
recording parameters (image size, frame rate) 
to your DVR.

Manual

From the 

QUICK SETUP

 drop-down menu, 

select 

MANUAL

. The following options 

become available:

• 

IMAGE SIZE

: Select 720x480, 720x240, or 

360x240

• 

RECORD FRAME

: Select frame rate—frame 

rate varies based on Image Size

• 

IMAGE QUALITY

: Select Low, Normal, Fine, 

or Best

• 

EVENT

: Select Alarm, V-Loss (Video loss), 

Motion, Alarm & Loss, Alarm & Motion, 
Loss & Motion, All, or Off

• 

PRE RECORD TIME

: Set the length of time 

the system records prior to an event. Set from 
0~5 seconds

• 

POST RECORD TIME

: Set the length of time 

the system continues to record after an event. 
Set from 0~60 seconds

• 

AUDIO RECORD

: Set to ON/OFF

Note: 

An audio capable camera (not 

included) or microphone (not included) are 
necessary is necessary for audio recording.

• 

REMOTE CONTROL ID

: Designate an ID for 

the remote control to use with the system. Set 
from 11, 12, 13, 14, 21, 22, 23, 24, 31, 32, 34, 
41, 42, 43, 44, and ALL

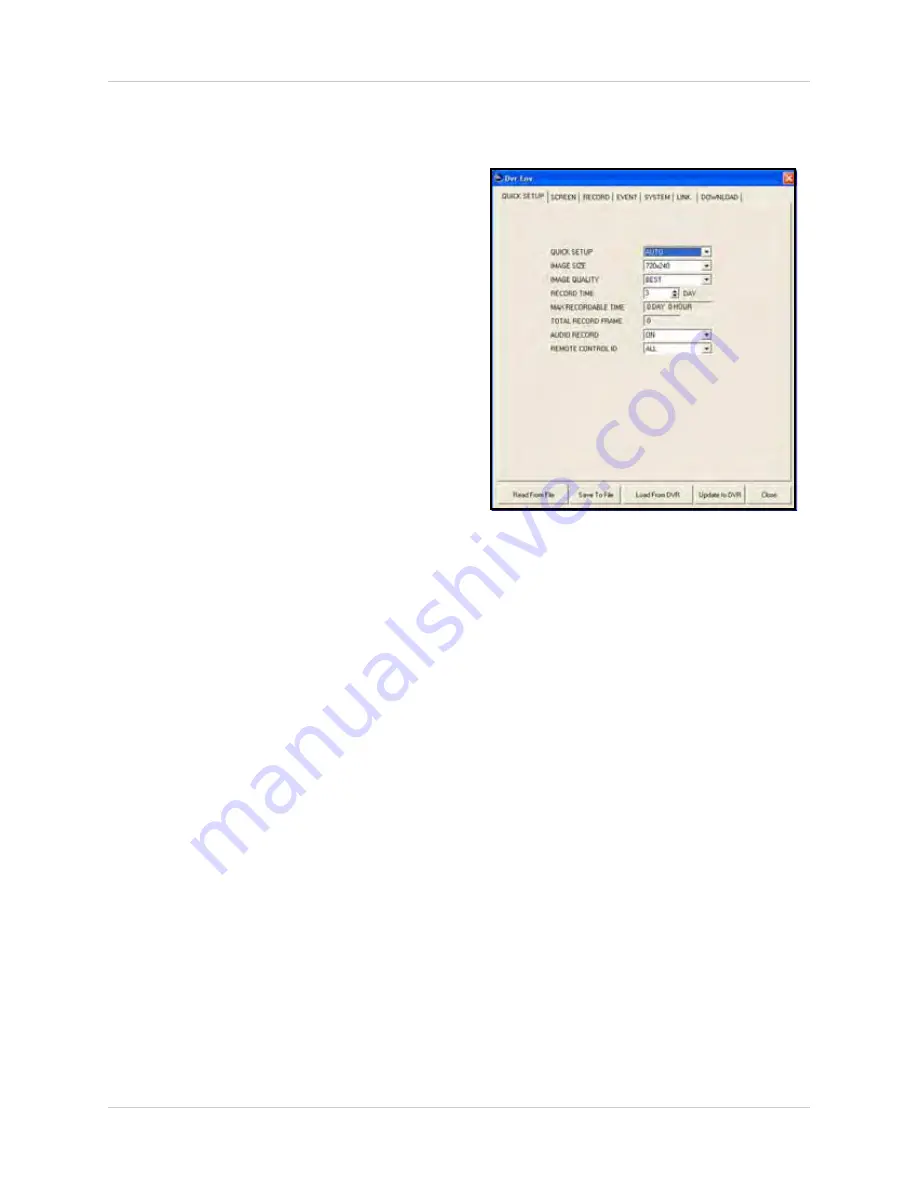
AUTO

From the 

QUICK SETUP

 drop-down menu, 

select 

AUTO

. The following options become 

available:

• 

IMAGE SIZE

: Select 720x480, 720x240, or 

360x240

• 

IMAGE QUALITY

: Select Low, Normal, Fine, 

or Best

• 

RECORD TIME

: Set from 1~999 days.

• 

MAX RECORDABLE TIME

: (Non-selectable) 

The system calculates the maximum 
recording time available on the hard drive 
based on changes to Image Size, Image 
Quality, and Record Time (non-selectable).

• 

TOTAL RECORD FRAME

: (Non-selectable) 

Based on the values you input for Record 
Time, Image Size, and Image Quality, the 
system calculates the adequate 
frames-per-second for the recording. A short 
recording time will result in a higher FPS rate 

Figure 23.1 Quick Setup: Auto

Summary of Contents for VB300 SERIES

Page 1: ...Copyright 2009 Digimerge Technology Inc www digimerge com INSTRUCTION MANUAL English Version 3 0 DIGIMERGE BLADE MICRO FORM FACTOR H 264 DIGITAL VIDEO RECORDER MODELS VB300 SERIES...

Page 2: ...EFER SERVICING TO QUALIFIED SERVICE PERSONNEL The lightning flash with arrowhead symbol within an equilateral triangle is intended to alert the user to the presence of uninsulated dangerous voltage wi...

Page 3: ...ulation have it replaced by your service technician 7 Power Cord Protection Power supply cords should be routed so that they are not likely to be walked on or pinched by items placed upon or against t...

Page 4: ...can prevent fire electric shock or other hazards 16 Safety Check Upon completion of any service or repairs to this video product ask the service technician to perform safety checks recommended by the...

Page 5: ...functions and quality of this product the specifications are subject to change without notice from time to time FCC CLASS B NOTICE Note This equipment has been tested and found to comply with the lim...

Page 6: ...emote client network Supports external keyboard controller and matrix switch Web browser support Quick setup Individual settings per channel Two way audio over the network Copy USB flash memory Extern...

Page 7: ...System 8 Starting the System 8 Password 8 On Screen Display 9 Display Views 10 Additional Display Functions 11 Auto Sequence 11 Freeze 11 Picture in Picture 12 Setting the Time 13 Recording 14 Event...

Page 8: ...EVENT CHECK 36 EVENT MESSAGE 36 EVENT BUZZER 36 SENSOR INPUT 37 RELAY OUTPUT 37 SYSTEM 38 HDD 38 CLOCK 39 VIDEO STANDARD 40 LANGUAGE 40 REMOTE CONTROL ID 40 KEY ECHO 40 ADVANCED SETUP 41 Managing Pass...

Page 9: ...2 Closing Windows 62 Search 63 Time Search 63 Event Search 64 Block Search 65 Calendar Search 66 Text Search 67 Log Search 68 HDD Search 69 File Search 70 Saving Video 71 Viewing Recorded Video 71 Con...

Page 10: ...Remote Viewing 105 Appendix C Setting Up DDNS Service 108 Appendix D Connect PTZ Cameras 111 Appendix E Connecting a Monitor 112 Appendix F Connecting Motion Alarm Devices 113 Appendix G Full Connecti...

Page 11: ...OUNTING PLATE 4 X SCREWS 2 X AA BATTERIES 1 X CAMERA OCTOPUS CABLE 2 X RCA Y ADAPTER 1 X IR EXTENDER HARD DRIVE SIZE NUMBER OF CHANNELS AND CAMERA CONFIGURATION MAY VARY BY MODEL PLEASE REFER TO YOUR...

Page 12: ...e Camera Input port on the rear panel of the Blade DVR 3 Connect a DVI monitor a Connect a DVI cable not included from the DVI port on the rear panel of the Blade DVR to the DVI port on the back of yo...

Page 13: ...FF Press to increase playback speed 1X 2X 4X 16X 32X 64X 128X 11 Playback Direction Press to switch between Reverse and Forward playback 12 Record Press to commence Recording 13 LEDs Record HDD and LA...

Page 14: ...hanges values of selected menu options 19 Enter Press to select menu options opens the Settings menu 20 Preset Press to open the Copy menu 21 Menu Press to open the System Menu enables Auto Focus 22 B...

Page 15: ...a VGA monitor 6 USB Ports x2 Connect external USB hard drives or external CD RW DVD RW drives for system backup connect USB flash drive for to install firmware updates NOTE Only the top USB port suppo...

Page 16: ...rease value of selected menu option focus control of PTZ camera 10 B FRZ F Press to open close Freeze Mode press to increase value of selected menu option focus control of PTZ camera 11 SEARCH COPY BO...

Page 17: ...nu 2 Right Button Right click anywhere on the screen to open the System Menu double click anywhere on the screen to return to the previous menu 3 Scroll Wheel Move the scroll wheel up or down to incre...

Page 18: ...tial loading sequence After a few moments the system loads a live display view Password You do not have to enter a password upon initial startup However for security measures you should change your AD...

Page 19: ...left corner 2 Camera channels Yellow Continuous recording for connected cameras White Disconnected inactive camera Red Event recording motion alarm 3 Channel display single channel or multi channel 4...

Page 20: ...button on the remote control to change between display views Single channel full screen 16 channel grid 10 channel 9 channel 7 channel Quad Customize the layout for the five multi screen display view...

Page 21: ...o include or exclude from Auto Sequence including full screen single channels and video loss channels See AUTO SEQUENCE on page 24 To enable Auto Sequence 1 Press the button on the remote control 2 Pr...

Page 22: ...ll screen 2 Press the button on the remote control The PIP window opens in the top left corner 3 Once in PIP mode you have access to the following options CHANNEL Press channel buttons 1 16 to change...

Page 23: ...press the button 3 From the CLOCK menu select DATE TIME and press the button 4 Press the buttons to select the year month day hour minute and seconds Press the buttons to adjust the date and time 5 P...

Page 24: ...ystem records when an alarm or sensor is triggered Video Loss The system records when a camera is disconnected or suffers video loss The systememploysapre recordfunctiontocapturevideosecondsbeforethev...

Page 25: ...ss to pause playback press again to resume playback View playback in slow motion 1 2 1 4 1 8 1 16 1 32 1 64 1 128 Press to increase playback speed 2X 4X 8X 16X 32X 64X 128X Press to exit Playback mode...

Page 26: ...recorded data The SEARCH RESULT screen opens NOTE To change the month select the month and press the buttons to change the year select the year and press the buttons 3 From the SEARCH RESULT screen pr...

Page 27: ...ONT USB_REAR1 or USB_REAR2 INTERNAL CD RW DVD RW is not applicable NOTE The front panel USB port is typically used for a USB flash drive the bottom USB port on the rear panel is used for USB external...

Page 28: ...vents To use Event Search 1 Under HDD ID select NORMAL HDD 1 or HDD 0 NOTE Normal is the default selection for the single hard drive included with the system 2 Under CHANNEL press the buttons to selec...

Page 29: ...nd return to live mode If using a mouse right click or move the scroll wheel to exit playback FILE SEARCH Use File Search to search for video files saved to an external USB drive or USB flash drive no...

Page 30: ...SEARCH and press the button 2 Under HDD ID select NORMAL HDD 1 or HDD 0 NOTE Normal is the default selection for the single hard drive included with the system 3 Press the button to view all the bookm...

Page 31: ...ck or move the scroll wheel to exit playback LOG FILE Use the Log File to see a list of the activities and events on the system NOTE You must connect a USB drive to the system in order to view log fil...

Page 32: ...EVENT Adjust Motion Detection Event options and Sensor input 5 SYSTEM Adjust HDD options set the system time video standard and language 6 LINK Adjust networking PTZ and Email notification options 7...

Page 33: ...Y Low Normal Fine and Best RECORD TIME Set from 1 999 days MAX RECORDABLE TIME The system calculates the maximum recording time available on the hard drive based on changes to Image Size Image Quality...

Page 34: ...conds ADD AUTO SINGLE Enable disable single channels from Auto Sequence mode If set to OFF default all single full screen channels will be skipped while in Auto Sequence mode AUTO SINGLE Set the dwell...

Page 35: ...00 00 MM DD YY Months are displayed with characters e g OCT 02 2005 00 00 00 DD MM YY Days are displayed with characters e g 02 OCT 2005 00 00 00 TITLE DISPLAY Select ON OFF to display the channel ti...

Page 36: ...he client software to transfer a new bitmap file MULTI SCREEN Change the configurations for the five multi screen display views To change screen configurations 1 Press the buttons to select MULTI 4E M...

Page 37: ...ted channels appear hidden on network viewer screen PLAY Selected channels appear hidden during playback LV NW Selected channels appear hiddenduringlivemodeandinthenetwork viewer LV PB Live and Playba...

Page 38: ...60 seconds The higher the dwell time the longer the channel will be displayed on screen on the spot monitor VIDEO LOSS SKIP You can omit channels with video loss from the sequence to the spot monitor...

Page 39: ...n to open the RECORD PROGRAM menu using the mouse double click anywhere on the screen RECORD PROGRAM By default there are 10 different predefined programs 0 9 available for you to use in the RECORD SE...

Page 40: ...l amount of frames available on the system non selectable QUALITY Set the recording quality for each channel for Normal and Event recording The left column is for Normal recording the right column is...

Page 41: ...tings 2 Press the button on the remote control until you see the Save Exit screen Select SAVE ONLY or SAVE AND EXIT to save your settings AUDIO RECORD Enable disable recording for the four audio chann...

Page 42: ...XIT to save your settings HOLIDAY Set a unique recording schedule for holidays With Holiday Recording enabled you can set different recording parameters for times when you may be away from your home o...

Page 43: ...ing enables the system to write data to the internal hard disk and an external USB hard drive s simultaneously NOTE In order to use Event or Mirror backup youmusthaveatleastoneexternal USB hard drive...

Page 44: ...r function To enable disk mirroring 1 Select BACKUP MODE 2 Press the buttons and select MIRROR 3 Press the button on the remote control until you see the Save Exit screen Select SAVE ONLY or SAVE AND...

Page 45: ...d press the button to exit the Area Setup Grid NOTE An enabled active cell is clear a disabled inactive cell is green 5 Under TEST MOTION press the button to test your motion detection settings To ver...

Page 46: ...arily but then return to the previous screen EVENT M_RTN Display the channel s for the triggered event in multi split screen momentarily and then returns to the previous screen 3 Press the button on t...

Page 47: ...ettings RELAY OUTPUT Configure the relays on the system To set the relay output 1 Select RELAY SELECT and press the buttons to set the type of relay 2 Select RELAY OUTPUT TIME and press the buttons to...

Page 48: ...t After a few moments the system returns to the HDD menu 4 Press the button on the remote control until you see the Save Exit screen Select SAVE ONLY or SAVE AND EXIT to save your settings NOTE If you...

Page 49: ...select TIME ADJUST and press the button 2 Press the buttons to select and configure the following options INTERNET TIME ADJUST Set to ON OFF If ON the system time will be updated by an Internet server...

Page 50: ...e button on the remote control until you see the Save Exit screen Select SAVE ONLY or SAVE AND EXIT to save your settings REMOTE CONTROL ID To set the remote control ID for the system 1 From the Syste...

Page 51: ...on the remote control until you see the Save Exit screen Select SAVE ONLY or SAVE AND EXIT to save your settings NOTE You can only use channel buttons 1 9 to enter the password The password must be 8...

Page 52: ...s DVR MENU SETUP Use the DVR Menu Setup option to save your system settings to a USB flash drive load system settings and restore system settings to factory defaults To save your system settings 1 Ins...

Page 53: ...your system Check the manufacturer s website for the availability of firmware upgrades To perform a firmware upgrade 1 Insert a USB flash drive into the USB port on the front panel of the system 2 Fro...

Page 54: ...or example if your IP address is 192 168 0 107 change the last digits to 50 i e 192 163 0 50 This ensures that port forwarding will not change in the event of power failure or resetting of your networ...

Page 55: ...rol until you see the Save Exit screen Select SAVE ONLY or SAVE AND EXIT to save your settings PTZ Set the model speed and ID for connected PTZ cameras not included NOTE Consult the owner s manual of...

Page 56: ...SERVER and press the button to open the character table Press the and buttons to enter the IP address of the SMTP server 3 Select DVR E MAIL ADDR and press the button to open the character table Pres...

Page 57: ...en Select SAVE ONLY or SAVE AND EXIT to save your settings DVR LOCATION Enter a location for the system This location will appear in outgoing email notifications when events occur To enter a location...

Page 58: ...NAME Use the Character Table to enter your DDNS username PASSWORD Use the Character Table to enter your DDNS password DDNS STATUS Once you have entered your DDNS information select DDNS STATUS and pr...

Page 59: ...the channel from the list 5 Under COPY START TIME press the e buttons to select the year month day hour minute and second and then press the buttons to change the values 6 Under COPY END TIME press th...

Page 60: ...re compatible with the system To use MEDIA FORMAT 1 From the COPY menu select MEDIA FORMAT and press the button 2 Under FORMAT MEDIA press the buttons to select USB_FRONT USB_REAR1 or USB_REAR2 INTERN...

Page 61: ...ed by the system i e PROGRAM0 9 QUICK SETUP USB STORAGE The location of the USB external drive REAR1 or REAR2 or USB flash drive FRONT The system supports a maximum of 2 x 2 5 SATA HDD 1 TB USB CD DVD...

Page 62: ...m IP SERVER RESPONSE Displays CONNECT or DISCONNECT RECORDING BITRATE Displays the recording bitrate for the system channels in Kbps SAVE EXIT A shortcut to the save exit screen You normally access th...

Page 63: ...ction System Requirements Prior to installing DigiClient make sure your system meets or exceeds the following system requirements High speed Internet connected recommended when using DigiClient Descri...

Page 64: ...e the installation 3 Click Install to install DigiClient to the default location C Program Files DVR DVR Viewer or first click Browse to change the save location NOTE Click Abort during the installati...

Page 65: ...ntinue the installation of Roxio UDF Reader 2 Select your language from the drop down menu and click Next 3 In the next window click Install to start the installation 4 Click Reboot to restart your sy...

Page 66: ...At the login window enter your username and password by default username ADMIN password leave BLANK and click OK 3 To exit close the DigiClient main window enter your username and password and click...

Page 67: ...the list and click Connect Go to step 4 OR 3a Select your DVR from the list If necessary configure the following options When finished click Change settings for the DVR are saved Click Connect 4 Enter...

Page 68: ...DVRs 3 DVR Search Opens the DVR Search window to search for connected DVRs on the network 4 HDD Search Opens the HDD search window 5 File Search Opens the File Search window to search for saved video...

Page 69: ...R not recording click channels to view in full screen 10 Playback Controls Click buttons to Play forward and reverse playback pause rewind fast forward and record 11 Time Version Displays the current...

Page 70: ...menu for the connected DVR Print Take a snapshot of the live image with several print options Microphone Enable disable microphones PTZ Opens the PTZ control window Status View system and network sta...

Page 71: ...live viewing Changing Channels To change channels 1 Click the Channel Buttons 2 Click individual channels in the Channel Indicator to view single channels in full screen 3 Double click a channel on a...

Page 72: ...ow To playback recorded video 1 While in Live Mode Click The oldest recorded video file begins playing in the DigiClient main window 2 Use the playback controls to control the video 3 Click to return...

Page 73: ...hard drive from the drop down menu by default NORMAL 4 Under Channel select ALL or an individual channel 5 Under Search Time enter a time manually using your keyboard or click to open the pop up calen...

Page 74: ...n window OR 2 Under HDD select a hard drive from the drop down menu by default NORMAL 3 Under Channel select ALL or an individual channel 4 Under Event check uncheck the boxes for Alarm Loss or Motion...

Page 75: ...ick The Time Search window opens 2 Select a file from the list 3 Click Play Playback begins in the DigiClient main window OR 2 Under HDD select a hard drive from the drop down menu by default NORMAL 3...

Page 76: ...indow opens Dates with recorded data appear in yellow 2 Click to select the year and or month Click one of the dates highlighted in yellow DigiClient searches for recorded data The results appear in y...

Page 77: ...ct a file from the list 3 Click Play Playback begins in the DigiClient main window OR 2 Under HDD select a hard drive from the drop down menu by default NORMAL 3 Under Channel select ALL or an individ...

Page 78: ...nter the date and time manually in the search field or click to open the pop up calendar 3 Select a date from the pop up calendar and click OK 4 From the Log Search window click Search 5 Click Save Lo...

Page 79: ...nnect a backup hard drive to your PC NOTE Make sure the drive is set to Slave mode 2 Click to open HDD Search 3 Select your hard drive from the list If desired use the drop down menus to select an ind...

Page 80: ...lick Folder Select to browse for the folder on your PC with saved video data from your DVR Use the Search Time field Date and Time sliders to jump to specific dates and or times 3 Click Play The file...

Page 81: ...ording Viewing Recorded Video Use File Search to playback video data saved to your PC You can also convert saved dvr files into more common avi files To playback video 1 Click to open File Search 2 Se...

Page 82: ...eo files to AVI 1 Open File Viewer 2 From the File Viewer main window click to open the Search Window 3 Click AVI Convert or click Folder Select to browse for the folder with your saved dvr files File...

Page 83: ...pen the file with a AVI compatible media player ATTENTION You can only view AVI files if your media player has the DivX or XviD codec not included VLC and DivX Player can play AVI files natively If yo...

Page 84: ...imilar to what you will find on the your DVR s front panel or remote control NOTE Some of the functions of the DVR Controller may not work with all DVR makes and models 1 Camera Number Input Click to...

Page 85: ...uttons Click the following to control playback search and PTZ REC Click to start stop recording SLOW Click to slow down playback speed PB PAUSE Click to pause playback press again to resume playback F...

Page 86: ...Status window displays four types of information about your DVR System Displays Video Type Software Version Hardware Version and hard disk information space remaining number of hard disks connected Re...

Page 87: ...s not increase the size of the image on the page it only increase the size of the image on screen Paper Size Click the drop down menu to select from A3 A4 A5 B4 B5 legal and letter Memo Add text to th...

Page 88: ...the memo 4 When you are finished click Memo to close the text box The text appears below the image on the page NOTE Changes you make to the font will apply to all text in the memo Printing the Snapsho...

Page 89: ...the Copy Time arrows to set a time interval in minutes Click the slider at the bottom of the window to quickly advance the date and time between the Start and End times NOTE Copy Time lets you increa...

Page 90: ...2 Enter the date and time you want copied using Copy Time Copy Start Copy End or the slider at the bottom of the window see Figure 1 0 3 If necessary enter your DVR s password in the Password text fie...

Page 91: ...able disable connected microphones Audio Click to mute unmute listen in audio A red speaker icon appears in the top right corner of the channel window NOTE Audio is only available on channels 1 4 RCA...

Page 92: ...p of the Remote Setup Window QUICK SETUP SCREEN RECORD EVENT SYSTEM LINK DOWNLOAD Click the tabs to open the respective menus The following buttons appear at the bottom of the window READ FROM FILE Lo...

Page 93: ...pable camera not included or microphone not included are necessary is necessary for audio recording REMOTE CONTROL ID Designate an ID for the remote control to use with the system Set from 11 12 13 14...

Page 94: ...SCREEN COVERT SPOT CAMERA Auto Sequence Configure full screen and multi screen display settings for Auto Sequence mode To configure Auto Sequence 1 Under AUTO SINGLE click to increase decrease for in...

Page 95: ...channelwhile in a split screen display view REMOTE CONTROL ID Select ON OFF to display or hide the remote control ID in use with the system By default this option is set to OFF SPOT TITLE DISPLAY Set...

Page 96: ...ulti screen displays To configure multi screen 1 Under LIVE 4E LIVE 6 LIVE 7 LIVE9B LIVE 10 AND LIVE 13 click to select the channel for use in each respective multi screen display 2 Check uncheck the...

Page 97: ...ar as the channel title on screen 4 To save your settings to your DVR click Update to DVR Spot Adjust the settings for the Spot monitor not included To configure spot options 1 Under SPOT MODE select...

Page 98: ...r each channel 2 To save your settings to your DVR click Update to DVR Record The Record tab contains the following options RECORD RECORD PROGRAM AUDIO HOLIDAY Record Use the Record menu to set a reco...

Page 99: ...ear or OFF PLAY MODE Select FIELD or FRAME 4 To save your settings to your DVR click Update to DVR Record Program By default there are 10 different predefined programs 0 9 available for you to use in...

Page 100: ...Recordingtimes Pre Recording is the length of time the system records before an event 0 5 seconds Post Recording is the length of time the system records after an event 0 60 seconds The left column is...

Page 101: ...enu 2 Under HOLIDAY SETUP enter up to 40 dates for holiday recording mm dd 3 To save your settings to your DVR click Update to DVR Event The Event tab contains the following options EVENT MOTION DETEC...

Page 102: ...on screen when an event occurs 4 Under EVENT MESSAGE RESET select from 1 30 from the drop down menu This is the time in seconds that the system will reset the Event Message after a detected event 5 Un...

Page 103: ...your settings to your DVR click Update to DVR Sensor Input Configure the sensors connected to the system Depending on your model you can connect from 4 to 16 sensors To configure sensor input 1 Click...

Page 104: ...CK ADVANCED SETUP System To configure system options 1 Under VIDEO STANDARD select NTSC PAL or AUTO from the drop down menu NOTE If you select AUTO the system will automatically detect NTSC or PAL 2 U...

Page 105: ...s GMT 06 00 Los Angeles is GMT 08 00 DAYLIGHT SAVINGS TIME Select ON OFF to enable disable DST on the DVR START TIME END TIME Usethe drop down menus to select month date day of week and time for DST 2...

Page 106: ...CHP Mode allows you to quickly connect the first time by obtaining an IP address from the router After the initial setup we recommend that you set DHCP to OFF and set the IP address between 1 100 For...

Page 107: ...ransmission to 1 or 2 2 To save your settings to your DVR click Update to DVR PTZ Set the model speed and ID for connected PTZ cameras not included NOTE Please refer to your PTZ camera s instruction m...

Page 108: ...SS MOTION 6 To save your settings to your DVR click Update to DVR Download Use the Download tab to download new firmware and upgrade your DVR Firmware upgrades can help improve the functionality of yo...

Page 109: ...e following options as desired Display Check uncheck the boxes to enable disable Channel Title Date Time Event and Frame Rate Play Mode From the drop down menu select Field Mode or Frame Mode Field Mo...

Page 110: ...password re enter the password in the Confirm password field NOTE User must have a password 4 Check uncheck the boxes to grant deny the new user permission to the following authorities 5 Click Save t...

Page 111: ...Enable or disable a username and password check when navigating DigiClient To enable disable password check 1 Open the User window 2 Under Check Password check uncheck the box to enable disable passwo...

Page 112: ...pear in the Connection list 3 From the DigiClient Main Window click DigiClient will separate the items in the Connection List into individual windows DigiClient s primary controls will appear in a min...

Page 113: ...ording schedule Daily Weekly adjust specific hour per channel Pre Post alarm recording 5 sec pre 60 sec post programmable per camera Event Log search Up to 20 000 for user log in out configuration cha...

Page 114: ...ubject to continuous improvement Digimerge Technology Inc and its subsidiaries reserve the right to modify product design specifications and prices without notice and without incurring any obligation...

Page 115: ...p Remote Access Overview To setup remote viewing 1 With the system powered off connect the system to the router using the included Ethernet cable 2 Power the system on You must connect the system to t...

Page 116: ...n Your IP address is near the top of the screen your MAC address is near the bottom of the screen 3 Press the button on the remote control until you see the Save Exit screen Select SAVE ONLY or SAVE A...

Page 117: ...his data to the external IP address of the Router The Router then needs to decide where this data is to be sent to This is where setting up Port Forwarding becomes important Port Forwarding tells the...

Page 118: ...rranty Information with your purchase details optional 3 Complete the System Information fields Product License Select your product model from the Product License drop down menu e g VB300 Product Code...

Page 119: ...emote access to your system Record your information below Username Domain name Password Only the first part of the Domain Name is required for setup on the system For example if the full domain sent i...

Page 120: ...ress the buttons and the buttons to select and input data for the following DOMAIN NAME USER NAME PASSWORD The Character Table will open for you to input the data from the confirmation email NOTE Only...

Page 121: ...mera 1 Connect the Transmit Cable to the TA port on the 485 port on the rear panel of the DVR 2 Connect the Receive Cable to the TB port on the 485 port on the rear panel of the DVR 3 Connect the came...

Page 122: ...ideo port BNC on the rear panel of the system to use the Monitor Out function Monitor Out displays the exact on screen display of the system NOTE A BNC to RCA adapter not included is required to conne...

Page 123: ...sensor activates the camera on CH4 will also become active if enabled in the Alarm menu on the system To connect an external alarm sensor to the system 1 Connect the Ground Cable to the desired Channe...

Page 124: ...luded Not Included BNC CAMERAS via octopus cable PS 2 port near front panel PS 2 MOUSE not included PTZ CAMERA not included LINE AUDIO SPEAKERS not included DVI MONITOR not included Up to 16 cameras o...

Page 125: ...flat see figure 34 0 The hard drive is attached on a mounting plate NOTE Make sure not to damage the cables connecting the fan to the circuit board 3 Disconnect the cables from the hard drive 4 Remove...

Page 126: ...rcuit board see figure 34 2 3 Secure the mounting plate with attached hard disk to the four mounting post with the four screws 4 Reconnect the cables to the hard disk Make sure the cables are connecte...

Page 127: ...o cancel or the button The system formats the hard disk erasing all recorded video data System settings and configurations remain intact After a few moments the system returns to the HDD menu NOTE Do...

Page 128: ...s from your audio source i e audio capable camera microphone to the RCA female cables in the Y adapter 3 Press the button to open the Main Menu 4 Select RECORD and press the button 5 From the Record m...

Page 129: ...s 2 Channel Indicators click to view selected channel in full screen 3 Search Click to open the Search window 4 Playback Controls Forward reverse playback skip previous and increase decrease playback...

Page 130: ...Connect the USB drive with your copied video data to a PC or insert the CD DVD in your computer s optical drive NOTE If you have copied the data to a CD DVD insert the disk into your computer s optic...

Page 131: ...ou convert dvr files to avi for increased flexibility when playing back the video in third party media players such as VLC and DivX Player Converting the file to AVI can be particularly useful if you...

Page 132: ...on _ fps avi 2 Double click the file to open in your default media player or right click to open the file with a AVI compatible media player Figure 36 4 AVI files after conversion ATTENTION You can on...

Page 133: ...he system will continue to write data to the external hard drive until the external hard drive is full Once the external hard drive is full the system will then overwrite the earliest recorded data le...

Page 134: ...first external hard drive then to the second hard drive then to the third hard drive etc Once the final external hard drive is full the system will overwrite the earliest data on the first external ha...

Page 135: ...e rear panel of the system NOTE The system supports ONLY DVD RW drives and media With the CD RW DVD RW drive connected to the system you can search and playback the copied video data on a CD DVD using...

Page 136: ...Internet Explorer 1 Open Internet Explorer 2 From the main browser window select Tools Internet Options 3 Click the Security tab 4 Click Trusted Sites from the available zones and then click Sites 5...

Page 137: ...the site must match the port number on your DVR 2 Click Connect 3 When prompted enter your 8 digit system password ADMIN by default 11111111 and click OK Live video appears from your connected DVR NOT...

Page 138: ...ng 5 IP Server Check the box to use an IP server 6 Live Play frames Click Live to start live viewing click Play to begin playback The display shows the current frame rate non selectable affected by ba...

Page 139: ...quence 1 From live viewing click Auto Channels are displayed sequentially in single channel mode 2 Click to increase decrease dwell time from 1 60 seconds NOTE The higher the dwell time the longer a c...

Page 140: ...with another plugged device such as an electric calculator or phone charger Remote control is not detected by the system Batteries in the remote control are drained Install two fresh AAA alkaline bat...

Page 141: ...port on the rear panel of the system Press the Power button again to turn the system ON There is no picture on selected channels camera picture is not being displayed Camera cables are loose or have b...

Page 142: ...IT S ALL ON THE WEB Digimerge Technology Inc VISIT www digimerge com www digimerge com Product Information User Manuals Quick Start Guides Specification Sheets Software Upgrades Firmware Upgrades...

Reviews: