Chapter 4: Media Station|V10 Software
33
To open an existing sequence:
1
If necessary, Select File > Open Bin to open the
Bin where the sequence is stored.
2
Double-click the desired sequence.
To add clips to a sequence:
1
Drag the desired sequence from the Bin and
drop onto the Record monitor. The sequence ap-
pears in the Timeline below the Source and
Record Monitors. If the Timeline does not ap-
pear, select Tools > Timeline.
2
Drag the first clip to the Source Monitor.
3
Select what to include in the sequence (this is
equivalent to creating a region in Pro Tools):
• Press the Spacebar to play or pause the clip.
• Press the Home key to go to the top.
• Press the End key to go to the end.
• Click and drag beneath the window to
scrub.
• Press the Left and Right Arrow keys to
nudge.
• Enable Caps Lock to hear audio while
scrubbing.
• Click the Mark In button to set an in point.
• Click the Mark Out button to set an out
point.
If there is no in point or out point, the sequence
will include everything after the cursor.
To include the whole clip in the sequence, press
the Home key, which will place the cursor at the
start of the clip.
4
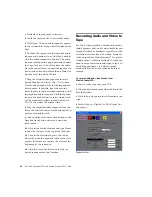
Verify that the Source Track Enable buttons
are properly aligned with the Timeline Track En-
able buttons. To align the Source and Timeline
tracks, click on Source track button and drag to
the Timeline track button.
5
Click the Overwrite button (the red arrow), to
add the selected part of the clip to the sequence.
6
To add another clip to the sequence, repeat
the preceding steps. Click in the Timeline and
either press the End key to place the cursor at
the end of the sequence, or place the cursor
where you would like the new clip to start, then
click the Overwrite or Splice-In button (the yel-
low arrow).
Deleting Clips from a Sequence
To delete clips from a sequence:
1
In the Timeline, click the clip you want to de-
lete so that the cursor appears between its
boundaries.
2
Click the Track Enable buttons on the left side
of the Timeline so that all audio and video
tracks in the Timeline are selected (purple).
Mark In button
Mark Out button
Track Enable buttons
Overwrite button
Splice-In button

