background image

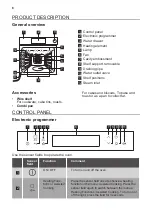
PRODUCT DESCRIPTION

General overview

5

12

10

9

4

11

8

5

4

3

2

2

1

3

6

7

1

1

Control panel

2

Electronic programmer

3

Water drawer

4

Heating element

5

Lamp

6

Fan

7

Cavity embossment

8

Shelf support, removable

9

Draining pipe

10

Water outlet valve

11

Shelf positions

12

Steam inlet

Accessories

• Wire shelf

For cookware, cake tins, roasts.

• Combi pan

For cakes and biscuits. To bake and

roast or as a pan to collect fat.

CONTROL PANEL

Electronic programmer

1

11

2

4

6

3

9 10

5

7

8

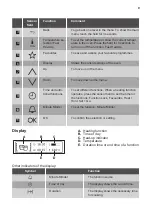
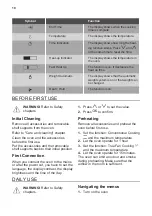
Use the sensor fields to operate the oven.

Sensor

field

Function

Comment

1

ON / OFF

To turn on and off the oven.

2

Heating Func‐

tions or Assisted

Cooking

Press the sensor field once to choose a heating

function or the menu: Assisted Cooking. Press the

sensor field again to switch between the menus:

Heating Functions, Assisted Cooking. To turn on or

off the light, press the field for 3 seconds. 

8

Summary of Contents for DKS38024XK

Page 1: ...DKS38024XK User Manual EN Steam oven ...

Page 2: ...ty This appliance can be used by children aged from 8 years and above and persons with reduced physical sensory or mental capabilities or lack of experience and knowledge if they have been given supervision or instruction concerning the use of the appliance in a safe way and understand the hazards involved Children between 3 and 8 years of age and persons with very extensive and complex disabiliti...

Page 3: ...he appliance Do not use harsh abrasive cleaners or sharp metal scrapers to clean the glass door since they can scratch the surface which may result in shattering of the glass If the mains power supply cable is damaged it must be replaced by the manufacturer its Authorised Service Centre or similarly qualified persons to avoid an electrical hazard To remove the shelf supports first pull the front o...

Page 4: ...e electrical ratings of the mains power supply Always use a correctly installed shockproof socket Do not use multi plug adapters and extension cables Make sure not to cause damage to the mains plug and to the mains cable Should the mains cable need to be replaced this must be carried out by our Authorised Service Centre Do not let mains cables touch or come near the appliance door or the niche bel...

Page 5: ... open flames to come in contact with the appliance when you open the door Do not put flammable products or items that are wet with flammable products in near or on the appliance WARNING Risk of damage to the appliance To prevent damage or discoloration to the enamel do not put ovenware or other objects in the appliance directly on the bottom do not put aluminium foil directly on the bottom of cavi...

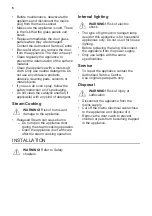
Page 6: ...gent Steam Cooking WARNING Risk of burns and damage to the appliance Released Steam can cause burns Do not open the appliance door during the steam cooking operation Open the appliance door with care after the steam cooking operation Internal lighting WARNING Risk of electric shock The type of light bulb or halogen lamp used for this appliance is for household appliances only Do not use it for hou...

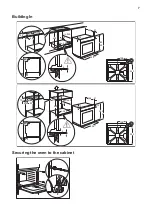
Page 7: ...uilding In 18 594 589 114 21 548 595 1 min 550 20 600 min 560 3 5 60 20 80 520 60 198 523 min 550 20 595 1 18 590 min 560 594 589 114 21 548 3 5 70 60 520 60 20 198 523 Securing the oven to the cabinet 7 ...

Page 8: ...sts Combi pan For cakes and biscuits To bake and roast or as a pan to collect fat CONTROL PANEL Electronic programmer 1 11 2 4 6 3 9 10 5 7 8 Use the sensor fields to operate the oven Sensor field Function Comment 1 ON OFF To turn on and off the oven 2 Heating Func tions or Assisted Cooking Press the sensor field once to choose a heating function or the menu Assisted Cooking Press the sensor field...

Page 9: ...enu 8 Down To move down in the menu 9 Time and addi tional functions To set different functions When a heating function operates press the sensor field to set the timer or the functions Function Lock Favourites Heat Hold Set Go 10 Minute Minder To set the function Minute Minder 11 OK To confirm the selection or setting Display A D E B C A Heating function B Time of day C Heat up indicator D Temper...

Page 10: ... cleaning chapter Clean the oven and the accessories before the first use Put the accessories and the removable shelf supports back to their initial position First Connection When you connect the oven to the mains or after the power cut you have to set the language the display contrast the display brightness and the time of the day 1 Press or to set the value 2 Press to confirm Preheating Remove a...

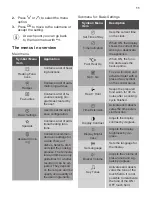
Page 11: ...s and the quality and quantity of the used ingredients Submenu for Basic Settings Symbol Menu item Description Set Time of Day Sets the current time on the clock Time Indication When ON the display shows the current time when you deactivate the appliance Fast Heat Up When ON the func tion decreases the heat up time Set Go To set a function and activate it later with a press of any symbol on the co...

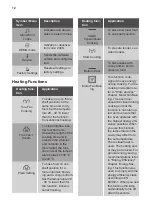
Page 12: ...0 C lower than for the function Conven tional Cooking Heating func tion Application Conventional Cooking To bake and roast food on one shelf position Slow Cooking To prepare tender suc culent roasts Bottom Heat To bake cakes with crispy bottom and to preserve food Moist Fan Bak ing This function is de signed to save energy during cooking For the cooking instructions re fer to Hints and tips chapte...

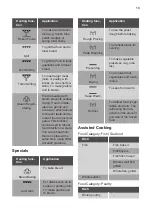
Page 13: ...can reheat more than one plate at the same time using differ ent shelf positions Specials Heating func tion Application Bread Baking To bake bread Au Gratin For dishes such as la sagna or potato gratin To make gratins and to brown Heating func tion Application Dough Proving To rise the yeast dough before baking Plate Warming To preheat plates for serving Preserving To make vegetable preserves e g ...

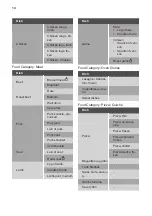
Page 14: ...uckle Loin of veal Roast veal Lamb Leg of lamb Saddle of lamb Lamb joint medium Dish Game Hare Leg of hare Saddle of hare Venison Haunch of veni son Saddle of veni son Roast game Food Category Oven Dishes Dish Lasagne Cannel loni frozen Vegetables au gra tin Sweet dishes Food Category Pizza Quiche Dish Pizza Pizza thin Pizza extra top ping Pizza frozen Pizza American frozen Pizza chilled Pizza sna...

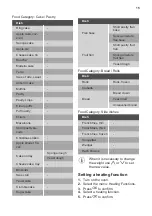
Page 15: ...Sugar cake Dish Flan base Short pastry flan base Sponge mixture flan base Fruit flan Short pastry fruit flan Sponge mixture fruit flan Yeast dough Food Category Bread Rolls Dish Rolls Rolls frozen Ciabatta Bread Bread crown Yeast plait Unleavened bread Food Category Side dishes Dish French fries thin French fries thick French fries frozen Croquettes Wedges Hash browns When it is necessary to chang...

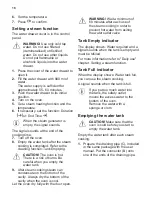
Page 16: ... when you empty the water tank 9 After steam cooking steam can condensate on the bottom of the cavity Always dry the bottom of the cavity when the oven is cool Let the oven dry fully with the door open WARNING Wait a minimum of 60 minutes after each use of the steam cooking in order to prevent hot water from exiting the water outlet valve Tank Empty indicator The display shows Water required and a...

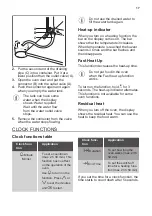
Page 17: ... the bar flashes and then disappears Fast Heat Up This function decreases the heat up time Do not put food in the oven when the Fast heat up function works To turn on the function hold for 3 seconds The heat up indicator alternates This function is not available for some oven functions Residual heat When you turn off the oven the display shows the residual heat You can use the heat to keep the foo...

Page 18: ... 80 C The function Duration is set The function Heat Hold keeps prepared food warm at 80 C for 30 minutes It turns on after the baking or roasting procedure ends You can turn on or turn off the function in the menu Basic Settings 1 Turn on the oven 2 Select the heating function 3 Set the temperature above 80 C 4 Press again and again until the display shows Heat Hold 5 Press to confirm When the fu...

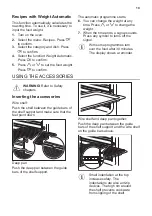
Page 19: ...s Press any symbol to turns off the signal With some programmes turn over the food after 30 minutes The display shows a reminder USING THE ACCESSORIES WARNING Refer to Safety chapters Inserting the accessories Wire shelf Push the shelf between the guide bars of the shelf support and make sure that the feet point down Deep pan Push the deep pan between the guide bars of the shelf support Wire shelf...

Page 20: ...el grill to put at the bottom of the baking dish Glass bowl A Lid B The injector and the injector tube C D C is the injector tube for steam cooking D is the injector for direct steam cooking Injector tube C Injector for direct steam cooking D Steel grill E Do not put the hot baking dish on cold wet surfaces Do not put cold liquids in the baking dish when it is hot 20 ...

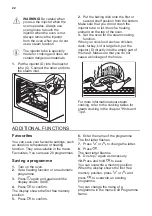
Page 21: ...special hole in the lid of the dietary baking dish C 2 Put the baking dish onto the second shelf position from the bottom 3 Put the other end of the injector tube into the steam inlet Make sure that you do not crush the injector tube or let it touch a heating element on the top of the oven 4 Set the oven for the steam cooking function Direct steam cooking Put the food onto the steel grill in the b...

Page 22: ...do not cause a blockage of the holes For more information about steam cooking refer to the cooking tables for steam cooking in the chapter Hints and Tips ADDITIONAL FUNCTIONS Favourites You can save your favourite settings such as duration temperature or heating function They are available in the menu Favourites You can save 20 programmes Saving a programme 1 Turn on the oven 2 Set a heating funct...

Page 23: ...with one press of any symbol 1 Turn on the oven 2 Set a heating function 3 Press again and again until the display shows Duration 4 Set the time 5 Press again and again until the display shows Set Go 6 Press to confirm Press any symbol except for to start the function Set Go The set heating function starts When the heating function ends a signal sounds Function Lock is on when the heating function...

Page 24: ...he standard settings for temperature cooking time and shelf position If you cannot find the settings for a special recipe look for the similar one The oven has a special system which circulates the air and constantly recycles the steam With this system you can cook in a steamy environment and keep the food soft inside and crusty outside It decreases the cooking time and energy consumption Baking c...

Page 25: ...ating is not needed 150 20 35 3 2 and 4 Baking tray Sweet buns 180 200 12 20 2 Baking tray Brioches 180 15 20 3 2 and 4 Baking tray Use the cake mould FLANS C min Vegetables filled 170 180 30 40 1 Lasagne 170 180 40 50 2 Potato gratin 160 170 50 60 1 2 and 4 Use the second shelf position Use the wire shelf MEAT C min Roast pork 1 kg 180 90 110 Veal 1 kg 180 90 110 MEAT C min Roast beef rare 1 kg 2...

Page 26: ...nd shelf position FISH C min Trout 3 4 fish 1 5 kg 180 25 35 FISH C min Tuna 4 6 fil lets 1 2 kg 175 35 50 Hake 200 20 30 Cooking in the dietary baking dish Use the function True Fan Steam Use the second shelf position Set the temperature to 130 C VEGETABLES min Tomatoes 15 Aubergines 15 20 Broccoli florets 20 25 Courgette slices 20 25 Pepper strips 20 25 Cauliflower florets 25 30 Kohlrabi 25 30 A...

Page 27: ...tatoes quar tered 35 45 Polenta 40 45 Unpeeled potatoes medi um 50 60 Steam Regenerating Preheat the empty oven Set the temperature to 130 C Use the second shelf position min Pasta and sauce 10 15 Side dishes 10 15 One Plate dish 10 15 Meat 10 15 Vegetables 10 15 Casseroles Gratins 15 25 Baking and roasting CAKES Conventional Cooking True Fan Cook ing min C C Whisked rec ipes 170 2 160 3 2 and 4 4...

Page 28: ... Plum cake preheat the empty oven 175 1 160 2 50 60 Bread tin Biscuits 140 3 140 150 3 25 45 Baking tray Meringues 120 3 120 3 80 100 Baking tray Meringues preheat the empty oven two levels 120 2 and 4 80 100 Baking tray Buns preheat the empty oven 190 3 190 3 12 20 Baking tray Eclairs 190 3 170 3 25 35 Baking tray Eclairs two levels 170 2 and 4 35 45 Baking tray Plate tarts 180 2 170 2 45 70 Cake...

Page 29: ...ing tray Pizza 230 250 1 230 250 1 10 20 Baking tray Deep pan Scones 200 3 190 3 10 20 Baking tray Preheat the empty oven Use the cake mould FLANS Conventional Cook ing True Fan Cooking min C C Pasta flan preheating is not needed 200 2 180 2 40 50 Vegetable flan preheat ing is not needed 200 2 175 2 45 60 Quiches 180 1 180 1 50 60 Lasagne 180 190 2 180 190 2 25 40 Cannelloni 180 190 2 180 190 2 25...

Page 30: ...T Conventional Cook ing True Fan Cooking min C C Pork shoulder with rind 180 2 170 2 120 150 Pork shin 2 pieces 180 2 160 2 100 120 Leg of lamb 190 2 175 2 110 130 Whole chicken 220 2 200 2 70 85 Whole turkey 180 2 160 2 210 240 Whole duck 175 2 220 2 120 150 Whole goose 175 2 160 1 150 200 Rabbit cut in pieces 190 2 175 2 60 80 Hare cut in pieces 190 2 175 2 150 200 Whole pheasant 190 2 175 2 90 ...

Page 31: ...BREAD kg C min White bread 1 2 pieces 0 5 kg for each 1 180 190 45 60 Bread rolls 6 8 rolls 0 5 190 210 20 30 Baking tray use the second and the fourth shelf position Rye bread 1 2 pieces 0 5 kg for each 1 180 200 50 70 Focaccia 190 210 20 25 Baking tray Crispy baking with Pizza Setting Preheat the empty oven Use the first shelf position unless specified otherwise PIZZA C min Pizza thin crust 200 ...

Page 32: ...eat the empty oven Use the fourth shelf position Grill with the maximum temperature setting GRILL kg min 1st side min 2nd side Fillet steaks 4 pieces 0 8 12 15 12 14 Beef steak 4 pieces 0 6 10 12 6 8 Sausages 8 12 15 10 12 Pork chops 4 pieces 0 6 12 16 12 14 Chicken half 2 1 30 35 25 30 Kebabs 4 10 15 10 12 Chicken breast 4 pieces 0 4 12 15 12 14 Burgers 6 0 6 20 30 Fish fillet 4 pieces 0 4 12 14 ...

Page 33: ...am joint 1 1 5 kg 160 180 90 120 Chops Spare rib 1 1 5 kg 170 180 60 90 Meatloaf 0 75 1 kg 160 170 50 60 Pork knuckle precooked 0 75 1 kg 150 170 90 120 VEAL C min Roast veal 1 kg 160 180 90 120 Veal knuckle 1 5 2 kg 160 180 120 150 LAMB C min Lamb leg Roast lamb 1 1 5 kg 150 170 100 120 Lamb saddle 1 1 5 kg 160 180 40 60 POULTRY C min Poultry portions 0 2 0 25 kg each 200 220 30 50 Chicken half 0...

Page 34: ...re shelf to collect fat Always cook without a lid while using this function 3 Select the function Slow Cooking You can set the temperature between 80 C and 150 C for the first 10 minutes The default is 90 C 4 After 10 minutes the oven automatically lowers the temperature to 80 C Set the temperature to 120 C kg min Steaks 0 2 0 3 20 40 3 Fillet of beef 1 1 5 90 150 3 Roast beef 1 1 5 120 150 1 Roas...

Page 35: ...tion Put no more than six one litre preserve jars on the baking tray Fill the jars equally and close with a clamp The jars cannot touch each other Put approximately 1 2 litre of water into the baking tray to give sufficient moisture in the oven When the liquid in the jars starts to simmer after approximately 35 60 minutes with one litre jars stop the oven or decrease the temperature to 100 C see t...

Page 36: ...let it cool down for one night to complete the drying For 1 tray use the third shelf position For 2 trays use the first and fourth shelf position VEGETABLES C h Beans 60 70 6 8 VEGETABLES C h Peppers 60 70 5 6 Vegetables for soup 60 70 5 6 Mushrooms 50 60 6 8 Herbs 40 50 2 3 Set the temperature to 60 70 C FRUIT h Plums 8 10 Apricots 8 10 Apple slices 6 8 Pears 6 9 Moist Fan Baking recommended acce...

Page 37: ... 9 pieces baking tray or dripping pan 180 2 30 40 Pizza frozen 0 35 kg wire shelf 220 2 10 15 Swiss roll baking tray or dripping pan 170 2 25 35 Brownie baking tray or dripping pan 175 3 25 30 Soufflè 6 pieces ceramic ramekins on wire shelf 200 3 25 30 Sponge flan base flan base tin on wire shelf 180 2 15 25 Victoria sand wich baking dish on wire shelf 170 2 40 50 Poached fish 0 3 kg baking tray o...

Page 38: ...20 pieces baking tray or dripping pan 180 2 25 30 Short crust bis cuits 20 pieces baking tray or dripping pan 150 2 25 35 Tartlets 8 pieces baking tray or dripping pan 170 2 20 30 Vegetables poached 0 4 kg baking tray or dripping pan 180 3 35 45 Vegetarian ome lette pizza pan on wire shelf 200 3 25 30 Mediterranean vegetables 0 7 kg baking tray or dripping pan 180 4 25 30 Information for test inst...

Page 39: ...ake cake mould Ø26 cm Conven tional Cooking Wire shelf 2 170 40 50 Preheat the oven for 10 minutes Sponge cake cake mould Ø26 cm True Fan Cooking Wire shelf 2 160 40 50 Preheat the oven for 10 minutes Sponge cake cake mould Ø26 cm True Fan Cooking Wire shelf 2 and 4 160 40 60 Preheat the oven for 10 minutes Short bread True Fan Cooking Baking tray 3 140 150 20 40 Short bread True Fan Cooking Bakin...

Page 40: ... mild cleaning agent To clean metal surfaces use a dedicated cleaning agent Clean stubborn stains with a special oven cleaner Everyday Use Clean the oven cavity after each use Fat accumulation or other food remains may cause fire The risk is higher for the grill pan Moisture can condense in the oven or on the door glass panels To decrease the condensation operate the oven for 10 minutes before coo...

Page 41: ...way from the side wall and remove it 2 1 Install the removed accessories in the opposite sequence Cleaning the water tank WARNING Do not put water into the water tank during the cleaning procedure During the cleaning procedure some water can drip from the steam inlet onto the cavity of the oven Put a dripping pan on the shelf level directly below the steam inlet to prevent water from falling onto ...

Page 42: ... Steam Set the temperature between 130 and 230 C Turn it off after 10 minutes Let it cool down and continue with the removal of the tank contents Refer to Emptying the water tank 4 Rinse the water tank and clean the remaining lime residue in the oven with a cloth 5 Clean the drain pipe by hand in warm water with soap To prevent damage do not use acids sprays or similar cleaning agents Removing and...

Page 43: ...ls by their top edge and carefully pull them out one by one Start from the top panel Make sure the glass slides out of the supports completely 10 Clean the glass panels with water and soap Dry the glass panels carefully Do not clean the glass panels in the dishwasher When the cleaning is completed install the glass panels and the oven door Make sure that you put the glass panels A and B back in th...

Page 44: ... the glass cover TROUBLESHOOTING WARNING Refer to Safety chapters What to do if Problem Possible cause Remedy You cannot activate or oper ate the oven The oven is not connected to an electrical supply or it is connected incorrectly Check if the oven is correct ly connected to the electrical supply refer to the connec tion diagram if available The oven does not heat up The oven is turned off Turn o...

Page 45: ...g the water tank The display shows an error code that is not in this table There is an electrical fault Turn off the oven with the house fuse or the safety switch in the fuse box and turn it on again If the display shows the error code again contact the Customer Care De partment Steam and condensation settle on the food and in the cavity of the oven You left the dish in the oven for too long Do no...

Page 46: ...ctric cooking appliances Part 1 Ranges ovens steam ovens and grills Methods for measuring performance Energy saving The oven contains features which help you save energy during everyday cooking Make sure that the oven door is closed properly when the oven operates Do not open the door too often during cooking Keep the door gasket clean and make sure it is well fixed in its position Use metal cookw...

Page 47: ...sidual heat indicator or temperature appears on the display Cooking with the lamp off Turn off the lamp during cooking Turn it on only when you need it Moist Fan Baking Function designed to save energy during cooking When you use this function the lamp automatically turns off after 30 seconds You may turn on the lamp again but this action will reduce the expected energy savings ENVIRONMENTAL CONCE...

Page 48: ...867355776 A 262019 ...

Reviews: