background image


15

)


In some rare cases, the screen may show a small amount of noise. This 
may be caused by non-standard signal frequencies from the VGA card. 
It is not a defect. You can improve it by automatic adjustment or by 
manually adjusting the Clock Phase and Pixel Frequency in the image 
menu. 

)


When shutting down the computer system or turning off the monitor, 
some interference lines may appear on your screen.  This is a normal 
situation. 

)


To extend the product life, we suggest you use the power saving 
function of your computer system. 

Summary of Contents for DV150

Page 1: ...Diamond View DV150 LCD Color Monitor 15 1 38 35cm LCD Panel Size User s Manual ...

Page 2: ...er expressed or implied with respect to the contents hereof and specifically disclaims any warranties merchantability or fitness for any particular purpose Further Mitsubishi Electric Australia reserves the right to revise this publication and to make changes from time to time in the contents hereof without obligation to notify any person of such revision or changes Fill in here For future referen...

Page 3: ...iii ...

Page 4: ... or over a radiator or other heat source or in a built in installation unless proper ventilation is provided 4 The DV150 monitor should only be operated with the AC adaptor model LE 9702B manufactured by Lien Electronics If you are not sure of the type of mains power available consult your dealer or local Power Company 5 Never push objects of any kind or spill liquid of any kind into this product ...

Page 5: ...en Display Operation Procedure 6 Contrast hot key mode 6 Brightness hot key mode 6 Main menu mode 6 Making Adjustments 7 Control Functions Available in Main Menu 7 Auto automatically adjusts Color Temperature Phase V Position H Position and Pixel Clock while the screen size is full 12 When Your Monitor Must Be Adjusted 13 How to Adjust Your Monitor using the Diskette 13 Supported Timings 14 Troubl...

Page 6: ......

Page 7: ...re missing or damaged consult your place of purchase immediately 9 LCD monitor with attached signal cable 9 Power cord adapter 9 User s manual 9 Diskette Locate the model name and the serial number label on the back of your monitor or underneath its stand Write down the details of your monitor and dealer in the space on page ii of this manual for future reference ...

Page 8: ... 70 lighter than traditional 15 CRT monitors 9 Lower Power Consumption Compared to the maximum 100W power consumption of 17 CRT monitors this monitor consumes only 36W in operation maximum 9 Intelligent Screen Technology The On Screen Display OSD allows you to adjust all settings simply with on screen menus 9 High Quality Ratiometric Expansion With any resolution within the monitor s specified ran...

Page 9: ...sumption of the monitor while it is not in use To release the monitor from the power saving condition press any key on the computer s keyboard The power consumption at NORMAL and OFF modes is as follows Mode Power Consumption Horizontal Sync Vertical Sync Power LED Normal 36 W ON ON Green Off 5 W OFF OFF Amber ...

Page 10: ...ower supply for voltages of 100 240V AC 50 60Hz 1 Make sure that the computer system is turned off 2 Plug the signal cable into the signal connector at the rear of PC 3 Plug adapter output cable to the jack at the rear of LCD monitor and the power cord to the adapter 4 Connect the power cord to power source 5 Turn on the computer and the monitor ...

Page 11: ...of each is as follows z Enter key enters sub menus or selects items z Exit key goes back to main menus auto save or leaves OSD z 3 key adjusts the parameter setting to a lower value or adjusts contrast setting z 4 key adjusts the parameter setting to a higher value or adjusts brightness setting z Auto Automatically adjusts Colour Temperature V Position Phase H Position and Pixel Clock ...

Page 12: ... key mode 1 Press 4 to enter brightness hot key mode 2 Press 3or4 to do the adjustments Main menu mode Grouped by functions the OSD offers 5 groups of functions in its Main Menu for making adjustments Luminance Geometry Color adjustment Recall and Miscellaneous The following describes the contents of each function and how you can make the adjustments 6 ...

Page 13: ...function item then press Enter and3or4to make the adjustment 4 Press Exit to save the settings and go back to main menu Control Functions Available in Main Menu 1 Luminance Press Enter to go into sub menu and press3or4 to locate the function item There are two items Contrast adjust the difference between the light and dark areas Brightness adjust the brightness of the display 7 ...

Page 14: ...l Position adjusts the vertical position of the display Phase adjusts the phase of pixel clock It can improve the focus and stability of your screen as well Pixel Clock adjusts the frequency of the pixel With this function you can enlarge or reduce the width of your screen 3 Color Adjustment 8 ...

Page 15: ...d adjustment G Green adjustment B Blue adjustment Recall recalls the preset color settings 4 Recall Locate and press Enter you can recall the preset settings This page is also a status display field that shows current horizontal and vertical frequency status If you set a timing that is not listed on the preset timing table Non Preset Mode will be shown on this page 9 ...

Page 16: ...s OSD Position Hor horizontal Position adjusts OSD horizontal position Ver vertical Position adjusts OSD vertical position ABC Language Select De Deutsche En English Es Español Fr Français It Italiano Ja Japanese 10 ...

Page 17: ...11 ...

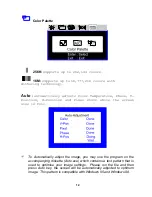
Page 18: ...on and Pixel Clock while the screen size is full To Automatically adjust the image you may use the program on the accompanying diskette Auto exe which contains a test pattern that is used to optimise your image settings Please run the file and then press Auto key the screen will be automatically adjusted to optimum image This pattern is compatible with Windows 95 and Windows 98 12 ...

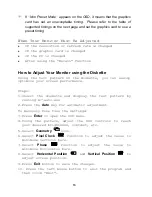
Page 19: ...sily optimize your screen performance Steps 1 Insert the diskette and display the test pattern by running A auto exe 2 Press the Auto key for automatic adjustment To manually fine tune the settings 3 Press Enter to open the OSD menu 4 Using the pattern adjust the OSD controls to reach your desired brightness contrast etc 5 Select Geometry icon 6 Select Pixel Clock function to adjust the value to m...

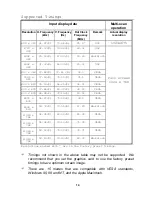
Page 20: ...8 P 60 32 P 40 00 VESA 800 x 600 48 08 P 72 19 P 50 00 VESA 800 x 600 46 87 P 75 00 P 49 5 VESA 832 x 624 49 72 N 74 55 N 57 29 Macintosh 1024 x 768 48 36 N 60 00 N 65 00 VESA 1024 x 768 56 48 N 70 10 N 75 00 VESA 1024 x 768 60 02 P 75 00 P 78 75 VESA 1024 x 768 60 24 N 74 93 N 80 00 Macintosh full screen 1024 x 768 Resolutions marked with are in the factory preset timings Timings not shown in the...

Page 21: ...ou can improve it by automatic adjustment or by manually adjusting the Clock Phase and Pixel Frequency in the image menu When shutting down the computer system or turning off the monitor some interference lines may appear on your screen This is a normal situation To extend the product life we suggest you use the power saving function of your computer system ...

Page 22: ...ture on the screen check Power saving mode Press any key and move the mouse to reactivate the computer Signal cable connector pins If there are bent or missing pins consult your place of purchase 9 If the picture is unstable check Signal cable connector pins If there are bent or missing pins consult your place of purchase Graphics card See if the settings are made properly Scanning frequency Chang...

Page 23: ...17 9 Characters look too dark or too light Adjust related settings See Chapter 3 Adjusting the Monitor ...

Page 24: ... Do not use harsh chemicals or strong cleaning solvents to clean the monitor screen Wipe it with clean soft cloth with mild cleaning solution 8 Do not place anything on your monitor or AC adaptor Bad ventilation may elevate temperature in the unit and cause damage to it Need More Help If your problems remain after checking this manual please contact your place of purchase Driver files and product ...

Page 25: ...3 Hz 36W max Max Resolution 1024 x 768 pixels Video Input RGB input User s Control Power ON OFF OSD Regulatory Compliance C Tick AS3548 AS3260 CE TCO 99 Optional Display Area 307 2mm H X 230 4mm V Ambient Temperature Operating Storage 5 C 40 C 41 F 104 F 20 C 60 C 4 F 140 F Humidity Operating Storage 20 85 10 85 Dimensions W x H x D 390 mm x 361 mm x 170 mm Weight net 5 8 Kg 5 19 ...

Page 26: ...toria Road Rydalmere NSW 2116 Telephone 02 9684 7777 Fax 02 9898 0484 Web site http www mitsubishi electric com au New Zealand Contact information for MELCO New Zealand is Address MELCO New Zealand Ltd 1 Parliament Street Lower Hutt Telephone 04 560 9100 Fax 04 560 9140 Web site http www melco co nz ...

Page 27: ......

Reviews: