background image

Dialogic D/4PCI Linecard Installation and Replacement


 R2B 

Copyright 

ã

 Ericsson Enterprise AB 2001


6

Installing the D/4PCI Linecard in the Platform


Because Dialogic D/4PCI linecards are designed to be installed in the PCI expansion bus, 
the interrupt requests and memory addresses used by the cards are assigned by the BIOS 
of the platform, not by configuring jumpers or switches. 

All PCI linecards installed in the 

platform should share IRQ 5

. The method of assigning this interrupt will vary depending 

on the particular BIOS and platform used. For example, a BIOS may allow you to assign 
IRQ 5 to the PCI expansion slots you intend to use for the linecards. Another BIOS may 
automatically assign IRQ 5 to the PCI expansion slot based on its location in the 
platform. Refer to the platform documentation to determine how to configure the 
platform to assign IRQ 5 to expansion slots used by PCI linecards. 

After you have prepared the Dialogic PCI linecards for installation and have determined 
how to assign IRQ 5 to the expansion slots they use, you can install the linecard in the 
computer platform. 

IMPORTANT 

Dialogic D/4PCI linecards cannot be used with any other makes or models of telephony 
linecards. If other makes or models of telephony linecards are installed in the platform, they 
must be removed prior to installing D/4PCI linecards. 

To install D/4PCI linecards: 

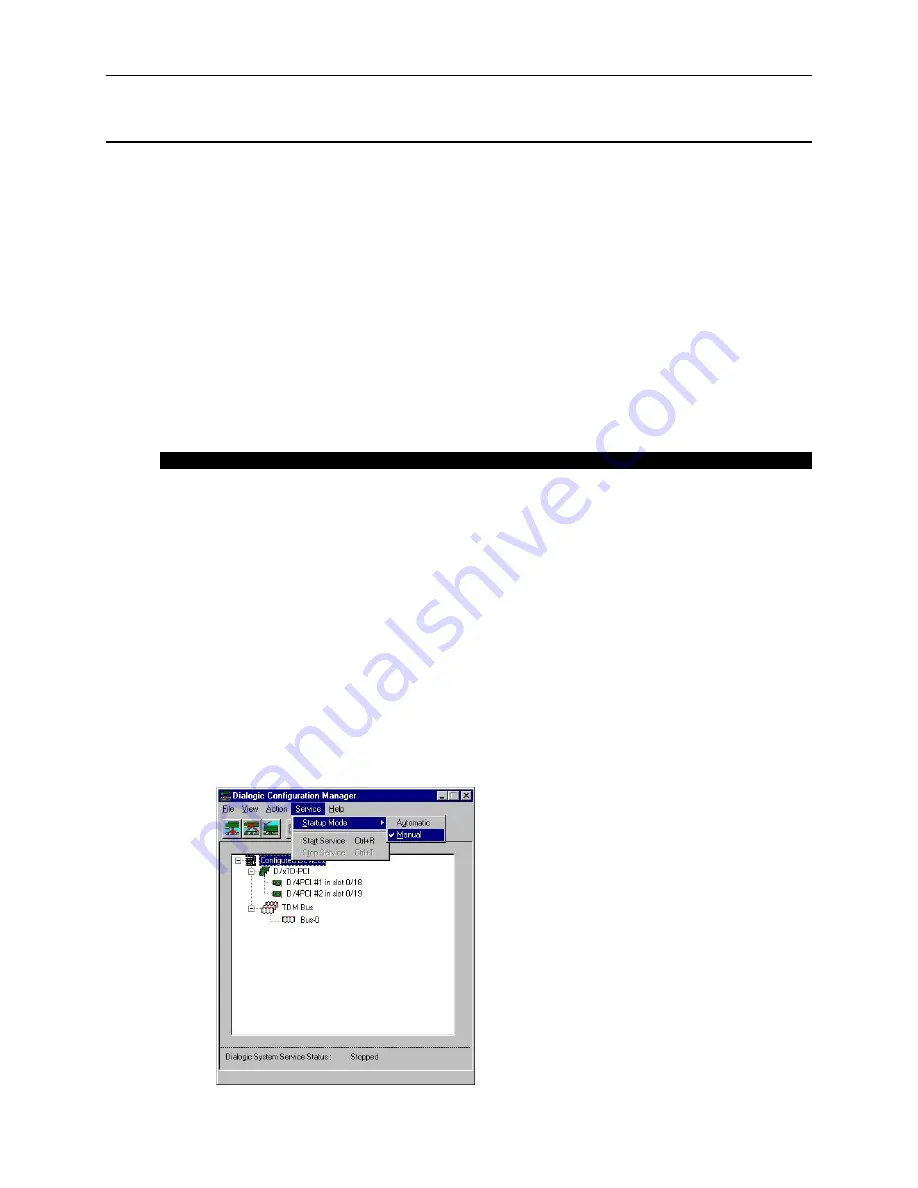
1.  If already installed, configure the Dialogic System Service to start manually (continue 

to step 2).  

If Dialogic System Software is not installed, skip to step 5. 

2.  From the Start menu, point to Programs, point to Dialogic System Software, and 

select

 Dialogic Configuration Manager – DCM

3.  From the Service menu, point to Startup Mode, and select 

Manual

Summary of Contents for D/4PCI

Page 1: ...ialogic System Software 9 Using the Dialogic Configuration Manager DCM 13 Configuring Lines in the Telephony Server Configuration 19 This document explains how to install or replace Dialogic D 4PCI linecards in a OneBox telephony server This document also explains how to install Dialogic System Software version SR5 01 and Dialogic Native Architecture DNA version 3 3 We recommend that you read this...

Page 2: ...d wear a grounding strap at all times Gathering Tools and Equipment Before you begin disassembling the telephony server platform verify that you have the following required tools and equipment OneBox Telephony Server program CD ROM Dialogic System Software SR5 01 CD ROM if installing New feature key diskette if the addition of linecards exceeds the number of ports for which you are currently licen...

Page 3: ...office CO lines Contact your local telephone company for its requirements Table 1 D 4PCI Technical Specifications Feature Specification Number of ports 1 4 the OneBox telephony server port assignment is determined by the card s linecard identification number Dialing DTMF Analog network interface On board loop start interface circuits Voice coding PCM ADPCM µ law PCM FCC registration number EBZUSA ...

Page 4: ...oming telephone calls when the telephony server platform is turned on but either the telephony server or the Dialogic System Software device driver is not running If switch SW4 is in the OFF position the default line state setting is onhook callers will get a ring no answer RNA response If switch SW4 is in the ON position the default line state setting is offhook callers will get a busy signal Not...

Page 5: ...d identification number 2 the four ports provided by the linecard will be designated ports 5 8 If your platform will have more than one linecard make note of the linecard identification number of each linecard to clarify the process of connecting the platform to the telephone system IMPORTANT Each linecard installed in the platform must use a unique linecard identification number If two linecards ...

Page 6: ...e platform Refer to the platform documentation to determine how to configure the platform to assign IRQ 5 to expansion slots used by PCI linecards After you have prepared the Dialogic PCI linecards for installation and have determined how to assign IRQ 5 to the expansion slots they use you can install the linecard in the computer platform IMPORTANT Dialogic D 4PCI linecards cannot be used with any...

Page 7: ...xpansion slot for the replacement linecard Adds ports to the OneBox platform Select an empty PCI expansion bus slot that will be assigned IRQ 5 and remove the slot s retaining screw and access cover plate 8 Insert the linecard into the PCI bus slot Gently press the linecard down to seat the edge connector into the slot applying pressure only to the top edge of the board Rocking the card or applyin...

Page 8: ...ed the linecard identification number 2 will be assigned port numbers 5 8 as shown in Figure 3 Keep this port number assignment scheme in mind when connecting each D 4PCI linecard to the telephone system Figure 3 D 4PCI linecard port assignments To cable Dialogic D 4PCI linecards to the telephone system Plug the linecords jacks from the telephone system switch to the RJ 11 connectors on the D 4PCI...

Page 9: ...ll Dialogic System Software version SR5 01 IMPORTANT Remove previously installed versions of Dialogic System software before you install a new version 1 Log on to Windows NT Workstation or Windows 2000 Professional with an account that has Administrator privileges on the OneBox telephony server platform 2 Insert the Dialogic program CD ROM into the CD ROM drive 3 From the Start menu click Run and ...

Page 10: ...xt 12 In the Program Group Folder dialog box accept the default folder value and click Next 13 In the Setup Options Summary dialog box verify the Current Settings and click Next Automatic installation of the software begins 14 In the Please Make Your Selection Now dialog box clear all boxes and click Next 15 In the Setup Complete dialog box select Yes I want to restart my computer now and click Fi...

Page 11: ...e Start menu select Run 4 Click Browse open the Dialogic folder on the CD ROM then double click the file Setup exe 5 With the path to Setup exe in the Run dialog box click OK to start the setup program 6 In the Setup Options dialog box click Custom then click Next 7 In the Custom Components Selection dialog box select only the Dialogic Core Drivers Firmware and Configuration Files option then clic...

Page 12: ...ck box then click Finish 11 If prompted Would you like to install Gamma Link Fax click No 12 If prompted Would you like to install SpeechWorks click No 13 When the installation is complete select No I will restart my computer later then click OK The Setup program closes and the Dialogic Configuration Manager dialog box appears Refer to Using the Dialogic Configuration Manager DCM for instruction o...

Page 13: ...nstallation and Configuration Knowledge Base book in the help system for advice about troubleshooting the Dialogic System Software Starting and Stopping Dialogic System Service The Dialogic System Service downloads firmware to the D 4PCI and initializes its device drivers If you are installing the Dialogic System Software for the first time the Dialogic services have not been started Note Only use...

Page 14: ... Configuration Manager DCM If the service for the D 4PCI linecard is not running the Dialogic System Service Status line at the bottom of the DCM dialog box will read Stopped as shown below 2 From the Service menu select Start Service as shown above 3 DNA version 3 3 only When the Dialogic System Service dialog box displays Success Dialogic services started click OK The Dialogic System Service Sta...

Page 15: ...ic Configuration Manager DCM If the service for the D 4PCI linecard is running the Dialogic System Service Status line at the bottom of the DCM dialog box will read Running as shown below 2 From the Service menu select Stop Service as shown above 3 DNA version 3 3 only When the Dialogic System Service dialog box displays Success Dialogic services stopped click OK The Dialogic System Service Status...

Page 16: ... Enterprise AB 2001 16 To set the Startup Mode to Automatic 1 From the Start menu point to Programs point to Dialogic System Software and select Dialogic Configuration Manager DCM 2 From the Service menu point to Startup Mode and select Automatic 3 From the File menu select Exit ...

Page 17: ...oftware until you restart the Dialogic System Service Refer to the earlier section Starting and Stopping Dialogic System Service for details To configure a D 4PCI linecard 1 Log on to Windows NT Workstation or Windows 2000 Professional with an account that has Administrator privileges on the OneBox platform 2 From the Start menu point to Programs point to Dialogic System Software and select Dialog...

Page 18: ...he value selected for the Country parameter the DCM will suggest default values for the other parameters that optimize the configuration of the linecard for use in the selected country We recommend using the default settings given by the DCM for your country 7 When you have finished configuring the linecard click OK to apply the changes you have made and exit the Dialogic Configuration Manager 8 F...

Page 19: ...guring Lines in the Telephony Server Configuration You must modify one configuration parameter in the telephony server On the Integration tab in the Configuration utility select Loop Start in the Type box for all lines provided by the D 4PCI linecard s on your platform Select Loop Start for all D 4PCI lines ...

Reviews: