background image

Configuring Advanced Settings / Processing Images

Tips and Tricks for Text Layout

Adjusting the Location, Size, or Angle of a Text

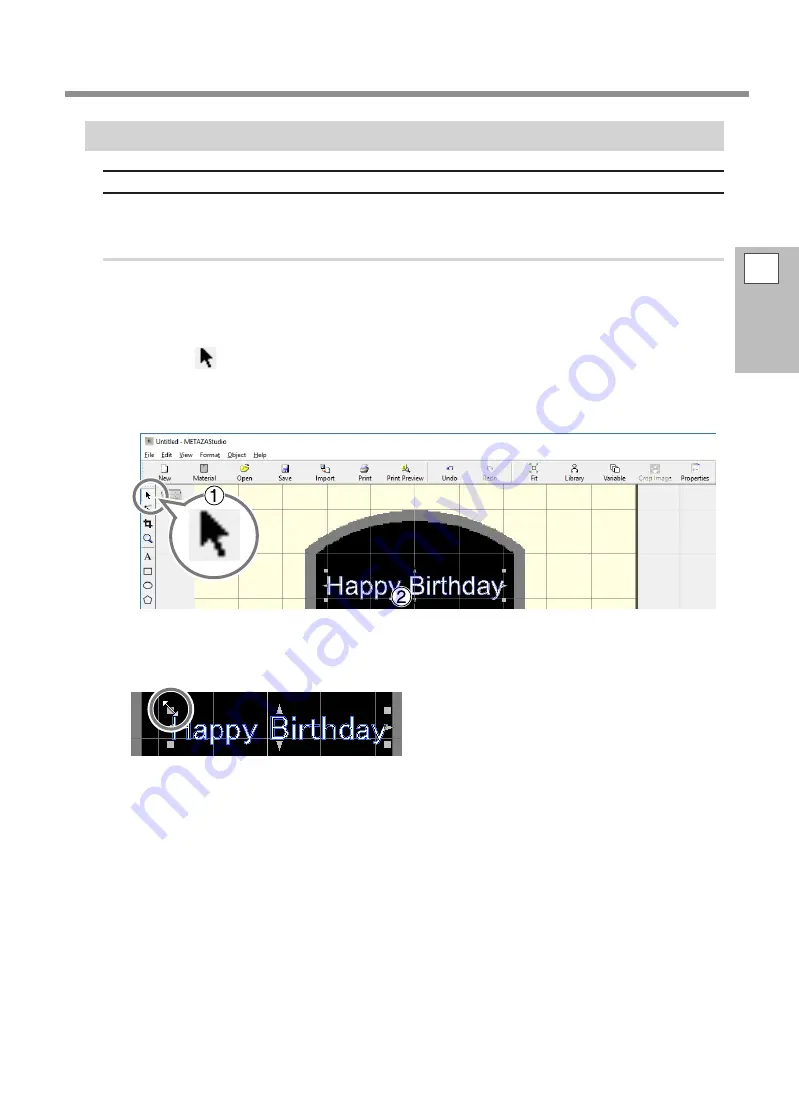
You can change the location, size, and angle of placed text just as with an image.

Procedure

Enter text.


"

P.58 "Step 3: Type in the Text."

Adjust the text position.

Click 

.

Click the laid-out text.

Eight handles appear around the text.

Drag the text to adjust its location.

Adjust the size of the frame.

Drag the handles to adjust the size.

2

Imprinting

75

Summary of Contents for METAZA MPX-95

Page 1: ...ocument and the specifications of this product are subject to change without notice DGSHAPE Corporation assumes no responsibility for any damage that may occur through use of this product regardless o...

Page 2: ...ing the housing Max output 46 5 W Pulse duration 3 0 s Wavelength 655 nm FEDERAL COMMUNICATIONS COMMIS SION RADIO FREQUENCY INTERFERENCE STATEMENT NOTE This equipment has been tested and found to comp...

Page 3: ...ti casalinghi Este producto debe devolverse al centro de reciclaje m s cercano a su domicilio para su correcta eliminaci n No lo tire a la basura Deite fora separadamente este produto no seu centro de...

Page 4: ......

Page 5: ...the Power 32 Switching Off the Power 33 Installing Removing the Base Unit 34 Installing Removing the Base Table or Grid Table to from the Base Plate 35 Installing Removing the Base Plate 37 Chapter 2...

Page 6: ...e 108 Cleaning the Machine and Material Retainers 109 Cleaning the Adhesive Sheet 109 Cleaning of the Head Cap 109 Adjusting 110 Adjusting the Striking Force of the Pin 110 Adjusting the Origin Locati...

Page 7: ...pect to the home and all its furnishings as well to domestic animals or pets About the Symbols The symbol alerts the user to important instructions or warnings The specific meaning of the symbol is de...

Page 8: ...per son Climbing or leaning on the machine may dislodge components and cause a slip or fall resulting in injury Be careful around the milling tool The milling tool is sharp Broken milling tools are a...

Page 9: ...other power supply may lead to fire or electrical shock Never place any flammable object near the machine Never use a combustible aerosol spray nearby Never use in any location where gases can accumul...

Page 10: ...cord This prevents accidents caused by unex pected electric leakage or unintentional start of the machine For accessories optional and consum able items power cord and the like use only genuine articl...

Page 11: ...he mean ings of these labels are as follows Be sure to heed their warnings Also never remove the labels or allow them to become obscured Caution HighTemperature Do not touch immediately after imprinti...

Page 12: ...utre effet ind sirable sur la maison tous les meubles et m me les animaux domestiques propos des symboles Le symbole attire l attention de l utilisateur sur les instructions importantes ou les avertis...

Page 13: ...et causer un faux pas ou une chute ce qui causerait des blessures tre attentif dans le p rim tre de l outil de coupe L outil de coupe est ac r Les outils de coupes bris s sont aussi dangereux Faire pr...

Page 14: ...er d objet inflammable proximit de l appareil Ne jamais utiliser de produit inflammable en a rosol proximit de l appareil Ne jamais utiliser l appareil dans un endroit o des gaz peuvent s accumuler Un...

Page 15: ...peut pr venir les accidents en cas de fuite de courant inattendue ou de d mar rage accidentel Utiliser uniquement des accessoires d origine accessoires en option et consommables c ble d alimentation...

Page 16: ...n e ci dessous Respecter les aver tissements Ne jamais retirer les vignettes et ne pas les laisser s encrasser Attention temp rature lev e Ne pas toucher imm diatement apr s l impression ATTENTION Ne...

Page 17: ...environment where silicone substances oil grease spray etc are present Doing so may cause poor switch contact Moving the Machine When moving the machine be sure to support it at the bottom using two...

Page 18: ...for how to install and use the included software Be sure to read this first METAZA Driver 2 Help electronic format manual METAZAStudio Help electronic format manual SFEdit2 Help electronic format manu...

Page 19: ...ou Can Install and Set Up 23 Installing the Driver and the Software 24 Installation 29 Installation Environment 29 Removing the Retainers 30 Connecting the Machine to a Computer 31 Switching the Power...

Page 20: ...sallowyoutoperformimprintalignmenteasilywithjustonepushofabutton Variable Imprinting for Continuous Printing Even when printing different multiple codes in a row you can continue printing without stop...

Page 21: ...a dedicated vise this kit makes it possible to imprint even on small items that are not easily secured such as watches and pens For more information refer to Using the Gift Kit in the manual included...

Page 22: ...unit is composed of the following two parts which can be installed or removed from the machine P 37 Installing Removing the Base Plate Cover Head unit Hold the middle area of the cover when opening t...

Page 23: ...head is a consumable part replace it at the appropriate time P 113 Head Replacement Marking pin Material Retainers Grid table adhesive sheet When securing the material using the grid table the adhesiv...

Page 24: ...r cord 1 USB cable 1 Grid table 1 Adhesive sheet 1 Head MPH 90 1 1 Head caps round bottom 10 2 Test material Brass plated plates 4 Test material MD NI 1 Hexagonal wrench 1 DGSHAPE Software Package CD...

Page 25: ...he Software You Can Install and Set Up METAZAStudio Thisisaprogramforcreatingimprintdata Itenablesyouimportandcrop images to imprint and perform editing to add text boxes and the like SFEdit2 This pro...

Page 26: ...DGSHAPE Software Package CD into the computer When the automatic playback window appears click Run menu exe If the User Account Control window appears click Allow or Yes The install menu appears autom...

Page 27: ...following actions if the screens shown below appear during installation Windows 10 Click Install Windows 8 1 Click Install Windows 7 Click Install this driver software anyway G Follow the displayed in...

Page 28: ...uring the next steps P 31 Connecting the Machine to a Computer How to Open the METAZA Driver 2 Printing Preferences Screen The Printing Preferences screen can be displayed after METAZA Driver 2 instal...

Page 29: ...nces screen opens How to Open the METAZA Driver 2 Help Open the METAZA Driver 2 Printing Preferences screen and then click Help P 26 How to Open the METAZA Driver 2 Printing Preferences Screen 1 Getti...

Page 30: ...for Name of software to use under the Name of software to use folder Windows 8 1 1 On the Start screen click 2 On the Apps screen click Name of software to use How to Display Help for Software Start...

Page 31: ...mmediate access to the electrical outlet CAUTION Install in a level and stable location Failure to do so may result in falling of the machine leading to injury Never install in a location subject to w...

Page 32: ...or screws that remain may cause faulty operation or breakdown when the power is switched on Items Used Retainer Hexagonal wrench Retainer A 2 Retainer B 1 each for L and R Retaining screws 7 Retainer...

Page 33: ...disassemble repair or modify the AC adapter Doing so may result in fire electrical shock or injury Entrust repairs to a trained service technician WARNING When using an extension cord or power strip u...

Page 34: ...bottom cover of the machine B Loosen the head s stopper Rotate the knob once Stopper Loosen C Press the Power Movement button The head moves to the left rear and the lamp of the Power Movement button...

Page 35: ...error is cleared and the power lamp is lit If the lamp continues to blink refer to the following section P 118 The Power Movement Button Is Blinking Switching Off the Power Procedure Hold down the Po...

Page 36: ...ed material P 42 Preparing the Material Base table Base plate Base unit Main unit Switch off the power before installing or removing the base unit or the base plate The base unit or base plate can be...

Page 37: ...t also the grid table can be directly mounted to the base plate P 61 2 Load the material on the grid table Removing the Base Table or Grid Table Procedure A Open the bottom cover of the machine B Lift...

Page 38: ...ther the base plate is installed C Place the base table or grid table on the base plate Place the protrusions on the bottom of the base table or grid table into the holes on the base plate For a Base...

Page 39: ...it or base plate are mounted on the machine set the material P 61 2 Load the material on the grid table Removing the Base Plate Procedure A Open the bottom cover of the machine B Remove the hooks from...

Page 40: ...cations at the same time Machine Base plate C Set the hooks on both sides of the machine so that they catch on the base plate and then lock the hooks OK Not OK Not OK IMPORTANT Make sure the hooks on...

Page 41: ...mprint Operations 68 Stopping Imprinting Operations 68 Deleting Data from Imprint Queue 69 Configuring Advanced Settings Processing Images 70 Processing Images 70 Tips and Tricks for Text Layout 75 Cr...

Page 42: ...r Preparing the Material P 42 Check the several conditions for thickness hardness and the like that must be met for a material to be imprinted Creating Imprint Data P 48 Create imprinting data using M...

Page 43: ...Switch on the power to the machine P 32 Switching On the Power B Starting METAZAStudio P 28 How to Start The Software C Click File Set up the printer The Print Setup dialog box appears D Select the pr...

Page 44: ...uded with it Conditions may vary if the optional kit is used Imprint Surface Hardness Vickers hardness HV of 200 or less Materials which may crack or split by imprinting such as glass stone precious s...

Page 45: ...d 40 mm to 70 mm 1 6 in to 2 8 in Not used Imprinting 40 mm 1 6 in material is possible regardless of whether a base table is used Base table Base plate 0 3 mm to 40 mm 0 01 in to 1 6 in Base table Ba...

Page 46: ...a that can be imprinted 80 mm 3 2 in 118 mm 4 6 in Distance from machine Securing the grid table is not possible if the base unit is not used In addition to placing a support to keep the material hori...

Page 47: ...nd Length general guide Aluminum 2 0 mm 0 08 in Length or width of 60 mm 2 4 in or less 1 5 mm 0 06 in Length or width of 40 mm 1 6 in or less 1 0 mm 0 04 in Length or width of 30 mm 1 2 in or less 0...

Page 48: ...o high Not OK L shape Not OK Flat view Cross sec tional view The back surface must be flat with no difference in level The back surface is curved OK The back surface is uneven Not OK Not OK Flat view...

Page 49: ...er with extended curved surface Recommended imprint area A Area reached by the marking pin B 10 mm 0 4 in 2 0 mm 0 08 in 2 8 mm 0 11 in 20 mm 0 8 in 2 8 mm 0 11 in 4 0 mm 0 16 in 30 mm 1 2 in 3 4 mm 0...

Page 50: ...ick All Apps All Programs or Programs for Windows 7 3 Click the METAZAStudio icon under the METAZAStudio folder Windows 8 1 1 On the Start screen click 2 On the Apps screen click METAZAStudio P 49 MET...

Page 51: ...the grid and the view magnification Moving the pointer to a toolbar button or pointing to a menu command makes a brief explanation of the button or command appear at the left edge Present Cursor Posit...

Page 52: ...ver Settings 7 Center line This indicates the vertical and horizontal centers of the window 8 Grid This is a grid of lines displayed in the work area It serves as a guide for positioning images and te...

Page 53: ...th the same shape as the plate and with the name of tag P 42 Preparing the Material 25 mm 0 98 in 40mm 25mm 40 mm 1 6 in MEMO If you want to register new material see the section given below P 102 Reg...

Page 54: ...a type of material To use material that is not included in the list you can register the material P 102 Registering a Composition and Adjusting the Striking Force If you use the METAZA Driver 2 setti...

Page 55: ...ng Imprint Data E Select the shape of the material 1 Click the icon with the tag name 2 Click The Material Size dialog box appears 3 Enter the values for the size of the material 4 Click OK 2 Imprinti...

Page 56: ...g Imprint Data ThematerialyouselectedappearsintheEditwindow Theportiondisplayedasthematerialbecomes the imprint area without change F Click File Preferences The Preferences dialog box appears 2 Imprin...

Page 57: ...et Margin to 1 mm 0 0394 in 2 Click OK IMPORTANT To imprint a flat material make the margin at least 1 mm 0 0394 in If the margin is set to less than 1 mm 0 0394 in the marking pin may strike and dama...

Page 58: ...ormat exported by CorelDraw version 7 or 8 Illustrator and CorelDraw files are subject to a number of limitations For details see the online help for METAZAStudio METAZAStudio online help Hints and Ti...

Page 59: ...If the material has holes take care to ensure that the image is not laid out over the holes If you include the holes in the imprint area the marking pins might hit the edge of the material and cause d...

Page 60: ...he Text Type in the text to be imprinted Procedure A Click B Enter text 1 Click on the imprint area 2 Enter text You can change the size and orientation of the typed text and fill it METAZAStudio onli...

Page 61: ...print Data Step 4 Save Imprinting Data Save the imprint data to a file Procedure A Click The Save As dialog box appears B For Save in specify where to save the file Type in a file name Click Save 2 Im...

Page 62: ...n the head s stopper Rotate the knob once The stopper and ring come into contact with each other Ring Stopper Loosen D Fix the head s stopper Align the center of the knob with the top of the triangle...

Page 63: ...o scratches or stains Some material may cause scratches and stains on the head cap during imprinting which may affect the imprint quality Scratches and stains on the material may also damage the head...

Page 64: ...grid table The following illustrations show a machine with the base table attached Place the adhesive sheet straight within the grid table frame by aligning the sheet with the scale marks Be careful n...

Page 65: ...ser pointer points coincides with the center of the work area in METAZAStudio By making the position to which the laser pointer points coincide with the center of the area to be imprinted you can prin...

Page 66: ...Material When Imprinting Curved Surfaces Imprinting without a head cap is limited to material with an even imprint surface placed horizontally 3 Fix the height of the head When no head cap is used A P...

Page 67: ...op of the triangle directly below The center of the knob must be positioned immediately above the top of the triangle D Press the Power Movement button The head moves to the left rear E Detach the hea...

Page 68: ...nt quality priority of quality or speed The selection made when creating new imprint data is reflected in the material setting Print Range Use this option mainly for variable imprinting Normally All i...

Page 69: ...orientation P 60 Mounting the Material IMPORTANT Make sure to align the position using the laser pointer button every time the material is replaced E Click OK Imprinting of the next page starts Variab...

Page 70: ...ht slowly blinks while the transmitted imprint data is being deleted The light turns off and the power is switched off MEMO When imprinting is paused the head stays in the same position The head will...

Page 71: ...the Start menu on the computer 2 Click Control Panel 3 Click Devices and Printers Windows 7 1 Click the Start menu 2 Click Devices and Printers B Double click the Roland MPX 95 icon C From the Printe...

Page 72: ...ust the required portion This operation is called trimming Procedure A Import the image P 56 Step 2 Import the Image B Select the image 1 Click 2 Click the image Eight trimming bars appear around the...

Page 73: ...gs Processing Images Adjusting the Location Size or Angle of an Image A Click B Adjust the position of the image 1 Click the image appear at the four corners of the image 2 Drag the image to adjust it...

Page 74: ...ur corners of the image to adjust the size Handles D Adjust the angle of the image 1 With the handles present at the four corners of the image click the image a second time The shape of the handles at...

Page 75: ...an image whose angle has been changed To perform trimming first return the image to its original angle Enclosing an Image in a Frame You can change the arrangement of the imprint data by placing a fr...

Page 76: ...erted into the window C Adjust the size and location of the frame When the size of the frame is larger than that of the material the result becomes as shown in the figure The adjustment methods are th...

Page 77: ...ge the location size and angle of placed text just as with an image Procedure A Enter text P 58 Step 3 Type in the Text B Adjust the text position 1 Click 2 Click the laid out text Eight handles appea...

Page 78: ...anges to a pointer for rotation 3 Drag to change the angle of the text MEMO Holding down the keyboard s SHIFT key as you drag makes the angle change by 45 degrees at a time Using this method can be co...

Page 79: ...iguring Advanced Settings Processing Images C Set the text placement 1 Click the Format tab 2 Select the Align with Curve check box 3 Click OK The layout of the text changes to a fan shape 2 Imprintin...

Page 80: ...g tools Procedure A Create a shape 1 Click the drawing tool Use in this example 2 In the editing window create a shape on the material METAZAStudio online help Commands Toolbar buttons Drawing tools B...

Page 81: ...AZAStudio online help Commands Object menu Convert to Polyline Integrate Polyline Filling Text There are two ways to fill text Fill and Island Fill Select whichever method you desire Fill Text is fill...

Page 82: ...ncreased and consequently the head cap will wear out faster Periodically check the state of the head cap to ensure that it is replaced as often as needed P 113 Head Cap Replacement Creating Editing a...

Page 83: ...ine for lining up a text string horizontally When text is written horizontally the base lines of adjacent characters are lined up along a horizontal line so that there is no unevenness 6 Text box This...

Page 84: ...art METAZAStudio P 48 Starting METAZAStudio P 28 How to Start The Software B Click Edit Stroke Font Run SFEdit2 SFEdit2 starts C Click File New The Select Base Font dialog box appears D Create the str...

Page 85: ...r the created stroke character font and save 1 Enter the name of the created stroke character Giving a name based on the base font name allows you to easily identify the new name later For example MS...

Page 86: ...did not create a stroke character font at the time of installation reinstall SFEdit2 and create a stroke character font P 24 Installing the Driver and the Software P 129 To Install Software Separatel...

Page 87: ...Click the Format tab 2 Select Stroke The options for Font become limited to stroke character 3 Select the stroke character font 4 Click OK Entered characters are changed into stroke characters The st...

Page 88: ...lick 2 Click the stroke character you want to edit Six pointers appear around the stroke character 3 Click Edit Stroke Font Edit Stroke SFEdit2 starts C From the Character List click the stroke charac...

Page 89: ...ng Advanced Settings Processing Images D Close SFEdit2 1 Click The edit is overwritten to the selected stroke character font 2 Click SFEdit2 closes The edit is reflected to the stroke character 2 Impr...

Page 90: ...Configuring Advanced Settings Processing Images Checking and Adjusting Finished Result of an Image Checking the Finished Results in the Preview Window Click The Preview window appears 2 Imprinting 88...

Page 91: ...e brightest areas and shadows the dark est areas Using this can be effective when you want to achieve a sense of tension with a good balance of light and dark 3 Gamma This mainly adjusts the brightnes...

Page 92: ...me composition and size A CSV file is required to perform variable imprinting You can create a CSV file using database files For information on creating a CSV file contact the administrator of the dat...

Page 93: ...o select a type of material To use material that is not included in the list you can register the material P 102 Registering a Composition and Adjusting the Striking Force If you use the METAZA Driver...

Page 94: ...use move while holding down the left button of the mouse diagonally downward on the work area in METAZAStudio A variable field within which you can place text is created Work area black area on the sc...

Page 95: ...er of the variable field coincide with the center of the work area means making the center of the variable field coincide with the reference point in the actual imprint operation Though you can imprin...

Page 96: ...tudio Commands Object menu Properties Properties dialog box P 28 How to Display Help for Software After configuring the settings click OK 2 Place text inside the variable field A Click Load CSV File T...

Page 97: ...of the imported CSV file into the variable field Text is displayed in the variable field You can display each symbol in turn by clicking If you want to change the size or location of the variable fie...

Page 98: ...When imprinting a curved surface imprint ing the entire surface of the material as with flat material is not possible For this reason the METAZAStudio editing window displays the imprint area instead...

Page 99: ...rgins 1 Set Margin to 0 mm 0 in 2 Click OK MEMO When imprinting a curved surface the imprintable area is limited To ensure a sufficient imprint area set the margins to 0 mm 0 in C Click File Set up th...

Page 100: ...e values for the size of the material 1 Click the Material tab 2 Enter the diameter In this example set to 20 mm 0 8 in 3 Select Direction Orient in the direction of the center vise Vertical Horizonta...

Page 101: ...s and text on the area This section explains the method of inputting characters horizontally on portrait material A Enter the first letter 1 Type in the text to be imprinted and then adjust how it s l...

Page 102: ...entering text will appear 1 Click 2 Press the key left arrow key on the keyboard The result becomes as shown in the figure D Input the remaining text and move the text to the desired position P 71 Ad...

Page 103: ...e of the material is available you can import the image under the following conditions File format Must be either BMP bitmap or JPEG Colors Binary black and white Portions corresponding to the materia...

Page 104: ...the striking force of compositions you ve registered yourself Procedure A Display the METAZA Driver 2 Printing Preferences screen P 26 How to Open the METAZA Driver 2 Printing Preferences Screen B Se...

Page 105: ...eful Impact MAX You can set the maximum value of imprint impact for an image Raise the value when bright areas of the image are struck with too little force or when overall striking is too weak Lower...

Page 106: ...r 2 Click Control Panel 3 Click View devices and printers or Devices and Printers Windows 7 1 Click the Start menu on the computer 2 Click Devices and Printers B Right click the Roland MPX 95 icon and...

Page 107: ...operation method refer to the online help for METAZAStudio P 28 How to Display Help for Software About Dr Engrave What is Dr Engrave Dr Engrave is imprinting software for plate materials This softwar...

Page 108: ...ower P 32 Switching On the Power D Press the Power Movement button Lower the head to a position where it can detect the material height IMPORTANT If the material height does not meet the conditions an...

Page 109: ...Machine and Material Retainers 109 Cleaning the Adhesive Sheet 109 Cleaning of the Head Cap 109 Adjusting 110 Adjusting the Striking Force of the Pin 110 Adjusting the Origin Location 111 Replacing Co...

Page 110: ...wer switches left switched off Failure to observe these instructions may cause the machine to move sud denly resulting in injury CAUTION Never touch the heads immediately after imprinting has finished...

Page 111: ...et by gently stroking its surface If the soiling of the adhesive sheet is severe wash it using diluted neutral detergent Rinse thoroughly with water to remove all detergent completely IMPORTANT Be sur...

Page 112: ...n in the figure You need to prepare the included test imprint material brass or a material equal to or larger than 60 mm 2 4 in wide by 60 mm 2 4 in long Adjustment pattern Procedure A Start MPX 95 He...

Page 113: ...e imprinted refer to the sections given below P 120 The Imprinted Location Isn t Where Desired D When you have finished click The window closes Adjusting the Origin Location If the imprinted text or i...

Page 114: ...djusting B Click Adjust Origin The Adjust Origin wizard appears Follow the on screen instructions to perform adjustment C When you have finished click The window closes 3 Maintenance and Adjustment 11...

Page 115: ...sland Fill Characters and objects excluding Fill objects are imprinted using lines placed at intervals For details refer to the help for METAZAStudio Commands Format menu Font Properties dialog box P...

Page 116: ...95 Head Manager Procedure A Start MPX 95 Head Manager P 28 How to Start The Software B Switch on the power to the machine P 32 Switching On the Power The amount of pin usage is indicated in this wind...

Page 117: ...en How to Replace the Head MPX 95 Head Manager is used for replacing the head The pattern shown in the figure is struck during the head replacement operation You need to prepare a test imprint materia...

Page 118: ...to be imprinted with a test pattern using the adhesive sheet and grid table P 60 Mounting the Material Use a head cap If the adjustment pattern fails to be imprinted refer to the sections given below...

Page 119: ...bject to Be Imprinted Using METAZAStudio 119 The Imprinted Location Isn t Where Desired 120 The Imprinted Image Is Unattractive 121 The Image Is Uneven 122 The Image Is Always Faint at the Same Locati...

Page 120: ...ace height of the material and secure the head firmly with the knob If the head is fixed at the position that is lower than the surface height of thematerial thetipoftheheadhitsthesurfaceof themateria...

Page 121: ...t properly P 31 Connecting the Machine to a Computer Is the cable used for the connection to the computer connected correctly Check if the connection cable is disconnected YouCannotSelecttheMaterialof...

Page 122: ...head position does not match the height position of the material Adjust the head position and then tighten the knob firmly P 60 Mounting the Material Is the origin point of the ma chine displaced If...

Page 123: ...Image Correction tab and adjust the force of striking Perform imprinting while leaving the value for Impact MAX unchanged and increasing the value for Impact MIN a little at a time At this time leave...

Page 124: ...ting Finished Result of an Image Was bidirectional imprinting performed Bidirectional imprinting can shorten the imprint time but the imagequalitymaysuffer Ifthishappens gototheMETAZADriver 2 setting...

Page 125: ...the image quality Adjust the levelness of the machine according to the following procedure Please note that this is not effective when unevenness in the image is unrelated to the imprint location suc...

Page 126: ...Preferences screen opens D Click Test Print in the Option tab The test pattern is imprinted on the material E Use the scale to read and note the locations where the test pattern is not continuous or n...

Page 127: ...Troubleshooting F Enter the correction value 1 Select Correct slope 2 Enter the scale values you noted in E into METAZA Driver 2 3 Click OK 4 Trouble shooting 125...

Page 128: ...tor or as a member of the Administrators group B Insert the DGSHAPE Software Package CD into the computer When the automatic playback window appears click Run menu exe The setup menu appears automatic...

Page 129: ...allation starts Proceed by following the on screen instructions Perform the following actions if the screens shown below appear during installation Windows 10 Click Install Windows 8 1 Click Install W...

Page 130: ...e setup menu I Remove the CD from the CD ROM drive J Connect the machine to the computer using the USB cable Please use the included USB cable Do not use a USB hub METAZA Driver 2 is installed automat...

Page 131: ...u appears automatically C Click Custom Install D Click Install of the program you want to install P 23 The Software You Can Install and Set Up For information about METAZA Driver 2 installation refer...

Page 132: ...printers other than this machine 3 Click Desktop 4 Right click the Start button and then click Device Manager 5 If the User Account Control window appears click Continue The Device Manager appears 6...

Page 133: ...on to Windows as an administrator 3 Click Desktop 4 Right click the Start button and then click Control Panel 5 Click Uninstall a program or Programs and Features 6 Click the Windows driver for the ma...

Page 134: ...ated 8 Select SETUP64 EXE 64 bit version or SETUP EXE 32 bit version and click Open and then click OK 9 When the User Account Control window appears click Allow 10 The setup program for the Windows dr...

Page 135: ...e 1 Remove all included items attached to the machine A Make sure the power is switched off B Open the cover of the machine C If the base unit has been removed install it P 37 Installing Removing the...

Page 136: ...r Movement button for ten seconds or longer The head moves as shown below B Fix the head at the highest position 1 Loosen the knob 2 Lift the head to the highest position and tighten the knob Tighten...

Page 137: ...ner A Retainer B and the retaining screws refer to P 30 Removing the Retainers Items Used Retainer Hexagonal wrench Retainer A 2 Retainer B 1 each for L and R Retaining screws 7 Retainer B Secure to t...

Page 138: ...136...

Page 139: ...Chapter 5 Appendix Main Unit Specifications 138 Imprint Area 138 Location of Power Rating and Serial Number Label 139 Specifications 140 System Requirements for USB Connection 140 5 Appendix 137...

Page 140: ...view of the grid table Recommended imprint area 50 mm 50 mm 2 0 in 2 0 in 80 mm 3 2 in 50 mm 2 0 in 50 mm 2 0 in 80 mm 3 2 in Maximum imprint area 80 mm 80 mm 3 2 in 3 2 in Setting configuration throu...

Page 141: ...uirements for voltage frequency and amperage given here Back surface Serial number This is required when you seek mainte nance servicing or support Never peel off the label or let it get dirty Power R...

Page 142: ...2 0 in 2 0 in 2 8 in Resolution 529 dpi High resolution 353 dpi Photo 265 dpi Text 1058 dpi Vector Imprint direction Unidirectional imprinting or bidirectional imprinting Selectable withWindows drive...

Reviews: