Arc-Zone.com, Inc.
2091 Las Palmas Drive, Ste. F
Carlsbad, CA 92011 - Tel. 1.760.931.1500
Email: [email protected]
Copyright©2017, Arc-Zone.com®, Inc. All Rights Reserved
5 / 13
DGP-PG3-A Product User Manual | Released: 11/16 Rev. H | ©2017 Diamond Ground Products
Page 5
5. UNPACKING & MOUNTING
The first thing you should do is check for shipping damage. Diamond Ground Products, Inc. takes great pride
in producing quality products. If for some reason you find anything to be defective, please contact the Service
Department at (805) 498-3837 and we will work with you to rectify the problem to your satisfaction.
After unpacking the box you should have these items:
• The Piranha III Tungsten Grinder.
• Three Allen wrenches, sizes 3/32”, 7/64” & 1/8” for replacing wheels.
• PIII Manual
• Pin Vise
Mounting of the grinder is as follows. Place the unit on a flat surface allowing enough space for the operator to
work in. This also provides proper ventilation. Make sure the power switch is in the off position and plug it into
the electrical outlet. Switch the power on and the unit is ready to operate.
6. PREPARING ELECTRODES
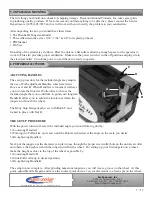
ADJUSTING HANDLES
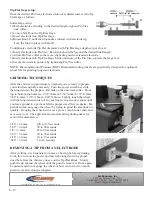
The set up procedure for the included angle may require
the use of both adjustment Handles, which are listed
above as A and B. When Handle A is loosened, it allows
you to rotate the Universal Collet Arm to choose the
included angle that you would like to grind your tungsten.
Handle B allows you to adjust the location at which the
tungsten will touch the wheel.
The Body Stop Gauge depth is set with Knob C and
locked in place with Nut D.
THE SET UP PROCEDURE
With the power turned off, select the included angle you would like to grind by:
1) Loosening Handle A
2) Turning the Collet Arm on its axis until the Pointer is directed at the angle on the scale you desire.
3) Re-tightening Handle A.
Next, put the tungsten at the diameter you plan to use through the proper sized collet hole on the universal collet
and observe the height at which the tungsten will hit the wheel. For setting up your first tungsten on a wheel,
make the height as close to the top of the wheel as possible by:
1) Loosening Handle B.
2) Slide Collet Arm up to desired position.
3) Re-tightening Handle B.
The setup in now complete. After grinding numerous tungstens, you will wear a groove on the wheel. At this
point, adjust Handle B again and move the contact point down a very small amount to a fresh spot on the wheel.
A
B
C
D
t
5. UNPACKING & MOUNTING
t
6. PREPARING ELECTRODES
DGP-PG3-A Product User Manual | Released: 11/16 Rev. H | ©2017 Diamond Ground Products
Page 5
5. UNPACKING & MOUNTING
The first thing you should do is check for shipping damage. Diamond Ground Products, Inc. takes great pride
in producing quality products. If for some reason you find anything to be defective, please contact the Service
Department at (805) 498-3837 and we will work with you to rectify the problem to your satisfaction.
After unpacking the box you should have these items:
• The Piranha III Tungsten Grinder.
• Three Allen wrenches, sizes 3/32”, 7/64” & 1/8” for replacing wheels.
• PIII Manual
• Pin Vise
Mounting of the grinder is as follows. Place the unit on a flat surface allowing enough space for the operator to
work in. This also provides proper ventilation. Make sure the power switch is in the off position and plug it into
the electrical outlet. Switch the power on and the unit is ready to operate.
6. PREPARING ELECTRODES
ADJUSTING HANDLES
The set up procedure for the included angle may require
the use of both adjustment Handles, which are listed
above as A and B. When Handle A is loosened, it allows
you to rotate the Universal Collet Arm to choose the
included angle that you would like to grind your tungsten.
Handle B allows you to adjust the location at which the
tungsten will touch the wheel.
The Body Stop Gauge depth is set with Knob C and
locked in place with Nut D.
THE SET UP PROCEDURE
With the power turned off, select the included angle you would like to grind by:
1) Loosening Handle A
2) Turning the Collet Arm on its axis until the Pointer is directed at the angle on the scale you desire.
3) Re-tightening Handle A.
Next, put the tungsten at the diameter you plan to use through the proper sized collet hole on the universal collet
and observe the height at which the tungsten will hit the wheel. For setting up your first tungsten on a wheel,
make the height as close to the top of the wheel as possible by:
1) Loosening Handle B.
2) Slide Collet Arm up to desired position.
3) Re-tightening Handle B.
The setup in now complete. After grinding numerous tungstens, you will wear a groove on the wheel. At this
point, adjust Handle B again and move the contact point down a very small amount to a fresh spot on the wheel.
A
B
C
D


