


25/06/2015
DFRduino Beginner Kit For Arduino V3 SKU:DFR0100 Robot Wiki
http://www.dfrobot.com/wiki/index.php/DFRduino_Beginner_Kit_For_Arduino_V3_SKU:DFR0100
6/23
61
62
63
64
65
66
67
delay(1000);
digitalWrite(carYellow, LOW); //yellow off
digitalWrite(carGreen, HIGH);
changeTime = millis(); //record the time since last change of lights
//then return to the main program loop
}
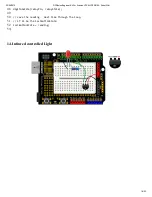
4.Fading Light
The connection diagram is the same with Blinknig a LED tutorial.
?
1
2
3
4
5
6
7
8
9
10
11
12
13
14
15
16
17
18
19
20
21
22
23
24
25
26
27
28
29
/*
Fading Light
This example shows how to fade an LED on pin 10 using the analogWrite() function.
*/
int
ledPin = 10; // the pin that the LED is attached to
void
setup() {
// declare pin 9 to be an output:
pinMode(ledPin,OUTPUT);
// initialize serial communication at 9600 bits per second:
Serial.begin(9600);
}
void
loop(){
fadeOn(1000,5);
fadeOff(1000,5);
}
void
fadeOn(unsigned int
time,int
increament){
//change the brightness by FOR statement
for
(byte value = 0 ; value < 255; value+=increament){
// print out the value:
Serial.println(value);
// set the brightness of pin 10:
analogWrite(ledPin, value);
delay(time/(255/5));
}
}


