background image

English

7

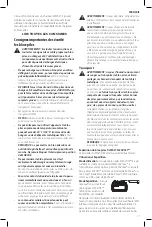
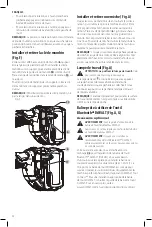
3.  The completion of charge will be indicated by the red 

light remaining ON continuously. The battery pack is 
fully charged and may be used at this time or left in the 
charger. To remove the battery pack from the charger, 
push the battery release button 

 2 

 on the battery pack 

and then slide the battery pack out of the charger.

nOTE: 

To ensure maximum performance and life of lithium-

ion battery packs, charge the battery pack fully before 
first use.

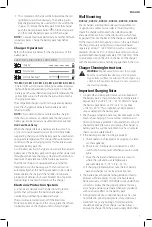
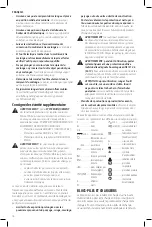
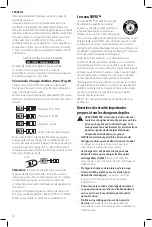
Charger Operation

Refer to the indicators below for the charge status of the 
battery pack.

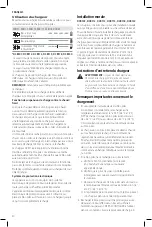
DCB107, DCB112, DCB113, DCB115, DCB118, DCB132

Charging

Fully Charged

Hot/Cold Pack Delay*

* DCB107, DCB112, DCB113, DCB115, DCB118, DCB132: 

The red light will continue to blink, but a yellow indicator 
light will be illuminated during this operation. Once the 
battery pack has reached an appropriate temperature, the 
yellow light will turn off and the charger will resume the 
charging procedure.

The compatible charger(s) will not charge a faulty battery 
pack. The charger will indicate faulty battery pack by 
refusing to light.

nOTE:

 This could also mean a problem with a charger.

If the charger indicates a problem, take the charger and 
battery pack to be tested at an authorized service center.

hot/Cold Pack Delay

When the charger detects a battery pack that is too hot 
or too cold, it automatically starts a Hot/Cold Pack Delay, 
suspending charging until the battery pack has reached an 
appropriate temperature. The charger then automatically 
switches to the pack charging mode. This feature ensures 
maximum battery pack life.
A cold battery pack will charge at a slower rate than a warm 
battery pack. The battery pack will charge at that slower rate 
throughout the entire charging cycle and will not return to 
maximum charge rate even if the battery pack warms.
The DCB118 charger is equipped with an internal fan 
designed to cool the battery pack. The fan will turn on 
automatically when the battery pack needs to be cooled.
Never operate the charger if the fan does not operate 
properly or if ventilation slots are blocked. Do not permit 
foreign objects to enter the interior of the charger.

Electronic Protection System

Li-Ion tools are designed with an Electronic Protection 
System that will protect the battery pack against 
overloading, overheating or deep discharge.
The tool will automatically turn off if the Electronic 
Protection System engages. If this occurs, place the lithium-
ion battery pack on the charger until it is fully charged.

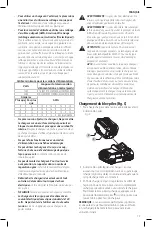
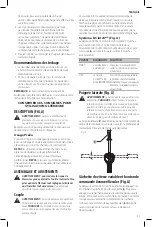
Wall Mounting

DCB107, DCB112, DCB113, DCB115, DCB118, DCB132

These chargers are designed to be wall mountable or to 
sit upright on a table or work surface.  If wall mounting, 
locate the charger within reach of an electrical outlet, 
and away from a corner or other obstructions which may 
impede air flow. Use the back of the charger as a template 
for the location of the mounting screws on the wall. Mount 
the charger securely using drywall screws (purchased 
separately) at least 1" (25.4  mm) long, with a screw head 
diameter of 0.28–0.35" (7–9 mm), screwed into wood to an 
optimal depth leaving approximately 7/32" (5.5 mm) of the 
screw exposed. Align the slots on the back of the charger 
with the exposed screws and fully engage them in the slots.

Charger Cleaning Instructions


WARNING: 

Shock hazard. Disconnect the charger 

from the AC outlet before cleaning. Dirt and grease 
may be removed from the exterior of the charger using 
a cloth or soft non-metallic brush. Do not use water or 
any cleaning solutions.

Important Charging Notes

1.  Longest life and best performance can be obtained if 

the battery pack is charged when the air temperature is 
between 65 °F and 75 °F (18 ° – 24 °C). DO NOT charge 
the battery pack below +40 °F (+4.5 °C), or above 
+104 °F (+40 °C). This is important and will prevent 
serious damage to the battery pack.

2.  The charger and battery pack may become warm to the 

touch while charging. This is a normal condition, and 
does not indicate a problem. To facilitate the cooling of 
the battery pack after use, avoid placing the charger or 
battery pack in a warm environment such as in a metal 
shed or an uninsulated trailer.

3.  If the battery pack does not charge properly:

a.  Check operation of receptacle by plugging in a lamp 

or other appliance;

b.  Check to see if receptacle is connected to a light 

switch which turns power off when you turn out the 
lights;

c.  Move the charger and battery pack to a location 

where the surrounding air temperature is 
approximately 65 °F – 75 °F (18 ° – 24 °C);

d.  If charging problems persist, take the tool, battery 

pack and charger to your local service center.

4.  The battery pack should be recharged when it fails to 

produce sufficient power on jobs which were easily 
done previously. DO NOT CONTINUE to use under these 
conditions. Follow the charging procedure. You may 
also charge a partially used pack whenever you desire 
with no adverse effect on the battery pack.

5.  Foreign materials of a conductive nature such as, but 

not limited to, grinding dust, metal chips, steel wool, 
aluminum foil, or any buildup of metallic particles 
should be kept away from charger cavities. Always 
unplug the charger from the power supply when there 

Summary of Contents for DCD130

Page 1: ...comentarios contáctenos 1 800 4 DeWALT Instruction Manual Guide D utilisation Manual de instrucciones DCD130 60V Max 1 2 12 7 mm Mixer Drill with E Clutch System Mélangeur Perceuse 12 7 mm 1 2 po 60 V max avec système E ClutchMD Mezclador Taladro de 12 7 mm 1 2 60V Máx con sistema E Clutch final page size 8 5 x 5 5 in ...

Page 2: ...English English original instructions 1 Français traduction de la notice d instructions originale 13 Español traducido de las instrucciones originales 26 ...

Page 3: ...minor or moderate injury Used without word Indicates a safety related message NOTICE Indicates a practice not related to personal injury which if not avoided may result in property damage WARNING Read all safety warnings and all instructions Failure to follow the warnings and instructions may result in electric shock fire and or serious injury WARNING To reduce the risk of injury read the instruct...

Page 4: ...educe personal injuries c Prevent unintentional starting Ensure the switch is in the off position before connecting to power source and or battery pack picking up or carrying the tool Carrying power tools with your finger on the switch or energizing power tools that have the switch on invites accidents d Remove any adjusting key or wrench before turning the power tool on A wrench or a key left att...

Page 5: ...ng Cutting accessory contacting a live wire may make exposed metal parts of the power tool live and could give the operator an electric shock Mixer Safety Instructions Hold the tool with both hands at the intended handles Loss of control can cause personal injury Ensure sufficient ventilation when mixing flammable materials to avoid a hazardous atmosphere Developing vapour may be inhaled or be ign...

Page 6: ...All Battery Packs WARNING Read all safety warnings and all instructions for the battery pack charger and power tool Failure to follow the warnings and instructions may result in electric shock fire and or serious injury Do not charge or use the battery pack in explosive atmospheres such as in the presence of flammable liquids gases or dust Inserting or removing the battery pack from the charger ma...

Page 7: ...120 Wh 1 battery implied Fuel Gauge Battery Packs Fig B Some DeWALT battery packs include a fuel gauge which consists of three green LED lights that indicate the level of charge remaining in the battery pack The fuel gauge is an indication of approximate levels of charge remaining in the battery pack according to the following indicators 75 100 charged 51 74 charged 50 charged Pack needs to be cha...

Page 8: ...sive internal heat Place the charger in a position away from any heat source The charger is ventilated through slots in the top and the bottom of the housing Do not operate the charger with a damaged cord or plug Do not operate the charger if it has received a sharp blow been dropped or otherwise damaged in any way Take it to an authorized service center Do not disassemble the charger take it to a...

Page 9: ... until it is fully charged Wall Mounting DCB107 DCB112 DCB113 DCB115 DCB118 DCB132 These chargers are designed to be wall mountable or to sit upright on a table or work surface If wall mounting locate the charger within reach of an electrical outlet and away from a corner or other obstructions which may impede air flow Use the back of the charger as a template for the location of the mounting scre...

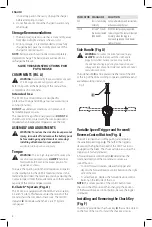
Page 10: ...otor and gear system E Clutch System Fig A The DCD130 is equipped with the DeWALT anti rotation E Clutch System This feature senses the motion of the tool and shuts the tool down if necessary The red LED indicator 8 illuminates when the E Clutch System is engaged INDICATOR DIAGNOSIS SOLUTION OFF Tool is functioning normally Follow all warnings and instructions when operating the tool SOLID E Clutc...

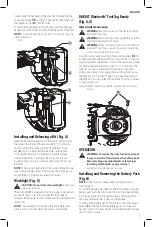
Page 11: ... Accessory WARNING Read instruction manual for the DeWALT Bluetooth Tool Tag WARNING Remove battery from tool before installing the DeWALT Bluetooth Tool Tag WARNING When installing or replacing the DeWALT Bluetooth Tool Tag use only the screws provided Be sure to securely tighten the screws Your tool comes with mounting holes and fasteners 12 for installing a DeWALT Bluetooth Tool Tag DCE041 You ...

Page 12: ... do not push hard enough to stall the motor or deflect the bit 3 Hold tool firmly with both hands to control the twisting action of the drill CAUTION Drill may stall if overloaded causing a sudden twist Always expect the stall Grip the drill firmly to control the twisting action and avoid injury 4 IF DRILL STALLS it is usually because it is being overloaded or improperly used RELEASE TRIGGER IMMED...

Page 13: ...ger 2 51 mm Self feed 4 5 8 118 mm METAL Twist 1 2 13 mm Hole saws 4 101 mm NOTE For holes in metal larger than 1 2 13 mm use hole saws ACCESSORY MUST BE RATED FOR USE AT SPEED EQUAL TO OR HIGHER THAN NAMEPLATE RPM OF TOOL WITH WHICH IT IS BEING USED Repairs The charger and battery pack are not serviceable WARNING To assure product SAFETY and RELIABILITY repairs maintenance and adjustment includin...

Page 14: ...TE Battery warranty voided if the battery pack is tampered with in any way DeWALT is not responsible for any injury caused by tampering and may prosecute warranty fraud to the fullest extent permitted by law 90 DAY MONEY BACK GUARANTEE If you are not completely satisfied with the performance of your DeWALT Power Tool Laser or Nailer for any reason you can return it within 90 days from the date of ...

Page 15: ...un message propre à la sécurité AVIS indique une pratique ne posant aucun risque de dommages corporels mais qui par contre si rien n est fait pour l éviter pourrait poser des risques de dommages matériels AVERTISSEMENT lire tous les avertissements de sécurité et toutes les directives Le non respect des avertissements et des directives pourrait se solder par un choc électrique un incendie et ou une...

Page 16: ...ique dans un endroit humide brancher l outil dans une prise ou sur un circuit d alimentation dotés d un disjoncteur de fuite à la terre GFCI L utilisation de ce type de disjoncteur réduit les risques de choc électrique 3 Sécurité personnelle a Être vigilant surveiller le travail effectué et faire preuve de jugement lorsqu un outil électrique est utilisé Ne pas utiliser d outil électrique en cas de...

Page 17: ...nt des trombones de la monnaie des clés des clous des vis ou autres petits objets métalliques qui peuvent établir une connexion entre les deux bornes Le court circuit des bornes du bloc piles risque de provoquer des brûlures ou un incendie d En cas d utilisation abusive le liquide peut gicler hors du bloc piles éviter tout contact avec ce liquide Si un contact accidentel se produit laver à grande ...

Page 18: ...homologué tel un masque antipoussières spécialement conçu pour filtrer les particules microscopiques Limiter toute exposition prolongée avec les poussières provenant du ponçage sciage meulage perçage ou toute autre activité de construction Porter des vêtements de protection et nettoyer à l eau savonneuse les parties du corps exposées Le fait de laisser la poussière pénétrer dans la bouche les yeux...

Page 19: ...ser l individu à l air libre Si les symptômes persistent consulter un médecin AVERTISSEMENT risques de brûlure Le liquide de la pile peut s enflammer s il est exposé à des étincelles ou à une flamme AVERTISSEMENT risques d incendie Ne jamais tenter d ouvrir le bloc piles pour quelque raison que ce soit Si le boîtier du bloc piles est fissuré ou endommagé ne pas l insérer dans un chargeur Ne pas éc...

Page 20: ... nickel ou au lithium ion ou un bloc piles indique que les coûts de recyclage de ces derniers en fin d utilisation ont déjà été réglés par DeWALT Dans certaines régions la mise au rebut ou aux ordures municipales des piles au nickel cadmium à l hydrure métallique de nickel ou au lithium ion est illégale le programme de l Appel à RecyclerMD constitue donc une solution pratique et écologique Appel à...

Page 21: ...que de chocs électriques Le fait de retirer le bloc piles ne réduira pas ces risques NE JAMAIS tenter de connecter 2 chargeurs ensemble Le chargeur a été conçu pour être alimenté en courant électrique domestique standard de 120 volts Ne pas tenter de l utiliser avec toute autre tension Cela ne s applique pas aux chargeurs de postes mobiles AVERTISSEMENT risques de chocs électriques Ne laisser aucu...

Page 22: ... murale DCB107 DCB112 DCB113 DCB115 DCB118 DCB132 Ces chargeurs ont été conçus pour une installation murale ou pour être posés sur une table ou une surface de travail Pour une fixation murale installez le chargeur à proximité d une prise électrique et à l écart de coins ou de toute autre obstruction au passage de l air Utilisez l arrière du chargeur pour marquer l emplacement des vis de montage su...

Page 23: ...entel peut provoquer des blessures Couple AVERTISSEMENT c est une perceuse à couple élevé Afin de réduire le risque de blessure corporelle grave tenez TOUJOURS l outil solidement avec les deux mains dans la position appropriée pour l utilisation comme illustré Le couple est le mouvement de torsion produit par la perceuse lorsque la mèche est en rotation Lorsque la mèche de la perceuse se heurte à ...

Page 24: ...ARQUE Lorsque vous utilisez une tige hexagonale ou des mèches à tige de trois côtés veillez à aligner les côtés plats de la mèche avec les mors du mandrin afin de vous assurer que la mèche est bien insérée dans les mors Lampe de travail Fig A ATTENTION ne pas fixer la lampe de travail Cela peut causer une blessure grave aux yeux La lampe de travail 7 est activée lorsque vous appuyez sur la gâchett...

Page 25: ... mélanger des matières inflammables Consultez l étiquette de l emballage de la matière et la fiche signalétique pour des renseignements sur l inflammabilité 1 Tenez le mélangeur avec les deux mains 2 Pour démarrer l outil appuyez sur la gâchette 3 Pour arrêter l outil relâchez la gâchette Durant le processus du mélange vous devez guider le mélangeur dans le récipient afin d assurer un mélange plus...

Page 26: ...ches de tarière électrique ou des scies à trous Le travail qui a tendance à se fendre doit être soutenu avec un bloc de bois Percer dans la maçonnerie Utilisez des mèches de maçonnerie à pointe en carbure à basses vitesses Maintenez une force égale sur la perceuse mais pas trop pour éviter de fissurer le matériau fragile Un flot de poussière régulier indique une vitesse de perçage appropriée MAINT...

Page 27: ...DeWALT CETTE GARANTIE LIMITÉE REMPLACE TOUTE AUTRE GARANTIE Y COMPRIS TOUTE GARANTIE IMPLICITE DE QUALITÉ MARCHANDE OU DE CONFORMITÉ À DES FINS PARTICULIÈRES ET EXCLUT TOUT DOMMAGE ACCESSOIRE OU INDIRECT Certains états n autorisent aucune limitation quant à la durée d une garantie implicite ni aucune exclusion ou limitation de garantie contre tout préjudice accessoire ou indirect aussi il se peut ...

Page 28: ...esiones corporales o daños materiales PELIGRO Indica una situación de peligro inminente que si no se evita provocará la muerte o lesiones graves ADVERTENCIA Indica una situación de peligro potencial que si no se evita podría provocar la muerte o lesiones graves ATENCIÓN Indica una situación de peligro potencial que si no se evita posiblemente provocaría lesiones leves o moderadas Utilizado sin pal...

Page 29: ...ores a fin de reducir el riesgo de descarga eléctrica f Si el uso de una herramienta eléctrica en un lugar húmedo es imposible de evitar utilice un suministro protegido con un interruptor de circuito por falla a tierra GFCI El uso de un GFCI reduce el riesgo de descargas eléctricas 3 Seguridad Personal a Permanezca alerta controle lo que está haciendo y utilice el sentido común cuando emplee una h...

Page 30: ...erías a Recargue solamente con el cargador especificado por el fabricante Un cargador adecuado para un tipo de paquete de baterías puede originar riesgo de incendio si se utiliza con otro paquete de baterías b Utilice herramientas eléctricas sólo con paquetes de baterías específicamente diseñados El uso de cualquier otro paquete de baterías puede producir riesgo de incendio y lesiones c Cuando no ...

Page 31: ...algunas pinturas en base a plomo polvo de sílice proveniente de ladrillos y cemento y otros productos de albañilería y arsénico y cromo provenientes de madera tratada químicamente Su riesgo de exposición a estos químicos varía dependiendo de la frecuencia con la cual realiza usted este tipo de trabajo Para reducir su exposición a estas sustancias químicas trabaje en una zona bien ventilada y lleva...

Page 32: ...unidades de batería de iones de litio se producen gases y materiales tóxicos Si el contenido de la batería entra en contacto con la piel lave el área de inmediato con agua y un jabón suave Si el líquido de la batería entra en contacto con sus ojos enjuáguelos con agua y los ojos abiertos por 15 minutos o hasta que cese la irritación Si se requiere de asistencia médica el electrolito de la batería ...

Page 33: ...ndo el nivel de carga está por debajo del nivel útil el indicador no se iluminará y la batería deberá recargarse Fig B NOTA El indicador de carga es sólo eso un indicador de la carga de la unidad de batería No indica el nivel de funcionalidad de la herramienta y puede variar de acuerdo a las piezas del producto la temperatura y la aplicación que el usuario le dé Para mayor información sobre unidad...

Page 34: ...e cualquier fuente de calor El cargador se ventila a través de las ranuras que se encuentran en la parte superior e inferior de la caja protectora No opere el cargador si su cable o enchufe están dañados No opere el cargador si ha recibido un golpe agudo si se ha caído o si ha sido dañado de alguna otra forma Llévelo a un centro de servicio autorizado No desarme el cargador llévelo a un centro de ...

Page 35: ...i las ranuras de ventilación están obstruidas No permita que entren objetos extraños dentro del cargador Sistema de protección electrónica Las herramientas con baterías de iones de litio están diseñadas con un Sistema de protección electrónico que protegerá la batería contra la sobrecarga el sobrecalentamiento o la descarga completa La herramienta se apagará automáticamente si el Sistema de protec...

Page 36: ...nstrucción NO utilice la herramienta en condiciones de humedad o en presencia de líquidos o gases inflamables Esta mezcladora taladro es una herramienta eléctrica profesional NO permita que los niños toquen la herramienta Si el operador no tiene experiencia operando esta herramienta su uso deberá ser supervisado MONTAJE Y AJUSTES ADVERTENCIA Para reducir el riesgo de lesiones personales graves apa...

Page 37: ...cte el eje de la manija en el sujetador de retención 11 en el soporte Para retirar la llave del mandril de su soporte jale la manija de la llave del mandril fuera del soporte y deslice la cabeza plana fuera del orificio NOTA Para evitar perder la llave del mandril no la guarde en ninguna otra orientación Fig F 10 6 11 6 Instalación y Liberación de Broca Fig A Abra las mordazas del mandril con llav...

Page 38: ...stalar dispositivos o accesorios Un arranque accidental podría causar lesiones Cómo Instalar y Retirar la Unidad de Batería Fig H NOTA Para mejores resultados verifique que su unidad de batería esté completamente cargada Para instalar la unidad de batería 1 en el mango de la herramienta alinee la unidad de batería con los rieles en el interior del mango de la herramienta y deslícela en el mango ha...

Page 39: ... firme sobre la herramienta Un flujo uniforme y uniforme de virutas metálicas indica la tasa de perforación adecuada Use un lubricante de corte cuando perfore metales Las excepciones son hierro fundido y latón que se deben perforar en seco NOTA Los orificios grandes 8 mm 5 16 a 13 mm 1 2 po en acero se pueden hacer más fácilmente si se perfora primero un orificio piloto 4 mm 5 32 a 5 mm 3 16 NOTA ...

Page 40: ...do DeWALT Utilice siempre piezas de repuesto idénticas Para reparación y servicio de sus herramientas eléctricas favor de dirigirse al Centro de Servicio más cercano CULIACAN SIN Blvd Emiliano Zapata 5400 1 Poniente Col San Rafael 667 717 89 99 GUADALAJARA JAL Av La Paz 1779 Col Americana Sector Juárez 33 3825 6978 MEXICO D F Eje Central Lázaro Cárdenas No 18 Local D Col Obrera 55 5588 9377 MERIDA...

Page 41: ...nes realizadas o intentadas por terceros ESTA GARANTÍA LIMITADA SE OTORGA EN VEZ DE TODAS LAS DEMÁS INCLUIDA LA GARANTÍA IMPLÍCITA DE COMERCIABILIDAD Y APTITUD PARA UN FIN PARTICULAR Y EXCLUYE TODOS LOS DAÑOS INCIDENTALES O CONSECUENTES Algunos estados no permiten limitaciones sobre la duración de una garantía implícita o la exclusión o limitación de daños incidentales o consecuentes así que estas...

Page 42: ......

Page 43: ......

Page 44: ... 60 90 X X X DCB207 20 X X X X 30 30 22 60 40 30 X 22 X 22 22 X X X DCB230 20 X X X X 60 60 45 140 90 67 X 45 X 45 45 90 X X DC9182 18 X 40 40 X X 40 X X X X X X X X X X 40 X DCB120 12 X X X X 30 30 20 60 45 35 X 20 X X X 45 X X DCB127 12 X X X X 35 35 30 90 60 50 X 30 X X X 60 X X DCB080 8 X X X 60 X X X X X X X X X X X X X X BT Bluetooth NOTE The Bluetooth word mark and logos are registered trad...

Reviews: