background image

65 Aleksandar Stamboliyski Str., 8000 Bourgas, Bulgaria

Tel: +359 56 820027, Fax: +359 56 836700

E-mail: [email protected] ,Web: www.devabroadcast.com

- 19 -

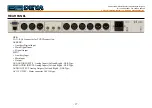
Navigation Through LCD Menu

THE BASICS

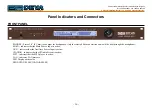
Upon power-up, the LCD Screen shows the Company Logo and the model of the device.

After the Initial screen disappears (in a few seconds), it will be replaced by the Main Menu 

readings.

This is the starting point of the navigation process.

Prior to proceeding further in the menu structure, it is important to note the basic functionality 

- the keyboard (placed on the right of the LCD Screen) consists of [Up], [Down], [Left], [Right] 

and [OK] buttons. The Main Menu structure has an up-and-down basis, expanded with left-to-right 

branches.

Summary of Contents for DB8009-MPX

Page 1: ...MAINTENANCE AND OPERATION INSTRUCTION MANUAL Publish Date 20 Jun 2019 DB8009 MPX MPX Audio Silence Monitor with Advanced Backup Capabilities ...

Page 2: ...7 GPIO Connector Pinouts 18 Electrical Characteristics of Optocouplers 18 Navigation Through LCD Menu 19 The Basics 19 Menu Structure 20 Keyboard lock 30 Restore Factory Defaults 30 Connecting DB8009 MPX 31 Analog Audio Inputs 31 Digital Audio Input 31 LAN Port 31 Operation 32 Manual IP Identification 32 Network Discovery 34 DB8009 MPX WEB interface menu pages 36 Status 36 Input 37 Main and AUX MP...

Page 3: ...ngs 44 How to connect to the RDS Console 45 RDS Console syntax 45 List of available RDS console commands and their responses 46 Output 47 MPX Output 47 Analog Audio 47 Digital Audio 47 Headphones 47 IP Voice Announcement 47 Dayparts 48 General 49 Network 50 Network 50 E mail 50 HTTP Server 51 FTP Server 51 SNMP Agent 51 Other 52 Firmware Update 52 Storage 52 Factory Defaults 52 Reboot 52 System Lo...

Page 4: ...THIS PAGE IS INTENTIONALLY LEFT BLANK ...

Page 5: ...ved us a reliable business partner and a valuable asset as our dealers worldwide would confirm In constant pursuit of precision and long term satisfaction DEVA enhances the reputation of our partners and clients alike Furthermore we have already a proven merit as a credible partner provider Our portfolio offers complete line of high quality and competitive products for FM and Digital Radio Radio N...

Page 6: ...ww devabroadcast com 6 Typographic conventions This manual uses the following typographic conventions Style Used for NOTE Important notes and recommendations Example Used when example text is cited Menu on page XX References OK Interface Interactive buttons Settings Menu paths are represented as follows Settings General Backup ...

Page 7: ...ates a fully DSP based Stereo Encoder which provides an MPX signal at the output even if the backup source has been set as Analog Digital or IP Audio The unit can be easily configured and monitored by users via SNMP the WEB Interface the front panel LCD display and the set of soft buttons Another important feature is its capability for alert notifications which in case radio silence is detected ca...

Page 8: ...essional Balanced Stereo analog inputs and outputs on XLR connectors Professional AES EBU Digital audio inputs and output on XLR connectors Headphones Jack on the front panel for local monitoring of the Audio Signal TCP IP Remote monitoring and control via SNMP and WEB Interface Multi format IP Audio Stream three separate sources Built in MP3 Player External or internal Digital clock sync Digital ...

Page 9: ...0db to 10dB AUX MPX COMPOSITE INPUT Connector BNC Unbalanced Impedance 10 kΩ Frequency Range 10 Hz to 200 kHz AUX ANALOG AUDIO INPUTS Connectors Balanced XLR Impedance 600Ω or high impedance Level 2 ranges 0dBu or 12dBu Jumper selectable with software adjustments Dynamic range 80dB Digital Gain Adjust 10db to 10dB AUX DIGITALAUDIO INPUTS Connectors Balanced XLR Coaxial Sample Rates 32 44 1 48 96 k...

Page 10: ...up to 18dBu INTERNAL STEREO ENCODER Output level 18dBu to 18dBu Pilot level 0 to 15 D A conversion 24 bit differential SNR 80 dB 20Hz 15kHz bandwidth Digital input referenced to 10dBFS unweighted THD 0 01 20Hz 15kHz bandwidth Digital input referenced to 10dBFS unweighted Stereo Separation 60dB Crosstalk 70dB Pilot protection 90dB relative to 9 pilot injection 250 Hz 38 kHz suppression 80dB referen...

Page 11: ...onfiguration and status information SNMP interface control configuration and status information Front Panel LCD with Keyboard NETWORK Connector RJ 45 Type Ethernet Device Discovery UPnP support OPERATING CONDITIONS Temperature 10 C 45 C Humidity 75 non condensing POWER REQUIREMENTS Voltage 115 230V AC internal switch 18VA Connector IEC320 rear panel SIZE AND WEIGHT Dimensions W H D 483 x 45 x 160 ...

Page 12: ...A AUDIO OUT XLR D A ANALOG L XLR ANALOG R XLR DIGITAL MPX OUT BNC AUDIO MPX SWITCHING MPX BACKUP MPX DSP JACK D A PHONES L R FRONT PANEL 1 2 3 4 5 6 1 2 4 5 6 1 MAIN MPX 2 AUX MPX 3 MAIN ANALOG AUDIO 4 MAIN DIGITAL AUDIO 5 AUX ANALOG AUDIO 6 AUX DIGITAL AUDIO 7 IP AUDIO 8 MP3 AUDIO 7 8 7 8 LEVEL METER LEVEL METER LEVEL METER LEVEL METER LEVEL METER 3 1 2 3 4 5 6 7 8 L R MONO L R MONO Because of th...

Page 13: ... equipment enclosure Do not remove the sticker from the equipment as it contains important specifications and the relevant serial number To join the equipment to the mains supply use the power cord purchased with the equipment The equipment must be used only for the purposes it was designed for Abuse or misuse of the equipment is extremely dangerous for people pets and property The manufacturer de...

Page 14: ...ipment to allow air to pass freely We do not recommend installation in rooms with high humidity dusty places or other aggressive conditions Although it is expected that a DB8009 MPX will be installed close to exciters or transmitters of even higher power please practice reasonable care and common sense in locating the unit away from abnormally high RF fields Please use only already checked power s...

Page 15: ...etain the original shipping carton and packing materials just in case return or reshipment becomes necessary In the event of return for Warranty repair shipping damage sustained as a result of improper packing for return may invalidate the Warranty Mounting RACK REQUIREMENT The DB8009 MPX mounts in a standard 19 inch equipment rack and requires only 1 inches 1U of vertical rack space The use of pl...

Page 16: ...ereo 1 4 6 3 mm jack output for headphones Only the selected Silence detection audio will be heard trough the headphones MAIN indicates that the Main Source Input is active AUX indicates that the Auxiliary Source Input is active IP AUDIO indicates that the IP Audio Stream is active MP3 indicates that the MP3 player is active LAN indicates LAN presence LED Display with scales FRONT PANEL NAVIGATION...

Page 17: ...ANEL GPIO LAN RJ 45 connector for TCP IP connection AES EBU Auxiliary Digital Input Main Digital Input Digital Output MPX Auxiliary Input Main Input Output AUX AUDIO INPUTS Analog Inputs Left and Right XLR Type MAIN AUDIO INPUTS Analog Inputs Left and Right XLR Type AUDIO OUTPUT Analog Outputs Left and Right XLR Type AC 115V 230V Mains connector IEC320 type ...

Page 18: ...tor Backup 1 Loss Collector Backup 2 Loss Collector GP IN GPI Selector Main Loss Emitter Backup 1 Loss Emitter Backup 2 Loss Emitter GND 1 2 3 4 5 6 7 8 9 3 3V LOAD GND Main C Main E LOAD GND 3 3V Main Main Active Main Active 0 3 3V LOAD GND Main C Main E LOAD GND 3 3V Main GPI Selector Normally Open GP IN GND GND GP IN Electrical Characteristics of Optocouplers Vec 6V Ic 50mA Vce 70V Pd 150mW ...

Page 19: ...odel of the device After the Initial screen disappears in a few seconds it will be replaced by the Main Menu readings This is the starting point of the navigation process Prior to proceeding further in the menu structure it is important to note the basic functionality the keyboard placed on the right of the LCD Screen consists of Up Down Left Right and OK buttons The Main Menu structure has an up ...

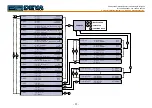
Page 20: ...k 253kbps R 1 Main Inputs 1 100 MPX Adj 6 0dBu 2 0dBFS Aud Adj 6 0dBu 2 AUX Inputs 1 100 MPX Adj 6 0dBu 2 0dBFS Aud Adj 6 0dBu 12 Back 1 2 3 4 5 6 7 8 9 10 11 12 L MAIN MPX OUTPUT L MPX R Backup 1 AUX ANA L R Main MAIN MPX L MPX R 3 IP Audio 1 URL 2 Decoder Auto 4 Backup 1 Main Main MPX 2 Backup 1 AUX Ana 5 Dayparts 1 Dayparting Disable 2 Daypart 1 6 Stereo Gen 1 Stereo Mode Stereo 2 Pre Emphasis ...

Page 21: ...dB 1 Main Inputs 4 Dig Aud Gain 0 0dB 5 Back 2 OK OK EDIT MODE MOVE CURSOR SPIN VALUE OK CONFIRM BACK 2 AUX Inputs 1 100 MPX Adj 6 0dBu 2 0dBFS Aud Adj 6 0dBu 2 AUX Inputs 1 100 MPX Adj 6 0dBu 2 0dBFS Aud Adj 6 0dBu B 2 AUX Inputs 3 Ana Aud Gain 0 0dB 4 Dig Aud Gain 0 0dB 2 AUX Inputs 3 Ana Aud Gain 0 0dB 4 Dig Aud Gain 0 0dB 2 AUX Inputs 4 Dig Aud Gain 0 0dB 5 Back 3 OK OK EDIT MODE MOVE CURSOR S...

Page 22: ...er 4 GPI1 Func Not used 4 Backup 5 Loss Th 50 0dB 6 Loss Tout 5s 4 Backup 5 Loss Th 50 0dB 6 Loss Tout 5s 4 Backup 7 Recover Th 50 0dB 8 Recover Tout 5s 4 Backup 7 Recover Th 50 0dB 8 Recover Tout 5s 4 Backup 9 MPX Loss Th 50 10 MPX Loss Tout 5s 4 Backup 9 MPX Loss Th 50 10 MPX Loss Tout 5s 4 Backup 11 MPX Recover Th 50 12 MPX Recover Tou 5s 4 Backup 11 MPX Recover Th 50 12 MPX Recover Tou 5s 4 Ba...

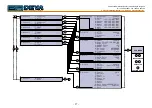
Page 23: ...IT MODE MOVE CURSOR SPIN VALUE OK CONFIRM BACK 5 2 Daypart 1 1 DP Weekday Never 2 DP Start 00 00 00 5 2 Daypart 1 1 DP Weekday Never 2 DP Start 00 00 00 5 2 Daypart 1 3 DP Duration 00 00 00 4 DP Input Main 5 2 Daypart 1 3 DP Duration 00 00 00 4 DP Input Main 5 2 Daypart 1 4 DP Input Main 5 Back 5 Dayparts 3 Daypart 2 4 Daypart 3 5 Dayparts 3 Daypart 2 4 Daypart 3 5 Dayparts 5 Daypart 4 6 Daypart 5...

Page 24: ...Stereo Mode Stereo 2 Pre Emphasis Flat F 6 OK 6 Stereo Gen 3 Audio Gain 0 0dB 4 Pilot Inj 10 0 6 Stereo Gen 3 Audio Gain 0 0dB 4 Pilot Inj 10 0 6 Stereo Gen 5 RDS Inj 0 0 6 Pilot Phase 0d 6 Stereo Gen 5 RDS Inj 0 0 6 Pilot Phase 0d 6 Stereo Gen 7 MPX Limiter Disable 8 MPX Th 0 0dBr 6 Stereo Gen 7 MPX Limiter Disable 8 MPX Th 0 0dBr 6 Stereo Gen 8 MPX Th 0 0dBr 9 Back OK EDIT MODE MOVE CURSOR SPIN ...

Page 25: ...d 6 8 PTY NONE 7 RDS 9 PTYN DB8009 10 PTYN Group Off 7 RDS 9 PTYN DB8009 10 PTYN Group Off 7 RDS 11 CT Group On 12 MS Music 7 RDS 11 CT Group On 12 MS Music 7 RDS 13 TP Off 14 TA Off 7 RDS 13 TP Off 14 TA Off 7 RDS 15 DI 16 AFLIST 7 RDS 15 DI 16 AFLIST 7 RDS 16 AFLIST 17 Back OK EDIT MODE MOVE CURSOR SPIN VALUE OK CONFIRM BACK 7 15 DI 1 Stereo Off 2 Art Head Off 7 15 DI 1 Stereo Off 2 Art Head Off...

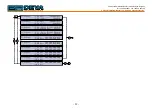
Page 26: ...w devabroadcast com 8 OK 8 Audio MPX 1 Phones 0 0dB Out 2 Analog Out 5 0dBu 8 Audio MPX 1 Phones 0 0dB Out 2 Analog Out 5 0dBu H 8 Audio MPX 3 MPX Out 6 0dBu Out 4 Digital Out Enable 8 Audio MPX 3 MPX Out 6 0dBu Out 4 Digital Out Enable 8 Audio MPX 4 Digital Out Enable Out 5 Back OK EDIT MODE MOVE CURSOR SPIN VALUE OK CONFIRM BACK ...

Page 27: ...HTTP Enable 2 Port 80 3 Timeout 3 min 4 Back OK 9 3 SNMP 1 SNMP Enable 2 Mngr IP 192 168 001 00 3 Mngr Port 162 4 AGENT Port 161 5 AGENT ID 0 6 Rd Comm DEVA8009 7 Wr Comm DEVA8009 8 Timeout 3 min 9 Back OK OK OK 9 4 FTP 1 FTP Enable 2 Data Port 2020 3 Cmd Port 21 4 Back OK OK 9 5 SNTP 1 SNTP Enable 2 Server pool ntp org 3 Port 123 4 Back OK OK 9 Network 1 Ethernet 2 HTTP 9 Network 1 Ethernet 2 HTT...

Page 28: ...vice 3 Front Panel 4 Fact Defaults 10 Device 3 Front Panel 4 Fact Defaults 10 Device 4 Fact Defaults 5 Back 10 2 Date 1 Date 15 Jun 2012 Time 2 Time 00 00 00 3 TZone 0 00 4 DST None 5 Back 10 3 Front 1 Disp Contr 100 Panel 2 Scr Saver 2 min 3 Timeout 10 sec 4 Back 10 4 Fact 1 Apply to None Defaults 2 Execute Done 10 4 Fact 1 Apply to None Defaults 2 Execute Done 10 4 Fact 2 Execute Done Defaults 3...

Page 29: ... 2 Serial 89WORKU K 11 Status 3 Fw Rev 1 5 1691 2019 0 4 Assigned By AutoIP 11 Status 3 Fw Rev 1 5 1691 2019 0 4 Assigned By AutoIP 11 Status 5 IP 169 254 070 033 4 NMask 255 255 000 000 11 Status 5 IP 169 254 070 033 4 NMask 255 255 000 000 11 Status 7 GWay 000 000 000 000 8 DNS1 000 000 000 000 11 Status 7 GWay 000 000 000 000 8 DNS1 000 000 000 000 11 Status 9 DNS2 000 000 000 000 10 Back 11 St...

Page 30: ...w 1 Disconnect Remove all external cables and etc except the Mains Power 2 Using the keyboard navigate to 10 Device 10 4 Factory Defaults 3 Press the OK Button and select one of the following options All Keep COM Chans Press OK 4 Press the Down button and then OK to select the Execute menu Then using the Down button select Yes and press OK 5 The device will be returned to its factory defaults WARN...

Page 31: ...damageDB8009 MPX DIGITAL AUDIO INPUT Using a cable ending with a standard XLR connectors connect the AES EBU signal source to the digital audio input of DB8009 MPX NOTE As only one input can be managed by the encoder at a time please select the preferred signal source input either analog or digital one Selecting the preferred input can be performed under SETTINGS menu see Input on page 37 LAN PORT...

Page 32: ...nu Manual IP Identification MANUAL IP IDENTIFICATION 1 Connect the device to the local network or to the Internet by LAN cable 2 Using the front panel navigation menu press OK button to enter the device Menu 3 Using the navigation buttons find the 6 Network press OK navigate to 6 1 Ethernet General press OK navigate to 3 IP 4 Ascreen containing information about the 2 DHCP Mode and the 3 IP Addres...

Page 33: ... devabroadcast com Web www devabroadcast com 33 NOTE Due to the inability of some WEB Browsers to read the IP address format displayed on the screen of the device the numbers included in the IP Address must be written without the leading zeros For example 192 168 020 068 must be written as 192 168 20 68 ...

Page 34: ...nced sharing settings 2 Select your current network profile 3 Click Turn on network discovery and then click Save changes If you re prompted for an administrator password or confirmation type the password or provide confirmation 4 To access the device open a new Explorer bar and click on Network If you have successfully enabled the network discovery option the device will be displayed Double click...

Page 35: ...7 Fax 359 56 836700 E mail office devabroadcast com Web www devabroadcast com 35 NOTE If you have already enabled this function on your computer just open a new Explorer bar and click on Network The device must be displayed If not follow the instructions described above ...

Page 36: ...e Auto button the DB8009 MPX will automatically select audio source in accordance with the applied Audio Backup Settings At the bottom of the control window is an information bar gathering all the important connection parameters Firmware Version in use Serial Number IP Address and etc Upon change of the Web Interface screens the main status window will resize automatically and become a constant pa...

Page 37: ...on it Gain Audio gain adjust from 10 to 10 dB Default value is 0dB MP3 Audio Player The Playback Order can be changed from here The following options are available A Z Z A Shuffle Playlist and Shuffled Playlist Information on the used and available SD card storage respectively could also be found in this section Repeat and Next button to navigate through the playlist if need be are also available ...

Page 38: ...option is available only when the audio source is set to MP3 Audio Player The Jingle player is designed for playing jingles speech and music at different intervals specified by the user The intervals are counted by songs From the Mode drop down menu the number of songs after which a jingle should be played is chosen The Playback Order is also user defined Generally speaking the Jingle Player allow...

Page 39: ...sponding timeouts MPX Monitor Mode Defines which signal will be monitored for silence and respectively switch over The following options are available MPX Mono the DB8009 MPX will monitor the L R sub band only MPX Stereo the unit will monitor the L R sub band and the PILOT signal How the device works The DB8009 MPX has two MPX Main and AUX two Digital Main and AUX and two Analog Main and AUX input...

Page 40: ...d 75μs for USA Injection levels Set the levels of the components included in the obtained final stereo multiplex signal Audio gain adjusts the level of the entire MPX Audio Pilot allows injection level from 0 to 15 of the 19 kHz pilot tone to be specified RDS sets the injection level from 0 to 15 of the RDS subcarrier Stereo Adjustment From here you can change the phase of the PILOT tone MPX ITU L...

Page 41: ...tility within the DB8009 MPX An in depth discussion of the mathematical calculation is given in RDS RBDS Standard To use the PI calculator for US K and W call signs simply enter call letters into the CALL box The hexadecimal code will automatically be calculated into PI box If the hexadecimal code for a US station is known you may enter it under PI and then the call sign will be calculated automat...

Page 42: ...ic Announcement This is a temporary flag added to the RDS data stream only when a traffic bulletin is being aired Some RDS car radios can be set to search for traffic bulletins among various TP stations while tuned to a listener s preferred program or even while playing a tape or CD As soon as any TP station broadcasts a traffic bulletin the receiver temporarily switches over to receive it When th...

Page 43: ...resh rate of the block message or slowest safe scrolling 9 Fastest is the fastest speed but many RDS radios display gibberish at high speed settings The display should be stable with any radio at a speed setting of 7 or lower Parse Mode sets the scroll step to be used in the block mode message transmission more popular as grouped word method Once Parse Mode option is set this encoder function is v...

Page 44: ...d of other RDS functions Radio Text can be turned off entirely by setting RT Speed 0 A zero value in this field turns the Radio Text message off but does not delete any saved message from memory The RT Radio Text is set in Basic RDS tab PTYN Program Type Name Settings PTYN Program Type Name is transmitted as 8 bit characters PTYN must only be used to enhance Program Type information and it must no...

Page 45: ...keyboard First row is the welcome message from the RDS console Next the user types in the password in this case pass followed by Enter Third row is the response meaning that the password is accepted and the user may proceed with commands Fourth row is a set command These types of commands are used to set new value to RDS parameters In the example above PI is the Program Identification command equa...

Page 46: ...dioText off 1 to 9 update rate slow to fast Command Echo ECHO 0 or 1 0 echo off 1 echo on CT group 4A control CTON 0 disbles or 1 enables type 4A Group Transmission PTYN group 10A control PTYNON 0 disbles or 1 enables type 10A Group Transmission AF count AFCOUNT Sets the numbers of AFs transmitted SPECIAL COMMAND MEANING Set parameter value Following a parameter command sets new value to that para...

Page 47: ... the Headphones Only the selected Silence detection audio will be heard trough the headphones IP Voice Announcement Enables or disables the IP Voice Announcement option By default and to ease the set up process the option is enabled Once the set up process is completed it is recommended the option to be disabled Otherwise the IP Voice Announcement will continue to be played WHEN APPLYING NEW SETTI...

Page 48: ...n sections Daypart 1 to Daypart 9 There are nine positions at your disposal that can be set The settings to be applied for each of them are identical 1 Set the desired Weekday from the drop down menu For your convenience the option Every day is also available 2 Set the Start Time and Duration 3 To finalize the setup select the preset that should be used during this time period Repeat the same proc...

Page 49: ...l section Later on it will be used as a title name on all WEB pages Customizing the name will make the device more recognizable WEB Log the maximum storage time of the log files is chosen from here Log files older than the specified will be permanently deleted Date Time used for manually determining the current date and time Copy Local Time button will set the Date Time to correspond to that of yo...

Page 50: ...d or E mail 2 fields Fill in your e mail account settings Sender Username and Password Server Server Port and Connection Type If you experience difficulties in the set up or would like to use DEVA account for sending of alarm email notifications press the DEVA button option and complete the recipient emails E mail 1 and E mail 2 only The other fields must be left blank otherwise the email notifica...

Page 51: ... Port Read Write Communities Manager IP Manager Port and Agent Session Time Agent enables disables SNMP Agent Agent ID is used for identification of the device among others when an SNMP notification is being sent Once all needed settings are applied use the Test button to generate a test notification which upon success will be received by the SNMP Manager Press the Download button to download the ...

Page 52: ...ults To restore DB8009 MPX to its Factory Defaults press the All except IP button Anew window will appear confirm that you want to restore the factory defaults and wait for the process to be completed On completion of the process the settings should have the proper default values except for the Network settings IP Address they will be preserved NOTE When the device is returned to its factory defau...

Page 53: ...om Web www devabroadcast com 53 System Log By pressing the View button all recorded in the system log information will be depicted on the screen Pressing the Clear button will delete all recorded system log information Reload will reload the data To go back to the Other section press the back button of your web browser ...

Page 54: ... Networks DB8009 MPX implements UPnP which lets you easily find it in your local network For this purpose your system should have UPnP enabled see UPnPActivation on page 55 To discover the device follow the next steps Connect the device to the local network Open My Network Places on your computer Find the decoder s icon Double click it to open the DB8009 MPX web interface ...

Page 55: ... to Windows XP SP2 or SP3 If you use another operating system please contact your system administrator Open My Network Places If you have the caption displayed in the picture below click on it Then click Yes and wait for the process to complete Now you should see the device If you still have troubles finding the device please see http support microsoft com kb 941206 or contact your system administ...

Page 56: ...lezilla project org This is a widespread open source software distributed free of charge hence available for downloading from the Internet NOTE The FTP Server can manage only one connection at a time TheFTP Server works in Passive mode Hence the FTP Client should also be set in passive mode 2 IP Router and Port Translation Settings If the connection to the device is made through a Network address ...

Page 57: ...cases FileZilla s Quick connect feature is not able to connect with the DEVA unit That is why we recommend the device to be assigned in the program manually Enter the FTPClient and go to File Site manager New Site Adialog box requiring obligatory information about the device will appear Fill in the needed information and press OK Select Transfer Settings sub menu and apply the settings as shown be...

Page 58: ... not apply to damage caused by misuse abuse accident or neglect This Warranty is voided by unauthorized attempts at repair or modification or if the serial identification label has been removed or altered III TERMS OF WARRANTY DEVA Broadcast Ltd products are warranted to be free from defects in materials and workmanship A Any discrepancies noted within TWO YEARS of the date of delivery will be rep...

Page 59: ... mail Phone Fax Which DEVA Broadcast Ltd product did you purchase Product Serial Purchase date Installation date Your signature Signing this warranty registration form you are stating that all the information provided to DEVA Broadcast Ltd are truth and correct DEVA Broadcast Ltd declines any responsibility for the provided information that could result in an immediate loss of warranty for the abo...

Reviews: