background image

126

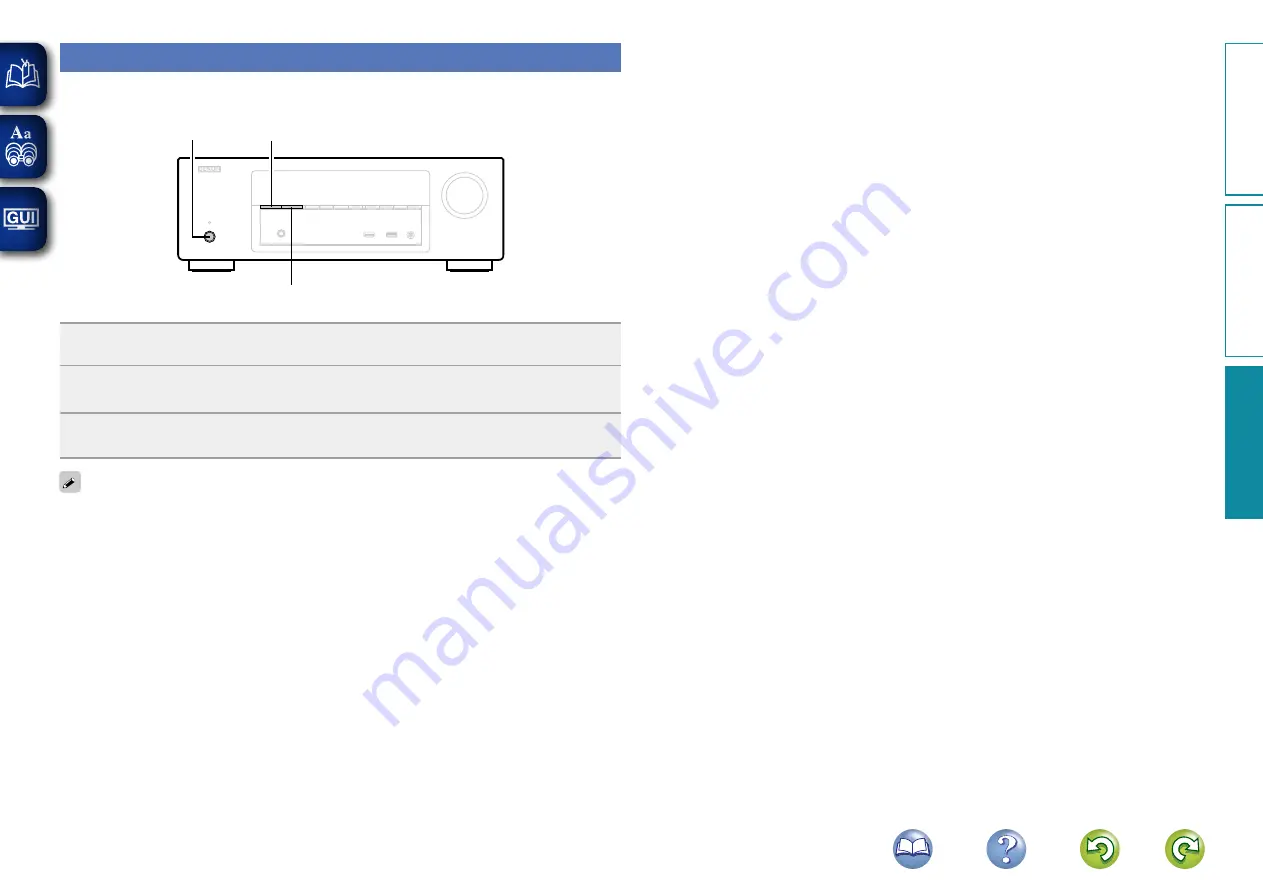
Resetting the microprocessor

Perform this procedure if the display is abnormal or if operations cannot be performed.
When the microprocessor is reset, all the settings are reset to their default values.

X

SOURCE SELECT 

1

SOURCE SELECT 

0

1

Turn off the power using 

X

.

2

Press 

X

 while simultaneously pressing 

SOURCE SELECT 

0

 and 

SOURCE SELECT 

1

.

3

Once  the  display  starts  flashing  at  intervals  of  about  1  second,  release  the  two 

buttons.

If in step 3 the display does not flash at intervals of about 1 second, start over from step 1.

Basic v

ersion

A

dv

anced v

ersion

Inf
or

mation

Inf
or

mation

Summary of Contents for AVR-1713

Page 1: ...AVR 1713 INTEGRATED NETWORK AV RECEIVER Owner s Manual Basic version Advanced version Information ...

Page 2: ... has been spilled or objects have fallen into the apparatus the apparatus has been exposed to rain or moisture does not operate normally or has been dropped 15 Batteries shall not be exposed to excessive heat such as sunshine fire or the like FCC INFORMATION For US customers 1 COMPLIANCE INFORMATION Product Name Integrated Network AV Receiver Model Number AVR 1713 This product complies with Part 1...

Page 3: ...cloths or curtains Naked flame sources such as lighted candles should not be placed on the unit Observe and follow local regulations regarding battery disposal Do not expose the unit to dripping or splashing fluids Do not place objects filled with liquids such as vases on the unit Do not handle the mains cord with wet hands When the switch is in the OFF STANDBY position the equipment is not comple...

Page 4: ...ng a listening mode Sound Mode 64 Selecting a listening mode 64 Advanced version 68 Installation connection of speakers Advanced 69 Speaker installation 69 Speaker connection 70 Playback Advanced operation 73 HDMI control function 73 Sleep timer function 74 Quick select function 75 Web control function 76 Various memory functions 77 Playback in ZONE2 Separate room 78 Audio output 78 Playback 78 Ho...

Page 5: ...rst select the language when prompted Then simply follow the instructions displayed on the TV screen to set up the speakers network etc Easy to use Graphical User Interface This unit is equipped with an easy to see Graphical User Interface that uses menu displays and levels The use of level displays increases operability of the this unit HDMI connectors enable connection to various digital AV devi...

Page 6: ...unit sit for an hour or two with the power turned off and wait until there is little difference in temperature before using the unit Cautions on using mobile phones Using a mobile phone near this unit may result in noise If that occurs move the mobile phone away from this unit when it is in use Moving the unit Turn off the power and unplug the power cord from the power outlet Next disconnect the c...

Page 7: ...etup vpage 20 F Playback Basic operation vpage 27 F Selecting a listening mode Sound Mode vpage 64 Basic version Here we explain the connections and basic operation methods for this unit Basic version Advanced version Information Basic version ...

Page 8: ...a HDMI If your TV is connected to this unit via other video output connectors perform menu operations while seeing the display on this unit Do not plug in the power cord until all connections have been completed However when the Setup Assistant is running follow the instructions in the Setup Assistant C page 7 screen for making connections During Setup Assistant operation the input output connecto...

Page 9: ... unit Output Input IN Output MONITOR OUT Input Resolutions of HDMI compatible TVs can be checked at Monitor vpage 106 NOTE The menu screen is only displayed on TV connected to this unit via HDMI If your TV is connected to this unit via other video output connectors perform menu operations while seeing the display on this unit HDMI signals are digital HDMI signals cannot be converted into analog si...

Page 10: ...in a home theater system which tend to be complicated to be more organized Mutual control through the HDMI control function vpage 73 This unit and the HDMI device connected via HDMI can be linked to perform operations such as power control volume control and input source switching Other video and audio functions such as 3D video playback Content Type the ARC function are supported vpage 11 There i...

Page 11: ...TV When the ARC function is used connect a device with a Standard HDMI cable with Ethernet or High Speed HDMI cable with Ethernet for HDMI Refer to the owner s manual for your TV for details about TV connection and settings GConnection to a TV with the ARC functionH IN OUT Audio signals from the TV Audio from the TV This unit Speakers TV GConnection to a TV without the ARC functionH IN OUT IN OUT ...

Page 12: ...uired in addition to the HDMI cable In this case refer to Connecting a TV vpage 13 for the connection method For the ARC function see About ARC Audio Return Channel function vpage 8 Connecting to a device equipped with a DVI D connector The DVI D Digital Visual Interface method is also used for video transmission via digital signals This is developed mainly for computers and some AV devices such a...

Page 13: ... not match the monitor s resolution In this case switch the Blu ray Disc DVD player s resolution to a resolution with which the monitor is compatible Connecting this unit to video devices via HDMI connections Cables used for connections Audio and video cable sold separately HDMI cable This interface allows transfer of digital video signals and digital audio signals over a single HDMI cable OUT HDM...

Page 14: ...annot be output from the HDMI MONITOR output connector HDMI function This unit supports the following HDMI functions n nAbout 3D function This unit supports input and output of 3D 3 dimensional video signals of HDMI To play back 3D video you need a TV and player that provide support for the HDMI 3D function and a pair of 3D glasses NOTE When playing back 3D video refer to the instructions provided...

Page 15: ...eparately Ethernet cable Changing the source assigned to connectors This unit can change the source that is assigned to the DIGITAL AUDIO IN connectors Here a connection to the DVD player is taken as an example for explanation The rear panel video input and digital audio input connectors do not have the input connector indication for DVD players DVD However DIGITAL AUDIO IN connectors have the ASS...

Page 16: ...higher playback quality is achieved a DIGITAL AUDIO OPTICAL connector DIGITAL AUDIO COAXIAL connector z When a multichannel audio digital bit stream audio is input this unit decodes the audio to play back surround sound z z When making this type of connection you must change the settings on this unit v Input connector setting n nVideo connection The following methods are available for connecting t...

Page 17: ...unit decodes the audio to play back surround sound z z When making this type of connection you must change the settings on this unit v Input connector setting s AUDIO IN CBL SAT connector This makes an analog audio connection This type of connection converts digital audio to analog audio so the output audio may be degraded compared to connections a n nVideo connection The following methods are ava...

Page 18: ...ttings on this unit v Input connector setting s AUDIO IN DVD connector This makes an analog audio connection This type of connection converts digital audio to analog audio so the output audio may be degraded compared to connections a n nVideo connection The following methods are available for connecting to this unit The numbers prefixed with connectors indicate the recommendation order The smaller...

Page 19: ...s not possible to use this unit by connecting the unit s iPod USB port to a PC via a USB cable Do not use an extension cable when connecting a USB memory device This may cause radio interference with other devices When connecting an iPhone to this unit keep the iPhone at least 20 cm away from this unit If the iPhone is kept closer to this unit and a telephone call is received by the iPhone noise m...

Page 20: ...n where the noise level becomes minimal NOTE Do not connect two FM antennas simultaneously If you are unable to receive a good broadcast signal we recommend installing an outdoor antenna For details inquire at the retail store where you purchased the unit Connecting an HDMI incompatible device FM outdoor antenna Direction of broadcasting station 75 Ω coaxial cable FM indoor antenna supplied Basic ...

Page 21: ...a speed of 100 Mbps or greater n nEthernet cable CAT 5 or greater recommended Use only a shielded STP or ScTP LAN cable which is available at retailer The normal shielded type Ethernet cable is recommended If a flat type cable or unshielded type cable is used other devices could be affected by noise If you have an Internet provider contract for a line on which network settings are made manually ma...

Page 22: ... power outlet To household power outlet AC 120 V 60 Hz Power cord NOTE Do not plug in the power cord until all connections have been completed Do not bundle power cords together with connection cables Doing so can result in humming or noise Basic version Advanced version Information Basic version ...

Page 23: ...ones before performing Audyssey Setup Setup Here we explain Audyssey Setup which allows you to automatically make the optimal settings for your speakers and Network which allows you to connect this unit to a home network LAN This unit lets you play via your home network LAN music files stored on a computer and music content such as that from Internet radio n n Speaker connection vpage 70 n n Set u...

Page 24: ... of the listener s ear Sound receptor Setup microphone If you do not have a tripod or stand set up the microphone on for example a seat without a back NOTE Do not hold the setup microphone in your hand during measurements Avoid placing the setup microphone close to a seat back or wall as sound reflections may give inaccurate results Set up speakers Audyssey Setup 3Connect the setup microphone to t...

Page 25: ...eat the operation from step 3 This step automatically checks the speaker configuration and speaker size and calculates the channel level distance and crossover frequency It also corrects distortion in the listening area 6Select Begin Test and then press ENTER When measuring begins a test tone is output from each speaker Measurement requires several minutes 7The detected speakers are displayed The ...

Page 26: ...ions two to eight positions other than the main listening position Just one position can be measured but measuring multiple positions increases the accuracy of the correction of acoustic distortion within the listening area 9Move the setup microphone to position 2 select Continue and then press ENTER The measurement of the second position starts Measurements can be made in up to eight positions Au...

Page 27: ...without any loss in the dynamism and clarity of the sound when for example the volume suddenly increases for commercials shown during television programs n n When turning Dynamic Volume on Press u to select Yes and then press ENTER The unit automatically enters Medium vpage 87 mode n n When turning Dynamic Volume off Press i to select No and then press ENTER NOTE After performing Audyssey Setup do...

Page 28: ...t noise is too high or level is too low MultEQ XT Retry There is too much noise in the room for accurate measurements to be made Speaker or subwoofer sound is too low for accurate measurements to be made Either turn off any device generating noise or move it away Perform again when the surroundings are quieter Check the speaker installation and the direction in which the speakers are facing Adjust...

Page 29: ... press ui to select equalizing curve Audyssey or Audyssey Flat to be checked Use o p to switch the display between the different speakers 3 Press BACK The confirmation screen reappears Repeat step 2 Retrieving Audyssey Setup settings If you set Restore to Yes you can return to Audyssey Setup measurement result value calculated at the start by MultEQ XT even when you have changed each setting manua...

Page 30: ...rating instructions of the connected devices when playing them Turning the power on Press POWER X to turn on power to the unit The power indicator lights green and the power turns on You can also switch the power to standby by pressing X on the main unit n nWhen power is switched to standby Press POWER X GPower indicator status in standby modeH Normal standby Off When HDMI Control vpage 90 is set ...

Page 31: ...en The sound is reduced to the level set at Mute Level vpage 86 To cancel press MUTE again Muting can also be canceled by adjusting the master volume Important information Playing a Blu ray Disc player DVD player The following describes the procedure for playing Blu ray Disc player DVD player 1 Prepare for playback q Turn on the power of the TV subwoofer and player w Change the TV input to the inp...

Page 32: ...Pod connect the iPod to the iPod USB port vpage 16 2 Press POWER X to turn on power to the unit 3 Press iPod USB to switch the input source to iPod USB Remote iPod is displayed on the display of this unit Nothing is displayed on the TV screen 4 Operate iPod itself directly while seeing the iPod screen to play back music n nStreaming music stored in iPhone iPod touch or iPad directly to the unit vp...

Page 33: ... to select the item then press ENTER or p to select the file to be played 6 Press ENTER p or 1 Playback starts n nAdjusting the sound quality Restorer Make this setting at Restorer vpage 86 in the menu You can use the Restorer function to restore to a state close to the audio before compression while correcting the bass feel to enjoy a richer playback experience The default setting is Mode3 Low n ...

Page 34: ...TION iPod Title Now Playing Artist Album 00 06 100 Previous Option Pause Next Back Option Repeat Random Operation Mode 3 Use o p to select random playback mode OPTION iPod Title Now Playing Artist Album 00 06 100 Previous Option Pause Next Back Off Random Each time o p is pressed the setting is changed as shown below Off On Off Disable random playback On Enable random playback 4 Press ENTER The di...

Page 35: ...d files can be played on certain portable players compatible with MTP z3 Only files that are not protected by copyright can be played on this unit Content downloaded from pay sites on the Internet are copyright protected Also files encoded in WMA format when ripped from a CD etc on a computer may be copyright protected depending on the computer s settings NOTE File types that this unit does not su...

Page 36: ...the USB memory device is divided into multiple partitions only the first partition is played back NOTE Note that DENON will accept no responsibility whatsoever for any problems arising with the data on a USB memory device when using this unit in conjunction with the USB memory device USB memory devices will not work via a USB hub DENON does not guarantee that all USB memory devices will operate or...

Page 37: ...ch as the source name volume and sound mode name OPTION Text Search Repeat playback Random playback Picture View Slideshow uio p Cursor operation Auto search cue ui ENTER Press and release Enter ENTER Press and hold Stop BACK Return SETUP Setup menu 8 9 Auto search cue 1 Playback 3 Pause Basic version Advanced version Information Basic version DVD ...

Page 38: ... TUNE or TUNE to select the station you want to hear Scanning is performed until it finds an available radio station When it finds a radio station it stops the scan automatically and tunes in n nAdding to the FAVORITES STATION button vpage 60 Operations available through the OPTION button Press the OPTION button to display a menu of functions that can be used on the TV screen Select the function y...

Page 39: ...t Skip GDisplay of this unitH Tune Mode 4 Use o p to select tuning mode then press ENTER GTV ScreenH Auto Tune Mode GDisplay of this unitH Mode Auto Auto Automatically tune to the station Manual Manually tune to the station 5 Press TUNE or TUNE to select the station you want to hear The frequency changes in steps each time the button is pressed When tuning in stations manually press and hold TUNE ...

Page 40: ... 50MHz Tune Preset Option Direct Tune Option Preset Memory Tune Mode Auto Preset Preset Name Preset Skip GDisplay of this unitH Direct Tune 4 Use ui to select a number and press p The screen that lets you enter the frequency is displayed GTV ScreenH FM MHz Direct Tune GDisplay of this unitH Direct Tune FM MHz If o is pressed the immediately preceding input is cancelled 5 Repeat step 3 and enter th...

Page 41: ...Auto Preset then press ENTER GTV ScreenH TUNE OPTION AUTO CH FM CH 1 FM 87 50MHz Tune Preset Option Direct Tune Option Preset Memory Tune Mode Auto Preset Preset Name Preset Skip GDisplay of this unitH Auto Preset 4 Press ENTER The unit starts to tune in to radio stations automatically and preset them GTV ScreenH Start Press ENTER to start Auto Preset Auto Preset GDisplay of this unitH AutoPreset ...

Page 42: ...10 MHz CH 5 FM 90 10 MHz CH 8 FM 90 10 MHz CH 7 FM 90 10 MHz CH 4 FM 107 90 MHz Preset Memory GDisplay of this unitH 01 FM 87 50MHz Stored The channel numbers of broadcast stations set as Preset Skip vpage 41 are grayed out but these stations can be preset When grayed out channel numbers are preset these are highlighted and the Preset Skip setting changes to On Channel Default Settings 1 8 87 50 8...

Page 43: ...et name is displayed Each time o p is pressed the setting is changed as shown below 1 8 9 16 25 32 17 24 41 48 49 56 33 40 GTV ScreenH CH 3 FM 98 10 MHz CH 2 FM 89 10 MHz CH 1 FM 87 50 MHz Preset Group CH 6 FM 90 10 MHz CH 5 FM 90 10 MHz CH 8 FM 90 10 MHz CH 7 FM 90 10 MHz CH 4 FM107 90 MHz Preset Name 1 8 GDisplay of this unitH Group 1 8 5 Use ui to select the broadcast station you want to name t...

Page 44: ...10 MHz CH 5 FM 90 10 MHz CH 8 FM 90 10 MHz CH 7 FM 90 10 MHz CH 4 FM107 90 MHz On On On On On On On On Preset Skip 1 8 Set No 1 8 to skip CH 3 FM 98 10 MHz CH 2 FM 89 10 MHz CH 1 FM 87 50 MHz Preset Group Set No 1 8 to skip CH 6 FM 90 10 MHz CH 5 FM 90 10 MHz CH 8 FM 90 10 MHz CH 7 FM 90 10 MHz CH 4 FM107 90 MHz On On On On On On On On Preset Skip 1 8 GDisplay of this unitH Set 1 8to Skip 4 2 GTo ...

Page 45: ...t Skip 1 8 On GDisplay of this unitH 1 87 50M On 3 Use o p to select On The skip is cancelled NOTE You cannot cancel the skip for each group Listening to FM broadcasts n nFM operation buttons Operation buttons Function CHANNEL Preset channel selection INFO Display of information such as the source name volume and sound mode name OPTION Switch tuning modes Direct frequency tuning Preset Memory Auto...

Page 46: ...er Network 4 Use ui to select the item you want to play then press ENTER or p Internet Radio 1 7 zzzzz Search Stations Search Podcasts Recommended Stations radiodenon com Recently Played Search by Keyword zzzzz Country name Displays typical Internet radio stations your country Search Stations Displays all Internet radio stations that this unit can tune in to Search Podcasts Displays Internet radio...

Page 47: ...versely lower bit rates mean a lower sound quality but less tendency for the sound to be interrupted Radio station server full or Connection down is displayed if the station is busy or not broadcasting On this unit folder and file names can be displayed as titles Any characters that cannot be displayed are replaced with period NOTE The radio station database service may be suspended without notice...

Page 48: ...nd you can now log in 5 Enter your account information E mail address and password and log in The top menu of vTuner is displayed 6 Select the search criteria genre region language etc of your choice The list of radio stations matching the criteria is displayed You can also enter a keyword to search for a station you want to hear 7 Select the radio station of your choice from the list and then cli...

Page 49: ...tandard This unit can show the artwork that was embedded by using MP3 ID3 Tag Ver 2 3 or 2 4 This unit is compatible with WMA META tags If the image size pixels of an album artwork exceeds 500 500 WMA MP3 WAV FLAC or 349 349 MPEG 4 AAC then music may not be played back properly z2 Only files that are not protected by copyright can be played on this unit Content downloaded from pay sites on the Int...

Page 50: ...g options 3 Select Allowed in the drop down list for AVR 1713 4 Select Allowed in the drop down list for Media programs on this PC and remote connections 5 Click OK to finish When using Windows Media Player 11 1 Start up Windows Media Player 11 on the PC 2 Select Media Sharing in the Library 3 Click the Share my media check box select AVR 1713 and then click Allow 4 As you did in step 3 select the...

Page 51: ...er playback experience The default setting is Mode3 Low n nSwitching the screen display Press STATUS on the main unit The display switches between track title artist name and album title each time the button is pressed n nGoing back to the previous screen Press o or BACK n nChanging the screen display duration Make this setting at Audio Display vpage 91 in the menu The default setting is 30s Press...

Page 52: ...vpage 60 n n Playing back music and a favorite picture at the same time Picture View vpage 61 n n Playing back still images in sequential order Slideshow vpage 61 n nMedia server operation buttons Operation buttons Function PAGE df Page search INFO Display of information such as the source name volume and sound mode name OPTION Text Search Repeat playback Random playback Favorites Memory Picture V...

Page 53: ...he Music Genome Project To listen to Pandora you will need a free Pandora account If you do not have a Pandora account you can create one at www pandora com or from the Pandora smartphone application It is necessary to associate this machine with a Pandora account by visiting http www pandora com denon from your PC n nAbout SiriusXM vpage 56 Enjoy anywhere access to the unparalleled content of Sir...

Page 54: ...u entered in Step 5 is displayed on the top screen of Flickr If you enter a screen name that does not exist The Flickr Contact you entered could not be found is displayed Check and enter the correct screen name 7 Use ui to select the folder and then press ENTER or p Favorites Displays the favorite photographs of the specified user Photostream Displays a list of shared photographs PhotoSets Display...

Page 55: ...recently added photographs Search by text Search for photographs by keyword 3 Use ui to select the file and then press ENTER or p The selected file is displayed NOTE Depending on the file format some photographs cannot be viewed n nFlickr operation buttons Operation buttons Function PAGE df Page search INFO Display of information such as the source name volume and sound mode name OPTION Slideshow ...

Page 56: ... Pandora and activation code are displayed Access the Pandora web page from your PC and register the displayed activation code and account information Then press ENTER BACK Pandora I have a Pandora account Please go to http www pandora com denon and follow the instructions there to create a new account Your activation code is zzzzzz I am new to Pandora Cancel Continue This is an identification cod...

Page 57: ... 5 G T 6 H U 7 I V 8 J W 9 K X L Y M Z D M2 a A SPACE INSERT DELETE O K Search by Artist Search by Track 4 Press ui select a file e g D M2 from the list and press ENTER or p Radio is added to the end of a filename and your new station is created e g D M2 Radio BACK My Station 4 4 Sign out Exit New Station Quick Mix D M1 Radio D M2 Radio Your new station will play music with similar qualities to th...

Page 58: ...eb page Bookmark this track Bookmarks the track currently being played You can check on a computer or iPhone etc For details see the Pandora web page I m tired of this track Press when you don t like the track that is being played The track will not be played for 1 month Delete this station Press when you want to delete the station that is being played NOTE You can Skip up to 6 Tracks that are bei...

Page 59: ...iriusXM account 2 Press NETWORK 3 Use uio p to select SiriusXM then press ENTER Favorites Internet Radio Media Server Network 4 Select Sign in then press ENTER BACK SiriusXM Sign in Sign in Start Trial Please set your SiriusXM username and password You can go to www siriusxm com to sign up for an account Or select Start Trial below to start the one time free trial Cancel Enter 5 Input the Username...

Page 60: ...B Country Chirisitan Jazz Standards Sign Out Exit Are you sure you want to sign out Yes No n nSiriusXM operation buttons Operation buttons Function PAGE df Page search INFO Display of information such as the source name volume and sound mode name uio p Cursor operation ENTER Press and release Enter ENTER Press and hold Stop BACK Return SETUP Setup menu FAVORITE STATION 1 3 Add call up favorites vp...

Page 61: ...USB Internet Radio Media Server 1 While content is playing press OPTION The option menu screen is displayed 2 Use ui to select Text Search then press ENTER The keyboard input screen is displayed OPTION USB 1 9 D M1 D M2 D M3 Music1 Music2 Music3 Music4 Option Option Text Search Repeat Random Slideshow 3 Enter the first character of the Internet radio station or file you want to search for and then...

Page 62: ... 4 Press ENTER The display returns to the playback screen Performing random playback Random USB Media Server 1 While content is playing press OPTION The option menu screen is displayed 2 Use ui to select Random then press ENTER OPTION USB Title Now Playing Artist Album 00 06 100 Previous Option Pause Next Back MP3 128kbps Repeat Option Random Picture View 3 Use o p to select random playback mode O...

Page 63: ...utton You can add up to three types of content NOTE Please note that if you add new content to a number that already contains content the older content is deleted The following operations update the database on the media server which may make the added music files unplayable When you quit the media server and then restart it When music files are deleted or added on the media server When using an E...

Page 64: ...nd the picture you were viewing is shown on the screen OPTION USB Title Now Playing Artist Album 00 06 100 Previous Option Pause Next Back MP3 128kbps Option Repeat Random Picture View Playing back still images in sequential order Slideshow You can play back still image JPEG files stored on a USB memory device or media server and pictures on Flickr website as a slide show The display time can also...

Page 65: ...Tunes volume setting level You should turn down the iPhone iPod touch iPad or iTunes volume prior to playback and then adjust it to a suitable level n nPlaying iTunes music with this unit 1 Install iTunes 10 or later on a Mac or Windows PC that is connected to the same network as this unit 2 Turn this unit ON Set IP Control vpage 101 to Always On for this unit NOTE When IP Control is set to Always...

Page 66: ...ckups Forget All Remotes Reset Sync History of the data on this computer will be changed Prevent iPods iPhones and iPads from syncing automatically Allow iTunes control from remote speakers Devices is displayed on the menu screen while AirPlay is being operated Source input will be switched to NETWORK when AirPlay playback is started You can stop AirPlay playback by pressing the o or choosing othe...

Page 67: ...stening mode is switched MOVIE Switches to the listening mode suitable for enjoying movies and TV programs MUSIC Switches to the listening mode suitable for enjoying music GAME Switches to the listening mode suitable for enjoying games Pressing MOVIE MUSIC or GAME displays a list of the listening modes that can be selected Each time you press MOVIE MUSIC or GAME the listening mode changes While th...

Page 68: ...ton Input signal Listening mode MUSIC 2 channel z1 STEREO DOLBY PLg Music z2 DTS NEO 6 Music z2 MULTI CH STEREO ROCK ARENA JAZZ CLUB MATRIX VIRTUAL Multi channel z3 STEREO Dolby Digital DOLBY DIGITAL Dolby TrueHD DOLBY TrueHD Dolby Digital Plus DOLBY DIGITAL Plus DTS DTS SURROUND DTS 96 24 DTS HD DTS Express DTS HD HI RES DTS HD MSTR DTS Express PCM multi channel MULTI CH IN MULTI CH STEREO ROCK A...

Page 69: ...ton Input signal Listening mode GAME 2 channel z1 STEREO DOLBY PLg Game z2 MULTI CH STEREO VIDEO GAME VIRTUAL Multi channel z3 STEREO Dolby Digital DOLBY DIGITAL Dolby TrueHD DOLBY TrueHD Dolby Digital Plus DOLBY DIGITAL Plus DTS DTS SURROUND DTS 96 24 DTS HD DTS Express DTS HD HI RES DTS HD MSTR DTS Express PCM multi channel MULTI CH IN MULTI CH STEREO VIDEO GAME VIRTUAL PURE All DIRECT PURE DIRE...

Page 70: ...de can be selected when playing multi channel PCM sources Original listening mode Listening mode type Description MULTI CH STEREO This mode is for enjoying stereo sound from all speakers The same sound as that from the front speakers L R is played back at the same level from the surround speakers L R ROCK ARENA This mode is for enjoying the atmosphere of a live concert in an arena JAZZ CLUB This m...

Page 71: ...Playback Advanced operation vpage 73 F Playback in ZONE2 Separate room vpage 78 F How to make detailed settings vpage 79 Advanced version Here we explain functions and operations that let you make better use of this unit Basic version Advanced version Information Advanced version ...

Page 72: ...to 16 Ω Use the illustration below as a guide for how high each speaker should be installed The height does not need to be exactly the same Surround speaker 2 3 ft 60 90 cm GViewed from the sideH Front speaker When 5 1ch speakers are installed FL FR SW C SL SR z1 z2 Listening position z1 22 30 z2 120 GSpeaker abbreviationsH FL Front speaker L SW Subwoofer FR Front speaker R SL Surround speaker L C...

Page 73: ...e instructions in the Setup Assistant screen for making connections Power is not supplied to the speaker terminals while the Setup Assistant is running Use speakers with the speaker impedances shown below Speaker terminals Speaker impedance FRONT 6 16 Ω CENTER SURROUND Connecting the speaker cables Carefully check the left L and right R channels and red and black polarities on the speakers being c...

Page 74: ...akers Cables used for connections Audio cable sold separately Speaker cable Subwoofer cable NOTE For speaker cable connections see page 70 For speaker impedance see page 70 SL SR FL FR C SW Basic version Advanced version Information Advanced version ...

Page 75: ...Cables used for connections Audio cable sold separately Speaker cable Subwoofer cable NOTE For speaker cable connections see page 70 For speaker impedance see page 70 Speaker connection Basic version Advanced version Information Advanced version ...

Page 76: ...tor are output to the television or other device connected to the HDMI output connector even if the power of this unit is in standby pass through function To use this unit to play the audio of a TV that does not support the ARC function connect the TV with an optical digital or analog connection vpage 8 To use the pass through function connect an HDMI connection device that is compatible with HDMI...

Page 77: ...at steps 2 and 3 There is a change to the connection between the devices and the HDMI or an increase in devices Sleep timer function You can have the power automatically switched to standby once a set time has elapsed This is convenient for viewing and listening while going to sleep Press SLEEP and display the time you want to set The indicator on the display lights The time switches as shown belo...

Page 78: ...ICK SELECT 1 CBL SAT 40 STEREO QUICK SELECT 2 Blu ray 40 STEREO QUICK SELECT 3 GAME 40 STEREO QUICK SELECT 4 NETWORK 40 STEREO Changing the Quick Select Name On this unit you can change the Quick Select name displayed on the menu to the name that you prefer For the name change method see Quick Sel Names vpage 105 n nChanging the settings 1 Set the items below to the settings you want to save q Inp...

Page 79: ...fig MAIN ZONE ZONE2 41 0 CBL SAT CBL SAT Setup Menu w e r w Click when you select the zone to operate vGExample 1H e Click when you operate the setup menu vGExample 2H r Click to change the Web control screen setting vGExample 3H 6 Operate GExample 1H MAIN ZONE control screen 40 0 MOVIE DIRECT STEREO STANDARD SIMULATION MUSIC GAME PURE ZONE CONTROL NETWORK iPod USB FM QUICK SELECT RELOAD Add To Yo...

Page 80: ...4H Network audio operating screen ZONE CONTROL NETWORK iPod USB FM QUICK SELECT RELOAD SEARCH 40 0 NETWORK iPod USB MAIN ZONE NETWORK REPEAT RANDOM ONE 8 9 2 1 3 ALL OFF OFF ON Slideshow OFF Favorites Internet Radio Media Server W2 W4 W3 W6 W5 W7 W8 W2 Click to return to the previous screen W3 Click the content you want to operate W4 When searching using an acronym click v and select from the disp...

Page 81: ... audio connections in order to prevent noise NOTE It is not possible to play the digital audio signals input from the HDMI COAXIAL or OPTICAL connectors in ZONE2 Use analog connections for ZONE2 playback Playback 1 Press ZONE2 X to turn on the ZONE2 power The indicator on the display lights Also press input source select button when in standby mode the power turns on Press ZONE2 X again to turn of...

Page 82: ... from the display input sources that are not used 94 Source Level Adjusts the playback level of the audio input 94 Input Select Sets the audio input mode and decode mode 94 Video Source Video of another input source is played back combined with the playing audio 95 Setting items Detailed items Description Page Speakers Audyssey Setup The acoustic characteristics of the connected speakers and liste...

Page 83: ...Audio Video Inputs Speakers Network General Setup Assistant e w q r Selected setup item GExample 2H Audyssey Setup screen with illustration Audyssey Setup Your AVR can automatically measure the acoustics of your room and the optimize your speakers Start Parameter Check i u y t History icon y Operation guidance text u Illustration i Selected setup item t NOTE When the menu is operated on a computer...

Page 84: ...XIAL None None None MEDIA PLAYER None OPTICAL None w Press ENTER q CBL SAT COAX e CBL SAT COAX Press ENTER q TV screen Displays the selected line Display Displays the selected item Use ui to move to the item you want to set w Press ENTER to set to the mode in which the setting can be made e 0 1 is displayed at the sides of items whose setting can be changed Use o p to change to the desired setting...

Page 85: ...Space key y Cursor keys u Insert key i Delete key o OK key n nInput method 1 Display the screen for inputting characters vpage 79 Menu map 2 Select a character to be changed qUse uio p to select or wPress ENTER to place the cursor at the character to be changed Each time ENTER is pressed the cursor moves by one character 3 Select a character to be input with uio p then press ENTER The types of cha...

Page 86: ... the previous item press o or BACK Exiting the Menu press SETUP while the menu is displayed The menu display disappears Items that can be set with the Audio procedure Surr Parameter vpage 84 Tone vpage 85 Dialogue Level vpage 85 Subwoofer Level vpage 86 Restorer vpage 86 Audio Delay vpage 86 Volume vpage 86 Audyssey vpage 87 Manual EQ vpage 88 Basic version Advanced version Information Advanced ve...

Page 87: ...re underlined You can adjust the surround audio sound field effects to match your preferences The items parameters that can be adjusted depend on the signal being input and the currently set sound mode For details on the adjustable parameters see Sound modes and surround parameters vpage 116 NOTE Some setting items cannot be set while playback is stopped Make the settings during playback When the ...

Page 88: ...an set this when the sound mode is MATRIX 0ms 300ms 30ms Effect Level Adjust the sound effect level You can set this when the sound mode is original listening mode 1 15 10 Set to a lower level if the positioning and sense of phase of the surround signals seems unnatural Room Size Determine size of acoustic environment You can set this when the sound mode is original listening mode Small Simulate a...

Page 89: ...t level Setting items Setting details Subwoofer Turn subwoofer output on and off On The subwoofer is used Off The subwoofer is not used NOTE This can be set when the sound mode is DIRECT vpage 64 and the Subwoofer Mode vpage 97 is LFE Main Subwoofer Level Set the subwoofer output level 12dB 12dB 0dB Restorer Compressed audio formats such as MP3 WMA Windows Media Audio and MPEG 4 AAC reduce the amo...

Page 90: ...ce Setting items Setting details Dynamic EQ Solve the problem of deteriorating sound quality as volume is decreased by taking into account human perception and room acoustics Works with MultEQ XT On Use Dynamic EQ Off Do not use Dynamic EQ is displayed when set to On NOTE When the menu Dynamic EQ setting is On it is not possible to do Tone Control vpage 85 adjustment Reference Offset Audyssey Dyna...

Page 91: ...frequency band 63Hz 125Hz 250Hz 500Hz 1kHz 2kHz 4kHz 8kHz 16kHz Select the speakers you want to adjust when Left Right or Each is selected e Adjust the level 20 0dB 6 0dB 0 0dB Curve Copy Copy Audyssey Flat vpage 87 curve from MultEQ XT Yes Copy No Do not copy Curve Copy is displayed after Audyssey Setup has been performed When you select Curve Copy and press ENTER the Copy Audyssey Flat prompt is...

Page 92: ...p to enter the setting To return to the previous item press o or BACK Exiting the Menu press SETUP while the menu is displayed The menu display disappears Items that can be set with the Video procedure HDMI Setup vpage 90 Volume Display vpage 90 Info Display vpage 91 Audio Display vpage 91 TV Format vpage 91 Basic version Advanced version Information Advanced version DVD ...

Page 93: ... extended period it is recommended that you unplug the power cord from the power outlet The HDMI control function controls operations of a TV that is compatible with the HDMI control function Make sure that the TV and HDMI are connected when you perform HDMI control If the HDMI Control settings have been changed always reset the power to connected devices after the change Setting items Setting det...

Page 94: ...ow display for 10 seconds after operation Off Turn display off TV Format Default settings are underlined Set the video signal format to be output for the TV you are using Setting items Setting details Format NTSC Select NTSC output PAL Select PAL output Format can also be set by the following procedure However the menu screen is not displayed 1 Press and hold the main unit s ZONE2 SOURCE and STATU...

Page 95: ...u is displayed The menu display disappears Important information n nAbout the display of input sources In this section the configurable input sources for each item are shown as follows CBL SAT DVD Blu ray GAME AUX MEDIA PLAYER iPod USB FM NETWORK TV AUDIO NOTE Input sources that have been set to Hide at Hide Source vpage 94 cannot be selected Items that can be set with the Inputs procedure Digital...

Page 96: ...s Digital Assign This unit has certain input sources such as CBL SAT assigned to audio and video connectors by default By making the default connections you can simply press an input source select button to play back audio or video from the connected device with ease When making connections other than the default settings you must change settings in this section Examples of Digital Assign menu scr...

Page 97: ...el of the selected input source s audio input Make this setting if there are differences in the input volume levels between the different sources Setting details 12dB 12dB 0dB The analog input level and digital input level can be adjusted independently for input sources for which DIGITAL is assigned at Digital Assign vpage 93 Input Select Default settings are underlined Set the audio input mode an...

Page 98: ... when inputting the corresponding input signal Video Source Default settings are underlined Video of another input source is played back combined with the playing audio Setting items Setting details Video Select Default Play the picture and sound of the input source CBL SAT DVD Select video input source to view The video of the selected input source is played along with the audio currently being p...

Page 99: ...lease set if necessary Menu operation 1 Press SETUP The menu is displayed on the TV screen 2 Use ui to select the menu to be set or operated 3 Press ENTER or p to enter the setting To return to the previous item press o or BACK Exiting the Menu press SETUP while the menu is displayed The menu display disappears Items that can be set with the Speakers procedure Audyssey Setup vpage 20 Manual Setup ...

Page 100: ... Large is not displayed when Front is set to Small Subwoofer Set the presence of a subwoofer Yes Use a subwoofer No Select when a subwoofer is not connected When Front is set to Small Subwoofer is automatically set to Yes Surround Set the presence and size of the surround speakers Large Use a large speaker that can adequately play back low frequencies Small Use a small speaker that has inadequate ...

Page 101: ...etting items Setting details Distances Set distance from listening position to speakers Measure beforehand the distance from the listening position to each speaker Unit Set the unit of distance Feet Meters Step Set the minimum variable width of the distance 1ft 0 1ft 0 1m 0 01m Set Defaults The Distances settings are returned to the default settings Yes Reset to the defaults No Do not reset to the...

Page 102: ...z Set the crossover frequency Crossovers can be set when the Bass Subwoofer Mode vpage 97 setting is LFE Main or when you have a speaker that is set to Small Always set the crossover frequency to 80Hz When using small speakers however we recommend setting the crossover frequency to a higher frequency For speakers set to Small sound below the crossover frequency is cut from the sound output The cut...

Page 103: ...information about your home network LAN such as the gateway address and subnet mask Menu operation 1 Press SETUP The menu is displayed on the TV screen 2 Use ui to select the menu to be set or operated 3 Press ENTER or p to enter the setting To return to the previous item press o or BACK Exiting the Menu press SETUP while the menu is displayed The menu display disappears Items that can be set with...

Page 104: ... On it consumes more standby power Network Friendly Name The Friendly Name is the name of this unit displayed on the network You can change the Friendly Name according to your preferences Setting items Setting details Edit Name Edits Friendly Name The default Friendly Name on first use is DENON AVR 1713 Up to 63 characters can be input For character input see page 82 Set Defaults Restores Friendly...

Page 105: ... When connected to a gateway router input its IP address Primary DNS Secondary DNS If there is only one DNS address indicated in the documentation supplied by your provider input it at Primary DNS If there are two or more DNS addresses input the first one at Secondary DNS r Press BACK The display returns to the playback screen When connecting to the network via a Proxy server select Proxy and pres...

Page 106: ...t Network Settings and press ENTER w Use ui to set Proxy and press ENTER e Use o p to set Proxy to On and press i The proxy server is enabled r Use o p to select the proxy server input method and then press ENTER Address Select when inputting by address Name Select when inputting by domain name t Press i and ENTER select Address or Name Use uio p to input the proxy server address or domain name an...

Page 107: ... To return to the previous item press o or BACK Exiting the Menu press SETUP while the menu is displayed The menu display disappears Items that can be set with the General procedure Language vpage 105 Quick Sel Names vpage 105 Auto Standby vpage 105 Front Display vpage 105 Information vpage 106 Firmware vpage 107 Setup Lock vpage 108 Basic version Advanced version Information Advanced version DVD ...

Page 108: ...gs are underlined When you do not perform any operation on this unit with no audio or video input for a specified time this unit automatically enters the standby mode Before it enters the standby mode Auto Standby is displayed on the display of this unit and the menu screen Setting details 30min The unit goes into standby after 30 minutes 60min The unit goes into standby after 60 minutes Off The u...

Page 109: ...tion about HDMI input output signals and monitor Signal Resolution Color Space Pixel Depth Monitor Interface Resolutions ZONE Show information about current settings MAIN ZONE This item shows information about settings for MAIN ZONE The information displayed differs according to the input source ZONE Name Select Source Name Sound Mode Input Mode Decode Mode Digital Assign Video Select etc ZONE2 Th...

Page 110: ...ile then try again Connection fail Failure in connecting to server Download fail Downloading of the firmware has failed Setting items Setting details Notifications Displays a notification message on this unit s menu screen when the latest firmware is released with Update Display a notification message on this unit s menu screen when downloadable firmware is released with Add New Feature Update The...

Page 111: ... and settings for a broadband Internet connection vpage 18 Do not turn off the power until updating or upgrading is completed Even with a broadband connection to the Internet approximately 1 hour is required for the updating upgrading procedure to be completed Once updating upgrade starts normal operations on this unit cannot be performed until updating upgrading is completed Furthermore there may...

Page 112: ...r information vpage 115 F Troubleshooting vpage 122 F Specifications vpage 127 F Index vpage 128 Information Here we list various information related to this unit Please refer to this information as needed Basic version Advanced version Information Information ...

Page 113: ...NES When the headphones are plugged into this jack audio will no longer be output from the connected speakers NOTE To prevent hearing loss do not raise the volume level excessively when using headphones Q1SOURCE SELECT buttons 0 1 27 126 Q2ZONE2 ON OFF button 78 Q3ZONE2 SOURCE button 78 Q4DIMMER button 105 Q5STATUS button 30 44 48 106 Q6QUICK SELECT buttons 75 rAUX HDMI connector 10 tiPod USB port...

Page 114: ... This lights when the sleep mode is selected vpage 74 iTuner reception mode indicators These light according to the reception conditions when the input source is set to FM STEREO In FM mode this lights up when receiving analog stereo broadcasts TUNED Lights up when the broadcast is properly tuned in oAudyssey indicators This indicator lights when the MultEQ XT vpage 87 Dynamic EQ vpage 87 or Dynam...

Page 115: ...IDEO 13 14 15 tHDMI connectors 9 10 yNetwork connector NETWORK 18 uDigital audio connectors DIGITAL AUDIO 13 14 15 iAnalog audio connectors AUDIO 14 15 oSubwoofer connector SUBWOOFER 71 72 NOTE Do not touch the inner pins of the connectors on the rear panel Electrostatic discharge may cause permanent damage to the unit Basic version Advanced version Information Information ...

Page 116: ...IE button MUSIC button GAME button PURE button tInformation button INFO 106 yCursor buttons uio p 81 83 89 92 96 100 104 uENTER button 81 83 89 92 96 100 104 iBACK button 83 89 92 96 100 104 oFAVORITE STATION buttons 1 3 60 Q0System buttons 31 34 49 55 Skip buttons 8 9 Play button 1 Pause button 3 Tuning up Tuning down buttons TUNE 35 36 Q1Remote control signal transmitter 114 Q2POWER button X 27 ...

Page 117: ...tery fluid should leak carefully wipe the fluid off the inside of the battery compartment and insert new batteries Remove the batteries from the remote control unit if it will not be in use for long periods Used batteries should be disposed of in accordance with the local regulations regarding battery disposal The remote control unit may function improperly if rechargeable batteries are used Opera...

Page 118: ...a Interface are trademarks or registered trademarks of HDMI Licensing LLC in the United States and other countries Made for iPod and Made for iPhone mean that an electronic accessory has been designed to connect specifically to iPod or iPhone respectively and has been certified by the developer to meet Apple performance standards Apple is not responsible for the operation of this device or its com...

Page 119: ... S D D D S S S STEREO S D S S S MULTI CH IN S D D D S DOLBY PRO LOGIC g S D D D Sz6 S S DOLBY PRO LOGIC S D D D S S S DOLBY DIGITAL S D D D S S DOLBY DIGITAL Plus S D D D S S DOLBY TrueHD S D D D S S S DTS NEO 6 S D D D Sz7 S S DTS SURROUND S D D D S S DTS 96 24 S D D D S S DTS HD S D D D S S DTS Express S D D D S S MULTI CH STEREO S D D D S S S ROCK ARENA S D D D S S S S S JAZZ CLUB S D D D S S S...

Page 120: ...S S S DTS SURROUND S S S S DTS 96 24 S S S S DTS HD S S S S DTS Express S S S S MULTI CH STEREO S S S S S ROCK ARENA Sz12 S S S S JAZZ CLUB S S S S S MONO MOVIE S S S S S VIDEO GAME S S S S S MATRIX S S S S S VIRTUAL S S S S S z1 During playback in PURE DIRECT mode the surround parameters are the same as in DIRECT mode z8 This item cannot be set when Dynamic EQ vpage 87 is set to On z9 For HD Audi...

Page 121: ...DOLBY DIGITAL 2ch DTS SURROUND DTS HD MSTR F DTS HD HI RES F DTS SURROUND S S F DTS 96 24 F DTS EXPRESS F DTS NEO 6 CINEMA S S S DTS NEO 6 MUSIC S S S DOLBY SURROUND DOLBY TrueHD F DOLBY DIGITAL F DOLBY DIGITAL S F F DOLBY PRO LOGIC g CINEMA S S S DOLBY PRO LOGIC g MUSIC S S S DOLBY PRO LOGIC g GAME S S S DOLBY PRO LOGIC S S S MULTI CH IN MULTI CH IN F DIRECT DIRECT S S S S S S S S S S S S S S S S...

Page 122: ...o signal output S Superimposed on the picture indicated in A Only the picture in is output NOTE If you operate the menu while playing back 3D video content or computer s resolution e g VGA the playback video is replaced by the menu screen The playback video is not displayed behind the menu screen This unit does not show the status display while playing back 3D video content or computer s resolutio...

Page 123: ...lby Laboratories Regular music such as that on CDs is encoded into 5 channels to achieve an excellent surround effect The surround channel signals are converted into stereo and full band signals with a frequency response of 20 Hz to 20 kHz or greater to create a three dimensional sound image offering a rich sense of presence for all stereo sources Dolby TrueHD Dolby TrueHD is a high definition aud...

Page 124: ...ompared to the interlace system this system provides images with less flickering and bleeding Protection circuit This is a function to prevent damage to devices within the power supply when an abnormality such as an overload excess voltage occurs or temperature for any reason In this unit the power indicator blinks and the unit enters standby mode when an abnormality occurs S Sampling frequency Sa...

Page 125: ...ore wire has come loose from the terminal or a core wire is touching the rear panel of this unit After unplugging the power cord take corrective action such as firmly re twisting the core wire or taking care of the terminal and then reconnect the wire 70 70 After turning on the power the power indicator is blinking red in intervals of approximately 0 5 seconds This unit amplifier circuit has faile...

Page 126: ...ending on the input signal or selected sound mode 71 72 97 97 97 DTS sound is not output Set Decode Mode on the menu to Auto or DTS 95 Dolby TrueHD DTS HD Dolby Digital Plus audio is not output Make HDMI connections 10 Symptom Cause Solution Page Dolby PLg mode or DTS NEO 6 mode cannot be selected Check that Speaker Config Center or Surround is set to other than None If the speaker system is 2 0 2...

Page 127: ...ng Check the set s IP address Some radio stations may go silent at certain times of the day In this case no audio is output even when a station is received Try again later or switch to another radio station 18 43 43 101 Symptom Cause Solution Page Files stored on a computer cannot be played Files are stored in a non compatible format Record in a compatible format You are attempting to play a file ...

Page 128: ...played screen and select this unit AirPlay playback has not started Click the 1 button in iTunes or press the 1 button on the iPhone iPod touch iPod 62 When using AirPlay with the iPhone iPod touch iPad the sound suffers from intermittent breaks or AirPlay does not function Quit the application running in the background of the iPhone iPod touch iPad and then play using AirPlay When playing via a w...

Page 129: ...efault values X SOURCE SELECT 1 SOURCE SELECT 0 1 Turn off the power using X 2 Press X while simultaneously pressing SOURCE SELECT 0 and SOURCE SELECT 1 3 Once the display starts flashing at intervals of about 1 second release the two buttons If in step 3 the display does not flash at intervals of about 1 second start over from step 1 Basic version Advanced version Information Information ...

Page 130: ...de n n Video section Standard video connectors Input output level and impedance 1 Vp p 75 Ω Frequency response 5 Hz 10 MHz 0 3 dB n n Tuner section FM Note μV at 75 Ω 0 dBf 1 x 10 15 W Receiving Range 87 5 MHz 107 9 MHz Usable Sensitivity 1 2 μV 12 8 dBf 50 dB Quieting Sensitivity MONO 2 8 μV 20 2 dBf S N MONO 70 dB IHF A weighted DIRECT mode STEREO 67 dB IHF A weighted DIRECT mode Total harmonic ...

Page 131: ... 120 DTS Digital Surround 120 DTS Express 67 120 DTS HD 67 120 DTS HD High Resolution Audio 120 DTS HD Master Audio 120 DTS NEO 6 Surround 67 120 Dynamic Comp 84 Dynamic EQ 87 Dynamic range 120 Dynamic Volume 87 v v E Edit Name 101 Effect Level 85 Error messages Audyssey Setup 25 v v F Favorites Memory 60 Firmware 107 FLAC 121 Flickr 50 51 FM 35 FM indoor antenna 17 Format 91 Friendly Name 101 Fro...

Page 132: ...e 64 116 Source Level 94 Source Rename 94 Speaker Connect 70 Install 69 Set up 20 Speaker Config 97 Speaker impedance 70 121 Speakers 96 Speaker Select 88 Standby Source 90 Subwoofer 86 Subwoofer Level 86 Subwoofer setting 21 Surr Parameter 84 sYCC601 color 121 v v T Text Search 58 Tone 85 Tone Control 85 Trademark 115 Treble 85 Troubleshooting 122 Tune Mode 36 Turning off the sound temporarily 28...

Page 133: ...9 0 7 51 64 198 0 1 23 32 43 5 1 27 32 47 0 19 32 15 0 5 23 64 136 0 5 15 16 151 0 17 3 32 434 0 13 35 64 344 0 2 23 64 60 0 1 49 64 45 0 1 49 64 45 0 47 64 18 5 55 64 22 0 Weight 18 lbs 5 oz 8 3 kg Basic version Advanced version Information Information ...

Page 134: ...D M Holdings Inc 3520 10065 00AD V00 www denon com ...

Page 135: ...ESPAÑOL FRANÇAIS ENGLISH AVR 1713 INTEGRATED NETWORK AV RECEIVER Getting Started Mise en route Antes de empezar ...

Page 136: ...s for setting up your receiver If you have setup problems If you need additional help in solving problems contact DENON customer service in your area See the address sheet included in the box 1 855 MY DENON 1 855 693 3666 Call for Assistance 9 00AM to 8 00PM M F E S T For frequency asked questions please visit www usa denon com FAQ For US and Canada only ...

Page 137: ...t s In the Box Setup microphone Remote control unit R03 AAA batteries Receiver Safety instructions Getting Started Owner s Manual Required for setup TV HDMI cable Speaker systems Note that the illustrations in this manual is for explanation purposes and may differ from the actual unit ...

Page 138: ...DS SVENSKA Setup Steps 1 Installing batteries in the remote control unit R03 AAA batteries There are three steps to the setup process 1 Install batteries in the remote control unit 2 Connect the receiver to your TV 3 Follow the On Screen Setup Assistant ...

Page 139: ...IANO ESPAÑOL NEDERLANDS SVENSKA 2 Connecting the receiver to your TV n nPlace the receiver near your TV TV Receiver n nConnect the receiver to your TV with an HDMI cable ARC HDMI IN ARC HDMI OUT MONITOR HDMI cable Receiver Rear panel ...

Page 140: ...5 ENGLISH DEUTSCH FRANÇAIS ITALIANO ESPAÑOL NEDERLANDS SVENSKA n nSelect the appropriate HDMI input on your TV HDMI INPUT TV remote control unit n nTurn on the TV TV remote control unit ...

Page 141: ...6 ENGLISH DEUTSCH FRANÇAIS ITALIANO ESPAÑOL NEDERLANDS SVENSKA n nTurn on receiver Connect to household power outlet AC 120 V 60 Hz Power cord Turn on receiver as shown below ...

Page 142: ...CBL SAT GAME iPod USB SOUND MODE PURE MOVIE GAME MUSIC SETUP VOLUME OPTION INFO BACK TUNE FAVORITE STATION MUTE ZONE 2 SOURCE SELECT MEDIA PLAYER ENTER Setup Assistant Proper configuration is essential to providing the best possible sound and video experience This Setup Assistant will walk you through connecting your speakers and components to your AV receiver Select Next to continue Next Cancel E...

Page 143: ...PDF version of the full owner s manual for the AV receiver Please reference this manual for more details about the setup and operation of the receiver and it s features Insert the disc into your PC Follow the screen or double click on the PDF file 1 2 Product Name Integrated Network AV Receiver Model Number AVR 1713 ...

Page 144: ...D M Holdings Inc Printed in China 5411 10759 00AD www denon com V00 ...

Page 145: ......

Page 146: ...tion Plan coverage 1 Call us toll free at 855 720 0823 Have your model number serial number and purchase receipt available when calling 2 Log on to http servicecontracts denon com Copyright 2011 D M Holdings Inc All Rights Reserved ...

Page 147: ...with a unit that has similar features and functionality Don t delay You must extend your coverage before your factory warranty expires To extend your warranty simply log on to our website http servicecontracts denon com or call us toll free at 855 720 0823 Features Benefits 100 o coverage on parts labor If unrepairable we ll replace it No deductibles or hidden charges Power surge protection Unlimi...

Page 148: ... Control App w ill not work with your new receiver Please download the current App to determine if it works w ith your receiver If not you will be notified when a new updated version is available For Android users please check our website at www usa denon com for availability We appreciate your understanding and your continued loyalty as a Denon customer DENON www dtnon com ...

Page 149: ... Skopje Tel 389 2 3133 104 Wo Kee Hong Trading Sdn Bhd 2nd Floor Left Wing Bangunan Infinite Centre Lot 1 Jalan 13 6 46200 Petali ng Jaya Selangor Darul Ehsan Malaysia Tel 03 7954 8088 Fax 03 7954 7088 Doublesin Zammit Ltd 53 Nicolo lsouard Street SLM04 Sliema Tel 356 213 40562 Fax 356 213 45522 Mauritius Mexico Mexico Mexico Moldova Montenegro Morocco Netherlands New Zealand Norway Oman Pakistan ...

Page 150: ...een spilled or objects have fallen into the apparatus the apparatus has been exposed to rain or moisture does not operate normally or has been dropped 15 Batteries shall not be exposed to excessive heat such as sunshine fire or the like CAUTION To completely disconnect this product from the mains disconnect the plug from the wall socket outlet The mains plug is used to completely interrupt the pow...

Page 151: ...peri6dicos manteles o cortinas battery disposal Ne jamais placer de flamme nue sur l appareil No deberan colocarse sobre el aparato fuentes Do not expose the unit to dripping or splashing notamment des bougies allumees inflamables sin proteccion como velas encendidas fluids Veillez arespecter les lois en vigueur lorsque vous A Ia hora de deshacerse de las pilas respete Ia Do not place objects fill...

Page 152: ......

Page 153: ...below DENON REGIONAL SUPER SERVICE CENTERS Repair only No parts orders please PYRAMID AUDIO 305 E Braker Lane Austin TX 78753 2746 512 458 8292 512 453 4542 Fax INNER SOUND 1416 S E Morrison Street Portland OR 97214 2646 503 238 1955 503 238 1787 Fax ELECTRONIC EXPRESS Inc 1809 E Fabyan Parkway West Chicago IL 60185 630 208 4600 630 208 4601 Fax UNITED RADIO SERVICE 5717 Enterprise Parkway E Syrac...

Page 154: ... defect 7 Use of the product outside the U S A 8 Damaged magnetic tape or CD DVD discs 9 Use in industriaL commerciaL and or professional applications I 0 Any installation or removal charges resulting from product failure What We Will Pay For If during the applicable warranty period from the date of original consumer purchase your DENON product is found to be defective by DENON DENON will repair o...

Page 155: ...ssional applications 10 Any installation or removal charges resulting from product failure What We Will Pay For If during the applicable warranty period from the date of original consumer purchase your DENON product is found to be defective by DENON DENON will repair or at its option replace with new used or equivalent model such defective product without charge for parts or labor How to Obtain Wa...

Page 156: ...dustrielle ou professionnelle 10 Toutes charges d installation ou de deplacement resultant d un defaut du produit Notre paiement Si votre produit DENON est reconnu defectueux par DENON durant Ia periode d application de Ia garantie apres Ia date d achat du consommateur DENON reparera ou ason choix remplacera avec un modele neuf usage ou equivalent ce produit ctefectueux sans frais de pieces ni de ...

Reviews: