background image

28 

  Setting up the monitor

Setting up the monitor

Connecting the stand - S2721Q

NOTE: The stand is not factory-installed.

NOTE: The following instructions are applicable only for attaching the 
stand that was shipped with your monitor. If you are attaching a stand 
that you purchased from any other source, follow the set up 
instructions that were included with the stand.

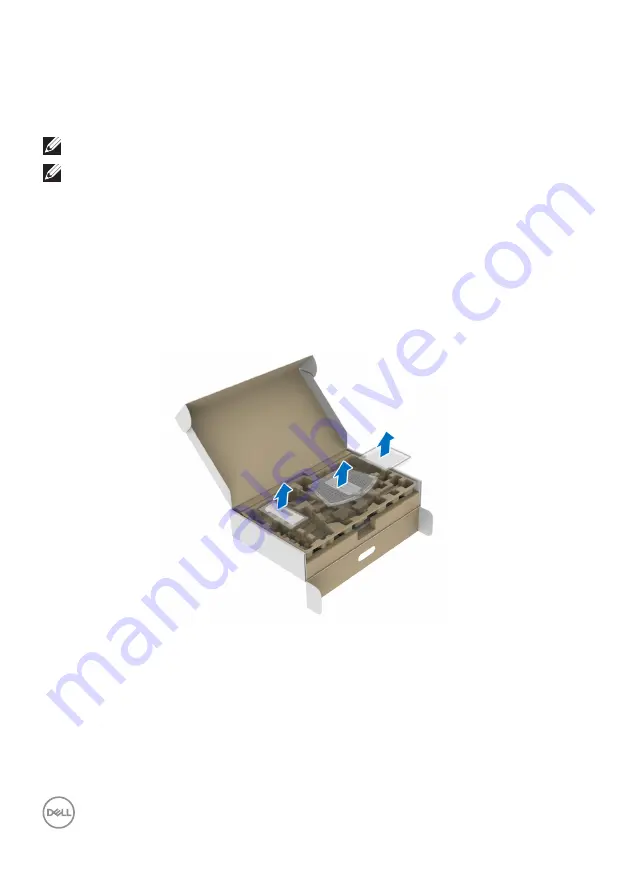
To attach the monitor stand:

1.

Follow the instructions on the flaps of packaging box to remove the stand 
from the top cushion that secures it.

2.

Remove the VESA cover, stand base, and stand riser from the packaging 
cushion.

Summary of Contents for S2721D

Page 1: ...Dell S2721Q S2721QS Monitor User s Guide Model S2721Q S2721QS Regulatory model S2721Qb ...

Page 2: ...r loss of data if instructions are not followed WARNING A WARNING indicates a potential for property damage personal injury or death Copyright 2020 Dell Inc or its subsidiaries All rights reserved Dell EMC and other trademarks are trademarks of Dell Inc or its subsidiaries Other trademarks may be trademarks of their respective owners 2020 08 Rev A00 ...

Page 3: ...s 16 Preset display modes 17 Electrical specifications 18 Physical characteristics 19 Environmental characteristics 20 Power management modes 21 Pin assignments 22 LCD monitor quality and pixel policy 24 Ergonomics 24 Handling and moving your display 26 Maintenance guidelines 27 Cleaning your monitor 27 Setting up the monitor 28 Connecting the stand S2721Q 28 Connecting the stand S2721QS 31 Connec...

Page 4: ...nitor 41 Using the front panel controls 41 Front panel button 42 Using the On Screen Display OSD menu 43 Accessing the menu system 43 OSD warning message 59 Setting the maximum resolution 62 Requirements to view or playback HDR content 63 Using the tilt swivel and vertical extension 64 Tilt 64 Swivel S2721QS only 64 Vertical extension S2721QS only 65 Rotating the display S2721QS only 65 Rotate clo...

Page 5: ... 5 Product specific problems 73 Speakers Specific Problems 74 Appendix 75 FCC notices U S only and other regulatory information 75 Contact Dell 75 ...

Page 6: ...ways be sure that your monitor is electrically rated to operate with the AC power available in your location Keep the monitor in room temperature Excessive cold or hot conditions can have an adverse effect on the liquid crystal of the display Do not subject the monitor to severe vibration or high impact conditions For example do not place the monitor inside a car trunk Unplug the monitor when it i...

Page 7: ...ee Contact Dell NOTE Some items may be optional and may not ship with your monitor Some features may not be available in certain countries NOTE If you are connecting a stand that you purchased from any other source follow the set up instructions that were included with the stand Component image Component description Display Stand riser a S2721Q b S2721QS Stand base a S2721Q b S2721QS ...

Page 8: ...8 About your monitor VESA screw cover S2721Q only Power cable varies by country HDMI cable Quick Setup Guide Safety Environmental and Regulatory Information ...

Page 9: ...een Display OSD adjustments for ease of set up and screen optimization Supports Picture by Picture PBP and Picture in Picture PIP Select mode NOTE When PIP PBP is activated AMD FreeSync in AMD Radeon software is disabled Power and OSD buttons lock Security lock slot 0 3 W in Standby mode Optimize eye comfort with a flicker free screen WARNING The possible long term effects of blue light emission f...

Page 10: ...tor Identifying parts and controls Front view S2721Q S2721QS Label Description Use 1 Function buttons For more information see Operating the monitor 2 Power On Off button with LED indicator To turn the monitor on or off ...

Page 11: ... S2721Q Back view with monitor stand S2721QS Back view with monitor stand Label Description Use 1 VESA mounting holes 100 mm x 100 mm behind attached VESA Cover Wall mount monitor using VESA compatible wall mount kit 100 mm x 100 mm ...

Page 12: ...e Tag is a unique alphanumeric identifier that enables Dell service technicians to identify the hardware components in your monitor and access warranty information 3 Stand release button Releases stand from the monitor 4 Regulatory label Lists the regulatory approvals 5 Cable management slot Use to organize cables by inserting them through the slot ...

Page 13: ...m view without monitor stand S2721QS Bottom view without monitor stand Label Description Use 1 Security lock slot Secures the monitor with security lock security lock not included 2 Power connector Connect the power cable shipped with your monitor ...

Page 14: ...ipped with your monitor 4 HDMI port HDMI 2 Connect your computer with the HDMI cable shipped with your monitor 5 DisplayPort Connect your computer with the DisplayPort cable 6 Line out port Connect your speakers NOTE This port does not support headphones 7 Speakers Provides audio output ...

Page 15: ...al Contrast ratio 1300 to 1 typical Faceplate coating Anti Glare treatment of the front polarizer Haze 25 3H Backlight White LED edgelight system Response time 8 ms gray to gray in Normal mode 5 ms gray to gray in Fast mode 4 ms gray to gray in Extreme mode The 4 ms gray to gray mode is achievable in the Extreme mode to reduce visible motion blur and increased image responsiveness However this may...

Page 16: ... Height adjustable stand 5 to 21 Not applicable Not applicable Not applicable 5 to 21 30 to 30 90 to 90 110 mm Built in speakers 2 x 3 W sound output Dell Display Manager compatibility Easy Arrange and other key features Security Security lock slot cable lock sold separately Model S2721Q S2721QS Horizontal scan range 130 kHz to 137 kHz automatic Vertical scan range 40 Hz to 60 Hz automatic Maximum...

Page 17: ...0 65 00 VESA 1024 x 768 60 00 75 00 78 80 VESA 1152 x 864 67 50 75 00 108 00 VESA 1280 x 1024 64 00 60 00 108 00 VESA 1280 x 1024 80 00 75 00 135 00 VESA 1600 x 900 60 00 60 00 108 00 VESA 1600 x 1200 75 00 60 00 162 00 VESA 1920 x 1080 67 50 60 00 148 50 2048 x 1280 78 90 59 90 174 30 2560 x 1440 88 79 59 95 241 50 3840 x 2160 135 60 594 Display mode Horizontal frequency kHz Vertical frequency Hz...

Page 18: ...00 x 900 60 00 60 00 108 00 VESA 1600 x 1200 75 00 60 00 162 00 VESA 1920 x 1080 67 50 60 00 148 50 2048 x 1280 78 90 59 90 174 30 2560 x 1440 88 79 59 95 241 50 3840 x 2160 133 313 60 533 25 Model S2721Q S2721QS Video input signals HDMI 2 0 DisplayPort 1 2 600 mV for each differential line 100 Ω input impedance per differential pair AC input voltage frequency current 100 VAC to 240 VAC 50 Hz or 6...

Page 19: ... not shipped with your Dell monitor Dimensions with stand Height 453 4 mm 17 85 in Extended 510 1 mm 20 08 in Compressed 400 1 mm 15 75 in Width 611 6 mm 24 08 in 611 6 mm 24 08 in Depth 186 8 mm 7 35 in 174 7 mm 6 88 in Dimensions without stand Height 364 6 mm 14 35 in 364 6 mm 14 35 in Width 611 6 mm 24 08 in 611 6 mm 24 08 in Depth 55 4 mm 2 18 in 55 4 mm 2 18 in Stand dimensions Height 176 0 m...

Page 20: ...ied displays BFR PVC reduced monitor excluding external cables Arsenic free glass and Mercury free for the panel only Temperature Operating 0 C to 40 C 32 F to 104 F Non operating Storage 20 C to 60 C 4 F to 140 F Shipping 20 C to 60 C 4 F to 140 F Humidity Operating 10 to 80 non condensing Non operating Storage 5 to 90 non condensing Shipping 5 to 90 non condensing Altitude Operating 5 000 m 16 4...

Page 21: ...software components and peripherals you ordered and shall have no obligation to update such information Accordingly the customer should not rely upon this information in making decisions about electrical tolerances or otherwise No warranty as to accuracy or completeness is expressed or implied VESA modes Horizontal sync Vertical sync Video Power indicator Power consumption Normal operation Active ...

Page 22: ...ned in Energy Star 8 0 version TEC Total energy consumption in kWh as defined in Energy Star 8 0 version Pin number 20 pin side of the connected signal cable 1 ML3 n 2 GND 3 ML3 p 4 ML2 n 5 GND 6 ML2 p 7 ML1 n 8 GND 9 ML1 p 10 ML0 n 11 GND 12 ML0 p 13 GND 14 GND 15 AUX p 16 GND 17 AUX n 18 Hot Plug Detect ...

Page 23: ...le 1 TMDS DATA 2 2 TMDS DATA 2 SHIELD 3 TMDS DATA 2 4 TMDS DATA 1 5 TMDS DATA 1 SHIELD 6 TMDS DATA 1 7 TMDS DATA 0 8 TMDS DATA 0 SHIELD 9 TMDS DATA 0 10 TMDS CLOCK 11 TMDS CLOCK SHIELD 12 TMDS CLOCK 13 CEC 14 Reserved N C on device 15 DDC CLOCK SCL 16 DDC DATA SDA 17 DDC CEC Ground 18 5 V POWER 19 HOT PLUG DETECT ...

Page 24: ...m back shoulder pain from using the monitor for long periods of time we suggest you to 1 Set the distance of the screen between 20 to 28 in 50 70 cm from your eyes 2 Blink frequently to moisten your eyes or wet your eyes with water after prolonged usage of the monitor 3 Take regular and frequent breaks for 20 minutes every two hours 4 Look away from your monitor and gaze at a distant object at 20 ...

Page 25: ...e a footrest if necessary to maintain a proper posture Vary your work activities Try to organize your work so that you do not have to sit and work for extended periods of time Try to stand or get up and walk around at regular intervals Keep the area under your desk clear of obstructions and cables or power cords that may interfere with comfortable seating or present a potential trip hazard monitor...

Page 26: ...all cables from the monitor Place the monitor in the original box with the original packing materials Hold the bottom edge and the side of the monitor firmly without applying excessive pressure when lifting or moving the monitor When lifting or moving the monitor ensure the screen is facing away from you and do not press on the display area to avoid any scratches or damage When transporting the mo...

Page 27: ...clean your anti static screen lightly dampen a soft clean cloth with water If possible use a special screen cleaning tissue or solution suitable for the anti static coating Do not use benzene thinner ammonia abrasive cleaners or compressed air Use a lightly dampened warm cloth to clean the monitor Avoid using detergent of any kind as some detergents leave a milky film on the monitor If you notice ...

Page 28: ...nd that was shipped with your monitor If you are attaching a stand that you purchased from any other source follow the set up instructions that were included with the stand To attach the monitor stand 1 Follow the instructions on the flaps of packaging box to remove the stand from the top cushion that secures it 2 Remove the VESA cover stand base and stand riser from the packaging cushion ...

Page 29: ... handle at the bottom of the stand base and turn it clockwise to secure the stand assembly 5 Close the screw handle 6 Open the protective cover to access the VESA slot on the display 7 Align and insert the stand assembly bracket into the groove on the back of the display until it locks in place ...

Page 30: ...30 Setting up the monitor 8 Install the VESA screw cover 9 Place the monitor in an upright position and lift the protective cover from the monitor ...

Page 31: ...her source follow the set up instructions that were included with the stand To attach the monitor stand 1 Follow the instructions on the flaps of packaging box to remove the stand from the top cushion that secures it 2 Remove the stand base and stand riser from the packaging cushion 3 Align and place the stand riser on the stand base 4 Open the screw handle at the bottom of the stand base and turn...

Page 32: ...r 6 Open the protective cover to access the VESA slot on the display 7 Attach the stand assembly to the display a Align and slide the tabs on the stand riser into the VESA slot b Press the stand down until it snaps into place ...

Page 33: ...iser with both hands firmly and lift the monitor Then place the monitor in an upright position on a flat surface NOTE Hold the stand riser firmly when lifting the monitor to avoid any accidental damage 9 Lift the protective cover from the monitor ...

Page 34: ... when using non Dell cables NOTE Route the cables through the cable management slot before connecting them NOTE Do not connect all cables to the computer at the same time NOTE The images are for the purpose of illustration only Appearance of the computer may vary To connect your monitor to the computer 1 Turn Off your computer and disconnect the power cable 2 Connect the HDMI or DisplayPort cable ...

Page 35: ...yPort DP to DP cable optional and power cable S2721Q S2721QS Organizing your cables After attaching all necessary cables to your monitor and computer See Connecting your monitor for cable attachment organize all cables as shown above S2721Q S2721QS ...

Page 36: ...36 Setting up the monitor Turning on your monitor S2721Q S2721QS ...

Page 37: ...of the monitor See Security lock slot For more information on using the Kensington lock purchased separately see the documentation that is shipped with the lock Secure your monitor to a table using the Kensington security lock S2721Q S2721QS NOTE The image is for the purpose of illustration only Appearance of the lock may vary ...

Page 38: ...shipped with your monitor If you are removing a stand that you purchased from any other source follow the set up instructions that were included with the stand To remove the stand 1 Place the monitor on a soft cloth or cushion 2 Press the dimple on the VESA cover to release it from the back of the display 3 Using a long screwdriver push the release latch located in the gap just above the stand 4 O...

Page 39: ...ructions are applicable only for removing the stand that was shipped with your monitor If you are removing a stand that you purchased from any other source follow the set up instructions that were included with the stand To remove the stand 1 Place the monitor on a soft cloth or cushion 2 Press and hold the stand release button at the back of the display 3 Lift the stand assembly up and away from ...

Page 40: ...ving the monitor stand S2721Q and Removing the monitor stand S2721QS 3 Using a Phillips screwdriver remove the four screws that secure the display back cover 4 Install the mounting bracket from the wall mounting kit to the display 5 Mount the monitor on the wall For more information see the documentation that shipped with the wall mounting kit NOTE For use only with UL or CSA or GS listed wall mou...

Page 41: ...t panel controls Use the control buttons on the front of the monitor to adjust settings The following table describes the front panel buttons Front panel button Description 1 Shortcut key Preset Modes Use this button to choose from a list of preset color modes 2 Shortcut key Volume To directly access the Volume adjustment slider ...

Page 42: ...h power light indicator Use the Power button to turn the monitor On and Off The white light indicates the monitor is On and fully functional A breathing white light indicates Standby mode Front panel button Description 1 Up Use the Up button to adjust increase ranges items in the OSD menu 2 Down Use the Down button to adjust decrease ranges items in the OSD menu 3 OK Use the OK button to confirm y...

Page 43: ...tween the setting options As you move from one icon to another the option name is highlighted See the following table for a complete list of all the options available for the monitor 3 Press the or or button once to activate the highlighted option NOTE The directional buttons and the OK button displayed may differ according to the menu you ve selected Use available buttons to make your selection 4...

Page 44: ... to decrease the brightness min 0 max 100 NOTE Manual adjustment of Brightness is disabled when Smart HDR is activated and HDR content is displayed Contrast Adjusts the Brightness first and then adjust the Contrast only if further adjustment is necessary Press the button to increase the contrast and press the button to decrease the contrast min 0 max 100 The Contrast function adjusts the degree of...

Page 45: ...ess the button to confirm the selection HDMI 1 Select the HDMI 1 input when you are using the HDMI connector Press the button to confirm the selection HDMI 2 Select the HDMI 2 input when you are using the HDMI connector Press the button to confirm the selection Auto Select Turning on the function allows you to scan for available input sources Reset Input Source Resets your monitor input settings t...

Page 46: ...ing the monitor Color Use Color to adjust the color setting mode Preset Modes Allows you to choose a preset mode from the list Standard Loads the monitor s default color settings This is the default preset mode ...

Page 47: ...shoulder For more information see Ergonomics Movie Loads color settings ideal for movies FPS Loads color settings ideal for First Person Shooter FPS games RTS Loads color settings ideal for Real Time Strategy RTS games RPG Loads color settings ideal for Role Playing Games RPG Warm Presents colors at lower color temperatures The screen appears warmer with a red yellow tint Cool Presents colors at h...

Page 48: ...eature can shift the color of the video image to green or purple This is used to adjust the desired flesh tone color Use or to adjust the hue from 0 to 100 NOTE Hue adjustment is available only when you select Movie FPS RTS or RPG preset mode Saturation This feature can adjust the color saturation of the video image Use or to adjust the saturation from 0 to 100 NOTE Saturation adjustment is availa...

Page 49: ...ure can make the image look sharper or softer Use or to adjust the sharpness from 0 to 100 Response Time Allows you to set the Response Time to Normal Fast or Extreme Dark Stabilizer The feature improves the visibility in the dark gaming scenarios The higher the value between 0 to 3 the better visibility in dark area of the display image NOTE The feature is disabled when Smart HDR or PIP PBP is ac...

Page 50: ...set the Smart HDR mode to Movie HDR Suitable for the playback of HDR video content Game HDR Suitable for playing HDR compatible games It displays more realistic scenes and makes the gaming experience immersive and entertaining NOTE When the monitor is processing HDR content Preset Modes and Brightness will be disabled NOTE The feature is disabled when PIP PBP is activated Reset Display Resets all ...

Page 51: ... PBP This function brings up a window displaying image from another input source NOTE The images under PBP mode will be displayed at the center of the split windows X X X X Sub Window Main Window DP DP HDMI 1 HDMI 1 HDMI 2 HDMI 2 ...

Page 52: ... disable this feature by selecting Off PIP PBP Sub Select between the different video signals that may be connected to your monitor for the PIP PBP sub window Press the button to confirm the selection PIP Size Adjusts the PIP sub window size NOTE The option is available only when the PIP mode is activated I II I II PIP PBP ...

Page 53: ...ow and sub window in PIP PBP mode Press the button to confirm the selection Audio Allows you to set the audio source from the main window or the sub window Contrast Sub Adjust the contrast level of the picture in PIP PBP mode Use to increase the contrast and use to decrease the contrast Audio Volume Allows you to set the volume level of speakers Use or to adjust the volume level from 0 to 100 Spea...

Page 54: ...lay to one of the eight languages English Spanish French German Brazilian Portuguese Russian Simplified Chinese or Japanese Transparency Select this option to change the menu transparency by pressing the and buttons min 0 max 100 Timer Sets the length of time the OSD will remain active after the last time you pressed a button Use or to adjust the slider in 1 second increments from 5 to 60 seconds ...

Page 55: ...nly the Power button is locked and not accessible by the user Menu Power Buttons Both the Menu function Power buttons are locked and not accessible by the user The default setting is Disable Alternative Lock Method for Menu function buttons You can also press and hold the Menu function button next to the Power button for 4 seconds to set the lock options NOTE To unlock the button s press and hold ...

Page 56: ... 2 Power Button LED Allows you to set the power LED indicator on or off to save energy Fast Wakeup The default setting is Off Selecting On may prevent the monitor from going into Standby mode Pressing any button except the button on the front panel of the monitor may also wake up the monitor after it goes into Standby mode Reset Personalization Resets all settings under the Personalize menu to the...

Page 57: ...splays the monitor s current settings DDC CI DDC CI Display Data Channel Command Interface allows your monitor parameters brightness color balance and etc to be adjustable via the software on your computer You can disable this feature by selecting Off Enable this feature for best user experience and optimum performance of your monitor ...

Page 58: ... by selecting On Service Tag Displays the service tag of your monitor This string is required when you look for phone support check your warranty status update drivers on Dell s website etc Reset Others Resets all settings under the Others menu to the factory preset values Factory Reset Restore all preset values to the factory default settings These are also the settings for ENERGY STAR tests ...

Page 59: ...hat it is receiving from the computer See Monitor specifications for the Horizontal and Vertical frequency ranges addressable by this monitor Recommended mode is 3840 x 2160 NOTE The message may be slightly different according to the connected input signal You will see the following message before the DDC CI function is disabled You will see the following message before the Fast Wakeup function is...

Page 60: ...d wake up the monitor to gain access to the OSD NOTE The message may be slightly different according to the connected input signal The OSD functions only in the normal operation mode If you press any button other than the power button during the Standby mode the following message will appear depending on the selected input Activate the computer and the monitor to gain access to the OSD NOTE The me...

Page 61: ...If either HDMI or DisplayPort input is selected and the corresponding cable is not connected a floating dialog box as shown below appears NOTE The message may be slightly different according to the connected input signal When Factory Reset is selected the following message appears See Troubleshooting for more information ...

Page 62: ...ings 2 Click Advanced display settings 3 Click the dropdown list of Resolution and select 3840 x 2160 4 Click Apply If you do not see 3840 x 2160 as an option you may need to update your graphics driver Depending on your computer complete one of the following procedures If you have a Dell desktop or portable computer Go to https www dell com support enter your service tag and download the latest d...

Page 63: ...e www nvidia com Ensure to download driver that supports Full Screen Playback mode e g PC games UltraBluRay players HDR on Win 10 Redstone 2 OS 381 65 or later AMD For a full range of HDR capable AMD graphics cards see www amd com Read the HDR driver support information and download the latest driver Intel Integrated Graphics HDR capable processor CannonLake or later Suitable HDR player Windows 10...

Page 64: ...ped with your monitor If you are attaching a stand that you purchased from any other source follow the set up instructions that were included with the stand With the stand attached to the monitor you can adjust the monitor for the most comfortable viewing angle Tilt NOTE The stand is not installed at the factory when shipped Swivel S2721QS only S2721Q S2721QS ...

Page 65: ...xtends vertically up to 110 mm The figure below illustrates how to extend the stand vertically Rotating the display S2721QS only Before you rotate the display ensure it is completely extended vertically and completely tilted up to avoid hitting the bottom edge of the monitor ...

Page 66: ...ell computer you require an updated graphics driver that is not included with this monitor To download the graphics driver go to www dell com support and see the Download section for Video Drivers for latest driver updates NOTE In the Portrait mode you may experience performance degradation when using graphic intensive applications such as 3D gaming ...

Page 67: ...y Settings 1 Right click on the desktop and click Properties 2 Select the Settings tab and click Advanced 3 If you have an ATI graphics card select the Rotation tab and set the preferred rotation 4 If you have an NVIDIA graphics card click the NVIDIA tab in the left hand column select NVRotate and then select the preferred rotation 5 If you have an Intel graphics card select the Intel graphics tab...

Page 68: ...t by performing the following steps 1 Turn Off both your computer and the monitor 2 Unplug the video cable from the computer 3 Turn On the monitor The floating dialog box should appear on screen against a black background if the monitor cannot sense a video signal and is working correctly While in self test mode the power LED remains white Also depending upon the selected input one of the dialogs ...

Page 69: ...lem with your monitor or with your computer and video card To run the built in diagnostics 1 Ensure that the screen is clean no dust particles on the surface of the screen 2 Press and hold Button 4 for about 4 seconds until a pop menu appears 3 Use Button 1 or Button 2 to select the diagnostic tool and use Button 3 to confirm A gray test pattern appears at the beginning of the diagnostic program 4...

Page 70: ...at the correct input source is selected in the Input Source menu No Video Power LED on No picture or no brightness Increase brightness contrast controls via OSD Perform monitor self test feature check Check for bent or broken pins in the video cable connector Run the built in diagnostics Ensure that the correct input source is selected in the Input Source menu Poor Focus Picture is fuzzy blurry or...

Page 71: ...icy see Dell support site at www dell com pixelguidelines Brightness Problems Picture too dim or too bright Reset the monitor to factory settings Adjust brightness contrast controls via OSD Geometric Distortion Screen not centered correctly Reset the monitor to factory settings Adjust horizontal vertical controls via OSD When using HDMI DisplayPort input the positioning adjustments are not availab...

Page 72: ...re that the video cable connecting the monitor to the computer is connected properly and is secure Reset the monitor to factory settings Perform monitor self test feature check to determine if the intermittent problem occurs in self test mode Missing Color Picture missing color Perform monitor self test feature check Ensure that the video cable connecting the monitor to the computer is connected p...

Page 73: ...e buttons on the front panel OSD does not appear on the screen Turn Off the monitor unplug the power cord plug it back and then turn On the monitor The OSD menu may be locked Press and hold the Menu function button next to the Power button for 4 seconds to unlock for more information see Lock No Input Signal when user controls are pressed No picture the LED light is white Check the signal source E...

Page 74: ...from the speakers Cannot hear any sound Turn Off the monitor unplug the monitor power cord replug it and then turn On the monitor Check the audio cable connection is connected correctly to the audio line out port of the computer Unplug the audio cable from the audio line out port Reset the monitor to factory settings ...

Page 75: ...latory information see the regulatory compliance website located at www dell com regulatory_compliance Contact Dell For customers in the United States call 800 WWW DELL 800 999 3355 NOTE If you do not have an active Internet connection you can find contact information on your purchase invoice packing slip bill or Dell product catalog Dell provides several online and telephone based support and ser...

Page 76: ......

Page 77: ......

Reviews: