


Removing a hard drive or SSD
Prerequisites
CAUTION: Many repairs may only be done by a certified service technician. You should only
perform troubleshooting and simple repairs as authorized in your product documentation, or as
directed by the online or telephone service and support team. Damage due to servicing that is
not authorized by Dell is not covered by your warranty. Read and follow the safety instructions
that came with the product.
1.
Follow the safety guidelines listed in the Safety instructions section.
2.
Follow the procedure listed in the Before working inside your system section.Follow the procedure
listed in the Before working inside your system section.
3.
Take the hard drive or SSD offline and wait until the hard drive or SSD indicator codes on the drive
carrier stop blinking.
When all indicators stop blinking, the drive is ready for removal. See your operating system
documentation for more information about taking the hard drive or SSD offline.
NOTE: All operating systems do not support hot-swappable drive installation. See the
documentation supplied with your operating system.
Steps
1.
Press the release button to open the hard drive or SSD carrier handle.
2.
Slide the hard drive or SSD carrier out until it is free of the hard drive or SSD slot.
3.
Slide the hard drive or SSD out until it is free of the hard drive or SSD bay.
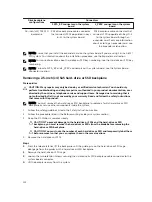
Figure 40. Removing a hard drive
1.
release button
2.
hard drive or SSD connector (on backplane)
3.
hard drive or SSD
4.
hard drive or SSD carrier handle
108