background image

Installing System Options

75

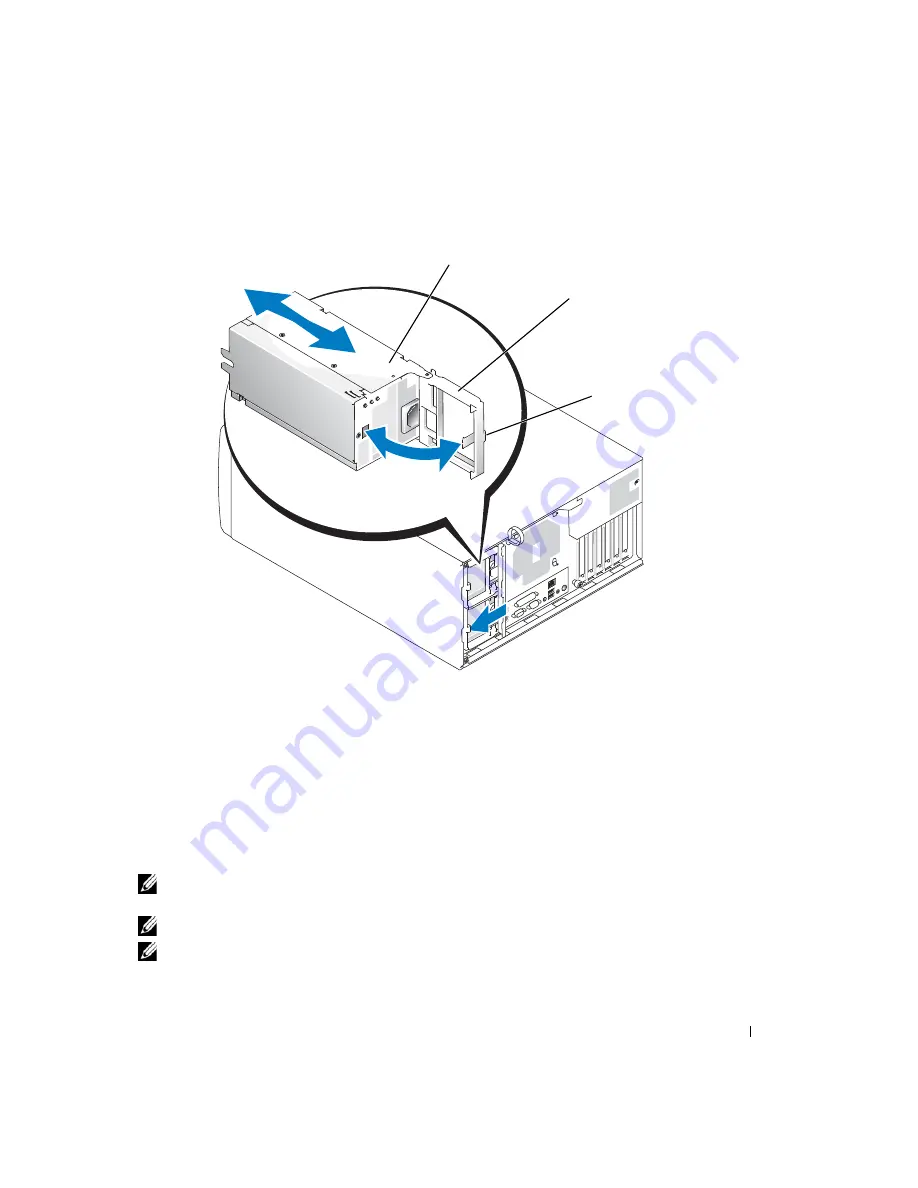
Figure 6-2.

Removing and Installing an Optional Redundant Power Supply

Expansion Cards

The system includes six expansion slots, configured as follows:

Slot 1 is PCI 64-bit, 66-MHz (3.3 V).

Slot 2 is PCI Express x4 lane (3.3 V).

Slot 3 is PCI Express x8 lane (3.3 V).

Slot 4 is PCI 32-bit, 33-MHz (5 V).

Slots 5 and 6 are PCI-X 64-bit, 100-MHz (3.3 V).


NOTE: 

Although the PCIe x4-lane expansion slot is physically a PCIe x8 connector, it functions only as a 

PCIe x4-lane slot. 


NOTE: 

The PCI and PCI-X slots can accommodate slower-rated expansion cards of the same type. 


NOTE: 

The PCIe slots do not accommodate PCI-X or PCI cards and the PCI-X and PCI slots do not 

accommodate PCIe cards.

power supply

power supply handle

spring tab

Summary of Contents for PowerEdge 1800

Page 1: ...w w w d e l l c o m s u p p o r t d e l l c o m Dell PowerEdge 1800 Systems Installation and Troubleshooting Guide ...

Page 2: ...notice 2009 Dell Inc All rights reserved Reproduction in any manner whatsoever without the written permission of Dell Inc is strictly forbidden Trademarks used in this text Dell the DELL logo PowerEdge PowerConnect PowerVault Axim Dell OpenManage DellNet Dell Precision Dimension Inspiron OptiPlex and Latitude are trademarks of Dell Inc Intel is a registered trademark of Intel Corporation MS DOS is...

Page 3: ... Features 16 Power Indicator Codes 17 SCSI Hard Drive Indicator Codes 18 NIC Indicator Codes 20 System Messages 20 System Beep Codes 29 Warning Messages 31 Diagnostics Messages 32 Alert Messages 32 3 Finding Software Solutions Before You Begin 33 Troubleshooting Errors and Conflicts 33 Input Errors 34 Application Conflicts 34 IRQ Assignment Conflicts 34 4 Running System Diagnostics Using Server Ad...

Page 4: ...rt Up Routine 41 Checking the Equipment 42 Troubleshooting External Connections 42 Troubleshooting the Video Subsystem 42 Troubleshooting the Keyboard 42 Troubleshooting the Mouse 43 Troubleshooting Basic I O Functions 43 Troubleshooting a Serial I O Device 44 Troubleshooting a USB Device 44 Troubleshooting a NIC 45 Responding to a Systems Management Software Alert Message 46 Inside the System 46 ...

Page 5: ...an External SCSI Tape Drive 62 Troubleshooting SCSI Hard Drives 63 Troubleshooting a SCSI Hard Drive System With a SCSI Backplane 63 Troubleshooting SATA Hard Drives 64 Troubleshooting a SATA Hard Drive 64 Troubleshooting a SATA Hard Drive in a RAID Configuration 65 Troubleshooting a RAID Controller Card 66 Troubleshooting Expansion Cards 67 Troubleshooting the Microprocessors 68 6 Installing Syst...

Page 6: ...nnecting Drives 91 Interface Cables 91 Drive Cable Configurations 91 DC Power Cables 92 IDE Configuration Information 93 SATA Configuration Information 93 SCSI Configuration Information 93 SCSI Interface Cables 93 SCSI ID Numbers 93 Device Termination 94 Configuring the Boot Drive 94 Diskette Drive 94 Removing a Diskette Drive 94 Installing a Diskette Drive 95 Front Panel Drive Inserts 96 Removing...

Page 7: ...Service 118 Technical Support Service 119 Dell Enterprise Training and Certification 119 Problems With Your Order 119 Product Information 119 Returning Items for Warranty Repair or Credit 119 Before You Call 120 Contacting Dell 122 A Jumpers Switches and Connectors Jumpers A General Explanation 139 Jumpers 139 System Board Jumpers 140 System Board Connectors 141 Disabling a Forgotten Password 142 ...

Page 8: ...Contents Parallel Connector 147 PS 2 Compatible Keyboard and Mouse Connectors 148 Video Connector 149 USB Connector 150 Integrated NIC Connector 150 Network Cable Requirements 151 Index 153 Figures Tables ...

Page 9: ...on Warranty information may be included within this document or as a separate document The Rack Installation Guide or Rack Installation Instructions included with your rack solution describes how to install your system into a rack The Getting Started Guide provides an overview of initially setting up your system The User s Guide provides information about system features and technical specificatio...

Page 10: ...er documents Release notes or readme files may be included to provide last minute updates to the system or documentation or advanced technical reference material intended for experienced users or technicians Obtaining Technical Assistance If at any time you do not understand a procedure described in this guide or if your system does not perform as expected a number of tools are provided to help yo...

Page 11: ...properly System indicators System messages Beep codes Warning messages Diagnostics messages Alert messages This section describes each type of message lists the possible causes and provides steps to resolve any problems indicated by a message The system indicators and features are illustrated in this section Figure 2 1 Tower and Rack Mount Orientations tower version with standard bezel rack versio...

Page 12: ...when the system is operating correctly The amber indicator lights up when the system needs attention due to a problem with power supplies fans system temperature or SCSI hard drives Table 2 1 lists the system s indicator patterns Different patterns are displayed as events occur in the system Table 2 1 System Status Indicator Patterns Blue indicator Amber Indicator Description Off Off Power is not ...

Page 13: ...tton or Connector Icon Description Blue system status indicator The blue system status indicator lights up during normal system operation Both the systems management software and the identification buttons located on the front and back of the system can cause the blue system status indicator to flash to identify a particular system Amber system status indicator The amber system status indicator fl...

Page 14: ...ned off immediately after the power button is pressed System identification button The identification buttons on the front and back panels can be used to locate a particular system within a rack When one of these buttons is pushed the blue system status indicator on the front and back blinks until one of the buttons is pushed again USB connectors Connects USB 2 0 compliant devices to the system NM...

Page 15: ...re 2 4 System With SCSI Hard Drives CD drive or optional data only DVD or combination drive diskette drive peripheral bay up to six SATA hard drives behind faceplate up to six SCSI hard drives CD drive or optional data only DVD or combination drive diskette drive peripheral bay ...

Page 16: ...k panel features Figure 2 5 Back Panel Features PS 2 mouse connector PS 2 keyboard connector USB connectors 2 serial connector NIC connector expansion slots 6 parallel connector video connector power cable strain relief loop Kensington lock system status indicator connector system status indicators system identification button optional redundant power supply PS1 optional redundant power supply PS2...

Page 17: ...to the system System status indicator connector Connects to an indicator that can signify when the system is operating correctly or when the system needs attention See Front Panel Indicators and Features USB connectors 2 Connects USB 2 0 compliant devices to the system NIC indicators Provide information on NIC status See NIC Indicator Codes System identification button Locates a particular system ...

Page 18: ...on on the status of the respective SCSI hard drive NOTE Hard drive indicator codes are not available on SATA hard drives Table 2 5 Redundant Power Supply Indicators Indicator Function Power supply status Green indicates that the power supply is operational Power supply fault Amber indicates a problem with the power supply AC line status Green indicates that a valid AC source is connected to the po...

Page 19: ...for operation drive online code appears The drive busy indicator signifies whether the hard drive is active on the SCSI bus The indicator is controlled by the hard drive Table 2 6 SCSI Hard Drive Status Indicator Codes Drive Status Indicator Indicator Code Drive bay empty Off Drive being prepared for operation drive online Steady green Drive being identified or prepared for removal Blinks green th...

Page 20: ...rtified service technician You should only perform troubleshooting and simple repairs as authorized in your product documentation or as directed by the online or telephone service and support team Damage due to servicing that is not authorized by Dell is not covered by your warranty Read and follow the safety instructions that came with the product Table 2 7 NIC Indicator Codes Indicator Indicator...

Page 21: ... the System Setup program See Using the System Setup program in the User s Guide If the system has a CD drive ensure that it is properly connected See Troubleshooting a CD Drive in Troubleshooting Your System CPUs with different cache sizes detected Microprocessors with different cache sizes are installed Ensure that all microprocessors have the same cache size and that they are properly installed...

Page 22: ...3_B Dual rank memory modules are installed in memory slots DIMM3_A and DIMM3_B These memory slots do not support dual rank memory modules Remove the memory modules from slots DIMM3_A and DIMM3_B See General Memory Module Installation Guidelines in Installing System Components Error Incorrect memory configuration Memory slots DIMM3_A and DIMM3_B must be empty if Dual Rank memory DIMMs are in slots ...

Page 23: ... Setup program improperly installed hard drive or loose interface or power cable faulty hard drive controller subsystem Run the System Setup program to correct the drive type See Using the System Setup Program in the User s Guide If the problem persists see Troubleshooting SCSI Hard Drives and Troubleshooting SATA Hard Drives in Troubleshooting Your System Hard disk read failure I O parity interru...

Page 24: ...See Getting Help Keyboard clock line failure Loose or improperly connected keyboard cable faulty keyboard faulty keyboard controller See Troubleshooting the Keyboard in Troubleshooting Your System Keyboard data line failure Keyboard failure Keyboard stuck key failure Memory address line failure at address read value expecting value Faulty or improperly installed memory modules See Troubleshooting ...

Page 25: ...ngs in the System Setup program See Using the System Setup Program in the User s Guide No PXE capable device available F12 pressed during POST and no PXE devices are detected Check the configuration settings in the System Setup program for the NICs See Using the System Setup Program in the User s Guide If the problem persists see Troubleshooting a NIC in Troubleshooting Your System No timer tick i...

Page 26: ...em board See Getting Help PCIe Training Error Slot n Faulty or improperly installed PCIe card in the specified slot number Reseat the PCIe card in the specified slot number See Expansion Cards If the problem persists see Getting Help Plug Play Configuration Error Embedded xxx Error encountered in initializing PCI device faulty system board Install the NVRAM_CLR jumper and reboot the system See Fig...

Page 27: ...plicable to this system System backplane error Faulty or improperly installed SCSI backplane board This message is not applicable to this system System halted Must power down Wrong password entered too many times Information only The amount of system memory has changed Memory has been added or removed or a memory module may be faulty If memory has been added or removed this message is informative ...

Page 28: ... is not installed Specified microprocessor VRM is faulty unsupported improperly installed or missing This message is not applicable to this system Warning Detected mode change from RAID to SCSI x of the embedded RAID subsystem Type of controller has changed from optional RAID when available to SCSI since previous system boot This message is not applicable to this system Warning Detected mode chang...

Page 29: ...or Update the BIOS firmware See Getting Help Write fault Faulty diskette CD diskette drive assembly hard drive or hard drive subsystem See Troubleshooting a Diskette Drive Troubleshooting a CD Drive Troubleshooting SCSI Hard Drives and Troubleshooting SATA Hard Drives in Troubleshooting Your System Write fault on selected drive NOTE For the full name of an abbreviation or acronym used in this tabl...

Page 30: ... Address line failure in the first 64 KB of main memory 1 4 2 Parity failure in the first 64 KB of main memory 1 4 3 Fail safe timer test failure 1 4 4 Software NMI port test failure 2 1 1 through 2 4 4 Bit failure in the first 64 KB of main memory 3 1 1 Slave DMA register failure See Getting Help 3 1 2 Master DMA register failure 3 1 3 Master interrupt mask register failure 3 1 4 Slave interrupt ...

Page 31: ...tion failure 3 4 2 Screen retrace test failure 3 4 3 Video ROM search failure 4 2 1 No timer tick 4 2 2 Shutdown test failure 4 2 3 Gate A20 failure 4 2 4 Unexpected interrupt in protected mode See Troubleshooting Expansion Cards in Troubleshooting Your System 4 3 1 Improperly installed or faulty memory modules See Troubleshooting System Memory in Troubleshooting Your System 4 3 2 No memory module...

Page 32: ...rd the message on a copy of the Diagnostics Checklist in Getting Help and then follow the instructions in that section for obtaining technical assistance Alert Messages Systems management software generates alert messages for your system Alert messages include information status warning and failure messages for drive temperature fan and power conditions For more information see the systems managem...

Page 33: ...m diagnostic tests complete successfully then the problem is most likely caused by the software and not the hardware Before You Begin Scan the software media with antivirus software Read the software documentation before you run the installation utility Be prepared to respond to prompts from the installation utility The installation utility may require you to enter information about your system su...

Page 34: ...ure the operating system you may need to reinstall or reconfigure a software application so that it can run properly in its new environment Application Conflicts Some applications can leave unnecessary files or data behind after they are deleted from your system Device drivers can also create application errors If application errors occur see your application device driver or operating system docu...

Page 35: ...IRQ11 Available IRQ12 PS 2 mouse port unless the mouse is disabled through the System Setup program IRQ13 Math coprocessor IRQ14 IDE CD drive controller IRQ15 Available Table 3 1 IRQ Assignment Defaults continued IRQ Line Assignment ...

Page 36: ...36 Finding Software Solutions w w w d e l l c o m s u p p o r t d e l l c o m ...

Page 37: ...stics log into the Server Administrator home page and then click the Diagnostics tab For information about using diagnostics see the online help For additional information see the Server Administrator User s Guide System Diagnostics Features The system diagnostics provides a series of menus and options for particular device groups or devices The system diagnostics menus and options allow you to Ru...

Page 38: ...tion 1 As the system boots press F10 during POST 2 From the utility partition s main menu select the Run System Diagnostics option From the Diagnostics Diskettes 1 Create a set of diagnostics diskettes from the Dell OpenManage Server Assistant CD See Using the Dell OpenManage Server Assistant CD in your User s Guide for information on creating the diskettes 2 Insert the first diagnostics diskette ...

Page 39: ...two lines at the bottom of the screen The first line lists the menu options that you can select press the left or right arrow key to highlight an option The second line provides information about the highlighted option For more information about a device group or device highlight the Help option and press Enter Press Esc to return to the previous screen Table 4 1 System Diagnostics Testing Options...

Page 40: ...c o m Error Messages When you run a system diagnostics test you may receive an error message during testing Record the message on a copy of the Diagnostics Checklist For a copy of the Diagnostics Checklist and instructions for obtaining technical assistance see Getting Help ...

Page 41: ...ystem s start up routine for the indications described in Table 5 1 Table 5 1 Start Up Routine Indications Look listen for Action An error message displayed on the monitor See System Messages in Indicators Codes and Messages A series of beeps emitted by the system See System Beep Codes in Indicators Codes and Messages Alert messages from the systems management software See the systems management s...

Page 42: ...m See Figure 2 5 for the back panel connectors on your system Troubleshooting the Video Subsystem Problem Monitor is not working properly Video memory is faulty Action 1 Check the system and power connections to the monitor 2 Run the appropriate online diagnostic test See Using Server Administrator Diagnostics in Running System Diagnostics If the tests run successfully the problem is not related t...

Page 43: ...to the next step 3 Swap the faulty mouse with a working mouse If the problem is resolved replace the faulty mouse See Getting Help 4 Enter the System Setup program and ensure that the mouse controller is enabled See Using the System Setup Program in your User s Guide If the problem is not resolved see Getting Help Troubleshooting Basic I O Functions Problem Error message indicates a problem with a...

Page 44: ...al device and swap the device with a comparable device 4 Turn on the system and the serial device If the problem is resolved replace the serial device See Getting Help If the problem persists see Getting Help Troubleshooting a USB Device Problem System message indicates a problem with a USB device Device connected to a USB port is not operating properly Action 1 Enter the System Setup program and ...

Page 45: ...tor does not light the network driver files might be damaged or missing Remove and reinstall the drivers if applicable See the NIC s documentation Change the autonegotiation setting if possible Use another connector on the switch or hub If you are using a NIC card instead of an integrated NIC see the documentation for the NIC card 3 Ensure that the appropriate drivers are installed and the protoco...

Page 46: ...ert Log window see the systems management software documentation Inside the System CAUTION Many repairs may only be done by a certified service technician You should only perform troubleshooting and simple repairs as authorized in your product documentation or as directed by the online or telephone service and support team Damage due to servicing that is not authorized by Dell is not covered by yo...

Page 47: ...n slot is physically a PCIe x8 connector it functions only as a PCIe x4 lane slot The system supports a 3 5 inch diskette drive and up to two externally accessible 5 25 inch drives such as CD data only DVD or half height tape drives The hard drive bays support the following hard drive configurations Up to two non hot plug SATA hard drives when the hard drives are connected to the system board SATA...

Page 48: ... ready SCSI hard drives when the optional SCSI hard drive cage is installed NOTE SCSI hot plug functionality is available only when SCSI RAID is used See the SCSI RAID controller s documentation to verify that its configuration supports hot plug SCSI hard drives During an installation or troubleshooting procedure you may be required to change a jumper setting For more information see Jumpers Switc...

Page 49: ...by the online or telephone service and support team Damage due to servicing that is not authorized by Dell is not covered by your warranty Read and follow the safety instructions that came with the product 1 Using the system key unlock the front bezel See Figure 5 2 Figure 5 2 Removing the Bezel 2 Slide the latch down and pull the right edge of the bezel away from the front panel See Figure 5 2 3 ...

Page 50: ... system s bezel hold the bezel s left side so that the inside bezel tabs remain properly engaged in the front panel bezel slots 2 Using the system key lock the bezel Stabilizing the Tower System CAUTION The tower system has four stabilizer feet on its bottom panel that can be rotated outward to help properly stabilize the system Ensure that the four stabilizer feet are rotated outward before you o...

Page 51: ... support team Damage due to servicing that is not authorized by Dell is not covered by your warranty Read and follow the safety instructions that came with the product 1 Remove the bezel See Removing the Bezel 2 If your system is a tower lay it on its right side 3 Loosen the three thumbscrews on the left side cover See Figure 5 4 4 Grasp the cover at both ends and slide it toward the front of the ...

Page 52: ...orm troubleshooting and simple repairs as authorized in your product documentation or as directed by the online or telephone service and support team Damage due to servicing that is not authorized by Dell is not covered by your warranty Read and follow the safety instructions that came with the product The vertical plastic baffle back fan assembly in the center of the system improves system coolin...

Page 53: ...ell is not covered by your warranty Read and follow the safety instructions that came with the product To remove the baffle back fan assembly perform the following steps 1 Press the release tab at the front of the assembly and the release tab at the back of the assembly 2 Slightly lift up the baffle back fan assembly and disconnect the back fan assembly cable from the system board See Figure A 3 f...

Page 54: ...ne service and support team Damage due to servicing that is not authorized by Dell is not covered by your warranty Read and follow the safety instructions that came with the product 1 Turn off the system and attached peripherals and disconnect the system from the electrical outlet 2 Open the system See Opening the System 3 Remove all expansion cards installed in the system See Removing an Expansio...

Page 55: ... tests in the system diagnostics See Running System Diagnostics If the tests fail see the appropriate section in this chapter Troubleshooting the System Battery Problem System message indicates a problem with the battery System Setup program loses system configuration information System date and time do not remain current NOTE If the system is turned off for long periods of time for weeks or month...

Page 56: ... Damage due to servicing that is not authorized by Dell is not covered by your warranty Read and follow the safety instructions that came with the product 1 Run the appropriate online diagnostics test See Using Server Administrator Diagnostics in Running the System Diagnostics 2 Locate the faulty power supply The power supply s fault indicator is lit See Power Indicator Codes in Indicators Codes a...

Page 57: ...tified service technician You should only perform troubleshooting and simple repairs as authorized in your product documentation or as directed by the online or telephone service and support team Damage due to servicing that is not authorized by Dell is not covered by your warranty Read and follow the safety instructions that came with the product Ensure that none of the following conditions exist...

Page 58: ...em Options If the replacement fan is working properly close the system See Closing the System If the replacement fan does not operate see Getting Help Troubleshooting System Memory Problem Faulty memory module Faulty system board Action CAUTION Many repairs may only be done by a certified service technician You should only perform troubleshooting and simple repairs as authorized in your product do...

Page 59: ... and attached peripherals and disconnect the system from its electrical outlet b Open the system See Opening the System c Remove the baffle back fan assembly See Removing the Baffle Back Fan Assembly NOTE Several configurations for the memory modules exist see General Memory Module Installation Guidelines in Installing System Options d Swap the memory modules in bank 1 with another bank of the sam...

Page 60: ... 4 Open the system See Opening the System 5 Ensure that the diskette drive interface cable is securely connected to the diskette drive and the system board 6 Ensure that a power cable is properly connected to the drive 7 Close the system See Closing the System 8 Reconnect the system to the electrical outlet and turn on the system and attached peripherals 9 Run the appropriate online diagnostic tes...

Page 61: ...rtified service technician You should only perform troubleshooting and simple repairs as authorized in your product documentation or as directed by the online or telephone service and support team Damage due to servicing that is not authorized by Dell is not covered by your warranty Read and follow the safety instructions that came with the product 1 Try using a different CD that you know works pr...

Page 62: ...at the tape drive is configured for a unique SCSI ID number and that the tape drive is terminated or not terminated based on the interface cable used to connect the drive See the documentation for the tape drive for instructions on selecting the SCSI ID number and enabling or disabling termination 6 Run the appropriate online diagnostics tests See Using Server Administrator Diagnostics in Running ...

Page 63: ... follow the safety instructions that came with the product NOTICE This procedure can destroy data stored on the hard drive Before you continue back up all files on the hard drive 1 Run the appropriate online diagnostic test See Using Server Administrator Diagnostics in Running System Diagnostics For information about testing the controller see the SCSI or RAID controller s documentation If the tes...

Page 64: ...ystem board or to a SCSI host adapter card installed in an expansion slot d Close the system See Closing the System 8 Format and partition the hard drive See the operating system documentation 9 If possible restore the files to the drive If the problem persists see Getting Help Troubleshooting SATA Hard Drives Troubleshooting a SATA Hard Drive Problem Faulty hard drive Damaged or improperly connec...

Page 65: ...rn on the system and attached peripherals 10 Format and partition the hard drive See the operating system documentation 11 If possible restore the files to the drive If the problem persists see Getting Help Troubleshooting a SATA Hard Drive in a RAID Configuration Problem Device driver error Damaged or improperly connected hard drive cables Action CAUTION Many repairs may only be done by a certifi...

Page 66: ...s continue to the next step 11 Format and partition the hard drive See the operating system documentation 12 If possible restore the files to the drive If the problem persists see Getting Help Troubleshooting a RAID Controller Card NOTE When troubleshooting a RAID controller card also see the documentation for your operating system and the RAID controller Problem Error message indicates a RAID con...

Page 67: ...ice technician You should only perform troubleshooting and simple repairs as authorized in your product documentation or as directed by the online or telephone service and support team Damage due to servicing that is not authorized by Dell is not covered by your warranty Read and follow the safety instructions that came with the product 1 Run the appropriate online diagnostic test See Using Server...

Page 68: ...ee Getting Help Troubleshooting the Microprocessors Problem Error message indicates a processor problem A heat sink is not installed for each processor Action CAUTION Many repairs may only be done by a certified service technician You should only perform troubleshooting and simple repairs as authorized in your product documentation or as directed by the online or telephone service and support team...

Page 69: ...the appropriate online diagnostic test If the tests complete successfully go to step 19 14 Turn off the system and attached peripherals and disconnect the system from the electrical outlet 15 Open the system See Opening the System 16 Replace processor 1 with another processor of the same capacity See Processors in Installing System Options 17 Close the system See Closing the System 18 Run the appr...

Page 70: ...70 Troubleshooting Your System w w w d e l l c o m s u p p o r t d e l l c o m ...

Page 71: ...hould only perform troubleshooting and simple repairs as authorized in your product documentation or as directed by the online or telephone service and support team Damage due to servicing that is not authorized by Dell is not covered by your warranty Read and follow the safety instructions that came with the product 1 Turn off the system including any attached peripherals and disconnect the syste...

Page 72: ...hat is not authorized by Dell is not covered by your warranty Read and follow the safety instructions that came with the product 1 Connect the fan cable to the front fan connector on the system board To identify system board connectors see Figure A 3 2 Replace the front fan assembly a Insert the two fan securing tabs into the two securing slots on the chassis See Figure 6 1 b Pivot the fan assembl...

Page 73: ... Expansion Card Guide and Front System Fan front fan release tab expansion card guide release tab expansion card guide front fan assembly fan securing slots 2 expansion card guide securing slots 2 expansion card guide securing tabs 2 fan securing tabs 2 ...

Page 74: ...om the power supply 2 Press the spring tab that secures the power supply handle and then pull the handle outward to release the power supply See Figure 6 2 3 Slide the power supply out of the chassis Installing a Redundant Power Supply 1 Slide the power supply into the chassis 2 When the power supply is fully inserted rotate the power supply handle inward to lock the power supply in place The powe...

Page 75: ...ess x8 lane 3 3 V Slot 4 is PCI 32 bit 33 MHz 5 V Slots 5 and 6 are PCI X 64 bit 100 MHz 3 3 V NOTE Although the PCIe x4 lane expansion slot is physically a PCIe x8 connector it functions only as a PCIe x4 lane slot NOTE The PCI and PCI X slots can accommodate slower rated expansion cards of the same type NOTE The PCIe slots do not accommodate PCI X or PCI cards and the PCI X and PCI slots do not ...

Page 76: ...uctions see the documentation that accompanied the card 2 Turn off the system including any attached peripherals and disconnect the system from the electrical outlet 3 Open the system See Opening the System in Troubleshooting Your System 4 If your system is configured as a tower lay the system on its right side 5 Remove the filler bracket from the expansion slot 6 Install the expansion card a Posi...

Page 77: ...e to servicing that is not authorized by Dell is not covered by your warranty Read and follow the safety instructions that came with the product 1 Turn off the system including any attached peripherals and disconnect the system from the electrical outlet 2 Open the system See Opening the System in Troubleshooting Your System 3 If your system is configured as a tower lay the system on its right sid...

Page 78: ...ed peripherals System Memory The six memory module sockets can accommodate from 256 MB to 12 GB of registered ECC PC2 3200 DDR 2 400 memory The memory sockets are located on the system board under the memory module shroud adjacent to the power supply bays See Figure A 3 You can upgrade the system memory by installing combinations of 256 MB 512 MB 1 GB and 2 GB registered memory modules You can pur...

Page 79: ...ess capacity take precedence over single ranked memory modules with greater capacity Dual ranked memory modules are not supported in bank 3 Table 6 1 and Table 6 2 show examples of different memory configurations Table 6 2 lists the various allowable combinations of single and dual ranked memory modules Table 6 1 Sample Memory Configurations Total Memory DIMM_1A DIMM_1B DIMM_2A DIMM_2B DIMM_3A DIM...

Page 80: ...side 3 Remove the baffle back fan assembly See Removing the Baffle Back Fan Assembly 4 Locate the memory module sockets See Figure A 3 5 Press the ejectors on the memory module socket down and out as shown in Figure 6 4 to allow the memory module to be inserted into the socket Table 6 2 Allowable Memory Module Configurations Single Ranked and Dual Ranked Memory Modules DIMM1_A DIMM1_B DIMM2_A DIMM...

Page 81: ... 4 through step 7 of this procedure to install the remaining memory modules See Table 6 1 and Table 6 2 for sample memory configurations 9 Reinstall the baffle back fan assembly See Installing the Baffle Back Fan Assembly 10 Close the system See Closing the System in Troubleshooting Your System 11 Optional Press F2 to enter the System Setup program and check the System Memory setting on the main S...

Page 82: ...assembly See Installing the Baffle Back Fan Assembly 7 Close the system See Closing the System in Troubleshooting Your System Processors It is possible to upgrade your processor s to take advantage of future options in speed and functionality Each processor and its associated internal cache memory are contained in a pin grid array PGA package that is installed in a ZIF socket on the system board T...

Page 83: ...ists that the processor might adhere to the heat sink and be removed from the socket It is recommended that you remove the heat sink while the processor is still warm 5 Wait 30 seconds for the heat sink to loosen from the processor 6 Repeat step 4 to open the other heat sink retention lever heat sink heat sink retention levers 2 ...

Page 84: ...taminate the thermal grease 8 Pull the socket release lever straight up until the processor is released from the socket See Figure 6 6 Figure 6 6 Installing and Removing the Processor 9 Lift the processor out of the socket and leave the release lever up so that the socket is ready for the new processor NOTICE Be careful not to bend any of the pins when removing the processor Bending the pins can p...

Page 85: ... the processor lightly in the socket making sure all pins are matched with the correct holes in the socket Because the system uses a ZIF processor socket do not use force which could bend the pins if the processor is misaligned When the processor is positioned correctly it drops down into the socket with minimal pressure c When the processor is fully seated in the socket rotate the socket release ...

Page 86: ...here is a danger of a new battery exploding if it is incorrectly installed Replace the battery only with the same or equivalent type recommended by the manufacturer Discard used batteries according to the manufacturer s instructions See your System Information Guide for additional information 1 Turn off the system including any attached peripherals and disconnect the system from the electrical out...

Page 87: ...tlet and turn it on 17 Enter the System Setup program and if the time and date are still incorrect see Getting Help for instructions on obtaining technical assistance Control Panel Removing the Control Panel CAUTION Many repairs may only be done by a certified service technician You should only perform troubleshooting and simple repairs as authorized in your product documentation or as directed by...

Page 88: ... the three screws securing the control panel to the front of the system See Figure 6 8 7 Disconnect the control panel and chassis intrusion switch cables from the back of the control panel Figure 6 8 Removing and Installing the Control Panel Installing the Control Panel CAUTION Many repairs may only be done by a certified service technician You should only perform troubleshooting and simple repair...

Page 89: ...8 4 If you removed a 5 25 inch drive in step 4 of the previous procedure reinstall the drive If you removed the chassis drive insert in step 4 of the previous procedure reinstall the insert See Installing the Front Panel Drive Inserts and Installing a 5 25 Inch Drive in Troubleshooting Your System 5 If the system is a tower stand the system upright 6 Close the system See Closing the System in Trou...

Page 90: ...90 Installing System Options w w w d e l l c o m s u p p o r t d e l l c o m ...

Page 91: ...led NOTE SCSI hot plug functionality is available only when SCSI RAID is used See the SCSI RAID controller s documentation to verify that its configuration supports hot plug SCSI hard drives Connecting Drives Interface Cables Most interface connectors are keyed for correct insertion When you disconnect an interface cable take care to grasp the cable connector rather than the cable itself to avoid ...

Page 92: ...op cable SATA hard drives and SATA controller card Up to six hot plug ready SCSI hard drives See Figure 7 11 and Figure 7 12 NOTE SCSI hot plug functionality is available only when SCSI RAID is used See the SCSI RAID controller s documentation to verify that its configuration supports hot plug SCSI hard drives 38 cm 15 inch or 63 cm 25 inch 68 pin SCSI 1 drop cable unterminated 38 cm 15 inch cable...

Page 93: ... that is connected to the system board SATA 0 connector is designated as the primary SATA hard drive and the SATA hard drive that is connected to the SATA 1 connector is the secondary hard drive SCSI Configuration Information Although SCSI drives are installed in essentially the same way as other drives their configuration requirements are different To install and configure a SCSI drive follow the...

Page 94: ... SCSI controller card See the documentation that accompanied the controller card To boot from a SATA or SCSI RAID array the drive must be connected to the RAID controller card See the documentation that accompanied the controller card Diskette Drive Removing a Diskette Drive CAUTION Many repairs may only be done by a certified service technician You should only perform troubleshooting and simple r...

Page 95: ...in your Product Information Guide 1 Connect the power cable and the interface cable to the diskette drive 2 Slide the diskette drive into the externally accessible drive bay See Figure 7 1 3 If your system is configured as a tower stand the system upright 4 Close the system See Closing the System in Troubleshooting Your System 5 Reconnect the system to its electrical outlet and turn the system on ...

Page 96: ...ice technician You should only perform troubleshooting and simple repairs as authorized in your product documentation or as directed by the online or telephone service and support team Damage due to servicing that is not authorized by Dell is not covered by your warranty Read and follow the safety instructions that came with the product 1 Turn off the system including any attached peripherals and ...

Page 97: ...s that came with the product NOTICE You must install both inserts in an empty 5 25 inch drive bay to maintain Federal Communications Commission FCC certification of the system The inserts also help keep dust and dirt out of the system 1 Install the chassis drive insert by sliding the insert into the chassis until the tabs on the side of the insert snap into place See Figure 7 2 2 Install the bezel...

Page 98: ... authorized by Dell is not covered by your warranty Read and follow the safety instructions that came with the product 1 Unpack the drive and controller card if applicable and prepare the drive for installation For instructions see the documentation that accompanied the drive Also see IDE Configuration Information or SCSI Configuration Information for information on configuring the drive 2 Turn of...

Page 99: ...re connecting the interface cable to a system board connector a Remove the baffle back fan assembly See Removing the Baffle Back Fan Assembly b Press and hold the expansion card guide release tab and remove the expansion card guide See Figure 6 1 c Remove the four drive bay screws and slide the drive bay forward to access the drive cable retainer 5 25 inch drive externally accessible drive bay pow...

Page 100: ...le Back Fan Assembly Figure 7 4 Accessing the System Board Drive Connectors 10 Connect the interface cable to the drive and to the system board or controller card Figure 7 5 illustrates a common cable configuration for externally accessible IDE drives Figure 7 6 illustrates a SCSI half height tape drive connected to the SCSI controller on the system board Figure 7 7 shows a SCSI half height tape d...

Page 101: ...Installing Drives 101 Figure 7 5 Connecting an IDE CD Drive and Optional IDE Tape Drive to the Integrated IDE Controller IDE connector IDE CD drive and optional tape drive IDE interface cable ...

Page 102: ...talling Drives w w w d e l l c o m s u p p o r t d e l l c o m Figure 7 6 Connecting a SCSI Tape Drive to the Integrated SCSI Controller SCSI controller connector optional SCSI tape drive SCSI interface cable ...

Page 103: ... outlet and turn the system on including any attached peripherals 14 Test the drive If you installed an IDE drive run the IDE devices tests in the system diagnostics to determine whether the tape drive operates properly See Running System Diagnostics If you installed a SCSI drive run the SCSI controllers test in the system diagnostics See Running System Diagnostics If you installed a tape drive se...

Page 104: ...ocumentation for information on setting up the drive When you format a high capacity hard drive allow enough time for the formatting to be completed Long format times for these drives are normal For example a large drive can take over an hour to format Do not turn off or reboot your system while the drive is being formatted Doing so can cause a drive failure Installing and Removing SATA Hard Drive...

Page 105: ...he system See Figure 7 8 b Slide the drive cage out of the system 6 If you are removing a drive remove the drive from the drive bay a Remove the four screws that secure the drive in the drive bay See Figure 7 8 There are two screws on each side of the drive cage that secure the drive b Slide the drive out of the drive bay ...

Page 106: ... drive bays slide the drive cage into the system See Figure 7 8 b Replace the four screws that secure the drive cage in the system 8 Connect all power cables and interface cables to the hard drives remaining in the drive bays 9 If your system is configured as a tower stand the system upright drive cageretention screws 4 hard drive bay drive bay retention screws 2 screws on each side of drive cage ...

Page 107: ...Information for information on configuring the drive 2 Turn off the system including any attached peripherals and disconnect the system from the electrical outlet 3 Open the system See Opening the System in Troubleshooting Your System 4 If your system is configured as a tower lay the system on its right side 5 If the drive was supplied with a controller card install the controller card in an expan...

Page 108: ...he system board SATA connectors See Figure 7 9 NOTE The drive bays are labeled 0 through 5 and the two connector SATA interface cable connectors are labeled 0 and 1 Ensure that you match the connector numbers with the drive bay numbers and the appropriate SATA connector on the system board If you are installing up to six SATA hard drives and using an optional SATA controller card connect the inter...

Page 109: ...Installing Drives 109 Figure 7 9 Connecting SATA Hard Drives to the Integrated SATA Controller SATA 0 connector SATA hard drives 2 SATA interface cables SATA 1 connector ...

Page 110: ...tem 15 Route the SATA interface cable through the SATA cable routing clips on the outside of the baffle back fan assembly See Figure 5 1 16 If your system is configured as a tower stand the system upright 17 Close the system See Closing the System in Troubleshooting Your System 18 Reconnect the system to its electrical outlet and turn the system on including any attached peripherals NOTICE Do not ...

Page 111: ...ives The drive bays in a system with an optional SCSI backplane board provide space for up to six 1 inch hard drives The hard drives plug into the SCSI backplane board which is connected to a controller on the system board or to a RAID controller card See Figure 7 11 and Figure 7 12 Figure 7 11 Hot Plug SCSI Hard Drives Connected to the Integrated SCSI Controller SCSI connector 38 cm 15 inch SCSI ...

Page 112: ...rd drives 1 Remove the bezel See Removing the Bezel in Troubleshooting Your System 2 Take the hard drive offline and wait until the hard drive indicator codes on the drive carrier signal that the drive can be removed safely See Table 2 6 If the drive has been online the drive status indicator blinks green two times a second as the drive is powered down When all indicators are off the drive is read...

Page 113: ...ot plug functionality is available only when SCSI RAID is used See the SCSI RAID controller s documentation to verify that its configuration supports hot plug SCSI hard drives 1 Remove the bezel See Removing the Bezel in Troubleshooting Your System 2 Open the hard drive carrier handle See Figure 7 13 NOTICE Do not insert a hard drive carrier and attempt to lock its handle next to a partially insta...

Page 114: ...rd and prepare it for installation For instructions see the documentation that accompanied the card 2 Turn off the system including any attached peripherals and disconnect the system from the electrical outlet 3 Open the system See Opening the System in Troubleshooting Your System 4 If your system is configured as a tower lay the system on its right side 5 Depending on the type of controller card ...

Page 115: ...d the hard drive tests in the system diagnostics See Running System Diagnostics If you are setting up a SCSI RAID array run the SCSI controllers tests and the hard drive tests in the system diagnostics See Running System Diagnostics Also see the RAID controller s documentation for information on testing the array ...

Page 116: ...116 Installing Drives w w w d e l l c o m s u p p o r t d e l l c o m ...

Page 117: ...em may not be available in all countries When prompted by Dell s automated telephone system enter your Express Service Code to route the call directly to the proper support personnel If you do not have an Express Service Code open the Dell Accessories folder double click the Express Service Code icon and follow the directions For instructions on using the technical support service see Technical Su...

Page 118: ...l com AutoTech Service Dell s automated technical support service AutoTech provides recorded answers to the questions most frequently asked by Dell customers about their portable and desktop computer systems When you call AutoTech use your touch tone telephone to select the subjects that correspond to your questions The AutoTech service is available 24 hours a day 7 days a week You can also access...

Page 119: ...website at www dell com For the telephone number to call to speak to a sales specialist see the contact information for your region Returning Items for Warranty Repair or Credit Prepare all items being returned whether for repair or credit as follows 1 Call Dell to obtain a Return Material Authorization Number and write it clearly and prominently on the outside of the box For the telephone number ...

Page 120: ...iently Remember to fill out the Diagnostics Checklist If possible turn on your system before you call Dell for technical assistance and call from a telephone at or near the computer You may be asked to type some commands at the keyboard relay detailed information during operations or try other troubleshooting steps possible only at the computer system itself Ensure that the system documentation is...

Page 121: ...m and version Peripherals Expansion cards Are you connected to a network Yes No Network version and network card Programs and versions See your operating system documentation to determine the contents of the system s start up files If possible print each file Otherwise record the contents of each file before calling Dell Error message beep code or diagnostic code Description of problem and trouble...

Page 122: ...tional Access Code Country Code City Code Department Name or Service Area Website and E Mail Address Area Codes Local Numbers and Toll Free Numbers Anguilla General Support toll free 800 335 0031 Antigua and Barbuda General Support 1 800 805 5924 Argentina Buenos Aires International Access Code 00 Country Code 54 City Code 11 Website www dell com ar Tech Support and Customer Care toll free 0 800 4...

Page 123: ...m E mail for French Speaking Customers support euro dell com be fr emaildell Technical Support 02 481 92 88 Customer Care 02 481 91 19 Corporate Sales 02 481 91 00 Fax 02 481 92 99 Switchboard 02 481 91 00 Bermuda General Support 1 800 342 0671 Bolivia General Support toll free 800 10 0238 Brazil International Access Code 00 Country Code 55 City Code 51 Website www dell com br Customer Support Tec...

Page 124: ...me Sales Small Business toll free 1 800 847 4096 Technical Support med large bus government toll free 1 800 387 5757 Sales Home Sales Small Business toll free 1 800 387 5752 Sales med large bus government toll free 1 800 387 5755 Spare Parts Sales Extended Service Sales 1 866 440 3355 Cayman Islands General Support 1 800 805 7541 Chile Santiago Country Code 56 City Code 2 Sales Customer Support an...

Page 125: ...ts GCP toll free 800 858 2055 Large Corporate Accounts Key Accounts toll free 800 858 2628 Large Corporate Accounts North toll free 800 858 2999 Large Corporate Accounts North Government and Education toll free 800 858 2955 Large Corporate Accounts East toll free 800 858 2020 Large Corporate Accounts East Government and Education toll free 800 858 2669 Large Corporate Accounts Queue Team toll free...

Page 126: ... computers den_support dell com E mail Support servers Nordic_server_support dell com Technical Support 7023 0182 Customer Care Relational 7023 0184 Home Small Business Customer Care 3287 5505 Switchboard Relational 3287 1200 Fax Switchboard Relational 3287 1201 Switchboard Home Small Business 3287 5000 Fax Switchboard Home Small Business 3287 5001 Dominica General Support toll free 1 866 278 6821...

Page 127: ...ountry Code 33 City Codes 1 4 Website support euro dell com E mail support euro dell com fr fr emaildell Home and Small Business Technical Support 0825 387 270 Customer Care 0825 823 833 Switchboard 0825 004 700 Switchboard calls from outside of France 04 99 75 40 00 Sales 0825 004 700 Fax 0825 004 701 Fax calls from outside of France 04 99 75 40 01 Corporate Technical Support 0825 004 719 Custome...

Page 128: ... 08844140083 Switchboard 2108129800 Sales 2108129800 Fax 2108129812 Grenada General Support toll free 1 866 540 3355 Guatemala General Support 1 800 999 0136 Guyana General Support toll free 1 877 270 4609 Hong Kong International Access Code 001 Country Code 852 Website support ap dell com E mail ap_support dell com Technical Support Dimension and Inspiron 2969 3189 Technical Support OptiPlex Lati...

Page 129: ...and Sales 01 204 4444 U K Sales dial within U K only 0870 907 4000 Fax SalesFax 01 204 0103 Switchboard 01 204 4444 Italy Milan International Access Code 00 Country Code 39 City Code 02 Website support euro dell com E mail support euro dell com it it emaildell Home and Small Business Technical Support 02 577 826 90 Customer Care 02 696 821 14 Fax 02 696 821 13 Switchboard 02 696 821 12 Corporate T...

Page 130: ...4 556 3490 24 Hour Automated Order Service 044 556 3801 Customer Care 044 556 4240 Business Sales Division up to 400 employees 044 556 1465 Preferred Accounts Division Sales over 400 employees 044 556 3433 Large Corporate Accounts Sales over 3500 employees 044 556 3430 Public Sales government agencies educational institutions and medical institutions 044 556 1469 Global Segment Japan 044 556 3469 ...

Page 131: ...81 91 00 Customer Care Brussels Belgium 02 481 91 19 Fax Brussels Belgium 02 481 92 99 Switchboard Brussels Belgium 02 481 91 00 Macao Country Code 853 Technical Support toll free 0800 582 Customer Service Penang Malaysia 604 633 4949 Transaction Sales toll free 0800 581 Malaysia Penang International Access Code 00 Country Code 60 City Code 4 Technical Support Dell Precision OptiPlex and Latitude ...

Page 132: ...e nl_server_support dell com Latitude nl_latitude_support dell com Inspiron nl_inspiron_support dell com Dimension nl_dimension_support dell com OptiPlex nl_optiplex_support dell com Dell Precision nl_workstation_support dell com Technical Support 020 674 45 00 Technical Support Fax 020 674 47 66 Home Small Business Customer Care 020 674 42 00 Relational Customer Care 020 674 4325 Home Small Busin...

Page 133: ...port servers nordic_server_support dell com Technical Support 671 16882 Relational Customer Care 671 17514 Home Small Business Customer Care 23162298 Switchboard 671 16800 Fax Switchboard 671 16865 Panama General Support 001 800 507 0962 Peru General Support 0800 50 669 Poland Warsaw International Access Code 011 Country Code 48 City Code 22 Website support euro dell com E mail pl_support_tech del...

Page 134: ...ternational Access Code 005 Country Code 65 Technical Support toll free 800 6011 051 Customer Service Penang Malaysia 604 633 4949 Transaction Sales toll free 800 6011 054 Corporate Sales toll free 800 6011 053 South Africa Johannesburg International Access Code 09 091 Country Code 27 City Code 11 Website support euro dell com E mail dell_za_support dell com Technical Support 011 709 7710 Customer...

Page 135: ...Code 00 Country Code 46 City Code 8 Website support euro dell com E mail swe_support dell com E mail Support for Latitude and Inspiron Swe nbk_kats dell com E mail Support for OptiPlex Swe_kats dell com E mail Support for Servers Nordic_server_support dell com Technical Support 08 590 05 199 Relational Customer Care 08 590 05 642 Home Small Business Customer Care 08 587 70 527 Employee Purchase Pr...

Page 136: ...rd 022 799 01 01 Taiwan International Access Code 002 Country Code 886 Technical Support portable and desktop computers toll free 00801 86 1011 Technical Support servers toll free 0080 60 1256 Transaction Sales toll free 0080 651 228 Corporate Sales toll free 0080 651 227 Thailand International Access Code 001 Country Code 66 Technical Support toll free 0880 060 07 Customer Service Penang Malaysia...

Page 137: ...siness Customer Care 0870 906 0010 Corporate Customer Care 01344 373 185 Preferred Accounts 500 5000 employees Customer Care 0870 906 0010 Central Government Customer Care 01344 373 193 Local Government Education Customer Care 01344 373 199 Health Customer Care 01344 373 194 Home and Small Business Sales 0870 907 4000 Corporate Public Sector Sales 01344 860 456 Home and Small Business Fax 0870 907...

Page 138: ...chase Program EPP Customers toll free 1 800 695 8133 Printers and Projectors Technical Support toll free 1 877 459 7298 Public government education and healthcare Customer Service and Technical Support toll free 1 800 456 3355 Employee Purchase Program EPP Customers toll free 1 800 234 1490 Dell Sales toll free 1 800 289 3355 or toll free 1 800 879 3355 Dell Outlet Store Dell refurbished computers...

Page 139: ...a circuit To change a jumper setting pull the plug off its pin s and carefully fit it down onto the pin s indicated Figure A 1 shows an example of a jumper Figure A 1 Example Jumpers CAUTION Ensure that the system is turned off before you change a jumper setting Otherwise damage to the system or unpredictable results may occur A jumper is referred to as open or unjumpered when the plug is pushed d...

Page 140: ...1 lists the jumpers settings Figure A 2 System Board Jumpers Table A 1 System Board Jumper Settings Jumper Setting Description J55 pins 1 and 2 default The password feature is enabled The password feature is disabled J55 pins 3 and 4 default The configuration settings in NVRAM are retained at system boot The configuration settings in NVRAM are cleared at next system boot jumpered unjumpered ...

Page 141: ...n card slots Figure A 3 System Board Connectors PCI64 66MHZ SLOT1 CP_CONN IDE1 FDD_CONN P1 FRONT_USB SCSI1 Fan1 Fan2 SATA CON 0 BT1 P2 DIMM 1_B DIMM 1_A DIMM 2_B DIMM 2_A DIMM 3_B DIMM 3_A SATA CON 1 PROC_1 PROC_2 PCI E X4 SLOT2 PCI E X8 SLOT3 PCI32 33MHZ SLOT4 PCI X 100MHZ SLOT5 PCI X 100MHZ SLOT6 RAC_conn PDB BP 12C J55 clear NVRAM jumper J55 password jumper ...

Page 142: ...stem fan power FDD_CONN Diskette drive connector FRONT_USB Front USB connector IDE1 IDE connector PCI64 66MHZ SLOT1 PCI 64 bit 66 MHz expansion card slot PCI E X4 SLOT2 PCI Express x4 lane expansion card slot NOTE Although the PCIe x4 lane expansion slot is physically a PCIe x8 connector it functions only as a PCIe x4 lane slot PCI E X8 SLOT3 PCI Express x8 lane expansion card slot PCI32 33MHZ SLO...

Page 143: ...ose the system See Closing the System in Troubleshooting Your System 6 Reconnect the system to its electrical outlet and turn the system on including any attached peripherals The existing passwords are not disabled erased until the system boots with the password jumper plug removed However before you assign a new system and or setup password you must install the jumper plug NOTE If you assign a ne...

Page 144: ...144 Jumpers Switches and Connectors w w w d e l l c o m s u p p o r t d e l l c o m ...

Page 145: ...tors on your system If you reconfigure the hardware connected to the system you may also need the pin number and signal information for these connectors Figure B 1 illustrates the connectors on the system Figure B 1 I O Connectors PS 2 mouse connector PS 2 keyboard connector USB connectors 2 serial connector NIC connector parallel connector video connector system status indicator connector system ...

Page 146: ...ble designation Both the new and the remapped COM connectors share the same IRQ setting COM1 and COM3 share IRQ4 while COM2 and COM4 share IRQ3 NOTE If two COM connectors share an IRQ setting you may not be able to use them both at the same time In addition if you install one or more expansion cards with serial connectors designated as COM1 and COM3 the integrated serial connector is disabled Befo...

Page 147: ... address 378h use the System Setup program to remap the integrated parallel connector See Using the System Setup Program in the User s Guide Figure B 3 illustrates the pin numbers for the parallel connector and Table B 3 defines the pin assignments for the connector Figure B 3 Parallel Connector Pin Numbers Table B 2 Serial Connector Pin Assignments Pin Signal I O Definition 1 DCD I Data carrier d...

Page 148: ... 4 Keyboard and Mouse Connector Pin Numbers Table B 3 Parallel Connector Pin Assignments Pin Signal I O Definition 1 STB I O Strobe 2 PD0 I O Printer data bit 0 3 PD1 I O Printer data bit 1 4 PD2 I O Printer data bit 2 5 PD3 I O Printer data bit 3 6 PD4 I O Printer data bit 4 7 PD5 I O Printer data bit 5 8 PD6 I O Printer data bit 6 9 PD7 I O Printer data bit 7 10 ACK I Acknowledge 11 BUSY I Busy ...

Page 149: ...deo controller Figure B 5 Video Connector Pin Numbers Table B 4 Keyboard and Mouse Connector Pin Assignments Pin Signal I O Definition 1 KBDATA or MFDATA I O Keyboard data or mouse data 2 NC N A No connection 3 GND N A Signal ground 4 FVcc N A Fused supply voltage 5 KBCLK or MFCLK I O Keyboard clock or mouse clock 6 NC N A No connection Shell N A N A Chassis ground Table B 5 Video Connector Pin As...

Page 150: ...ors to shut down See the documentation that accompanied the USB devices for their maximum current ratings Figure B 6 USB Connector Pin Numbers Integrated NIC Connector The system s integrated NIC functions as a separate network expansion card while providing fast communication between servers and workstations Figure B 7 illustrates the pin numbers for the NIC connector and Table B 7 defines the pi...

Page 151: ...gory 5 or greater wiring and connectors Do not exceed a cable run length from a workstation to a hub of 100 m 328 ft For detailed guidelines on operation of a network see Systems Considerations of Multi Segment Networks in the IEEE 802 3 standard Table B 7 NIC Connector Pin Assignments Pin Signal I O Definition 1 TD O Data out 2 TD O Data out 3 RD I Data in 4 NC N A No connection 5 NC N A No conne...

Page 152: ...152 I O Ports and Connectors w w w d e l l c o m s u p p o r t d e l l c o m ...

Page 153: ...E drives 93 SATA drives 93 SCSI drives 93 software 33 connecting drives 91 connectors keyboard 148 mouse 148 NIC 150 parallel 147 serial 146 system board 141 USB 150 video 149 cooling fan troubleshooting 57 cover installing 51 removing 51 D damaged systems troubleshooting 55 diagnostics advanced testing options 39 error messages 40 running from the diskettes 38 running from the utility partition 3...

Page 154: ...ting 64 help getting 117 I I O connectors location 145 IDE drives configuring 93 indicator patterns system status 12 indicators front panel 12 hard drive 18 NIC 20 optional bezel 12 power 17 system status 12 inside the system 46 installing 5 25 inch drive 98 bezel 50 CD drive 98 cover 51 diskette drive 95 expansion card 76 front system fan 72 front panel drive inserts 97 hard drive guidelines 104 ...

Page 155: ...e drive 94 expansion card 77 front system fan 71 front panel drive inserts 96 memory 82 SATA hard drive 104 SCSI hard drive 112 replacing battery 86 S safety 41 SATA drives configuring 93 SCSI drives configuring 93 ID numbers 93 interface cables 93 termination 94 SCSI hard drive troubleshooting 63 serial connector 146 serial I O device troubleshooting 44 software application conflicts 34 configuri...

Page 156: ...icroprocessors 68 mouse 43 NIC 45 power supplies 56 RAID controller card 66 SCSI hard drive 63 serial I O device 44 start up routine 41 system cooling 57 tape drive 62 USB device 44 video 42 wet system 54 U USB connector 150 USB device troubleshooting 44 V video connector 149 troubleshooting 42 W warning messages 31 warranty 9 wet system troubleshooting 54 ...

Page 157: ...gure 5 4 Opening the System 51 Figure 5 5 Removing the Baffle Back Fan Assembly 53 Figure 6 1 Removing the Expansion Card Guide and Front System Fan 73 Figure 6 2 Removing and Installing an Optional Redundant Power Supply 75 Figure 6 3 Removing and Installing an Expansion Card 77 Figure 6 4 Installing and Removing a Memory Module 81 Figure 6 5 Installing and Removing the Heat Sink 83 Figure 6 6 In...

Page 158: ... Hard Drives to an Optional SATA Controller Card 110 Figure 7 11 Hot Plug SCSI Hard Drives Connected to the Integrated SCSI Controller 111 Figure 7 12 Hot Plug SCSI Hard Drives Connected to a RAID Controller Card 112 Figure 7 13 Removing and Installing a Hot Plug Hard Drive 113 Figure A 1 Example Jumpers 139 Figure A 2 System Board Jumpers 140 Figure A 3 System Board Connectors 141 Figure B 1 I O ...

Page 159: ...ics Testing Options 39 Table 5 1 Start Up Routine Indications 41 Table 6 1 Sample Memory Configurations 79 Table 6 2 Allowable Memory Module Configurations Single Ranked and Dual Ranked Memory Modules 80 Table 7 1 Drive Cable Configuration 92 Table A 1 System Board Jumper Settings 140 Table A 2 System Board Connectors 142 Table B 1 I O Connector Icons 146 Table B 2 Serial Connector Pin Assignments...

Page 160: ...160 ...

Reviews: