background image

Removing the power and On-Screen Display (OSD) 

buttons board

1.

Follow the procedure in 

Before Working Inside Your Computer

.

2.

Remove the:
a.

stand

b.

back cover

3.

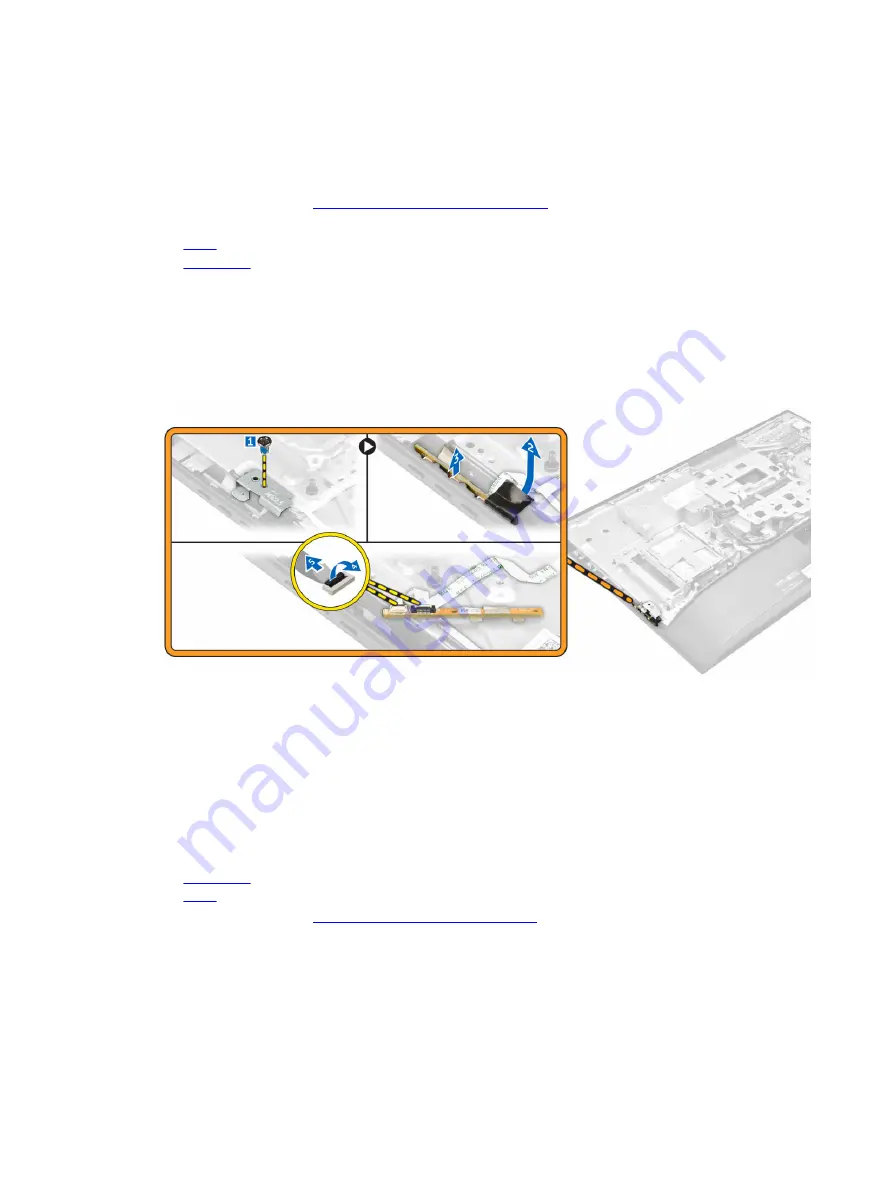
Perform the following steps as shown in the illustration:
a. Remove the screw to remove the metal plate that secures the power and OSD buttons board to 

the computer [1].

b. Peel off the tape from the OSD buttons board [2].
c. Remove the power and OSD buttons board from the chassis [3].
d. Disconnect the cables from the power and OSD buttons board to release the board from the 

computer [4, 5].

Installing the power and OSD buttons board

1.

Connect the power cable and the OSD buttons cable to the power and OSD buttons board.

2.

Affix the tape on the OSD buttons board.

3.

Insert the power and OSD buttons board into the slot.

4.

Align the metal plate on the power and OSD buttons board.

5.

Tighten the screw to secure the power and OSD buttons board.

6.

Install the:
a.

back cover

b.

stand

7.

Follow the procedure in 

After Working Inside Your Computer

.

28

Summary of Contents for OptiPlex 7440

Page 1: ...Dell OptiPlex 7440 All In One Owner s Manual Regulatory Model W11C Regulatory Type W11C001 ...

Page 2: ...problem WARNING A WARNING indicates a potential for property damage personal injury or death Copyright 2015 Dell Inc All rights reserved This product is protected by U S and international copyright and intellectual property laws Dell and the Dell logo are trademarks of Dell Inc in the United States and or other jurisdictions All other marks and names mentioned herein may be trademarks of their res...

Page 3: ...ng the hard drive assembly 15 Removing the optical drive assembly 15 Installing the optical drive assembly 16 Removing the system board shield 16 Installing the system board shield 17 Removing the heat sink 17 Installing the heat sink 18 Removing the WLAN card 18 Installing the WLAN card 19 Removing the speaker module 19 Installing the speakers 20 Removing the converter board 20 Installing the con...

Page 4: ...39 General screen options 39 System configuration screen options 40 Security screen options 42 Secure boot screen options 44 Performance screen options 45 Power management screen options 46 POST behavior screen options 47 Virtualization support screen options 48 Wireless screen options 48 Maintenance screen options 48 Cloud desktop screen options 49 Updating the BIOS 50 System and setup password 5...

Page 5: ...fications 55 Port and connector specifications 55 Power specifications 56 Camera optional specifications 56 Stand specifications 56 Physical specifications 57 Environmental specifications 57 5 Contacting Dell 59 5 ...

Page 6: ... by your warranty Read and follow the safety instructions that came with the product CAUTION To avoid electrostatic discharge ground yourself by using a wrist grounding strap or by periodically touching an unpainted metal surface such as a connector on the back of the computer CAUTION Handle components and cards with care Do not touch the components or contacts on a card Hold a card by its edges o...

Page 7: ...osing data save and close all open files and exit all open programs before you turn off your computer 1 Turning off your computer In Windows 10 using a touch enabled device or mouse 1 Click or tap 2 Click or tap and then click or touch Shut down In Windows 8 using a touch enabled device 1 Swipe in from the right edge of the screen opening the Charms menu and select Settings 2 Tap and then tap Shut...

Page 8: ...er 2 Connect any telephone or network cables to your computer 3 Connect your computer and all attached devices to their electrical outlets 4 Turn on your computer 5 If required verify that the computer works correctly by running Dell Diagnostics Important Information NOTE Avoid using the touchscreen in dusty hot or humid environments NOTE Sudden change in temperature may cause condensation on the ...

Page 9: ...ing the stand 1 Follow the procedure in Before Working Inside Your Computer 2 Place the computer on a flat surface with the display side facing downwards 3 Perform the following steps as shown in the illustration a Press the tab on the cover to release the stand 1 b Lift the stand upwards 2 4 Slide the stand and lift it away from the back cover 9 ...

Page 10: ...our Computer Removing the cable cover 1 Follow the procedures in Before Working Inside Your Computer 2 Remove the stand 3 Perform the following steps as shown in the illustration a Remove the screw that secures the cable cover 1 b Push the release tabs to release the cable cover and lift the back cover from the computer 2 c Lift the cable cover and remove it away from the computer 3 10 ...

Page 11: ... secure the cable cover to the computer 3 Install the stand 4 Follow the procedures in After Working Inside Your Computer Removing the back cover 1 Follow the procedures in Before Working Inside Your Computer 2 Remove the a stand b cable cover 3 Pry the edges of the back cover to release it from the computer 4 Lift the back cover from the computer 11 ...

Page 12: ...procedure in After Working Inside Your Computer Removing the speaker cover 1 Follow the procedure in Before Working Inside Your Computer 2 Remove the a stand b cable cover c back cover 3 Perform the following steps as shown in the illustration a Remove the screws that secure the speaker cover to the computer 1 b Slide the speaker cover to release it from the computer 2 12 ...

Page 13: ... the speaker cover 1 Align the speaker cover to its position on the back of the computer 2 Tighten the screws to secure the speaker cover to the computer 3 Install the a back cover b cable cover c stand 4 Follow the procedure in After Working Inside Your Computer 13 ...

Page 14: ...tion a Press the tab on the bracket and slide the hard drive assembly until the tabs are released from either side of the assembly 1 b Slide the hard drive assembly upwards to remove it from the computer 2 4 Perform the following steps as shown in the illustration a Pry the edges of the bracket to release the hard drive 1 b Slide the hard drive and lift it away from the bracket 2 14 ...

Page 15: ...e assembly 1 Follow the procedure in Before Working Inside Your Computer 2 Remove the a stand b back cover 3 Perform the following steps as shown in the illustration a Press the securing tab at the base of the drive to release the optical drive 1 b Push the back side of the optical drive 2 c Slide the optical drive assembly outward to remove it away from the computer 3 4 Perform the following step...

Page 16: ...re in After Working Inside Your Computer Removing the system board shield 1 Follow the procedure in Before Working Inside Your Computer 2 Remove the a stand b back cover 3 Perform the following steps as shown in the illustration a Press the securing tab to release the system board shield from the slots on the computer 1 b Slide the system board shield away from the computer 2 c Lift the system boa...

Page 17: ...king Inside Your Computer Removing the heat sink 1 Follow the procedure in Before Working Inside Your Computer 2 Remove the a stand b back cover c system board shield 3 Perform the following steps as shown in the illustration a Remove the screws that secure the heat sink module to the chassis 1 2 b Lift up the heat sink assembly and remove it from the computer 3 17 ...

Page 18: ...de Your Computer Removing the WLAN card 1 Follow the procedure in Before Working Inside Your Computer 2 Remove the a stand b back cover c system board shield 3 Perform the following steps as shown in the illustration a Disconnect the antenna cables from the connectors on the WLAN card 1 b Remove the screw that secures the WLAN card to the system board 2 c Hold the WLAN card and pull it from the co...

Page 19: ...he speaker module 1 Follow the procedure in Before Working Inside Your Computer 2 Remove the a stand b back cover c cable cover d speaker cover e system board shield 3 Perform the following steps as shown in the illustration a Disconnect the speaker cable from the connector on the system board 1 b Unthread the speaker cables from the retention clips 2 4 Perform the following steps as shown in the ...

Page 20: ... board shield b speaker cover c back cover d cable cover e stand 6 Follow the procedure in system board shield Removing the converter board 1 Follow the procedure in Before Working Inside Your Computer 2 Remove the a stand b back cover c cable cover d speaker cover 3 Perform the following steps as shown in the illustration a Disconnect the convertor board cable from the converter board 1 2 b Disco...

Page 21: ...is 2 Installing the converter board 1 Place the convertor board in its slot 2 Tighten the screws to secure the converter board to the chassis 3 Connect the converter board cable and display backlight cable to the connectors on the converter board 4 Install the a speaker cover b cable cover c back cover d stand 5 Follow the procedure in After Working Inside Your Computer 21 ...

Page 22: ...rm the following steps as shown in the illustration a Unthread the power supply cables from the retention clips in the chassis 1 b Disconnect the power supply cable from the connector on the system board 2 4 Perform the following steps as shown in the illustration a Remove the screw that secures the power supply socket to the chassis 1 b Slide the socket to remove it from the computer 2 22 ...

Page 23: ...ling the Power Supply Unit PSU 1 Place the PSU on the chassis 2 Tighten the screw to secure the PSU to the chassis 3 Place the socket in the slot on the chassis 4 Tighten the screw to secure the power supply socket to the chassis 5 Thread the power supply cable on the retention clips in the chassis 6 Connect the power supply cables to the connectors on the system board 23 ...

Page 24: ...k cover c system board shield d power supply unit 3 Perform the following steps as shown in the illustration a Remove the screws that secure the VESA mount bracket to the computer 1 b Lift the bracket away from the computer 2 Installing the VESA mount bracket 1 Align and place the bracket in the slot on the computer 2 Tighten the screws that secure the VESA mount bracket to the computer 3 Install ...

Page 25: ... the connector on the system board 1 b Remove the screws that secure the processor fan to the computer 2 c Lift the processor fan away from the computer 3 Installing the processor fan 1 Align and place the processor fan in the slot on the chassis 2 Tighten the screws to secure the processor fan to the system board 3 Connect the processor fan cable to the connector on the system board 4 Install the...

Page 26: ...the memory module until the release clips spring back to secure them in place 3 Install the a system board shield b back cover c stand 4 Follow the procedure in After Working Inside Your Computer Removing the intrusion switch 1 Follow the procedure in Before Working Inside Your Computer 2 Remove the a stand b back cover c VESA mount bracket d system board shield 3 Perform the following instruction...

Page 27: ...g the intrusion switch 1 Place the intrusion switch in the slot on the computer 2 Tighten the screw to secure the intrusion switch to the chassis 3 Thread the cable along the retention clips on the chassis 4 Connect the intrusion switch cable to the connector on the system board 5 Install a system board shield b VESA mount bracket c back cover d stand 6 Follow the procedures in After Working Insid...

Page 28: ...and OSD buttons board from the chassis 3 d Disconnect the cables from the power and OSD buttons board to release the board from the computer 4 5 Installing the power and OSD buttons board 1 Connect the power cable and the OSD buttons cable to the power and OSD buttons board 2 Affix the tape on the OSD buttons board 3 Insert the power and OSD buttons board into the slot 4 Align the metal plate on t...

Page 29: ...side Your Computer Removing the processor 1 Follow the procedure in Before Working Inside Your Computer 2 Remove the a stand b back cover c VESA mount bracket d system board shield e heatsink 3 Press the Lift the processor cover and remove the processor from its socket a Release the socket lever by pushing the lever down and out from under the tab on the processor shield 1 b Lift the lever upward ...

Page 30: ...riangle on the socket 3 Place the processor on the socket such that the slots on the processor align with the socket keys 4 Close the processor shield by sliding it under the retention screw 5 Lower the socket lever and push it under the tab to lock it 6 Install a heatsink b system board shield c VESA mount bracket d back cover e stand 7 Follow the procedure in After Working Inside Your Computer R...

Page 31: ...h pad cable from the connector on the system board 2 c Unthread the cable from the retention clips of the computer 3 4 Perform the following steps as shown in the illustration a Remove the screws that secure the optical drive cable and hard drive cable to the system 1 b Disconnect the optical drive cable and hard drive cable 2 5 Disconnect all the cables that are connected to the system board 31 ...

Page 32: ...pull the LVDS cable to disconnect it from the system board 1 2 b Lift the latch and disconnect the cable from the connector 3 4 7 Perform the following steps as shown in the illustration a Remove the screws that secure the system board to the chassis 1 b Slide the system board and lift it away from the chassis 2 32 ...

Page 33: ...System Board Layout The following image displays the system board layout of the computer 33 ...

Page 34: ...ows serial debug connector 28 HDD ODD power connector 29 SPI debug connector 30 Side key board connector 31 optical drive connector 32 heat sink 33 power supply connector 34 processor fan connector Installing the system board 1 Place the system board on the computer 2 Connect all the cables to the system board 3 Tighten the screws to secure the system board to the base panel 4 Connect the optical ...

Page 35: ... supply unit n heatsink o processor fan p speakers q system board NOTE These instructions are valid only for non touch computers For touch computers the display panel should be disassembled in a clean room environment 3 Perform the following steps as shown in the illustration a Remove the power switch cable from the retention clip 1 b Unthread the camera cable from the retention clips on the displ...

Page 36: ...llustration a Lift the latch and disconnect the cables 1 2 b Remove the screws that secure the display assembly to the chassis 3 c Lift the display assembly away from the computer 4 Installing the display assembly 1 Tighten the screws to secure the display bracket to the display panel 2 Place the display panel on the chassis 3 Affix the tape on the display panel 36 ...

Page 37: ... the a system board b speakers c processor fan d heatsink e power supply unit f converter board g power and OSD buttons board h intrusion switch i hard drive j optical drive k WLAN card l system board shield m VESA mount bracket n speaker cover o cable cover p back cover q stand 7 Follow the procedure in After Working Inside Your Computer 37 ...

Page 38: ...on Self Test POST when the Dell logo appears you can Access System Setup by pressing F2 key Bring up the one time boot menu by pressing F12 key The one time boot menu displays the devices that you can boot from including the diagnostic option The boot menu options are Removable Drive if available STXXXX Drive NOTE XXX denotes the SATA drive number Optical Drive Diagnostics NOTE Choosing Diagnostic...

Page 39: ...OS Version Service Tag Asset Tag Ownership Tag Ownership Date Manufacture Date and the Express Service Code Memory Information Displays Memory Installed Memory Available Memory Speed Memory Channels Mode Memory Technology DIMM A Size DIMM B Size PCI information Displays SLOT 1 and SLOT 2 Processor Information Displays Processor Type Core Count Processor ID Current Clock Speed Minimum Clock Speed M...

Page 40: ...tore Settings Restores the default settings of the computer Save Settings Saves the settings of the computer Apply Enables you to apply the settings Exit Exits and starts the computer Boot List Options Allows you to change the boot list option Legacy UEFI enabled by default Advanced Boot Options This option allows you the legacy option ROMs to load By default the Enable Legacy Option ROMs is disab...

Page 41: ... Drives Allows you to configure the SATA drives on board All drives are enabled by default The options are SATA 0 SATA 1 SATA 4 M 2 PCIe SSD 0 SMART Reporting This field controls whether hard drive errors for integrated drives are reported during system startup This technology is part of the SMART Self Monitoring Analysis and Reporting Technology specification This option is disabled by default En...

Page 42: ...s are Enable Microphone by default enable Enable Internal Speaker by default enable OSD Button Management This field allows you to enable or disable the OSD On Screen Display buttons on the All In One system Disable OSD buttons This option is unchecked by default Touchscreen This option allows you to enable or disable touchscreen Miscellaneous Devices Allows you to enable or disable the following ...

Page 43: ...h of Administrator and System passwords Password Bypass Allows you to enable or disable the permission to bypass the System and the Internal HDD password when they are set The options are Disabled Reboot bypass Default setting Disabled Password Change Allows you to enable the disable permission to the System and Hard Drive passwords when the admin password is set Default setting Allow Non Admin Pa...

Page 44: ...ard Access Allows you to set an option to enter the Option ROM Configuration screens using hotkeys during boot The options are Enabled One Time Enable Disabled Default setting Enable Admin Setup Lockout Allows you to enable or disable the option to enter setup when an admin password is set Enable Admin Setup Lockout This option is disabled by default HDD Protection Support Allows you to enable or ...

Page 45: ...he selected key Reset All Keys Resets to default setting Delete All Keys Deletes all the keys NOTE If you disable the Custom Mode all the changes made will be erased and the keys will restore to default settings Performance screen options Option Description Multi Core Support Specifies whether the process will have one or all cores enabled The performance of some applications will improve with the...

Page 46: ... You can set the AC Recovery to Power Off default Power On Last Power State Auto On Time Allows you to set the time at which the computer must turn on automatically The options are Disabled Every Day Weekdays Select Days Default setting Disabled NOTE This feature does not work if you turn off your computer using the switch on a power strip or surge protector or if Auto Power is set to disabled Dee...

Page 47: ... S3 state in operating system environment Block Sleep S3 state Default setting This option is disabled Intel Ready Mode This option enables the capability of Intel Ready Mode technology POST behavior screen options Option Description Numlock LED Specifies if the NumLock function can be enabled when the system boots This option is enabled by default Keyboard Errors Specifies whether keyboard relate...

Page 48: ...rtualization technology for direct I O must be enabled to use this feature Trusted Execution disabled by default Wireless screen options Option Description Wireless Device Enable Allows you to enable or disable the internal wireless devices WLAN WiGig Bluetooth All the options are enabled by default Maintenance screen options Option Description Service Tag Displays the Service Tag of your computer...

Page 49: ...ant only when the Integrated NIC control in the System Configuration group is set to Enable with Cloud Desktop Server Name This option specifies the server name of the server NOTE This option is relevant only when the Integrated NIC control in the System Configuration group is set to Enable with Cloud Desktop and when the server look up method is set to DNS Server IP Address This option specifies ...

Page 50: ... is relevant only when the Integrated NIC control in the System Configuration group is set to Enable with Cloud Desktop DNS IP address This option specifies the DNS IP address of the client The default IP Address is 255 255 255 255 NOTE This option is relevant only when the Integrated NIC control in the System Configuration group is set to Enable with Cloud Desktop Domain Name This option specifie...

Page 51: ...puter Follow the instructions on the screen System and setup password You can create a system password and a setup password to secure your computer Password Type Description System password Password that you must enter to log on to your system Setup password Password that you must enter to access and make changes to the BIOS settings of your computer CAUTION The password features provide a basic l...

Page 52: ...eting or changing an existing system and or setup password Ensure that the Password Status is Unlocked in the System Setup before attempting to delete or change the existing System and or Setup password You cannot delete or change an existing System or Setup password if the Password Status is Locked To enter the System Setup press F2 immediately after a power on or reboot 1 In the System BIOS or S...

Page 53: ...right click My Computer and then select Properties System specifications Feature Specification Processor cache Intel Core i3 i5 i7 series Total cache Up to 8 MB cache depending on processor type Chipset Intel Q170 chipset Memory specifications Feature Specification Memory type up to 1600 MHz unbuffered non ECC dual channel DDR4 2133 configuration Memory capacity 4 GB and 8 GB Memory connectors two...

Page 54: ...earphones or headphones can cause hearing damage or loss Adjustment of the volume control as well as the equalizer to settings other than the center position may increase the earphones or headphones output voltage and therefore the sound pressure level The use of factors influencing the earphones or headphones output other than those specified by the manufacturer e g operating system equalizer sof...

Page 55: ...ing angle 178 horizontal 178 vertical Pixel pitch 0 2475 mm Controls on screen controls Drives specifications Feature Specification Hard drive one 2 5 inch SATA drive with an adapter bracket and one 2 5 inch SATA drive optional Optical drive optional one DVD ROM SATA drive or DVD RW SATA drive Port and connector specifications Feature Specification Audio one line out connector at rear one global h...

Page 56: ...ecifications Feature Specification 155 Watt PSU for UMA 200 Watt dGPU and UHD 4K Frequency 47 Hz 63 Hz Voltage 90 VAC 264 VAC Input current Maximum 2 6 A Low AC range Maximum 1 3 A High AC range Camera optional specifications Feature Specification Image resolution 2 0 megapixel Video resolution FHD 1080p Diagonal viewing angle 74 degrees Stand specifications Feature Specification Tilt 5 degrees to...

Page 57: ...uration ordered and the manufacturing variability Environmental specifications Temperature Specifications Operating 0 C to 35 C 50 F to 95 F Storage 40 C to 65 C 40 F to 149 F Relative humidity maximum Specifications Operating 20 to 80 non condensing Storage 20 to 80 non condensing Maximum vibration Specifications Operating 0 26 GRMS at 5 to 350 Hz Storage 2 2 GRMS at 5 to 500 Hz Maximum shock Spe...

Page 58: ...Altitude maximum Specifications Non operating 0 m to 5000 m 0 ft to 16 404 ft Airborne contaminant level G2 or lower as defined by ANSI ISA S71 04 1985 58 ...

Page 59: ...upport and service options Availability varies by country and product and some services may not be available in your area To contact Dell for sales technical support or customer service issues 1 Go to Dell com support 2 Select your support category 3 Verify your country or region in the Choose a Country Region drop down list at the bottom of the page 4 Select the appropriate service or support lin...

Reviews: