background image

Steps

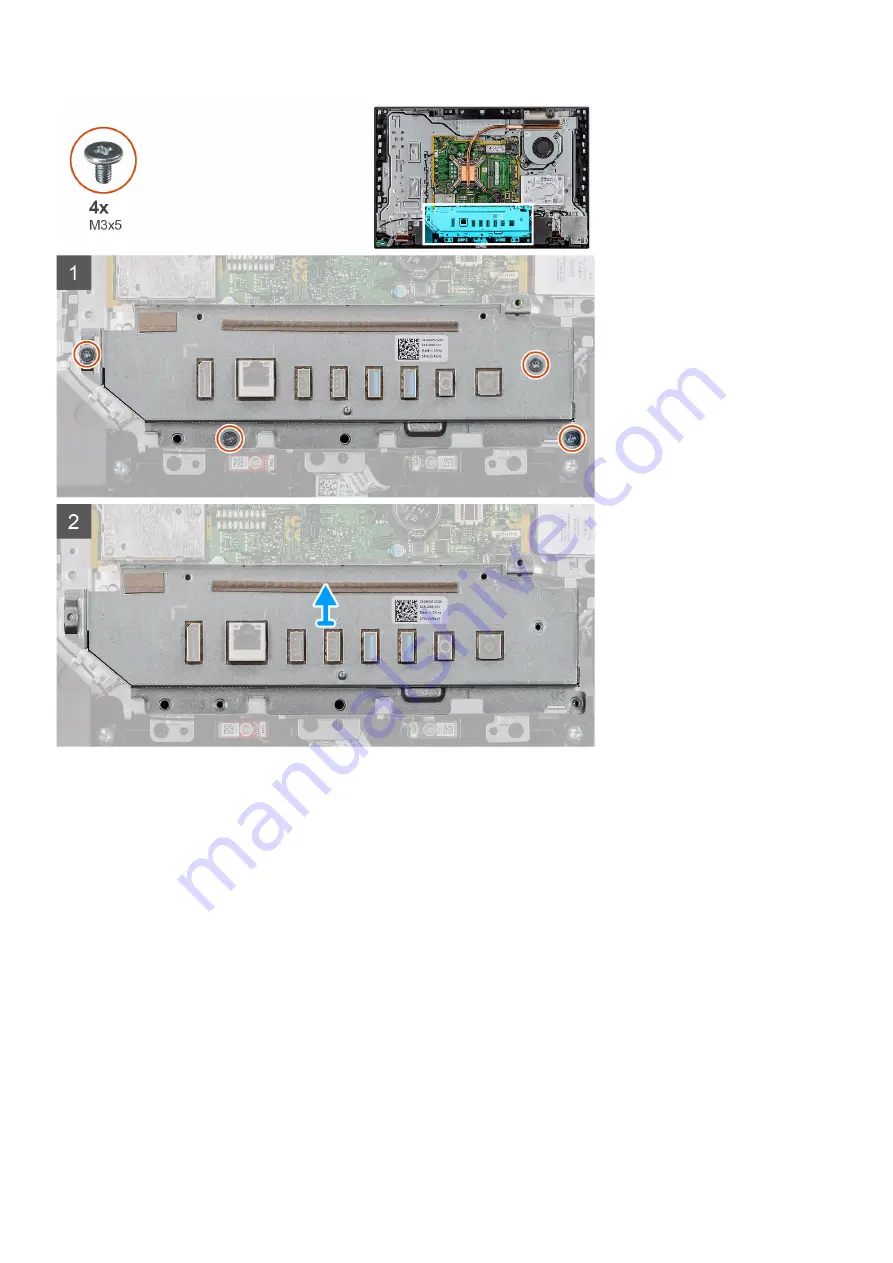
1. Remove the four screws (M3x5) that secure the rear-I/O bracket to the display-assembly base.
2. Lift the rear-I/O bracket off the display-assembly base.

Installing the rear-I/O bracket

Prerequisites

If you are replacing a component, remove the existing component before performing the installation procedure.

About this task

The following image indicates the location of the rear-I/O bracket and provides a visual representation of the installation
procedure.

50

Removing and installing components

Summary of Contents for OptiPlex 3280

Page 1: ...OptiPlex 3280 All in One Service Manual Regulatory Model W21B Regulatory Type W21B001 August 2021 Rev A01 ...

Page 2: ...tial damage to hardware or loss of data and tells you how to avoid the problem WARNING A WARNING indicates a potential for property damage personal injury or death 2020 2021 Dell Inc or its subsidiaries All rights reserved Dell EMC and other trademarks are trademarks of Dell Inc or its subsidiaries Other trademarks may be trademarks of their respective owners ...

Page 3: ...cover 19 Installing the cable cover 21 Back cover 22 Removing the back cover 22 Installing the back cover 24 Hard drive 25 Removing the hard drive 25 Installing the hard drive 26 Memory modules 26 Removing the memory modules 26 Installing the memory modules 27 System board shield 28 Removing the system board shield 28 Installing the system board shield 29 Solid state drive 30 Removing the M 2 2230...

Page 4: ... system board 55 Speakers 57 Removing the speakers 57 Installing the speakers 58 Power button board 60 Removing the power button board 60 Installing the power button board 60 Microphones 61 Removing the microphones 61 Installing the microphones 62 Side I O board 63 Removing the side I O board 63 Installing the side I O board 65 Audio board 66 Removing the audio board 66 Installing the audio board ...

Page 5: ... One Time boot menu 89 System and setup password 90 Assigning a system setup password 90 Deleting or changing an existing system setup password 91 Chapter 5 Troubleshooting 92 SupportAssist diagnostics 92 Diagnostic LED behavior 92 Recovering the operating system 93 Updating the BIOS in Windows 94 Updating the BIOS using the USB drive in Windows 94 Backup media and recovery options 94 WiFi power c...

Page 6: ...th the product or at www dell com regulatory_compliance CAUTION Before touching anything inside your computer ground yourself by touching an unpainted metal surface such as the metal at the back of the computer While you work periodically touch an unpainted metal surface to dissipate static electricity which could harm internal components CAUTION When you disconnect a cable pull it by its connecto...

Page 7: ...20 percent of ESD related failures The damage causes an immediate and complete loss of device functionality An example of catastrophic failure is a memory DIMM that has received a static shock and immediately generates a No POST No Video symptom with a beep code emitted for missing or nonfunctional memory Intermittent Intermittent failures represent approximately 80 percent of ESD related failures...

Page 8: ...rm sounds if the test fails Insulator Elements It is critical to keep ESD sensitive devices such as plastic heat sink casings away from internal parts that are insulators and often highly charged Working Environment Before deploying the ESD Field Service kit assess the situation at the customer location For example deploying the kit for a server environment is different than for a desktop or porta...

Page 9: ...k 4 Keep the load close The closer it is to your spine the less force it exerts on your back 5 Keep your back upright whether lifting or setting down the load Do not add the weight of your body to the load Avoid twisting your body and back 6 Follow the same techniques in reverse to set the load down After working inside your computer About this task CAUTION Leaving stray or loose screws inside you...

Page 10: ... Antenna modules Display panel Middle frame Recommended tools The procedures in this document may require the following tools Phillips screwdriver 1 Plastic scribe Screw list NOTE When removing screws from a component it is recommended to note the screw type the quantity of screws and then place them in a screw storage box This is to ensure that the correct number of screws and correct screw type ...

Page 11: ...2280 solid state drive Intel Optane memory M2x2 5 1 System fan M3x5 3 Wireless card shield M2x2 5 2 Wireless card M2x2 5 1 Camera assembly M3x5 2 Camera door M3x5 2 Heat sink UMA Captive screws 5 Rear I O bracket M3x5 4 System board M3x5 7 Speakers M3 4 7 1xZN 4 Power button board M3x5 1 Microphones M2x2 5 2 Side I O board shield M3x5 2 Side I O board M2 5x3 5 2 Removing and installing components ...

Page 12: ...tand Prerequisites 1 Follow the procedure in Before working inside your computer NOTE When servicing the system place it on an elevated clean and flat surface Dell recommends removing the stand to avoid accidental damage to the system display during servicing About this task The following image provides a visual representation of the fixed stand removal procedure 12 Removing and installing compone...

Page 13: ...ard to lift the stand off the back cover Installing the fixed stand Prerequisites If you are replacing a component remove the existing component before performing the installation procedure About this task The following image provides a visual representation of the fixed stand installation procedure Removing and installing components 13 ...

Page 14: ...equisites 1 Follow the procedure in Before working inside your computer CAUTION When servicing the system place it on an elevated clean and flat surface Dell recommends removing the stand to avoid accidental damage to the system display during servicing About this task The following image indicates the articulating stand and provides a visual representation of the removal procedure 14 Removing and...

Page 15: ...Steps 1 Press and slide the release button up Removing and installing components 15 ...

Page 16: ...he bottom cover and pull it out Installing the articulating stand Prerequisites If you are replacing a component remove the existing component before performing the installation procedure About this task The following image indicates the articulating stand and provides a visual representation of the installation procedure 16 Removing and installing components ...

Page 17: ...d Prerequisites NOTE Follow the same procedure to remove the Height Adjustable Stand with Optical Disk Drive 1 Follow the procedure in Before working inside your computer CAUTION When servicing the system place it on an elevated clean and flat surface Dell recommends removing the stand to avoid accidental damage to the system display during servicing About this task The following image provides a ...

Page 18: ...ght adjustable stand Prerequisites If you are replacing a component remove the existing component before performing the installation procedure NOTE Follow the same procedure to install the Height Adjustable Stand with Optical Disk Drive About this task The following image provides a visual representation of the height adjustable stand installation procedure 18 Removing and installing components ...

Page 19: ...over Prerequisites 1 Follow the procedure in Before working inside your computer CAUTION When servicing the system place it on an elevated clean and flat surface It is recommended to remove the stand to avoid accidental damage to the system display during servicing 2 Remove the stand About this task The following image provides a visual representation of the cable cover removal procedure Removing ...

Page 20: ...route the power cable from the slots on the cable cover 2 Remove the screw M3x9 that secures the cable cover to the bottom cover 3 Lift the cable cover from the bottom cover 20 Removing and installing components ...

Page 21: ...are replacing a component remove the existing component before performing the installation procedure About this task The following image provides a visual representation of the cable cover installation procedure Removing and installing components 21 ...

Page 22: ...our computer Back cover Removing the back cover Prerequisites 1 Follow the procedure in Before working inside your computer CAUTION When servicing the system place it on an elevated clean and flat surface Dell recommends removing the stand to avoid accidental damage to the system display during servicing 2 Remove the stand 3 Remove the cable cover optional About this task The following image provi...

Page 23: ...k cover to release it from the latch on the system board shield 2 Slide the back cover up to release the tabs on the cover from the slots on the middle frame 3 Lift the back cover up and remove it from the system Removing and installing components 23 ...

Page 24: ...are replacing a component remove the existing component before performing the installation procedure About this task The following image provides a visual representation of the back cover installation procedure 24 Removing and installing components ...

Page 25: ...ter Hard drive Removing the hard drive Prerequisites 1 Follow the procedure in Before working inside your computer 2 Remove the stand 3 Remove the cable cover optional 4 Remove the back cover About this task The following image indicates the location of the hard drive and provides a visual representation of the removal procedure Steps 1 Remove the two screws M3x5 that secure the hard drive assembl...

Page 26: ...bly into the slot on the display assembly base 2 Replace the two screws M3x5 that secures the hard drive assembly to the display assembly base Next steps 1 Install the cable cover optional 2 Install the back cover 3 Install the stand 4 Follow the procedure in After working inside your computer Memory modules Removing the memory modules Prerequisites 1 Follow the procedure in Before working inside ...

Page 27: ... until the memory module pops up 3 Slide and remove the memory module from the memory module slot NOTE Repeat step 2 and 3 if there are two memory modules Installing the memory modules Prerequisites If you are replacing a component remove the existing component before performing the installation procedure About this task The following image indicates the location of the memory module and provides ...

Page 28: ... the tabs on the DIMM door with the slots on the system board shield and snap it into place NOTE Repeat step 1 and 2 if there are two memory modules Next steps 1 Install the back cover 2 Install the cable cover optional 3 Install the stand 4 Follow the procedure in After working inside your computer System board shield Removing the system board shield Prerequisites 1 Follow the procedure in Before...

Page 29: ...isplay assembly base 2 Lift the system board shield off the display assembly base Installing the system board shield Prerequisites If you are replacing a component remove the existing component before performing the installation procedure About this task The following image indicates the location of the system board shield and provides a visual representation of the installation procedure Removing...

Page 30: ...stall the back cover 2 Install the cable cover optional 3 Install the stand 4 Follow the procedure in After working inside your computer Solid state drive Removing the M 2 2230 solid state drive Prerequisites 1 Follow the procedure in Before working inside your computer 2 Remove the stand 3 Remove the cable cover optional 4 Remove the back cover 5 Remove the system board shield 30 Removing and ins...

Page 31: ... the M 2 card slot on the system board Installing the M 2 2230 solid state drive Prerequisites CAUTION Solid state drives are fragile Exercise care when handling the solid state drive If you are replacing a component remove the existing component before performing the installation procedure About this task The following image indicates the location of the solid state drive and provides a visual re...

Page 32: ...er optional 4 Install the stand 5 Follow the procedure in After working inside your computer Removing the M 2 2280 solid state drive Intel Optane memory module Prerequisites 1 Follow the procedure in Before working inside your computer 2 Remove the stand 3 Remove the cable cover optional 4 Remove the back cover 5 Remove the system board shield About this task The following image indicates the loca...

Page 33: ...Optane memory module Prerequisites CAUTION Solid state drives are fragile Exercise care when handling the solid state drive If you are replacing a component remove the existing component before performing the installation procedure About this task The following image indicates the location of the solid state drive and provides a visual representation of the installation procedure Removing and inst...

Page 34: ...ver 3 Install the cable cover optional 4 Install the stand 5 Follow the procedure in After working inside your computer System fan Removing the fan Prerequisites 1 Follow the procedure in Before working inside your computer 2 Remove the stand 3 Remove the cable cover optional 4 Remove the back cover 5 Remove the system board shield About this task The following image indicates the location of the ...

Page 35: ...an along with its cable off the display assembly base Installing the fan Prerequisites If you are replacing a component remove the existing component before performing the installation procedure About this task The following image indicates the location of the fan and provides a visual representation of the installation procedure Removing and installing components 35 ...

Page 36: ...computer Coin cell battery Removing the coin cell battery Prerequisites 1 Follow the procedure in Before working inside your computer 2 Remove the stand 3 Remove the cable cover optional 4 Remove the back cover 5 Remove the system board shield NOTE Removing the coin cell battery resets the CMOS and BIOS settings to default and results in data lose It is recommended that you note the CMOS and BIOS ...

Page 37: ... the coin cell battery holder Installing the coin cell battery Prerequisites If you are replacing a component remove the existing component before performing the installation procedure About this task The following image indicates the location of the coin cell battery and provides a visual representation of the installation procedure Removing and installing components 37 ...

Page 38: ...ll the stand 5 Follow the procedure in After working inside your computer Wireless card Removing the wireless card Prerequisites 1 Follow the procedure in Before working inside your computer 2 Remove the stand 3 Remove the cable cover optional 4 Remove the back cover 5 Remove the system board shield About this task The following image indicates the location of the wireless card and provides a visu...

Page 39: ...off the wireless card 6 Disconnect the antenna cables from the wireless card 7 Slide and remove the wireless card from the wireless card slot Installing the wireless card Prerequisites If you are replacing a component remove the existing component before performing the installation procedure NOTE To avoid damage to the wireless card route the antenna cables accurately About this task The following...

Page 40: ...ireless card at an angle into the wireless card slot 5 Replace the screw M2x4 to secure the wireless card bracket to the wireless card 6 Align and place the wireless card shield on the system board and wireless card 7 Route the antenna cables through the routing guides on the display assembly base 8 Replace the two screws M2x4 to secure the wireless card shield to the system board Next steps 1 Ins...

Page 41: ...k cover 5 Remove the system board shield About this task The following image indicates the location of the camera assembly and provides a visual representation of the removal procedure Steps 1 Remove the two screws M3x5 that secure the camera assembly door to the display assembly base 2 Disconnect the camera cable from the connector on the system board Removing and installing components 41 ...

Page 42: ... installation procedure About this task The following image indicates the location of the camera and provides a visual representation of the installation procedure Steps 1 Slide the camera assembly on the middle frame and align the screw holes on the camera assembly with the screw holes on the middle frame 2 Replace the two screws M3x5 to secure the camera assembly to the middle frame 3 Route the ...

Page 43: ...onal 4 Install the stand 5 Follow the procedure in After working inside your computer Bottom cover Removing the bottom cover Prerequisites 1 Follow the procedure in Before working inside your computer 2 Remove the stand 3 Remove the cable cover optional 4 Remove the back cover 5 Remove the system board shield About this task The following image indicates the location of the bottom cover and provid...

Page 44: ...g image indicates the location of the bottom cover and provides a visual representation of the installation procedure Steps 1 Align the screw holes on the bottom cover with the screw holes on the display assembly base 2 Replace the four screws M3x5 to secure the bottom cover to the display assembly base Next steps 1 Install the system board shield 2 Install the back cover 3 Install the cable cover...

Page 45: ...stem fan About this task The following image indicates the location of the heat sink and provides a visual representation of the removal procedure Steps 1 In reverse sequential order as indicated on the heat sink loosen the five captive screws that secure the heat sink to the system board and the display assembly base 2 Slide and lift the heat sink off the system board and display assembly base Re...

Page 46: ...rovides a visual representation of the installation procedure Steps 1 Align the screw holes on the heat sink with the screw holes on the system board and the display assembly base 2 In sequential order as indicated on the heat sink tighten the five captive screws that secure the heat sink to the system board and display assembly base Next steps 1 Install the system fan 2 Install the system board s...

Page 47: ...d shield 6 Remove the system fan 7 Remove the heat sink About this task The following image indicates the location of the processor and provides a visual representation of the removal procedure Steps 1 Press the release lever down and then push it away from the processor to release it from the securing tab 2 Extend the release lever completely and open the processor cover Removing and installing c...

Page 48: ...visual representation of the installation procedure Steps 1 Ensure that the release lever on the processor socket is fully extended in the open position NOTE The pin 1 corner of the processor has a triangle that aligns with the triangle on the pin 1 corner on the processor socket When the processor is properly seated all four corners are aligned at the same height If one or more corners of the pro...

Page 49: ...l the cable cover optional 6 Install the stand 7 Follow the procedure in After working inside your computer Rear I O bracket Removing the rear I O bracket Prerequisites 1 Follow the procedure in Before working inside your computer 2 Remove the stand 3 Remove the cable cover optional 4 Remove the back cover 5 Remove the system board shield 6 Remove the bottom cover About this task The following ima...

Page 50: ...ly base Installing the rear I O bracket Prerequisites If you are replacing a component remove the existing component before performing the installation procedure About this task The following image indicates the location of the rear I O bracket and provides a visual representation of the installation procedure 50 Removing and installing components ...

Page 51: ...screws M3x5 that secure the rear I O bracket to the display assembly base Next steps 1 Install the bottom cover 2 Install the system board shield 3 Install the back cover 4 Install the cable cover optional 5 Install the stand 6 Follow the procedure in After working inside your computer Removing and installing components 51 ...

Page 52: ... the cables from the system board note the location of the connectors so that you can reconnect the cables correctly after you replace the system board 2 Remove the stand 3 Remove the cable cover optional 4 Remove the back cover 5 Remove the system board shield 6 Remove the memory module 7 Remove the wireless card 8 Remove the hard drive 9 Remove the M 2 2230 solid state drive 10 Remove the M 2 22...

Page 53: ... 10 Coin cell battery 11 Microphone module cable connector 12 SIO signal cable connector 13 Speaker cable connector 14 Audio board cable connector 15 SIO power cable connector 16 Display cable connector 17 M 2 WLAN connector 18 Power button cable connector 19 Display back light cable connector The following image indicates the location of system board and provides a visual representation of the re...

Page 54: ... cable from the connector on the system board 2 Disconnect the touchscreen cable from the connector on the system board 3 Disconnect the system fan cable from the connector on the system board 54 Removing and installing components ...

Page 55: ...x5 that secure the system board to the display assembly base 13 Lift and remove the system board from the display assembly base Installing the system board Prerequisites If you are replacing a component remove the existing component before performing the installation procedure About this task The following image indicates the connectors on your system board 1 Processor 2 Camera cable connector 3 T...

Page 56: ...wer button cable connector 19 Display back light cable connector The following image indicates the location of system board and provides a visual representation of the installation procedure 56 Removing and installing components ...

Page 57: ...e bottom cover 3 Install the coin cell 4 Install the processor 5 Install the heat sink 6 Install the M 2 2230 solid state drive Intel Optane 7 Install the M 2 2230 solid state drive 8 Install the hard drive 9 Install the wireless card 10 Install the memory module 11 Install the system board shield 12 Install the back cover 13 Install the cable cover optional 14 Install the stand 15 Follow the proc...

Page 58: ... the display assembly base 4 Lift the speakers along with the cable off the display assembly base Installing the speakers Prerequisites If you are replacing a component remove the existing component before performing the installation procedure About this task The following image indicates the location of the speakers and provides a visual representation of the installation procedure 58 Removing an...

Page 59: ...e speaker cable through the routing guide on display assembly base and connect the speaker cable to the system board Next steps 1 Install the rear I O bracket 2 Install the bottom cover 3 Install the system board shield 4 Install the back cover 5 Install the cable cover optional 6 Install the stand 7 Follow the procedure in After working inside your computer Removing and installing components 59 ...

Page 60: ...ovides a visual representation of the removal procedure Steps 1 Open the latch and disconnect the power button board cable from the connector on the system board 2 Unroute the power button board cable from the display assembly base 3 Remove the screw M3x5 that secures the power button board to the middle frame 4 Lift and remove the power button board with the cable off the middle frame Installing ...

Page 61: ...d cable to the connector on the system board and close the latch to secure the cable Next steps 1 Install the speakers 2 Install the rear I O bracket 3 Install the bottom cover 4 Install the system board shield 5 Install the back cover 6 Install the cable cover optional 7 Install the stand 8 Follow the procedure in After working inside your computer Microphones Removing the microphones Prerequisit...

Page 62: ...des on the display assembly base 2 Remove the two screws M2x2 5 that secure the microphone module 2 to the middle frame 3 Lift the microphone module 2 off the slots on the middle frame Installing the microphones Prerequisites If you are replacing a component remove the existing component before performing the installation procedure About this task The following image indicates the location of the ...

Page 63: ...the system board Next steps 1 Install the speaker 2 Install the rear I O bracket 3 Install the bottom cover 4 Install the back cover 5 Install the cable cover optional 6 Install the stand 7 Follow the procedure in After working inside your computer Side I O board Removing the side I O board Prerequisites 1 Follow the procedure in Before working inside your computer 2 Remove the stand 3 Remove the ...

Page 64: ...sembly base 2 Lift and remove the side I O board shield off the side I O board 3 Disconnect the SIO signal cable SIO power cable and audio board cable from the connector on the system board 4 Remove the SIO signal cable SIO power cable and audio board cable from the routing guides on the display assembly base 5 Remove the two screws M2 5x3 5 that secure the side I O board to the display assembly b...

Page 65: ...es on the display assembly base 2 Replace the two screws M2 5x3 5 to secure the side I O board to the display assembly base 3 Route the SIO signal cable SIO power cable and audio board cable through the routing guides on the display assembly base 4 Connect the SIO signal cable SIO power cable and audio board cable to the system board 5 Align the screw holes on the side I O board shield with the sc...

Page 66: ... the cable cover optional 4 Remove the back cover 5 Remove the system board shield 6 Remove the bottom cover 7 Remove the rear I O bracket 8 Remove the side I O bracket About this task The following image indicates the location of the audio board and provides a visual representation of the removal procedure Steps 1 Disconnect the audio board cable from the connector on the system board 2 Remove th...

Page 67: ...splay assembly base 2 Replace the screw M3x5 to secure the audio board to the display assembly base 3 Connect the audio board cable to the system board Next steps 1 Install the rear I O bracket 2 Install the bottom cover 3 Install the system board shield 4 Install the back cover 5 Install the cable cover optional 6 Install the stand 7 Follow the procedure in After working inside your computer Ante...

Page 68: ...ive 7 Remove the wireless card 8 Remove the system board 9 Remove the bottom cover 10 Remove the rear I O bracket 11 Remove the speakers 12 Remove the side I O board About this task The following image provides a visual representation of the antenna modules removal procedure 68 Removing and installing components ...

Page 69: ...lay assembly base 2 Remove the two screws M2x2 5 that secure the antenna modules to the middle frame 3 Carefully peel the copper foil that secures the antenna cables to the middle frame 4 Lift the antenna modules off the middle frame Removing and installing components 69 ...

Page 70: ...are replacing a component remove the existing component before performing the installation procedure About this task The following image provides a visual representation of the antenna modules installation procedure 70 Removing and installing components ...

Page 71: ...ard shield 8 Install the back cover 9 Install the cable cover optional 10 Install the stand 11 Follow the procedure in After working inside your computer Display panel Removing the display panel Prerequisites 1 Follow the procedure in Before working inside your computer 2 Remove the stand 3 Remove the cable cover optional 4 Remove the back cover 5 Remove the system board shield 6 Remove the hard d...

Page 72: ...the middle frame and display assembly base to the display panel 2 Place the system in an upright position 3 Holding the top corner release the display panel away from the middle frame and display assembly base 72 Removing and installing components ...

Page 73: ...e and display assembly base Installing the display panel Prerequisites If you are replacing a component remove the existing component before performing the installation procedure About this task The following image indicates the location of display panel and provides a visual representation of the installation procedure Removing and installing components 73 ...

Page 74: ...4 Replace the four screws M3x5 to secure the display panel to the middle frame and display assembly base 5 Remove the four jig screws from the display panel 6 Replace the four screw M3x5 to secure the display panel to the middle frame and display assembly base 7 Route the display cable in the routing guides on the display assembly base Next steps 1 Install the system board 2 Install the camera ass...

Page 75: ...l 4 Remove the back cover 5 Remove the system board shield 6 Remove the hard drive 7 Remove the wireless card 8 Remove the bottom cover 9 Remove the rear I O bracket 10 Remove the speakers 11 Remove the camera assembly 12 Remove the system board 13 Remove the power button board 14 Remove the microphones 15 Remove the side I O board 16 Remove the antenna module 17 Remove the display panel About thi...

Page 76: ... 1 Remove the 11 screws M3x5 that secure the middle frame to the display assembly base 2 Remove the middle frame and lift the middle frame off the display assembly base 76 Removing and installing components ...

Page 77: ...omponent remove the existing component before performing the installation procedure About this task The following image indicates the location of the middle frame and provides a visual representation of the installation procedure Removing and installing components 77 ...

Page 78: ...frame to the slots on the display assembly base then snap the middle frame into place on the display assembly base 2 Replace the 11 screws M3x5 to secure the middle frame to the display assembly base 78 Removing and installing components ...

Page 79: ...7 Install the camera assembly 8 Install the speakers 9 Install the rear I O bracket 10 Install the bottom cover 11 Install the wireless card 12 Install the hard drive 13 Install the system board shield 14 Install the back cover 15 Install the cable cover optional 16 Install the stand 17 Follow the procedure in After working inside your computer Removing and installing components 79 ...

Page 80: ... SupportAssist then click Continue 7 If necessary your computer starts to download and install SupportAssist NOTE Review on screen instructions for browser specific instructions 8 Click View Drivers for My System 9 Click Download and Install to download and install all driver updates detected for your computer 10 Select a location to save the files 11 If prompted approve requests from User Account...

Page 81: ...ystem setup options Updating the BIOS System and setup password BIOS overview The BIOS manages data flow between the computer s operating system and attached devices such as hard disk video adapter keyboard mouse and printer Entering BIOS setup program About this task Turn on or restart your computer and press F2 immediately Navigation keys NOTE For most of the System Setup options changes that yo...

Page 82: ...ons System information menu General System Information System Information BIOS Version Displays the BIOS version number Service Tag Displays the Service Tag of the computer Asset Tag Displays the Asset Tag of the computer Ownership Tag Displays the Ownership Tag of the computer Manufacture Date Displays the manufacture date of the computer Ownership Date Displays the ownership date of the computer...

Page 83: ... type of the computer Video BIOS Version Displays the video BIOS version of the computer Video Memory Displays the video memory information of the computer Panel Type Displays the Panel Type of the computer Native Resolution Displays the native resolution of the computer Audio Controller Displays the audio controller information of the computer Wi Fi Device Displays the wireless device information...

Page 84: ...ons are enabled Side USB Configuration Enable or disable rear USB configuration By default all the options are enabled USB PowerShare Enable or Disable USB PowerShare By default the Enable USB PowerShare option is not enabled Audio Enable or disable the integrated audio controller By default all the options are enabled OSD Button Management Disable OSD button Enable or disable OSD button By defaul...

Page 85: ... optional Absolute Persistence Module service from Absolute Software By default the option is enabled Chassis Intrusion Enable or disable the chassis intrusion feature By default the option is not enabled OROM Keyboard Access Enable or disable OROM keyboard access By default the option is enabled Admin Setup Lockout Enable to prevent users from entering Setup when an Admin Password is set By defau...

Page 86: ...ault the option is enabled Table 9 System setup options Power Management menu Power Management AC Recovery Enables the system to turn on automatically when AC is inserted By default the Power Off option is enabled Enable Intel Speed Shift technology Enable disable Intel Speed Shift Technology support Setting this option to enable to allows the operating system to select the appropriate processor p...

Page 87: ... Table 11 System setup options Manageability menu Manageability Intel AMT Capability Enable or disable the Intel AMT capability By default the Restrict MEBx Access option is enabled USB Provision Enable or disable USB provision By default the option is disabled MEBx Hotkey Enable or disable the MEBx hotkey feature By default the option is disabled Table 12 System setup options Virtualization Suppo...

Page 88: ...olution Auto OS Recovery Threshold Control the automatic boot flow for SupportAssist System Resolution Console and for the Dell OS Recovery tool SupportAssist OS Recovery Enable or disable the boot flow for the SupportAssist OS Recovery tool when certain system errors By default the option is enabled BIOSConnect Enable or disable the cloud service OS upon absence of local OS recovery By default th...

Page 89: ...nowledge Article https www dell com support article sln153694 Steps 1 Follow the procedure from step 1 to step 6 in Updating the BIOS in Windows to download the latest BIOS setup program file 2 Create a bootable USB drive For more information see the knowledge base article 000145519 at www dell com support 3 Copy the BIOS setup program file to the bootable USB drive 4 Connect the bootable USB driv...

Page 90: ...to a USB port of the computer 2 Turn on the computer and press F12 to access the One Time Boot Menu select BIOS Update using the mouse or arrow keys then press Enter The flash BIOS menu is displayed 3 Click Flash from file 4 Select external USB device 5 Select the file and double click the flash target file and then click Submit 6 Click Update BIOS The computer restarts to flash the BIOS 7 The com...

Page 91: ...ed in the System Setup before attempting to delete or change the existing System and Setup password You cannot delete or change an existing System or Setup password if the Password Status is Locked About this task To enter the System Setup press F2 immediately after a power on or reboot Steps 1 In the System BIOS or System Setup screen select System Security and press Enter The System Security scr...

Page 92: ...orough tests to introduce additional test options and provide extra information about the failed device s View status messages that indicate if the tests are completed successfully View error messages that indicate if problems were encountered during the test NOTE Some tests are meant for specific devices and require user interaction Ensure that you are present in front of the computer when the di...

Page 93: ...ersists replace the RTS battery 3 2 PCI or Video card chip failure Replace the system board 3 3 BIOS Recovery image not found Flash latest BIOS version If problem persists replace the system board 3 4 BIOS Recovery image found but invalid Flash latest BIOS version If problem persists replace the system board 3 5 Power rail failure EC ran into power sequencing failure If problem persists replace th...

Page 94: ...Download to download the BIOS file for your computer 7 After the download is complete browse the folder where you saved the BIOS update file 8 Double click the BIOS update file icon and follow the on screen instructions For more information see knowledge base article 000124211 at www dell com support Updating the BIOS using the USB drive in Windows Steps 1 Follow the procedure from step 1 to step ...

Page 95: ...in residual flea power before removing or replacing any components in your computer Draining residual flea power also known as a performing a hard reset is also a common troubleshooting step if your computer does not power on or boot into the operating system To drain residual flea power perform a hard reset Steps 1 Turn off your computer 2 Disconnect the power adapter from your computer 3 Remove ...

Page 96: ...ications technical help blogs drivers software updates and so on www dell com support Dell knowledge base articles for a variety of computer concerns 1 Go to https www dell com support home app knowledgebase 2 Type the subject or keyword in the Search box 3 Click Search to retrieve the related articles Contacting Dell To contact Dell for sales technical support or customer service issues see www d...

Reviews: