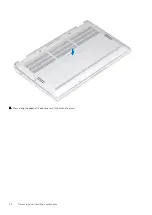
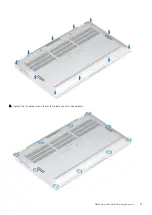
background image

HDMI 2.0

This topic explains the High-Definition Multimedia Interface (HDMI) 2.0 and its features along with the advantages.

HDMI is an industry-supported, uncompressed, all-digital audio/video interface. HDMI provides an interface between any compatible
digital audio/video source, such as a DVD player, or A/V receiver and a compatible digital audio and/or video monitor, such as a digital TV
(DTV). The intended applications for HDMI TVs, and DVD players. The primary advantage is cable reduction and content protection
provisions. HDMI supports standard, enhanced, or high-definition video, plus multichannel digital audio on a single cable.

HDMI 2.0 features

HDMI Ethernet Channel 

- Adds high-speed networking to an HDMI link, enabling users to take full advantage of their IP-enabled

devices without a separate Ethernet cable

Audio Return Channel

 - Allows an HDMI-connected TV with a integrated tuner to send audio data "upstream" to a surround audio

system, eliminating the need for a separate audio cable

3D

 - Defines input/output protocols for major 3D video formats, paving the way for true 3D gaming and 3D home theater applications

Content Type

 - Real-time signaling of content types between display and source devices, enabling a TV to optimize illustration

settings based on content type

Additional Color Spaces 

- Adds support for additional color models that are used in digital photography and computer graphics

4K Support

 - Enables video resolutions far beyond 1080p, supporting next-generation displays that rival the Digital Cinema systems

that are used in many commercial movie theaters

HDMI Micro Connector

 - A new, smaller connector for phones and other portable devices, supporting video resolutions up to 1080p

Automotive Connection System

 - New cables and connectors for automotive video systems, which are designed to meet the

unique demands of the motoring environment while delivering true HD quality

Advantages of HDMI

Quality HDMI transfers uncompressed digital audio and video for the highest, crispest image quality.

Low -cost HDMI provides the quality and functionality of a digital interface while also supporting uncompressed video formats in a
simple, cost-effective manner

Audio HDMI supports multiple audio formats from standard stereo to multichannel surround sound

HDMI combines video and multichannel audio into a single cable, eliminating the cost, complexity, and confusion of multiple cables that
are currently used in A/V systems

HDMI supports communication between the video source (such as a DVD player) and the DTV, enabling new functionality

Corning Gorilla Glass

Corning Gorilla Glass 5: Corning’s latest composition was formulated to address breakage the #1 consumer complaint, according to
Corning’s research. The new glass is just as thin and light as previous versions, but has been formulated to deliver dramatically improved
native damage resistance allowing improved in-field performance. Corning Gorilla Glass 5 has been tested for performance when
subjected to sharp contact damage, such as asphalt and other real-world surfaces.

Benefits

Enhanced retained strength after use.

High resistance to scratch and sharp contact damage.

Improved drop performance.

Superior surface quality.

Applications

Ideal protective cover for electronic displays in:

Smartphones

Laptop and tablet computer screens

Wearable devices

Touchscreen devices

Optical components

Technology and components

9

Summary of Contents for Latitude 9410

Page 1: ...Dell Latitude 9410 Service Manual Regulatory Model P110G Regulatory Type P110G001 ...

Page 2: ...al damage to hardware or loss of data and tells you how to avoid the problem WARNING A WARNING indicates a potential for property damage personal injury or death 2020 Dell Inc or its subsidiaries All rights reserved Dell EMC and other trademarks are trademarks of Dell Inc or its subsidiaries Other trademarks may be trademarks of their respective owners Rev A00 ...

Page 3: ...rd 15 Installing the SD memory card 15 SIM card tray 16 Removing the SIM card tray 16 Installing the SIM card tray 17 Base cover 18 Removing the base cover 18 Installing the base cover 21 Battery cable 24 Disconnecting the battery cable 24 Connecting the battery cable 24 Coin cell 25 Removing the coin cell battery 25 Installing the coin cell battery 26 Solid state drive 27 Removing the solid state...

Page 4: ...ng the battery 62 Installing the battery 64 System board 66 Removing the system board 66 Installing the system board 71 Keyboard 76 Removing the keyboard 76 Installing the keyboard 81 Palmrest assembly 85 5 Troubleshooting 88 SupportAssist Diagnostics 88 System diagnostic lights 90 M BIST 91 LCD Built in Self Test 91 Flashing BIOS USB key 92 Flashing the BIOS 92 Backup media and recovery options 9...

Page 5: ...ng a connector on the back of the computer CAUTION Handle components and cards with care Do not touch the components or contacts on a card Hold a card by its edges or by its metal mounting bracket Hold a component such as a processor by its edges not by its pins CAUTION When you disconnect a cable pull on its connector or on its pull tab not on the cable itself Some cables have connectors with loc...

Page 6: ...riodically touching an unpainted metal surface at the same time as touching a connector on the back of the computer After working inside your computer After you complete any replacement procedure ensure that you connect any external devices cards and cables before turning on your computer 1 Connect any telephone or network cables to your computer CAUTION To connect a network cable first plug the c...

Page 7: ...the answer to the consumers demands with a theoretically 10 times faster than its predecessor In a nutshell USB 3 2 features are as follows Higher transfer rates up to 20 Gbps Increased multilane operation of 10 Gbps each Increased maximum bus power and increased device current draw to better accommodate power hungry devices New power management features Full duplex data transfers and support for ...

Page 8: ...ose portable battery packs you charge your smartphones and other portable devices from today You could plug your laptop into an external display connected to a power cable and that external display would charge your laptop as you used it as an external display all via the one little USB Type C connection To use this the device and the cable have to support USB Power Delivery Just having a USB Type...

Page 9: ...nector A new smaller connector for phones and other portable devices supporting video resolutions up to 1080p Automotive Connection System New cables and connectors for automotive video systems which are designed to meet the unique demands of the motoring environment while delivering true HD quality Advantages of HDMI Quality HDMI transfers uncompressed digital audio and video for the highest cris...

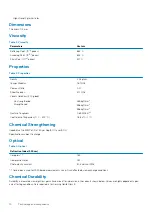
Page 10: ...9 MPa m0 5 Coefficient of Expansion 0 C 300 C 78 8 x 10 7 C Chemical Strengthening Capability of 850MPa CS at 50 µm Depth Of Layer DOL Specifications subject to change Optical Table 4 Optical Refractive Index 590 nm Core glass 1 50 Compression layer 1 51 Photo elastic constant 30 3 nm cm MPa Core index is used for FSM based measurements since it is unaffected by ion exchange conditions Chemical Du...

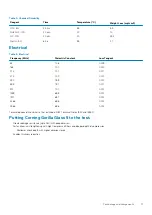
Page 11: ...0 490 7 99 0 010 599 7 97 0 011 912 7 01 0 012 1499 6 99 0 012 1977 6 97 0 014 2466 6 96 0 014 2986 6 96 0 014 Terminated coaxial line similar to that outlined in NIST Technical Notes 1520 and 1355 R Putting Corning Gorilla Glass 5 to the test Greater damage resistance upto 1 8X with deep abrasion Faster chemical strengthening with high Compressive Stress and deeper depth of compression Shallower ...

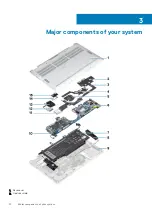
Page 12: ...Major components of your system 1 Base cover 2 Heatsink shield 3 12 Major components of your system ...

Page 13: ...3 WWAN shield 14 Solid state drive 15 SSD shield NOTE Dell provides a list of components and their part numbers for the original system configuration purchased These parts are available according to warranty coverages purchased by the customer Contact your Dell sales representative for purchase options Major components of your system 13 ...

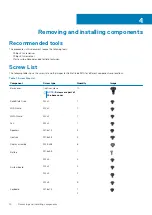
Page 14: ...d the images for Dell Latitude 9410 for different components and locations Table 7 Screw Size List Component Screw type Quantity Image Base cover Captive screws NOTE Screws are part of the base cover 10 Solid State Drive M2x2 1 WLAN card M2x2 1 WWAN card M2x2 1 Fan M2x2 1 Speakers M1 6x1 4 3 Heatsink M1 6x2 5 4 Display assembly M2 5x3 5 6 Battery M1 6x4 5 1 M2x3 4 System board M2x2 2 M2x4 2 M2x3 5...

Page 15: ...D memory card 1 Press the SD memory card to eject it from the SD memory card slot 1 2 Remove the SD memory card from the computer 2 Installing the SD memory card Insert the SD memory card into its slot 1 until it clicks into place 2 Removing and installing components 15 ...

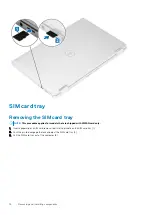
Page 16: ...ls that are shipped with WWAN card only 1 Insert a paperclip or a SIM card removal tool into the pinhole on the SIM card tray 1 2 Push the pin to disengage the lock and eject the SIM card tray 2 3 Pull the SIM card tray out of the computer 3 16 Removing and installing components ...

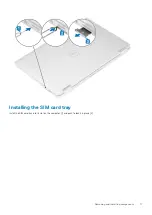
Page 17: ...Installing the SIM card tray Install the SIM card tray into its slot on the computer 1 and push to lock it in place 2 Removing and installing components 17 ...

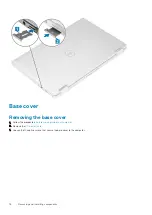
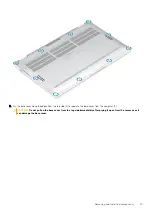
Page 18: ...ng the base cover 1 Follow the procedure in before working inside your computer 2 Remove the SD memory card 1 Loosen the 10 captive screws that secure the base cover to the computer 18 Removing and installing components ...

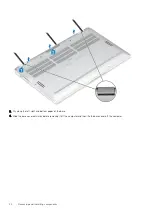
Page 19: ...om the top side 2 to separate the base cover from the computer 2 CAUTION Do not pull on the base cover from the top side immediately after prying it open from the recesses as it can damage the base cover Removing and installing components 19 ...

Page 20: ...ry along the left right and bottom edges of the base 4 Slide the base cover outwards before removing it off the computer and then life the base cover off the computer 20 Removing and installing components ...

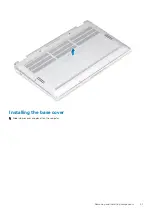
Page 21: ...Installing the base cover 1 Slide in base cover and place it on the computer Removing and installing components 21 ...

Page 22: ...2 Press along the edges of the base cover until it clicks into place 22 Removing and installing components ...

Page 23: ...3 Tighten the 10 captive screws to secure the base cover to the computer Removing and installing components 23 ...

Page 24: ...attery cable 1 Follow the procedure in before working inside your computer 2 Remove the SD memory card 3 Remove the base cover Disconnect the battery cable from the connector on the system board Connecting the battery cable Connect the battery cable to the connector on the system board 24 Removing and installing components ...

Page 25: ...emoving the coin cell battery 1 Follow the procedure in before working inside your computer 2 Remove the SD memory card 3 Remove the base cover 4 Disconnect the battery cable 1 Disconnect the coin cell battery cable from the connector on the system board 1 2 Peel and lift the coin cell battery off the computer 2 Removing and installing components 25 ...

Page 26: ...Installing the coin cell battery 1 Affix the coin cell battery to the system 1 2 Connect the coin cell battery cable to the connector on the system board 2 26 Removing and installing components ...

Page 27: ...uter Solid state drive Removing the solid state drive 1 Follow the procedure in before working inside your computer 2 Remove the SD memory card 3 Remove the base cover 4 Disconnect the battery cable 1 Peel off the metal foil 1 and the black tape 2 that partially covers the solid state drive SSD cover Removing and installing components 27 ...

Page 28: ...2 Remove the single M2x2 screw 1 that secures the SSD shield to the system board 3 Lift to remove the SSD shield from the system board 2 28 Removing and installing components ...

Page 29: ...ve the SSD module from the connector on the system board Installing the solid state drive 1 Align and slide the solid state drive SSD module into the connector on the system board Removing and installing components 29 ...

Page 30: ...D shield on the SSD module 1 and replace the single M2x2 screw 2 to secure it to the system board 3 Affix the black tape 1 and the metal foil 2 to secure the SSD shield in place 30 Removing and installing components ...

Page 31: ...mory card 3 Remove the base cover 4 Disconnect the battery cable 1 Partially peel off the Mylar sheet that covers the WLAN card 1 2 Remove the single M2x2 screw 2 that secures the WLAN card bracket to the WLAN card 3 Remove the WLAN card bracket from the WLAN card 4 Disconnect the wireless antennae cables 4 from the connectors on the WLAN card 5 Slide and remove the WLAN card 5 from the connector ...

Page 32: ...N antenna card cables 2 to the connector on the WLAN card 3 Align the screw hole on the WLAN card bracket with the screw hole on the WLAN card 3 4 Replace the single M2x2 4 screw to secure the WLAN card to the system board 5 Stick the Mylar sheet on the system board to cover the WLAN card 5 32 Removing and installing components ...

Page 33: ...ure in after working inside your computer WWAN card Removing the WWAN card 1 Follow the procedure in before working inside your computer 2 Remove the SD memory card 3 Remove the base cover 4 Disconnect the battery cable 1 Remove the metal shield from the WWAN card Removing and installing components 33 ...

Page 34: ...ket to the WWAN card 3 Remove the WWAN bracket 2 from the WWAN card 4 Disconnect the wireless antennae cables 3 from the connectors on the WWAN card 5 Slide and remove the WWAN card 4 from the connector on the system board 34 Removing and installing components ...

Page 35: ...on the system board 2 Connect the WWAN antenna cables 2 to the connector on the WWAN card 3 Align the screw hole on the WWAN card bracket with the screw hole on the WWAN card 3 4 Replace the single M2x2 screw 4 to secure the WWAN card to the system board Removing and installing components 35 ...

Page 36: ...5 Place the metal shield on the WWAN card 36 Removing and installing components ...

Page 37: ...ct the battery cable NOTE For the system shipped with a WWAN card there is an L shaped bracket P sensor bracket that covers the four WWAN LTE antenna cable connections to the system board The screw that secures the bracket to the system also helps secure the fan to the system Technicians must first remove the bracket before removing the fan and then reinstall the bracket after the fan is reinstall...

Page 38: ...2 Disconnect the fan cable 1 from the connector on the system board 1 3 Partially peel off the metal foil 2 and the black tape 3 on the SSD shield 38 Removing and installing components ...

Page 39: ...sor bracket to the system board 5 Remove the WWAN P sensor bracket 2 from the system board 6 Partially peel off the padded gasket 1 from the fan case 7 Remove the single M2x2 screw 2 that secures the fan to the system board Removing and installing components 39 ...

Page 40: ...g the palmrest on the bottom side of the fan Technicians should not lift the fan directly up as it may damage the fan Partially lift the left side of the fan and slide it to the left to remove it from the computer 40 Removing and installing components ...

Page 41: ...e connections to the system board The screw that secures the bracket to the system also helps secure the fan to the system Technicians must first remove the bracket before removing the fan and then reinstall the bracket after the fan is reinstalled 1 Slide the fan at an angle into its slot on the system board Removing and installing components 41 ...

Page 42: ...2 Replace the single M2x2 screw 1 to secure the fan to the system board 3 Adhere the padded rubber gasket 2 on the fan case 42 Removing and installing components ...

Page 43: ...e on the fan 5 Replace the single M2x2 screw 2 to secure the WWAN P sensor bracket to the fan 6 Connect the fan cable 1 to the connector on the system board 7 Adhere the black tape 2 and the metal foil 3 partially covering the SSD shield Removing and installing components 43 ...

Page 44: ...8 Adhere the Mylar sheet on the system board 1 Connect the battery cable 44 Removing and installing components ...

Page 45: ...side your computer 2 Remove the SD memory card 3 Remove the base cover 4 Disconnect the battery cable 1 Disconnect the speaker cable 1 from the connector from the system board and peel off the speaker flex cable 2 from the battery 2 Remove the three M1 6x1 4 screws 1 that secure the speakers to the system board and lift the speakers off the computer 2 Removing and installing components 45 ...

Page 46: ...ng the speakers 1 Align the screw holes on the speakers 1 with the screw holes on the chassis 2 Replace the three M1 6x1 4 screws 2 that secure the speakers to the chassis 46 Removing and installing components ...

Page 47: ...3 Connect the speaker cable 1 to the connector on the system board and adhere the speaker flex cable 2 on the battery Removing and installing components 47 ...

Page 48: ...dure in before working inside your computer 2 Remove the SD memory card 3 Remove the base cover 4 Disconnect the battery cable 1 Partially peel off the Mylar sheet 1 from the system board 2 Disconnect the camera and touch screen FPC cable 2 from the connector on the system board 3 Peel off the camera and touch screen FPC cable from the heatsink shield 3 48 Removing and installing components ...

Page 49: ...4 Remove the metal foil from the heatsink shield Removing and installing components 49 ...

Page 50: ...5 Remove the heatsink shield from the system board 50 Removing and installing components ...

Page 51: ...6 Remove the four M1 6x2 5 screws 1 that secure the heatsink on the system board 7 Lift the heatsink 2 off the system board Removing and installing components 51 ...

Page 52: ...he heatsink 1 Align the screw holes on the heatsink 1 with the screw holes on the system board 2 Replace the four M1 6x2 5 screws 2 that secure the heatsink to the system board 52 Removing and installing components ...

Page 53: ...3 Place the heatsink shield on the heatsink Removing and installing components 53 ...

Page 54: ...4 Adhere the metal foils on the heatsink shield 54 Removing and installing components ...

Page 55: ...d touch screen FPC cables on the heatsink shield 1 6 Connect the camera and touch screen FPC cables 2 to the connector on the system board 7 Adhere the Mylar sheet 3 on the system board Removing and installing components 55 ...

Page 56: ...he procedure in before working inside your computer 2 Remove the SD memory card 3 Remove the base cover 4 Disconnect the battery cable 1 Partially peel off the Mylar sheet 1 from the system board 2 Disconnect the camera and touch screen FPC cable 2 from the connector on the system board 3 Peel off the camera and touch screen FPC cable from the heatsink shield 3 56 Removing and installing component...

Page 57: ...icians must flip open in order to disconnect the display cable from the system board After flipping open the latch technicians must grasp the left and right sides of the cable s connector head and disconnect the display cable from the system board in a direct upward motion to prevent damage to the connector s pins 6 Disconnect the display cable from the connector on the system board 3 Removing and...

Page 58: ...7 Remove the six M2 5x3 5 screws 1 that secures the display hinges to the computer 8 Lift the display assembly off the computer 2 58 Removing and installing components ...

Page 59: ...replaced replace the entire display assembly Installing the display assembly 1 Install the display assembly with hinges open at 180º aligned to the computer 1 2 Replace the six M2 5x3 5 screws 1 that secures the display hinges to the computer 2 3 Connect the display cable 1 to the connector on the system board 4 Close the latch 2 and adhere the tape on the display cable 3 Removing and installing c...

Page 60: ... touch screen FPC and adhere it on the heatsink shield 1 6 Connect the camera and touch screen FPC to the connector on the system board 2 and stick the Mylar sheet on the system board 3 60 Removing and installing components ...

Page 61: ...or disassemble battery packs and cells Do not apply pressure to the surface of the battery Do not bend the battery Do not use tools of any kind to pry on or against the battery Ensure any screws during the servicing of this product are not lost or misplaced to prevent accidental puncture or damage to the battery and other system components If the battery gets stuck inside your computer as a result...

Page 62: ...uting channels along the left and bottom side of the battery As a result technicians must be careful when unrouting the antenna cables from their routing guides while they are still attached to the wireless card If there is difficulty in unrouting the antenna cables from their routing channels remove the WLAN card from the computer to create space to unroute the cables 2 Remove the single M1 6x4 5...

Page 63: ... extra M2x4 screw shown in green Remove the screw before removing the battery from the computer Table 8 Battery screw description Size Amount 4 cell battery Yellow M2x3L 5 Red M1 6x4 5L 1 6 cell battery Green M2x4L 1 Removing and installing components 63 ...

Page 64: ... 2 Replace the four M2x3 screws and single M1 6x4 5 screw that secure the battery to the palmrest assembly 2 NOTE Install the extra M2x4 screw for 6 cell battery The screw is shown in green in the battery disassembly section 3 Stick the tape on wireless antennae cable securing it to the battery 1 64 Removing and installing components ...

Page 65: ...4 Thread the antennae cables along the routing channels and supporting bracket on the battery 2 5 Connect the battery cable to the system board Removing and installing components 65 ...

Page 66: ...re five screws that secure the system board to the palmrest One of the screw is covered by the Real Time Clock RTC battery Technicians must first peel the RTC battery off the system board in order to access all the screws for the system board 2 Peel off the tape on the display cable connector of the system board 3 3 Pry the retention clips on both sides of the display cable connector to flip open ...

Page 67: ...n cable from the system board 1 6 Disconnect the USH board cable 2 and keyboard with backlight cable 3 from the system board 7 Disconnect the touchpad cable 4 and LED board cable 5 from the system board Removing and installing components 67 ...

Page 68: ...he system board 3 10 Disconnect the LTE P sensor and isolator antenna cables 4 from the system board 11 Disconnect the LTE MAIN and AUX antennae cables 5 from the system board Insert a plastic scribe into the slit at the bottom left corner of the connector and then carefully pry up the cable connector from the system board 68 Removing and installing components ...

Page 69: ...move the single M2x2 screw 1 and remove the SSD bracket from the system board 2 13 Remove the two M2x4 screws 3 and remove the USB Type C bracket 4 from the system board Removing and installing components 69 ...

Page 70: ...ove the five M2x3 screws 1 and remove the system board from the computer 2 NOTE Lifting the system board from the thin middle portion might damage the board 15 Hold the system board from the right side of the fan compartment and gently lift it Slightly bend the system board in order to remove it from the system 70 Removing and installing components ...

Page 71: ...ter removing all brackets and disconnecting all cables there are five screws that secure the system board to the palmrest One of the screw is covered by the Real Time Clock RTC battery Technicians must first peel the RTC battery off the system board in order to access all the screws for the system board Removing and installing components 71 ...

Page 72: ...ype C bracket 1 on the system board and secure it using two M2x4 screws 2 on the system board 3 Install the SSD bracket 3 and secure it using a single M2x2 screw 4 to the system board 72 Removing and installing components ...

Page 73: ...power button finger print reader bracket 2 on the system board and secure it using the single M2x2 screw 3 6 Connect the LTE P sensor and isolator antenna cables 4 on the system board 7 Connect the LTE MAIN and AUX antennae cables 5 on the system board Removing and installing components 73 ...

Page 74: ...utton cable to the system board 1 9 Connect the USH board cable 2 and keyboard with backlight cable 3 to the system board 10 Connect the touchpad cable 4 and LED board cable 5 to the system board 74 Removing and installing components ...

Page 75: ...rd and connect its cable to the system board 2 12 Connect the display cable to the system board 3 and flip close the actuator 4 13 Secure the display cable connector by sticking the tape on the system board 5 Removing and installing components 75 ...

Page 76: ...stall the base cover 11 Install the SIM card 12 Install the SD memory card 13 Follow the procedure after working inside your computer Keyboard Removing the keyboard 1 Follow the procedure in before working inside your computer 2 Remove the SD memory card 3 Remove the base cover 4 Disconnect the battery cable 5 Remove the coin cell 6 Remove the SSD 7 Remove the WLAN card 76 Removing and installing ...

Page 77: ...ed 13 Remove the system board 1 Peel off the USH board cable 1 touchpad cable 2 and LED board cable 3 from the keyboard base 2 Peel back the two pieces of LTE antenna module copper foil 1 3 and LTE AUX cable from the keyboard 2 3 Disconnect the smartcard reader FPC from the USH board 4 and peel off the FPC cable from the keyboard 5 Removing and installing components 77 ...

Page 78: ... the middle battery bracket 2 from the computer 5 Peel off the keyboard and backlight FPC cables from the keyboard 3 6 Remove the single M1 6x1 5 screw 4 to remove the left battery bracket 5 from the computer 78 Removing and installing components ...

Page 79: ...mbly Several of the screws are covered by the touchpad flexible flat cable LED flexible flat cable FFC keyboard flexible printed circuit FPC and copper foil Technicians must peel back these FFC FPC foil in order to access the keyboard screws Removing and installing components 79 ...

Page 80: ...8 Lift the keyboard off the palmrest assembly 80 Removing and installing components ...

Page 81: ...Installing the keyboard 1 Place the keyboard on the palmrest assembly Removing and installing components 81 ...

Page 82: ...sembly Several of the screws are covered by the touchpad flexible flat cable LED flexible flat cable FFC keyboard flexible printed circuit FPC and copper foil Technicians must peel back these FFC FPC foil in order to access the keyboard screws 82 Removing and installing components ...

Page 83: ...bracket 1 and secure it using two M1 6x1 5 screws 2 4 Stick the keyboard and backlight FPC cables to the keyboard 3 5 Install left battery bracket 4 and secure it using single M1 6x1 5 screw 5 Removing and installing components 83 ...

Page 84: ...o pieces of LTE antenna module copper foil 1 3 and LTE AUX cable on the keyboard 2 7 Route and stick the smart card FPC cable 4 on the keyboard and connect it to the USH board 5 84 Removing and installing components ...
Page 85: ...he battery cable 11 Install the base cover 12 Install the SIM card 13 Install the SD memory card 14 Follow the procedure after working inside your computer Palmrest assembly 1 Follow the procedure in before working inside your computer 2 Remove the SD memory card 3 Remove the base cover 4 Disconnect the battery cable 5 Remove the coin cell 6 Remove the SSD 7 Remove the WLAN card 8 Remove the WWAN ...

Page 86: ... for models shipped with a SmartCard reader 3 LED board with FFC 4 Touchpad with FPC 5 Wireless antenna module with antenna cables 6 NFC module with FPC for models shipped with an NFC reader 7 USH daughter board with FPC for models shipped with a USH daughter board 8 Fingerprint reader module with FPC for models shipped with a Fingerprint reader 9 Power button with FPC 1 Install the keyboard 2 Ins...

Page 87: ... Connect the battery cable 13 Install the base cover 14 Install the SIM card 15 Install the SD memory card 16 Follow the procedure after working inside your computer Removing and installing components 87 ...

Page 88: ...rts running the tests on all the detected devices Running SupportAssist diagnostics Invoke diagnostics by either of the methods that are suggested below Tap F12 key on keyboard as the Dell splash screen appears until you get the message Diagnostic Boot Selected On the one time boot menu screen use the Up Down arrow key to select the Diagnostics option and then press Enter Press and Hold Function F...

Page 89: ...touchscreen systems or clicking the next page button on the lower left hand side of the basic screen To run the test on specific device or run a specific test 1 To run a diagnostic test on a specific device press Esc and click Yes to stop the diagnostic test 2 Select the device from the using the checkbox in the top left of the test tile and click Run Tests or use Thorough Option check run more in...

Page 90: ...Power adapter is connected and the battery has more than 5 percent charge Amber Computer is running on battery and the battery has less than 5 percent charge Off Power adapter is connected and the battery is fully charged Computer is running on battery and the battery has more than 5 percent charge Computer is in sleep state hibernation or turned off The power and battery status light blinks amber...

Page 91: ...wer On Self Test How to run M BIST NOTE M BIST must be initiated on the system from a power off state either connected to AC power or with battery only 1 Press and hold both the M key on the keyboard and the power button to initiate M BIST 2 With both the M key and the power button held down the battery indicator LED may exhibit two states a OFF No fault detected with the system board b AMBER Indi...

Page 92: ...e Flashing the BIOS You may need to flash update the BIOS when an update is available or when you replace the system board Follow these steps to flash the BIOS 1 Turn on your computer 2 Go to www dell com support 3 Click Product support enter the Service Tag of your computer and then click Submit NOTE If you do not have the Service Tag use the auto detect feature or manually browse for your comput...

Page 93: ... it has been powered off and the battery has been removed The following procedure provides the instructions on how to conduct flea power release 1 Turn off your computer 2 Disconnect the power adapter from your computer 3 Press and hold the power button for 15 seconds to drain the flea power 4 Connect the power adapter to your computer 5 Turn on your computer Troubleshooting 93 ...

Page 94: ...e related articles Learn and know the following information about your product Product specifications Operating system Setting up and using your product Data backup Troubleshooting and diagnostics Factory and system restore BIOS information See Me and My Dell at www dell com support manuals To locate the Me and My Dell relevant to your product identify your product through one of the following Sel...

Reviews: