background image

Steps

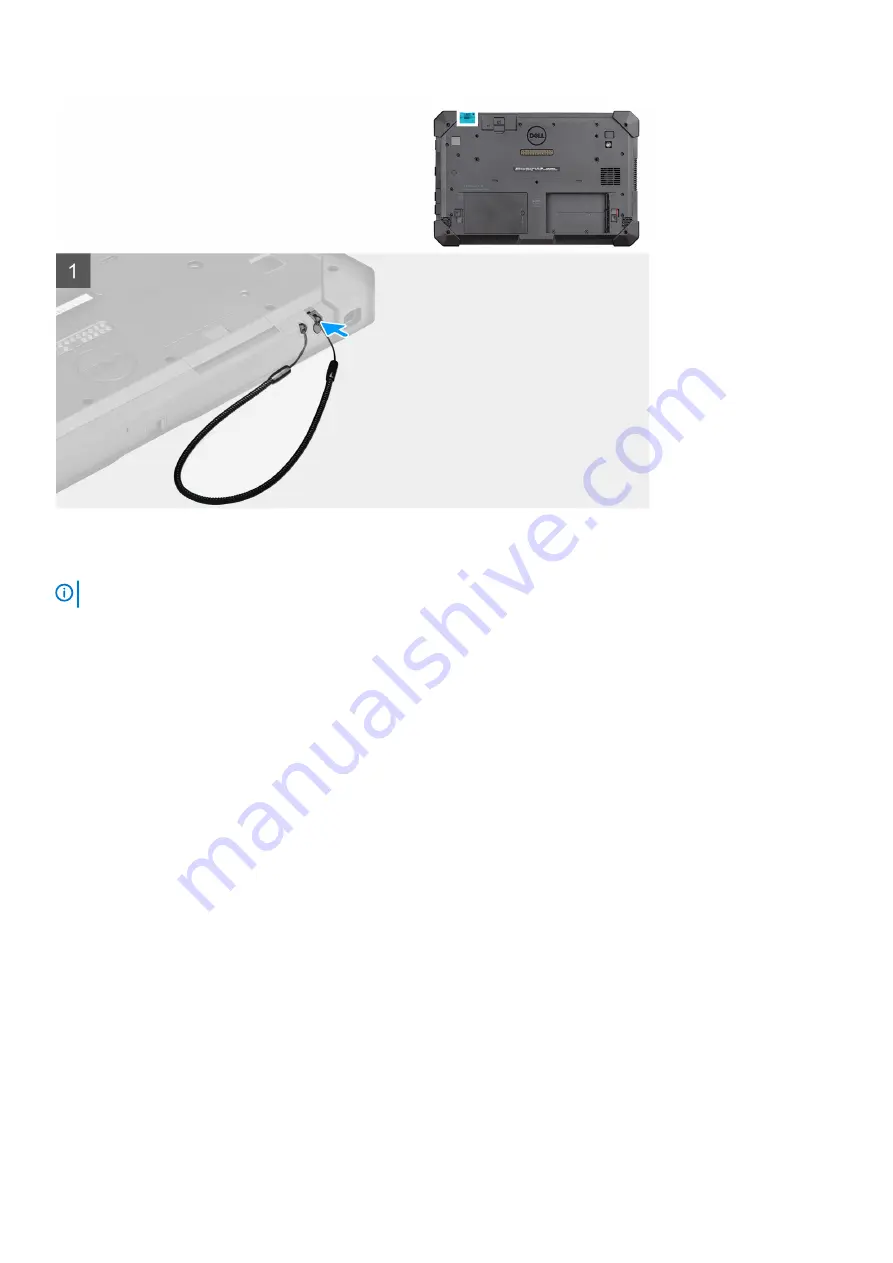
Insert the stylus into the slot on the tablet.

NOTE: 

When not in use, avoid hanging the stylus that is detached from its groove.

Next steps

1. Follow the procedure in 

after working inside your tablet

.

Display assembly

Removing the display assembly

Prerequisites

1. Follow the procedure in 

before working inside your tablet

.

2. Remove the 

batteries

.

About this task

The figure indicates the location of the display assembly and provides a visual representation of the removal procedure.

Removing and installing components

17

Summary of Contents for Latitude 7220

Page 1: ...Latitude 7220 Rugged Extreme Tablet Service Manual Regulatory Model T03H Regulatory Type T03H003 ...

Page 2: ...amage to hardware or loss of data and tells you how to avoid the problem WARNING A WARNING indicates a potential for property damage personal injury or death 2019 Dell Inc or its subsidiaries All rights reserved Dell EMC and other trademarks are trademarks of Dell Inc or its subsidiaries Other trademarks may be trademarks of their respective owners 2019 10 Rev A00 ...

Page 3: ...g the uSIM 14 Stylus 15 Removing the stylus 15 Installing the stylus 16 Display assembly 17 Removing the display assembly 17 Installing the display assembly 20 Function keys 23 Removing the function keys 24 Installing the function keys 25 Heat sink 26 Removing the heat sink 26 Installing the heat sink 27 System fan 28 Removing the system fan 28 Installing the system fan 29 Solid state drive 30 Rem...

Page 4: ... the docking board 57 Installing the docking board 58 Smart card reader and wireless passthrough daughterboard 59 Removing the smart card reader and wireless passthrough daughterboard 59 Installing the smart card reader and wireless passthrough daughterboard 61 3 System setup 64 Boot menu 64 Navigation keys 64 Boot Sequence 65 System setup options 65 General options 65 System information 66 Video ...

Page 5: ... 79 Assigning a system setup password 80 Deleting or changing an existing system setup password 80 4 Troubleshooting 81 Enhanced Pre Boot System Assessment ePSA diagnostics 81 Running the ePSA diagnostics 81 System diagnostic lights 81 Recovering the operating system 82 WiFi power cycle 83 5 Getting help 84 Contacting Dell 84 Contents 5 ...

Page 6: ...by periodically touching an unpainted metal surface simultaneously as touching a connector on the back of the tablet CAUTION Handle components and cards with care Do not touch the components or contacts on a card Hold a card by its edges or by its metal mounting bracket Hold a component such as a processor by its edges not by its pins CAUTION When you disconnect a cable pull on its connector or on...

Page 7: ...o the increased density of semiconductors used in recent Dell products the sensitivity to static damage is now higher than in previous Dell products For this reason some previously approved methods of handling parts are no longer applicable Two recognized types of ESD damage are catastrophic and intermittent failures Catastrophic Catastrophic failures represent approximately 20 percent of ESD rela...

Page 8: ...the kit for a server environment is different than for a desktop or portable environment Servers are typically installed in a rack within a data center desktops or portables are typically placed on office desks or cubicles Always look for a large open flat work area that is free of clutter and large enough to deploy the ESD kit with additional space to accommodate the type of system that is being ...

Page 9: ...ter you complete any replacement procedure ensure that you connect external devices cards and cables before turning on your tablet CAUTION To avoid damage to the tablet use only the battery that is designed for this particular Dell tablet Do not use batteries that are designed for other Dell tablets Steps 1 Connect any external devices such as a mobile keyboard or a docking station and replace any...

Page 10: ...t is recommended to note the screw type the quantity of screws and then place them in a screw storage box This is to ensure that the correct number of screws and correct screw type is restored when the component is replaced NOTE Screw color may vary with the configuration ordered Table 1 Screw list Component Screw type Quantity Screw image LCD M2 5x5 19 Heat sink M2x5 M2x3 1 3 System fan M2x5 4 So...

Page 11: ...ng of this product are not lost or misplaced to prevent accidental puncture or damage to the battery and other system components If the battery gets stuck inside your computer as a result of swelling do not try to release it as puncturing bending or crushing a lithium ion battery can be dangerous In such an instance contact Dell technical support for assistance See www dell com contactdell Always ...

Page 12: ... are replacing a component remove the existing component before performing the installation procedure About this task NOTE This tablet can accommodate two hot swap capable batteries Primary and optional The installation procedure of the primary and optional battery are identical The figure indicates the location of the battery and provides a visual representation of the installation procedure 12 R...

Page 13: ...licks into place 3 Slide the battery latch to the locked state 4 Ensure that the battery release latch is in the locked state Next steps 1 Follow the procedure in after working inside your tablet Subscriber Identification Module SIM card Removing the uSIM Prerequisites 1 Follow the procedure in before working inside your tablet 2 Remove the batteries Removing and installing components 13 ...

Page 14: ...de it out of the slot NOTE Use a flat pointed scribe to ease removing the SIM Inserting the uSIM Prerequisites If you are replacing a component remove the existing component before performing the installation procedure About this task The figure indicates the location of the uSIM and provides a visual representation of the installation procedure 14 Removing and installing components ...

Page 15: ...tteries 2 Follow the procedure in after working inside your tablet Stylus Removing the stylus Prerequisites 1 Follow the procedure in before working inside your tablet About this task The figure indicates the location of the stylus and provides a visual representation of the removal procedure Removing and installing components 15 ...

Page 16: ...ssist you in using the rugged tablet Installing the stylus Prerequisites If you are replacing a component remove the existing component before performing the installation procedure About this task The figure indicates the location of the stylus and provides a visual representation of the installation procedure 16 Removing and installing components ...

Page 17: ...cedure in after working inside your tablet Display assembly Removing the display assembly Prerequisites 1 Follow the procedure in before working inside your tablet 2 Remove the batteries About this task The figure indicates the location of the display assembly and provides a visual representation of the removal procedure Removing and installing components 17 ...

Page 18: ...18 Removing and installing components ...

Page 19: ...Removing and installing components 19 ...

Page 20: ...nel by an angle less than 90 NOTE Ensure not to flip more than 90 angle as the LCD panel ports and cables are connected to the system board and may damage the LCD cables 5 Remove the adhesive tape and disconnect the eDP cable from the connector on the system board 6 Remove the adhesive tape and disconnect the function key cable from the connector on the system board 7 Using a plastic scribe lift t...

Page 21: ...About this task The figure indicates the location of the component and provides a visual representation of the installation procedure Removing and installing components 21 ...

Page 22: ...22 Removing and installing components ...

Page 23: ...on a flat surface 7 Replace the 19 M2 5x5 screws that secure the display assembly to the chassis NOTE DO NOT force tighten the screws to avoid damage to the screws thread Next steps 1 Install the batteries 2 Follow the procedure in after working inside your computer Function keys NOTE The function key buttons are NOT keyed for correct installation These keys can be installed with several incorrect...

Page 24: ...he figure indicates the location of the function keys and provides a visual representation of the removal procedure Steps 1 Flip the display assembly 2 Remove the six M2x5 screws that secure the function keys board to the display assembly 3 Lift the function keys board away from the display assembly along with the function keys cable 24 Removing and installing components ...

Page 25: ... function keys and provides a visual representation of the installation procedure Steps 1 Align and place the function keys board on the display assembly 2 Replace the six M2x5 screws that secure the function keys board to the display assembly Next steps 1 Install the display assembly 2 Install the batteries 3 Follow the procedure in after working inside your computer Removing and installing compo...

Page 26: ...About this task The figure indicates the location of the heat sink and provides a visual representation of the removal procedure Steps 1 Remove the three M2X3 screws and M2X5 screw that secure the heat sink to the system board NOTE Remove the screws in the order of the callout numbers 1 2 3 4 as indicated on the heat sink 26 Removing and installing components ...

Page 27: ...replacing a component remove the existing component before performing the installation procedure About this task The figure indicates the location of the heat sink and provides a visual representation of the installation procedure Steps 1 Align the screws on the heat sink with the screw holes on the system board 2 Tighten the four captive screws to secure the heat sink to the system board NOTE Rep...

Page 28: ...orking inside your tablet 2 Remove the batteries 3 Remove the display assembly 4 Remove the heat sink About this task The figure indicates the location of the system fan and provides a visual representation of the removal procedure Steps 1 Unroute the cable from the routing guide on the system fan 2 Disconnect the system fan cable from the connector on the system board 28 Removing and installing c...

Page 29: ...ation of the system fan and provides a visual representation of the installation procedure Steps 1 Align the screws on the system fan with the screw holes on the system board 2 Replace the four M2x5 screws to secure the system fan to the chassis 3 Connect the system fan cable to the connector on the system board 4 Route the system fan cable through the routing guide on the system fan Next steps 1 ...

Page 30: ...esentation of the removal procedure Steps 1 Remove the M2x3 screw that secures the solid state drive to the system board 2 Slide and remove the solid state drive from the solid state drive slot on the system board Removing the M 2 2280 solid state drive Prerequisites 1 Follow the procedure in before working inside your tablet 2 Remove the batteries 3 Remove the display assembly 4 Remove the heat s...

Page 31: ...solid state drive and provides a visual representation of the installation procedure Steps 1 Align the notch on the solid state drive with the tab on the solid state drive slot 2 Replace the screw M2x3 that secures the solid state drive module to the system board Next steps 1 Install the heat sink 2 Install the display assembly 3 Install the batteries 4 Follow the procedure in after working inside...

Page 32: ...drive module to the system board Next steps 1 Install the heat sink 2 Install the display assembly 3 Install the batteries 4 Follow the procedure in after working inside your tablet WLAN card Removing the WLAN card Prerequisites 1 Follow the procedure in before working inside your tablet 2 Remove the batteries 3 Remove the display assembly About this task The figure indicates the location of the W...

Page 33: ...card 4 Slide and remove the WLAN card from the WLAN card slot Installing the WLAN card Prerequisites If you are replacing a component remove the existing component before performing the installation procedure About this task The figure indicates the location of the WLAN card and provides a visual representation of the installation procedure Removing and installing components 33 ...

Page 34: ...by your tablet Table 2 Connectors on the wireless card Antenna Cable Color Main white triangle White Auxiliary black triangle Black 3 Place the WLAN card bracket on the WLAN card 4 Replace the screw M2x3 to secure the WLAN card bracket to the WLAN card Next steps 1 Install the display assembly 2 Install the batteries 3 Follow the procedure in after working inside your tablet 34 Removing and instal...

Page 35: ...gure indicates the location of the WWAN card and provides a visual representation of the removal procedure Steps 1 Remove the screw M2x3 that secures the WWAN card bracket to the WWAN card 2 Remove the WWAN card bracket from the WWAN card 3 Disconnect the antenna cables from the WWAN card 4 Slide and remove the WWAN card from the WWAN card slot Removing and installing components 35 ...

Page 36: ... Slide the WWAN card at an angle into the WWAN card slot 2 Connect the antenna cables to the WWAN card The following table provides the antenna cable color scheme for the WWAN card that is supported by your tablet Table 3 Connectors on the wireless card Antenna Cable Color Main white triangle White Auxiliary black triangle Black 3 Place the WWAN card bracket on the WWAN card 4 Replace the screw M2...

Page 37: ... Open the latch and disconnect the microphone cable from the connector on the system board and remove the screw M2x5 that secures the integrated microphone assembly circuit board to the system board 2 Release the microphone assembly and lift the microphone from the tablet chassis NOTE NEVER pull the microphone by the cable In case the circuit board is not released smoothly push from below the micr...

Page 38: ...onnect the microphone cable to the connector on the system board Close the latch to secure the cable Next steps 1 Install the display assembly 2 Install the batteries 3 Follow the procedure in after working inside your tablet Front camera Removing the front camera Prerequisites 1 Follow the procedure in before working inside your tablet 2 Remove the batteries 3 Remove the display assembly About th...

Page 39: ...Removing and installing components 39 ...

Page 40: ...connect the camera cable that secures the cable to the system board 7 Lift the lens case by an angle not more than 35 and push upward to release the camera lens case 8 Remove the camera circuit board away from the tablet chassis Installing the front camera Prerequisites If you are replacing a component remove the existing component before performing the installation procedure About this task The f...

Page 41: ...Removing and installing components 41 ...

Page 42: ...mera lens case to the camera placeholder 6 Replace the screw M2x3 to secure the front camera circuit board on the tablet chassis 7 Slide the lens shutter in the lens channel and push towards left Next steps 1 Install the display assembly 2 Install the batteries 3 Follow the procedure in after working inside your tablet Coin cell battery Removing the coin cell battery Prerequisites 1 Follow the pro...

Page 43: ... 1 Disconnect the coin cell battery cable from the system board 2 Move the fingerprint reader cable and microSD card cable over the coin cell battery 3 Peel the coin cell battery off the system board Installing the coin cell battery Prerequisites If you are replacing a component remove the existing component before performing the installation procedure About this task The figure indicates the loca...

Page 44: ...tery cable to the connector on the system board Next steps 1 Install the display assembly 2 Install the batteries 3 Follow the procedure in after working inside your tablet System board Removing the system board Prerequisites 1 Follow the procedure in before working inside your tablet 2 Remove the batteries 3 Remove the display assembly 44 Removing and installing components ...

Page 45: ...m fan 6 Remove the solid state drive 7 Remove the WLAN 8 Remove the WWAN About this task The figure indicates the location of the system board and provides a visual representation of the removal procedure Removing and installing components 45 ...

Page 46: ...46 Removing and installing components ...

Page 47: ...Removing and installing components 47 ...

Page 48: ...e rubber grommet 7 Remove the screw M2x5 that secures the adhesive tape and peel the adhesive tape off the system board 8 Remove the two M2x3 screws that secure the camera MIPI plate to the system board 9 Peel the conductive cloth that secures the camera MIPI plate on the system board 10 Lift the latch and disconnect the OpExpansion module pogo connector cable from the system board 11 Lift the lat...

Page 49: ...g a component remove the existing component before performing the installation procedure About this task The figure indicates the location of the system board and provides a visual representation of the installation procedure Removing and installing components 49 ...

Page 50: ...50 Removing and installing components ...

Page 51: ...Steps 1 Place the system board on the tablet chassis Removing and installing components 51 ...

Page 52: ...rprint reader microSD card NFC mini serial speaker pogo connector right battery and left battery from the system board 13 As illustrated affix the adhesive tapes to the connectors on the system board 14 Connect the GPS cable to the system board 15 Connect the antenna cables to the system board 16 Connect the radio antenna cables and coin cell battery cable to the system board 17 Connect the antenn...

Page 53: ...mera board cable from the chassis Installing the rear camera Prerequisites If you are replacing a component remove the existing component before performing the installation procedure About this task The figure indicates the location of the rear camera and provides a visual representation of the installation procedure Removing and installing components 53 ...

Page 54: ...nstall the system fan 9 Install the heat sink 10 Install the display assembly 11 Install the batteries 12 Follow the procedure in after working inside your tablet Micro serial port and power connector port Removing micro serial port and power connector port Prerequisites 1 Follow the procedure in before working inside your tablet 2 Remove the batteries 3 Remove the display assembly About this task...

Page 55: ...ort and serial port to the system chassis 6 Flip the cables and lift the rubber grommet to release the DC in and serial port from the system chassis NOTE Rubber grommet ensures to secure the micro serial port cable from damage Installing micro serial port and power connector port Prerequisites If you are replacing a component remove the existing component before performing the installation procedu...

Page 56: ...the four M2x5 screws and two M1 6x5 screws that secure the metal bracket to the system chassis 5 Connect the serial port cable into the connector 6 Close the latch to secure the serial port cable to the system board 7 Connect the DC in port cable to the system board and replace the M2x5 screw that secures the system board to the system chassis Next steps 1 Install the display assembly 2 Install th...

Page 57: ...tem board About this task The figure indicates the location of the docking board and provides a visual representation of the removal procedure Steps 1 Remove the adhesive tape that secures the docking circuit board on the system chassis 2 Remove the five M2x5 screws that secure the docking circuit board on the system board chassis NOTE As the docking board is positioned beneath the system board en...

Page 58: ...elease the latch 2 Align the docking board and replace the five M2x5 screws that secure the docking board to the system chassis 3 Replace the adhesive tape to secure the docking board to the system chassis Next steps 1 Install the system board 2 Install the coin cell battery 3 Install the front camera 4 Install the microphone 5 Install the WWAN 6 Install the WLAN 7 Install the solid state drive 8 ...

Page 59: ...ove the heat sink 5 Remove the system fan 6 Remove the solid state drive 7 Remove the WLAN 8 Remove the WWAN 9 Remove the microphone 10 Remove the front camera 11 Remove the coin cell battery 12 Remove the system board 13 Remove the docking board About this task The figure indicates the location of the smart card reader and wireless passthrough daughterboard and provides a visual representation of...

Page 60: ...60 Removing and installing components ...

Page 61: ... the eight M2x5 screws that secure the smart card reader to the system chassis Installing the smart card reader and wireless passthrough daughterboard Prerequisites If you are replacing a component remove the existing component before performing the installation procedure About this task The figure indicates the location of the smart card reader and wireless passthrough daughterboard and provides ...

Page 62: ...62 Removing and installing components ...

Page 63: ...ireless passthrough daughterboard to the system chassis 5 Connect the smart card reader cable to the connector 6 Flip the smart card reader cable Next steps 1 Install the docking board 2 Install the system board 3 Install the coin cell battery 4 Install the front camera 5 Install the microphone 6 Install the WWAN 7 Install the WLAN 8 Install the solid state drive 9 Install the system fan 10 Instal...

Page 64: ... Press and hold the Volume up key to access the one time boot menu with a list of the valid boot devices for the system Diagnostics and BIOS Setup options are also in this menu The devices that are listed on the boot menu depend on the bootable devices in the system This menu is useful when you are attempting to boot to a particular device or to bring up the diagnostics for the system Using the bo...

Page 65: ...al Option Description System Information Displays the following information System Information Displays BIOS Version Service Tag Asset Tag Ownership Tag Manufacture Date Ownership Date and the Express Service Code Memory Information Displays Memory Installed Memory Available Memory Speed Memory Channel Mode Memory Technology DIMM A size and DIMM B size Processor Information Displays Processor Type...

Page 66: ...USB selected by default Optimize GPS USB PowerShare This option configures the USB PowerShare feature behavior Enable USB PowerShare disabled by default This feature is intended to allow users to power or charge external devices such as phones and portable music players using the stored system battery power through the USN PowerShare port on the notebook while the notebook is in a sleep state Audi...

Page 67: ...ns are 5 sec 10 sec enabled by default 15 sec 30 sec 1 min 5 min 15 min Never RGB Keyboard Backlight The RGB keyboard backlight feature There are six available colors four preset colors white red green and blue and two user configurable colors White Enabled and Active Red Enabled Green Enabled Blue Enabled Custom1 Disabled by default Custom2 Disabled by default Touchscreen This field controls whet...

Page 68: ...on lets you bypass the System Boot Password and the internal HDD password prompts during a system restart Disabled Always prompt for the system and internal HDD password when they are set This option is enabled by default Reboot Bypass Bypass the password prompts on Restarts warm boots NOTE The system will always prompt for the system and internal HDD passwords when powered on from the off state a...

Page 69: ...word support Hard Disk passwords need to be cleared before the settings can be changed This option is not set by default SMM Security Mitigation Allows you to enable or disable additional UEFI SMM Security Mitigation protections This option is selected by default Secure boot Table 7 Secure Boot Option Description Secure Boot Enable Allows you to enable or disable Secure Boot feature Secure Boot En...

Page 70: ...wing options Disabled Enabled Software controlled Default Enclave Memory Size This option sets SGX Enclave Reserve Memory Size Click one of the following options 32 MB 64 MB 128 MB Default Performance Table 9 Performance Option Description Multi Core Support This field specifies whether the process has one or all cores enabled The performance of some applications improves with the additional cores...

Page 71: ... is removed during Standby the system setup removes power from all the USB ports to conserve battery power Enable Wake on Dell USB C Dock Wake on LAN Allows you to enable or disable the feature that powers on the computer from the Off state when triggered by a LAN signal Disabled LAN Only Default setting Disabled Peak Shift This option enables you to minimize the AC power consumption during the pe...

Page 72: ...um power that can be drawn from the Type C connector The options are 7 5 Watts enabled by default 15 Watts NOTE Setting a higher power value for the Type C connector may cause the system to throttle sooner if the total system power budget is exceeded Power Usage Mode Allows you to choose the system power usage mode The options are Power Saver Balanced Performance enabled by default High Performanc...

Page 73: ... the local provisioning file via a USB storage device Enable USB Provision disabled by default MEBX Hotkey Allows you to specify whether the MEBx Hotkey function should enable during the system boot Enable MEBx hotkey enabled by default Virtualization support Option Description Virtualization This field specifies whether a virtual Machine Monitor VMM can utilize the conditional hardware capabiliti...

Page 74: ...the data securely from all internal storage devices Option Wipe on Next boot is not enabled by default The following is list of devices affected Internal SATA HDD SSD Internal M 2 SATA SDD Internal M 2 PCIe SSD Internal eMMC BIOS Recovery This field allows you to recover from certain corrupted BIOS conditions from a recover file on the user primary hard drive or an external USB key BIOS Recovery f...

Page 75: ...ervice Tag click Choose from all products 4 Choose the Products category from the list NOTE Choose the appropriate category to reach the product page 5 Select your computer model and the Product Support page of your computer appears 6 Click Get drivers and click Drivers and Downloads The Drivers and Downloads section opens 7 Click Find it myself 8 Click BIOS to view the BIOS versions 9 Identify th...

Page 76: ...he system and press F12 when the Dell Splash logo appears to display the One Time Boot Menu 5 Using arrow keys select USB Storage Device and click Return 6 The system will boot to a Diag C prompt 7 Run the file by typing the full filename e g O9010A12 exe and press Return 8 The BIOS Update Utility will load follow the instructions on screen Figure 1 DOS BIOS Update Screen Updating the Dell BIOS in...

Page 77: ...otable BIOS executable file that you downloaded from the Dell Support website and copied to the root of the USB key AC power adapter connected to the system Functional system battery to flash the BIOS Perform the following steps to execute the BIOS update flash process from the F12 menu CAUTION Do not power off the system during the BIOS update process Powering off the system could make the system...

Page 78: ...4 Select external USB device 5 Once the file is selected Double click the flash target file then press submit 78 System setup ...

Page 79: ... Password that you must enter to log on to your system Setup password Password that you must enter to access and make changes to the BIOS settings of your computer You can create a system password and a setup password to secure your computer CAUTION The password features provide a basic level of security for the data on your computer CAUTION Anyone can access the data stored on your computer if it...

Page 80: ...es The computer reboots Deleting or changing an existing system setup password Prerequisites Ensure that the Password Status is Unlocked in the System Setup before attempting to delete or change the existing System and or Setup password You cannot delete or change an existing System or Setup password if the Password Status is Locked About this task To enter the System Setup press F2 immediately af...

Page 81: ...on see Dell EPSA Diagnostic 3 0 Running the ePSA diagnostics Steps 1 Turn on your computer 2 As the computer boots press the F12 key as the Dell logo appears 3 If no keyboard attached Press and hold the volume up key to access the one time boot menu 4 On the boot menu screen select the Diagnostics option 5 Click the arrow at the bottom left corner Diagnostics front page is displayed 6 Click the ar...

Page 82: ...d but invalid 3 5 Power rail failure 3 6 System BIOS Flash incomplete 3 7 Management Engine ME error Camera status light Indicates whether the camera is in use Solid white Camera is in use Off Camera is not in use Caps Lock status light Indicates whether Caps Lock is enabled or disabled Solid white Caps Lock enabled Off Caps Lock disabled Recovering the operating system When your computer is unabl...

Page 83: ...The following procedure provides the instructions on how to conduct a WiFi power cycle NOTE Some ISPs Internet Service Providers provide a modem router combo device Steps 1 Turn off your computer 2 Turn off the modem 3 Turn off the wireless router 4 Wait for 30 seconds 5 Turn on the wireless router 6 Turn on the modem 7 Turn on your computer Troubleshooting 83 ...

Page 84: ... and telephone based support and service options Availability varies by country and product and some services may not be available in your area To contact Dell for sales technical support or customer service issues Steps 1 Go to Dell com support 2 Select your support category 3 Verify your country or region in the Choose a Country Region drop down list at the bottom of the page 4 Select the approp...

Reviews: