background image

Steps

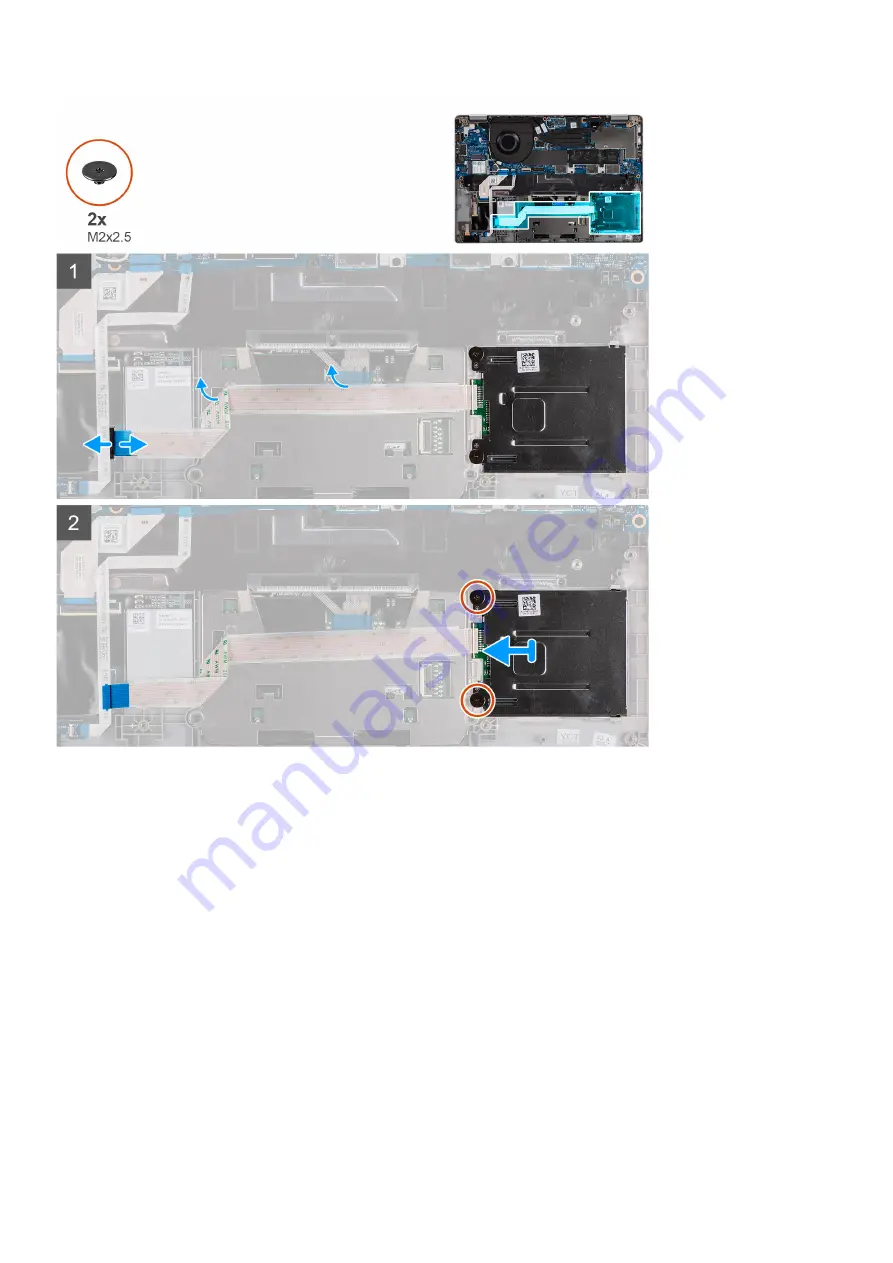
1. Open the latch and disconnect the clickpad FPC.
2. Open the latch and disconnect the smart card reader cable from its connector.
3. Remove the two screws (M2x2.5) that secure the smart card reader to the palm-rest assembly.
4. Lift the smart card reader off the palm-rest assembly.

Installing the smart card reader (optional)

Prerequisites

If you are replacing a component, remove the existing component before performing the installation procedure.

80

Removing and installing components

Summary of Contents for Latitude 5320

Page 1: ...Latitude 5320 Service Manual Regulatory Model P138G P139G Regulatory Type P138G001 P139G001 January 2021 Rev A00 ...

Page 2: ...ential damage to hardware or loss of data and tells you how to avoid the problem WARNING A WARNING indicates a potential for property damage personal injury or death 2021 Dell Inc or its subsidiaries All rights reserved Dell EMC and other trademarks are trademarks of Dell Inc or its subsidiaries Other trademarks may be trademarks of their respective owners ...

Page 3: ...ry 23 Lithium ion battery precautions 23 Removing the battery 23 Installing the battery 24 Battery cable 25 Removing the battery cable 25 Installing the battery cable 26 WLAN card 27 Removing the WLAN card 27 Installing the WLAN card 28 WWAN card 29 Removing the WWAN card 29 Installing the WWAN card 30 Solid state drive 31 Removing the M 2 2280 solid state drive 31 Installing the M 2 2280 solid st...

Page 4: ...hinges 66 Removing the display hinges 66 Installing the display hinges 67 Display back cover assembly 68 Removing the display back cover 68 Installing the display back cover 69 eDP cable 70 Removing the eDP cable 70 Installing the eDP cable 71 Sensor board 72 Removing the sensor board 72 Installing the sensor board 73 LED board 73 Removing the LED board 73 Installing the LED board 74 Camera 75 Rem...

Page 5: ...p password 107 Assigning a system setup password 107 Deleting or changing an existing system setup password 107 Chapter 5 Troubleshooting 109 Built in self test BIST 109 System board built in self test M BIST 110 Display panel power rail built in self test L BIST 110 Display panel power rail built in self test L BIST 111 Display panel built in self test LCD BIST 111 Dell SupportAssist Pre boot Sys...

Page 6: ... Dell technical assistance team Damage due to servicing that is not authorized by Dell is not covered by your warranty See the safety instructions that is shipped with the product or at www dell com regulatory_compliance CAUTION Before touching anything inside your computer ground yourself by touching an unpainted metal surface such as the metal at the back of the computer While you work periodica...

Page 7: ...ailures means that most of the time when damage occurs it is not immediately recognizable The DIMM receives a static shock but the tracing is merely weakened and does not immediately produce outward symptoms related to the damage The weakened trace may take weeks or months to melt and in the meantime may cause degradation of memory integrity intermittent memory errors etc The more difficult type o...

Page 8: ... space to accommodate the type of system that is being repaired The workspace should also be free of insulators that can cause an ESD event On the work area insulators such as Styrofoam and other plastics should always be moved at least 12 inches or 30 centimeters away from sensitive parts before physically handling any hardware components ESD Packaging All ESD sensitive devices must be shipped an...

Page 9: ...cedure automatically skips this step if the Owner Tag of the system is not set up in advance by the manufacturer 4 When the ready to proceed message appears on the screen press any key to proceed The system emits three short beeps and shuts down immediately Working on your computer 9 ...

Page 10: ...he replacement procedures without disconnecting the battery cable from the system board 5 To exit Service Mode after finishing replacement procedures connect AC adapter and press the power button to power on the system The system automatically returns to normal functioning mode After working inside your computer About this task CAUTION Leaving stray or loose screws inside your computer may severel...

Page 11: ...rnal devices peripherals or cables you removed before working on your computer 3 Replace any media cards discs or any other parts that you removed before working on your computer 4 Connect your computer and all attached devices to their electrical outlets 5 Turn on your computer Working on your computer 11 ...

Page 12: ...ack cover assembly eDP cable Sensor board LED board Camera Smart card reader Keyboard SIM card slot filler Palm rest and keyboard assembly Recommended tools The procedures in this document may require the following tools Phillips 0 screwdriver Plastic scribe NOTE The 0 screw driver is for screws 0 1 and the 1 screw driver is for screws 2 4 Screw list NOTE When removing screws from a component it i...

Page 13: ...attery Captive screws 4 WLAN M2x3 1 WWAN M2x3 1 Solid state drive bracket M2x2 5 2 Fan M2x3 2 Heat sink UMA only Captive screws 4 System board M2x3 M2x4 M2x2 5 2 1 2 Type C bracket M2x5 3 Power button with fingerprint reader M2x2 5 1 Fingerprint reader bracket Note Systems with non fingerprint reader configuration do not have a fingerprint reader bracket M2x4 1 Keyboard M2x2 19 Display assembly La...

Page 14: ...Table 1 Screw list continued Component Screw type Quantity Screw image eDP or display cable bracket M2x4 1 LED board M2x3 1 Smart card reader optional M2x2 5 2 14 Removing and installing components ...

Page 15: ...Major components of your system 1 Base cover Removing and installing components 15 ...

Page 16: ...nts and their part numbers for the original system configuration purchased These parts are available according to warranty coverages purchased by the customer Contact your Dell sales representative for purchase options SIM card tray Removing the SIM card tray Prerequisites Follow the procedure in before working inside your computer About this task The following image provides a visual representati...

Page 17: ...m 4 Remove the SIM card from the SIM card tray 5 Slide and push the SIM card tray back into the slot Installing the SIM card tray Prerequisites If you are replacing a component remove the necessary component before the installation procedure About this task The following image provides a visual representation of the SIM card tray installation procedure Removing and installing components 17 ...

Page 18: ... it to lock in place Next steps Follow the procedure in After working on your computer MicroSD card Removing the micro SD card Prerequisites Follow the procedure in before working inside your computer About this task The following image provides a visual representation of the micro SD card removal procedure 18 Removing and installing components ...

Page 19: ...Installing the micro SD card Prerequisites If you are replacing a component remove the existing component before performing the installation procedure About this task The following image provides a visual representation of the micro SD card installation procedure Removing and installing components 19 ...

Page 20: ...er working on your computer Base cover Removing the base cover Prerequisites 1 Follow the procedure in before working inside your computer About this task The following images indicate the location of the base cover and provide a visual representation of the removal procedure 20 Removing and installing components ...

Page 21: ... to release the base cover from the palm rest assembly 3 Lift the base cover off the palm rest assembly Installing the base cover Prerequisites If you are replacing a component remove the existing component before performing the installation procedure About this task The following images indicate the location of the base cover and provide a visual representation of the installation procedure Remov...

Page 22: ...22 Removing and installing components ...

Page 23: ...urface of the battery Do not bend the battery Do not use tools of any kind to pry on or against the battery Ensure any screws during the servicing of this product are not lost or misplaced to prevent accidental puncture or damage to the battery and other system components If the battery gets stuck inside your computer as a result of swelling do not try to release it as puncturing bending or crushi...

Page 24: ...ling the battery Prerequisites If you are replacing a component remove the existing component before performing the installation procedure About this task NOTE Latitude 5320 supports 3 cell 42 WHr and 4 cell 63 WHr battery configuration The following image indicates the location of the 3 cell 42 WHr battery and provides a visual representation of the installation procedure 24 Removing and installi...

Page 25: ...procedure in After working on your computer Battery cable Removing the battery cable Prerequisites 1 Follow the procedure in before working inside your computer 2 Remove the base cover 3 Remove the battery NOTE If battery is disconnected from system board for service then there is a delay during system boot as the system undergoes RTC battery reset About this task The following images indicate the...

Page 26: ...battery cable away from the battery Installing the battery cable Prerequisites If you are replacing a component remove the existing component before performing the installation procedure About this task The following image indicates the location of the battery cable and provides a visual representation of the installation procedure 26 Removing and installing components ...

Page 27: ...tery 2 Install the base cover 3 Follow the procedure in After working on your computer WLAN card Removing the WLAN card Prerequisites 1 Follow the procedure in before working inside your computer 2 Remove the base cover 3 Enter service mode About this task The following images indicate the location of the WLAN card and provide a visual representation of the removal procedure Removing and installin...

Page 28: ...om the system if the adhesive pad which helps secure the WLAN card in place is removed from the system along with the WLAN card adhere it back to the system Installing the WLAN card Prerequisites If you are replacing a component remove the existing component before performing the installation procedure About this task The following image indicates the location of the WLAN card and provides a visua...

Page 29: ... the WLAN card 4 Replace the screw M2x3 to secure the WLAN card bracket to the WLAN card Next steps 1 Install the base cover 2 Connect the AC adapter and power on the system 3 Follow the procedure in after working inside your computer WWAN card Removing the WWAN card Prerequisites 1 Follow the procedure in before working inside your computer 2 Remove the base cover 3 Enter service mode Removing an...

Page 30: ...the system 3 Disconnect the antenna cables from the connectors on the WWAN card 4 Slide and remove the WWAN card from the WWAN card slot Installing the WWAN card Prerequisites If you are replacing a component remove the existing component before performing the installation procedure About this task The following image indicates the location of the WWAN card and provides a visual representation of ...

Page 31: ...tem board and WWAN card and tighten the single M2x3 screw Next steps 1 Install the base cover 2 Connect the AC adapter and power on the system 3 Follow the procedure in After working on your computer Solid state drive Removing the M 2 2280 solid state drive Prerequisites 1 Follow the procedure in before working inside your computer 2 Remove the base cover 3 Enter service mode Removing and installi...

Page 32: ...ift the securing rod and carefully release it from the hook to remove it 4 Slide and remove the solid state drive from the solid state drive slot on the system board Installing the M 2 2280 solid state drive Prerequisites If you are replacing a component remove the existing component before performing the installation procedure About this task The following image indicates the location of the soli...

Page 33: ...secure the solid state drive thermal plate to the system board Next steps 1 Install the base cover 2 Connect the AC adapter and power on the system 3 Follow the procedure in After working on your computer Removing the M 2 2230 solid state drive Prerequisites 1 Follow the procedure in before working inside your computer 2 Remove the base cover 3 Enter service mode About this task The following imag...

Page 34: ... and remove the solid state drive from the solid state drive slot on the system board Installing the M 2 2230 solid state drive Prerequisites If you are replacing a component remove the existing component before performing the installation procedure About this task The following image indicates the location of the solid state drive and provides a visual representation of the installation procedure...

Page 35: ...ecuring rod Prerequisites 1 Follow the procedure in before working inside your computer 2 Remove the base cover 3 Enter service mode if SSD card has been installed and you are removing SSD card before replacing the securing rod About this task The figure provides a visual representation if you are replacing a M 2 2280 solid state drive with a M 2 2230 solid state drive NOTE Ensure the M 2 2280 sol...

Page 36: ...ender 3 Install the solid state drive Speakers Removing the speakers Prerequisites 1 Follow the procedure in before working inside your computer 2 Remove the base cover 3 Remove the battery About this task The following images indicate the location of the speakers and provide a visual representation of the removal procedure 36 Removing and installing components ...

Page 37: ... speaker cable from the routing guides on the palm rest and keyboard assembly 5 Lift the speakers along with the cable off the palm rest and keyboard assembly Installing the speakers Prerequisites If you are replacing a component remove the existing component before performing the installation procedure About this task The following image indicates the location of the speaker and provides a visual...

Page 38: ...ly 3 Connect the speaker cable to the system board 4 Adhere the tape back to secure the speaker cables 5 Connect the speaker cable to its connector on the system board 6 Connect the USH cable LED cable and clickpad cable to its connectors on the system board Next steps 1 Install the battery 2 Install the base cover 3 Follow the procedure in after working inside your computer 38 Removing and instal...

Page 39: ...move the WWAN card optional About this task The following images indicate the location of the fan and provide a visual representation of the removal procedure Steps 1 Note the antenna cable routing and remove the antenna cable from the routing guides on the fan 2 Disconnect the IR camera cable from its connector on the system board Removing and installing components 39 ...

Page 40: ...ng the fan Prerequisites If you are replacing a component remove the existing component before performing the installation procedure About this task The following image indicates the location of the fan and provides a visual representation of the installation procedure Steps 1 Using the alignment posts place the fan on the palm rest and keyboard assembly 2 Replace the two M2x3 screws to secure the...

Page 41: ...on Allow sufficient time for the heat sink to cool before you touch it NOTE For maximum cooling of the processor do not touch the heat transfer areas on the heat sink The oils in your skin can reduce the heat transfer capability of the thermal grease 1 Follow the procedure in before working inside your computer 2 Remove the base cover 3 Remove the battery About this task The following images indic...

Page 42: ...k The following image indicates the location of the heatsink and provides a visual representation of the installation procedure Steps 1 Align the screw holes on the heat sink with the screw holes on the system board 2 In sequential order as indicated on the heat sink tighten the four captive screws that secure the heat sink to the system board Next steps 1 Install the battery 2 Install the base co...

Page 43: ... to replace access other parts the system board can be removed and installed with the heat sink attached in order to simplify the procedure and preserve the thermal bond between the system board and heat sink In order to do so you must remove the two M2x3 screws securing the fan to the palm rest The following images indicate the location of the system board and provide a visual representation of t...

Page 44: ...ect the USH cable from its connectors on the system board 10 Disconnect the LED cable from its connectors on the system board 11 Disconnect the clickpad cable from its connectors on the system board 12 Remove the two M2x3 screws two M2x2 5 screws and single M2x4 screw that secures the system board to the palm rest and keyboard assembly 13 Lift the system board off the palm rest and keyboard assemb...

Page 45: ... palm rest and keyboard assembly 2 Replace the two M2x3 screws two M2x2 5 screws and single M2x4 screw to secure the system board to the palm rest and keyboard assembly 3 Replace the fingerprint sensor Removing and installing components 45 ...

Page 46: ...tors on the system board Next steps 1 Install the heat sink 2 Install the fan 3 Install the M 2 2280 SSD card or M 2 2230 SSD card 4 Install the WWAN card optional 5 Install the WLAN card 6 Install the battery 7 Install the base cover 8 Install the SIM card 9 Install the microSD card 10 Follow the procedure in after working inside your computer Power button with fingerprint reader optional Removin...

Page 47: ...rint reader optional About this task NOTE The system board can be installed with the heat sink attached in order to simplify the procedure and preserve the thermal bond between the system board and heat sink The following images indicate the location of the power button with fingerprint reader optional and provide a visual representation of the removal procedure Removing and installing components ...

Page 48: ... 2 Install the heat sink 3 Install the fan 4 Install the battery 5 Install the WWAN card optional 6 Install the WLAN card 7 Install the base cover 8 Follow the procedure in after working inside your computer Display assembly Removing the display assembly laptop Prerequisites 1 Follow the procedure in before working inside your computer 2 Remove the base cover 3 Remove the WLAN card 4 Remove the WW...

Page 49: ...About this task The following images indicate the location of the display assembly and provide a visual representation of the removal procedure Removing and installing components 49 ...

Page 50: ...nna cables 2 Disconnect the IR camera cable from its connector on the system board 3 Unroute the IR camera cable from underneath the fan 4 Remove the conductive tape covering the eDP cable 50 Removing and installing components ...

Page 51: ...re the right display hinge to the system board 9 Open the display hinges at an angle of 90 degrees 10 Gently slide the palm rest and keyboard assembly off the display assembly carefully Installing the display assembly laptop Prerequisites If you are replacing a component remove the existing component before performing the installation procedure About this task The following image indicates the loc...

Page 52: ...ent posts close the display hinges 4 Replace the two screws M2 5x4 that secure the left display hinge to the system board 5 Replace the two screws M2 5x4 that secure the right display hinge to the system board 6 Route the IR camera cable underneath the fan 7 Connect the IR camera cable to its connector on the system board 52 Removing and installing components ...

Page 53: ...card optional 3 Install the WLAN card 4 Install the base cover 5 Follow the procedure in after working inside your computer Removing the display assembly 2 in 1 Prerequisites 1 Follow the procedure in before working inside your computer 2 Remove the base cover 3 Remove the WLAN card 4 Remove the WWAN card optional 5 Remove the battery About this task The following images indicate the location of t...

Page 54: ...54 Removing and installing components ...

Page 55: ...2 5x4 that secure the left display hinge to the system board 8 Remove the two screws M2 5x4 that secure the right display hinge to the system board 9 Open the display hinges at an angle of 90 degrees 10 Gently slide the palm rest and keyboard assembly off the display assembly carefully Installing the display assembly 2 in 1 Prerequisites If you are replacing a component remove the existing compone...

Page 56: ...56 Removing and installing components ...

Page 57: ...n 9 Connect the eDP cable on to its connector on the system board and adhere the conductive tape 10 Connect the display cable to its connector on the system board 11 Replace the single screw M2x4 to secure the display cable bracket Next steps 1 Install the battery 2 Install the WWAN card optional 3 Install the WLAN card 4 Install the base cover 5 Follow the procedure in after working inside your c...

Page 58: ...xis or moving horizontally along the bezel to disengage the adhesive first before prying upwards NOTE Carefully pry and remove the bezel to minimize risk of display panel damages 2 Carefully pry along the outside edge of the display bezel and work your way around the entire display bezel until the display bezel is separated from the display cover NOTE Do not use a plastic scribe or any other objec...

Page 59: ...only for Latitude 5320 laptop and not for the 2 in 1 configuration If you are replacing a component remove the existing component before performing the installation procedure About this task The following image indicates the location of the display bezel and provides a visual representation of the installation procedure Removing and installing components 59 ...

Page 60: ...cedure is applicable only for Latitude 5320 laptop and not for the 2 in 1 configuration NOTE The display panel touch and nontouch and its support brackets are defined as a single assembly and cannot be further disassembled once it is removed from the display back cover The support brackets are not to be removed from the display panel 1 Follow the procedure in before working inside your computer 2 ...

Page 61: ...About this task The following images indicate the location of the display panel and provide a visual representation of the removal procedure Removing and installing components 61 ...

Page 62: ...62 Removing and installing components ...

Page 63: ...Prerequisites NOTE The display panel installation procedure is applicable only for Latitude 5320 laptop and not for the 2 in 1 configuration NOTE The display panel touch and nontouch and its support brackets are defined as a single assembly and cannot be further disassembled once it is removed from the display back cover The support brackets are not to be removed from the display panel NOTE When i...

Page 64: ...64 Removing and installing components ...

Page 65: ...s into the slots on the display cover 4 Replace the two M2x2 5 screws that secure the display panel to the display assembly Next steps 1 Install the display hinges 2 Install the display bezel 3 Install the display assembly 4 Install the battery 5 Install the base cover 6 Follow the procedure in after working inside your computer Removing and installing components 65 ...

Page 66: ...ur computer 2 Remove the base cover 3 Remove the battery 4 Remove the display assembly About this task The following images indicate the location of the display hinges and provide a visual representation of the removal procedure Steps 1 Remove the six M2 5x3 screws that secure the right and left display hinges to the display back cover 2 Remove the display hinges from the display back cover 66 Rem...

Page 67: ...rforming the installation procedure About this task The following image indicates the location of the display hinges and provides a visual representation of the installation procedure Steps 1 Lower the display hinges on the display assembly 2 Replace the six M2 5x3 screws to secure the left and right display hinges to the display back cover Next steps 1 Install the display assembly 2 Install the b...

Page 68: ...re in before working inside your computer 2 Remove the base cover 3 Remove the battery 4 Remove the display assembly 5 Remove the display bezel 6 Remove the display hinges 7 Remove the display panel 8 Remove the camera 9 Remove the eDP cable About this task The following images indicate the location of the display back cover and provide a visual representation of the removal procedure Steps After ...

Page 69: ... location of the display back cover and provides a visual representation of the installation procedure Steps Place the display back cover on a flat surface and perform the following steps to install the display back cover Next steps 1 Install the eDP cable 2 Install the camera 3 Install the display panel 4 Install the display hinges 5 Install the display bezel 6 Install the display assembly 7 Inst...

Page 70: ...procedure in before working inside your computer 2 Remove the base cover 3 Remove the battery 4 Remove the display assembly 5 Remove the display bezel 6 Remove the display hinges 7 Remove the display panel About this task The following images indicate the location of the eDP cable and provide a visual representation of the removal procedure 70 Removing and installing components ...

Page 71: ...ude 5320 laptop and not for the 2 in 1 configuration The following image indicates the location of the eDP cable and provides a visual representation of the installation procedure Steps Adhere the tape to securing the eDP cable to the display back cover Next steps 1 Install the display panel 2 Install the display hinges 3 Install the display bezel 4 Install the display assembly Removing and instal...

Page 72: ...cover 3 Remove the battery 4 Remove the display assembly 5 Remove the display bezel 6 Remove the display panel About this task The following images indicate the location of the sensor board and provide a visual representation of the removal procedure Steps 1 Open the latch and disconnect the display cable from connector on the sensor board 2 Gently lift the sensor board away from the display back ...

Page 73: ...able to the connector on the sensor board and close the latch Next steps 1 Install the display panel 2 Install the display bezel 3 Install the display assembly 4 Install the battery 5 Install the base cover 6 Follow the procedure in After working inside your computer LED board Removing the LED board Prerequisites 1 Follow the procedure in before working inside your computer 2 Remove the base cover...

Page 74: ...cable from its connector on the system board and LED board 2 Remove the single screw M2x3 that secures the LED board to the palm rest assembly 3 Lift the LED board and cable away from the palm rest assembly Installing the LED board Prerequisites If you are replacing a component remove the existing component before performing the installation procedure 74 Removing and installing components ...

Page 75: ...nnector on the LED board and the system board Next steps 1 Install the battery 2 Install the base cover 3 Follow the procedure in after working inside your computer Camera Removing the camera Prerequisites NOTE The camera removal procedure is applicable only for Latitude 5320 laptop and not for the 2 in 1 configuration 1 Follow the procedure in before working inside your computer 2 Remove the base...

Page 76: ...lly pry and lift the camera module from the display back cover Installing the camera Prerequisites NOTE The camera installation procedure is applicable only for Latitude 5320 laptop and not for the 2 in 1 configuration If you are replacing a component remove the existing component before performing the installation procedure About this task The following image indicates the location of the camera ...

Page 77: ...ide your computer Removing the infrared camera Prerequisites NOTE The infrared camera removal procedure is applicable only for Latitude 5320 laptop and not for the 2 in 1 configuration 1 Follow the procedure in before working inside your computer 2 Remove the base cover 3 Remove the battery 4 Remove the display assembly 5 Remove the display bezel 6 Remove the display hinges 7 Remove the display pa...

Page 78: ...camera Prerequisites NOTE The infrared camera installation procedure is applicable only for Latitude 5320 laptop and not for the 2 in 1 configuration If you are replacing a component remove the existing component before performing the installation procedure About this task The following image indicates the location of the infrared camera and provides a visual representation of the installation pro...

Page 79: ...w the procedure in after working inside your computer Smart card reader Removing the smart card reader optional Prerequisites 1 Follow the procedure in before working inside your computer 2 Remove the base cover 3 Remove the battery 4 Remove the speakers About this task NOTE For models with smart card reader configuration the smart card reader is preinstalled in the replacement palm rest assembly ...

Page 80: ...ve the two screws M2x2 5 that secure the smart card reader to the palm rest assembly 4 Lift the smart card reader off the palm rest assembly Installing the smart card reader optional Prerequisites If you are replacing a component remove the existing component before performing the installation procedure 80 Removing and installing components ...

Page 81: ...ssembly 2 Replace the two screws M2x2 5 to secure the smart card reader to the palm rest assembly 3 Connect the smart card reader cable to its connector and close the latch 4 Connect the clickpad FPC to its connector and close the latch Next steps 1 Install the speakers 2 Install the battery 3 Install the base cover 4 Follow the procedure in after working inside your computer Removing and installi...

Page 82: ... system board 10 Remove the power button with fingerprint reader 11 Remove the smart card reader optional 12 Remove the speakers 13 Remove the display assembly About this task NOTE The system board can be removed with the heat sink attached in order to simplify the procedure and preserve the thermal bond between the system board and heat sink The following images indicate the location of the keybo...

Page 83: ...Removing and installing components 83 ...

Page 84: ...keyboard bracket 7 Remove the keyboard from the keyboard bracket Installing the keyboard Prerequisites If you are replacing a component remove the existing component before performing the installation procedure About this task NOTE The system board can be installed with the heat sink attached in order to simplify the procedure and preserve the thermal bond between the system board and heat sink Th...

Page 85: ...Removing and installing components 85 ...

Page 86: ...he keyboard assembly to the palm rest 5 Connect the keyboard cable and keyboard backlit cable to its connectors Next steps 1 Install the display assembly 2 Install the speakers 3 Install the smart card reader optional 4 Install the power button with fingerprint reader 5 Install the system board 6 Install the heat sink 7 Install the fan 8 Install the battery 9 Install the M 2 2280 SSD card or M 2 2...

Page 87: ...slot filler must be removed and then re installed when replacing the palm rest The following image provides a visual representation of the SIM card slot filler removal procedure Steps 1 Pull the SIM card slot filler from the top side of the palm rest 2 Lift the SIM card slot filler out of the system Installing the SIM card slot filler Prerequisites If you are replacing a component remove the neces...

Page 88: ...ed in order to simplify the procedure and preserve the thermal bond between the system board and heat sink NOTE For models with smart card reader configuration the smart card reader is preinstalled in the replacement palm rest assembly 1 Follow the procedure in before working inside your computer 2 Remove the SIM card 3 Remove the microSD card 4 Remove the base cover 5 Remove the battery 6 Remove ...

Page 89: ...f the palm rest and provide a visual representation of the removal procedure Steps Installing the palm rest Prerequisites If you are replacing a component remove the existing component before performing the installation procedure About this task The following image indicates the palm rest and provides a visual representation of the installation procedure Removing and installing components 89 ...

Page 90: ... assembly 3 Install the power button with fingerprint reader optional 4 Install the heat sink 5 Install the speakers 6 Install the smart card reader optional 7 Install the fan 8 Install the M 2 2280 SSD card or M 2 2230 SSD card 9 Install the WWAN card optional 10 Install the SIM card slot filler for non WWAN configuration 11 Install the WLAN card 12 Install the battery 13 Install the base cover 1...

Page 91: ... for browser specific instructions 8 Click View Drivers for My System 9 Click Download and Install to download and install all driver updates detected for your computer 10 Select a location to save the files 11 If prompted approve requests from User Account Control to make changes on the system 12 The application installs all drivers and updates identified NOTE Not all files can be installed autom...

Page 92: ...oot Sequence BIOS setup System and setup password BIOS overview The BIOS manages data flow between the computer s operating system and attached devices such as hard disk video adapter keyboard mouse and printer Entering BIOS setup program About this task Turn on or restart your computer and press F2 immediately Navigation keys NOTE For most of the System Setup options changes that you make are rec...

Page 93: ... sequence screen also displays the option to access the System Setup screen BIOS setup NOTE Depending on the tabletcomputerlaptop and its installed devices the items listed in this section may or may not appear Overview Table 2 Overview Option Description System Information This section lists the primary hardware features on your system The options are System Information BIOS version Service Tag A...

Page 94: ...perating system to boot The options are Windows Boot Manager UEFI RST NOTE Legacy Boot mode is not supported on this platform Secure Digital SD Card Boot Allows you to enable or disable Enable Secure Digital SD Card Boot Secure Boot Secure Boot helps ensure your system boots using only validated boot software Enable Secure Boot By default this option is disabled NOTE The system has to be in UEFI b...

Page 95: ...bolt Configuration Allows you to enable or disable the USB mass storage devices to boot through the boot sequence or boot menu The options are Enable External USB Port This option is enabled by default Enable USB Boot Support This option is enabled by default By default all the options are enabled Enable Thunderbolt Technology Support Allows you to enable or disable the Thunderbolt Technology Enab...

Page 96: ...e users to use connected Type C Dell Dock to provide data stream when keeping the external USB ports disabled port functionality to video or power only Type C Dock Override This option is enabled by default The submenu is Video Allows users to use video on Dell Dock external ports Audio Allows users to use audio on Dell Dock external ports LAN Allows users to use LAN on Dell Dock external ports Au...

Page 97: ...ate Secure Digital SD Card This option is enabled by default Secure Digital SD Card Read Only Mode Display Table 6 Display options Option Description Display Brightness Allows you to set the screen brightness when running on battery and AC power The options are Brightness on battery power By default set to 50 Brightness on AC power By default set to 100 Touchscreen Allows you to enable or disable ...

Page 98: ... Control This feature senses the connection of the system to a wired network and disables the selected wireless radios WLAN and or WWAN The options are Control WLAN radio This option is disabled by default Control WWAN radio This option is disabled by default NOTE Checking Control WLAN radio can result in loss of dock connectivity when the system is docked over WiGig while also connected over a wi...

Page 99: ... Dock Allows you to connect a Dell USB C Dock to wake the system from standby mode By default the option Wake on Dell USB C Dock is enabled NOTE These features are only functional when the AC power adapter is connected If the AC power adapter is removed before Standby the BIOS removes power from all USB ports to conserve battery power Block Sleep This option enables you to block entering to sleep ...

Page 100: ...y Mitigation Allows you to enable or disable additional UEFI SMM Security Mitigation protection SMM Security Mitigation By default this option is enabled Data Wipe on Next Boot Allows BIOS to queue up data wipe cycle for storage devices connected to the motherboard on the next reboot Start Data Wipe By default this option is disabled NOTE Secure Wipe operation deletes information in a way that it ...

Page 101: ... set change or delete the NVMe SSD0 password The entries to set password are Enter the old password Enter the new password Press Enter once you enter the new password and again press Enter to confirm the new password Password Configuration Allows you to configure a password Upper Case Letter When enabled this field reinforces password must contain at least one upper capital letter Lower Case Lette...

Page 102: ...te packages Enable UEFI Capsule Firmware Updates By default this option is enabled NOTE Disabling this option blocks BIOS updates from services such as Microsoft Windows update or Linux Vendor Firmware Services BIOS Recovery from Hard Drive Allows you to recover BIOS on the primary hard drive or external USB drive in corrupted conditions BIOS Recovery from Hard Drive By default this option is enab...

Page 103: ...ing on automatically when an AC adapter is connected Wake on AC This option is disabled by default Wake on LAN Allows the system to power on using special LAN signals The options are Disabled This option is enabled by default LAN Only LAN with PXE Boot Auto On Time This setting allows a system to automatically power on for defined days time The options are Disabled This option is enabled by defaul...

Page 104: ...ight when the system is running only on battery power The options are 5 seconds 10 seconds This option is enabled by default 15 seconds 30 seconds 1 minute 5 minutes 15 minutes Never NOTE If Never is selected the backlight stays on always when the system is running on battery power Device Configuration Hotkey Access This feature allows users to access device configuration screens using hotkeys dur...

Page 105: ...t 5 seconds 10 seconds MAC Address Pass Through This allows you to choose a selected MAC address from the system to the external NIC MAC address in a supported dock or dongle The options are System Unique MAC Address enabled by default Disabled Virtualization support Table 15 Virtualization Support Option Description Intel Virtualization Technology This option specifies whether the system can run ...

Page 106: ... Intel Turbo Boost Technology This option is enabled by default Intel Hyper Threading Technology This option allows you to enable or disable the HyperThreading in the processor Enable Intel Hyper Threading Technology This option is enabled by default System logs Table 17 System Logs Option Description BIOS Event Log Allows you to either keep and clear the BIOS event log Clear BIOS Event Log The op...

Page 107: ...rity screen is displayed 2 Select System Admin Password and create a password in the Enter the new password field Use the following guidelines to assign the system password A password can have up to 32 characters The password can contain the numbers 0 through 9 Only lower case letters are valid upper case letters are not allowed Only the following special characters are allowed space 3 Type the sy...

Page 108: ...lect Setup Password alter or delete the existing setup password and press Enter or Tab NOTE If you change the System and or Setup password re enter the new password when prompted If you delete the System and Setup password confirm the deletion when prompted 5 Press Esc and a message prompts you to save the changes 6 Press Y to save the changes and exit from System Setup The computer restarts 108 S...

Page 109: ...d embedded controller EC failures M BIST must be manually initiated before POST and can also run on a dead system 2 L BIST L BIST is an enhancement to the single LED error code diagnostics and is automatically initiated during POST 3 LCD BIST LCD BIST is an enhanced diagnostic test that is introduced through Preboot System Assessment PSA on legacy systems Table 19 Functions M Bist L Bist Purpose E...

Page 110: ...stem board is functioning properly Display panel power rail built in self test L BIST About this task Next steps L BIST LCD Power Rail Test is an enhancement to the single LED error code diagnostics and is automatically initiated during POST L BIST isolates if the LCD is receiving power from the system board L BIST checks if the system board is supplying power to the LCD by performing an LCD Power...

Page 111: ...cks if the system board is supplying power to the LCD by performing an LCD Power Rail test If there is no power going to the LCD the battery status LED flashes a 2 8 LED error code Display panel built in self test LCD BIST About this task Steps 1 Press and hold the D key and then press the power button 2 Release both the D key and the power button when the computer begins POST 3 The display panel ...

Page 112: ...ic tests are performed For more information see Resolve Hardware Issues With Built in and Online Diagnostics SupportAssist ePSA ePSA or PSA Error Codes Running the SupportAssist Pre Boot System Performance Check Steps 1 Turn on your computer 2 As the computer boots press the F12 key as the Dell logo appears 3 On the boot menu screen select the Diagnostics option 4 Click the arrow at the bottom lef...

Page 113: ...e system board 2 3 No Memory RAM detected Confirm that the memory module is installed properly If problem persists replace the memory module 2 4 Memory RAM failure Reset and swap memory modules amongst the slots If problem persists replace the memory module 2 5 Invalid memory installed Reset and swap memory modules amongst the slots If problem persists replace the memory module 2 6 System board Ch...

Page 114: ... BIOS USB key Steps 1 Follow the procedure from step 1 to step 7 in Flashing the BIOS to download the latest BIOS setup program file 2 Create a bootable USB drive For more information see the knowledge base article SLN143196 at www dell com support 3 Copy the BIOS setup program file to the bootable USB drive 4 Connect the bootable USB drive to the computer that needs the BIOS update 5 Restart the ...

Page 115: ...o device Steps 1 Turn off your computer 2 Turn off the modem 3 Turn off the wireless router 4 Wait for 30 seconds 5 Turn on the wireless router 6 Turn on the modem 7 Turn on your computer Flea power release About this task Flea power is the residual static electricity that remains on the computer even after it has been powered off and the battery has been removed The following procedure provides t...

Page 116: ...cations technical help blogs drivers software updates and so on www dell com support Dell knowledge base articles for a variety of computer concerns 1 Go to https www dell com support home app knowledgebase 2 Type the subject or keyword in the Search box 3 Click Search to retrieve the related articles Contacting Dell To contact Dell for sales technical support or customer service issues see www de...

Reviews: