


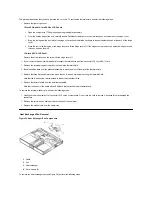


To remove the DC-DC board (see Figure 32), gently pull the DC-DC board off of connectors JP11 and JP16 on the system board. Do not rock the
board to remove it, because this may damage the connectors.
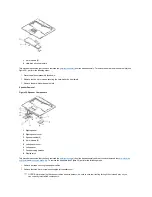
Hinge Saddle Removal
Figure 33. Hinge Saddle Components
This procedure assumes that you have removed the
. To remove the hinge saddles (see Figure 33), perform the following steps:
1.
Remove the four 4-mm screws from the top of the left and right hinge saddles.
2.
Remove the four 4-mm screws from the back of the computer above the ports.
3.
Remove the 10-mm screw and 20-mm screw from the right hinge saddle and remove the saddle.
1
DC-DC board
1
4-mm screws
2
4-mm screws
3
6-mm screw (1)
4
20-mm screws (2)
5
10-mm screws
6
Right hinge saddle
7
LED cable
8
Plastic frame
9
Left hinge saddle
Summary of Contents for Inspiron 7500
Page 6: ...Back to Contents Page AC Adapter Dell Inspiron 7500 ...
Page 7: ...Back to Contents Page Audio Jacks Dell Inspiron 7500 ...
Page 10: ...Back to Contents Page Component Locations Back View Dell Inspiron 7500 ...
Page 12: ...Back to Contents Page Battery Charge Gauge Dell Inspiron 7500 ...
Page 13: ...Back to Contents Page Removing and Installing a Battery Dell Inspiron 7500 ...
Page 26: ...Back to Contents Page ...
Page 38: ...Exploded View of 13 3 Inch Display Assembly Dell Inspiron 7500 ...
Page 39: ...Exploded View of 14 1 Inch Display Assembly Dell Inspiron 7500 ...
Page 44: ...Back to Contents Page Exploded View of Computer Dell Inspiron 7500 ...
Page 47: ...Back to Contents Page Component Locations Front View Dell Inspiron 7500 New artwork pending ...
Page 54: ...Back to Contents Page I O Connectors Dell Inspiron 7500 ...
Page 60: ...Back to Contents Page 30 Cone of Infrared Light Dell Inspiron 7500 ...
Page 64: ...Back to Contents Page Embedded Numeric Keypad Dell Inspiron 7500 ...
Page 89: ...Back to Contents Page PC Card Slots Dell Inspiron 7500 ...
Page 103: ...Back to Contents Page Removing the Memory Module Dell Inspiron 7500 ...
Page 104: ...Back to Contents Page Removing the Memory Module Cover Dell Inspiron 7500 ...
Page 136: ...Back to Contents Page Removing the Hard Disk Drive Dell Inspiron 7500 ...
Page 138: ...Back to Contents Page Removing Devices From the Media Bay Dell Inspiron 7500 ...
Page 140: ...Back to Contents Page Security Cable Slot Dell Inspiron 7500 ...
Page 159: ...Back to Contents Page Touch Pad Dell Inspiron 7500 ...


